Crochet boot covers can give ordinary winter boots the layered, cozy look associated with chalet and après-ski outfits without requiring a full pair of crocheted socks. Most of the projects here are technically boot cuffs or boot toppers: short pieces worn around the calf so that the decorative crochet remains visible above the boot shaft. One taller leg-warmer option creates a more dramatic covered-boot effect.
The differences matter. Chunky ribbing can imitate a substantial sweater cuff, puff stitches create dimensional texture, Tunisian crochet produces a firmer fabric, and lace or ruffles move the look toward romantic chalet styling. Button and ribbon details can make a simple pair of boots look more intentional without changing the footwear itself.
These pieces are decorative layers, not technical snow equipment. Keep crochet away from the outsole, heel contact area, and tread, and do not let loose yarn interfere with laces, buckles, zippers, or other closures. They do not replace waterproofing, insulation, or traction designed into winter footwear.
Quick List
- Chunky Ribbed Crochet Chalet Boot Covers
- Ribbon-and-Button Crochet Chalet Boot Covers
- C2C Textured Crochet Alpine Boot Covers
- Reversible Tunisian Crochet Chalet Boot Covers
- Knit-Look Crochet Ski-Lodge Boot Covers
- Super-Ribbed Crochet Chalet Boot Toppers
- Puff-Stitch Crochet Après-Ski Boot Covers
- Ruffled Crochet Romantic Chalet Boot Covers
- Bulky Button Crochet Cabin Boot Covers
- Open-Lace Crochet Chalet Boot Toppers
- Reversible-Look Lace Crochet Après-Ski Boot Covers
- Vintage Lace Crochet Chalet Boot Covers
- Everyday Crochet Ski-Lodge Boot Cuffs
- Tall Crochet Chalet Leg-Warmer Boot Covers
Boot Covers, Boot Cuffs, and Leg Warmers Are Not Quite the Same
A boot cuff is usually a short band worn partly inside or directly above the top of a boot. Its job is primarily to create the appearance of a sock or leg warmer without putting a full extra layer inside the footwear.
A taller boot topper extends farther up the leg and becomes more noticeable as part of the outfit. Leg warmers provide still more vertical coverage and can be pulled straight or arranged into soft folds above shorter boots.
For chalet styling, all three can work. The important question is how much crochet you want visible. A narrow cuff is subtle beneath a long coat, while a tall ribbed or slouchy warmer can become one of the main features of an après-ski outfit.
Do not extend crochet down over the outside of the boot toward the ground unless the original design specifically accounts for footwear safety. Yarn on the sole, tread, or heel area can interfere with the way the boot contacts the ground.
Fit the Crochet to the Boot Shaft, Not Just Your Calf
Measure where the accessory will actually sit. An ankle boot, mid-calf boot, and knee-high boot reach different parts of the leg, and the circumference at each point can be noticeably different.
Also check how much room the boot shaft has. A thick cuff may fit comfortably around your leg but become uncomfortable when several inches of crochet are tucked between the leg and a close-fitting boot.
If the project has buttons, puffs, ruffles, lace, or other pronounced details, try to keep those features above the boot edge. Compressing dimensional crochet inside a shaft wastes the decorative effect and may create pressure points.
Make the first cuff your real-world fit test. Try it with the boots, leggings, jeans, or tights you expect to wear before making the second one.
Build the Chalet Look Through Texture
Après-ski style does not require snowflakes or mountain motifs. Texture often does more work.
Chunky ribbing resembles the top of a substantial winter sock. Puff stitches and C2C blocks add depth. Tweed-like or heathered yarn can reinforce a rustic lodge mood, while ribbons and lace produce a more romantic alpine direction.
Color can support those choices. Cream, oatmeal, charcoal, camel, deep red, forest green, chocolate, and muted gray all work naturally with winter footwear, but they are not requirements. The more important decision is whether the cuff should blend into the boot or create a clearly visible contrast above it.
1. Chunky Ribbed Crochet Chalet Boot Covers
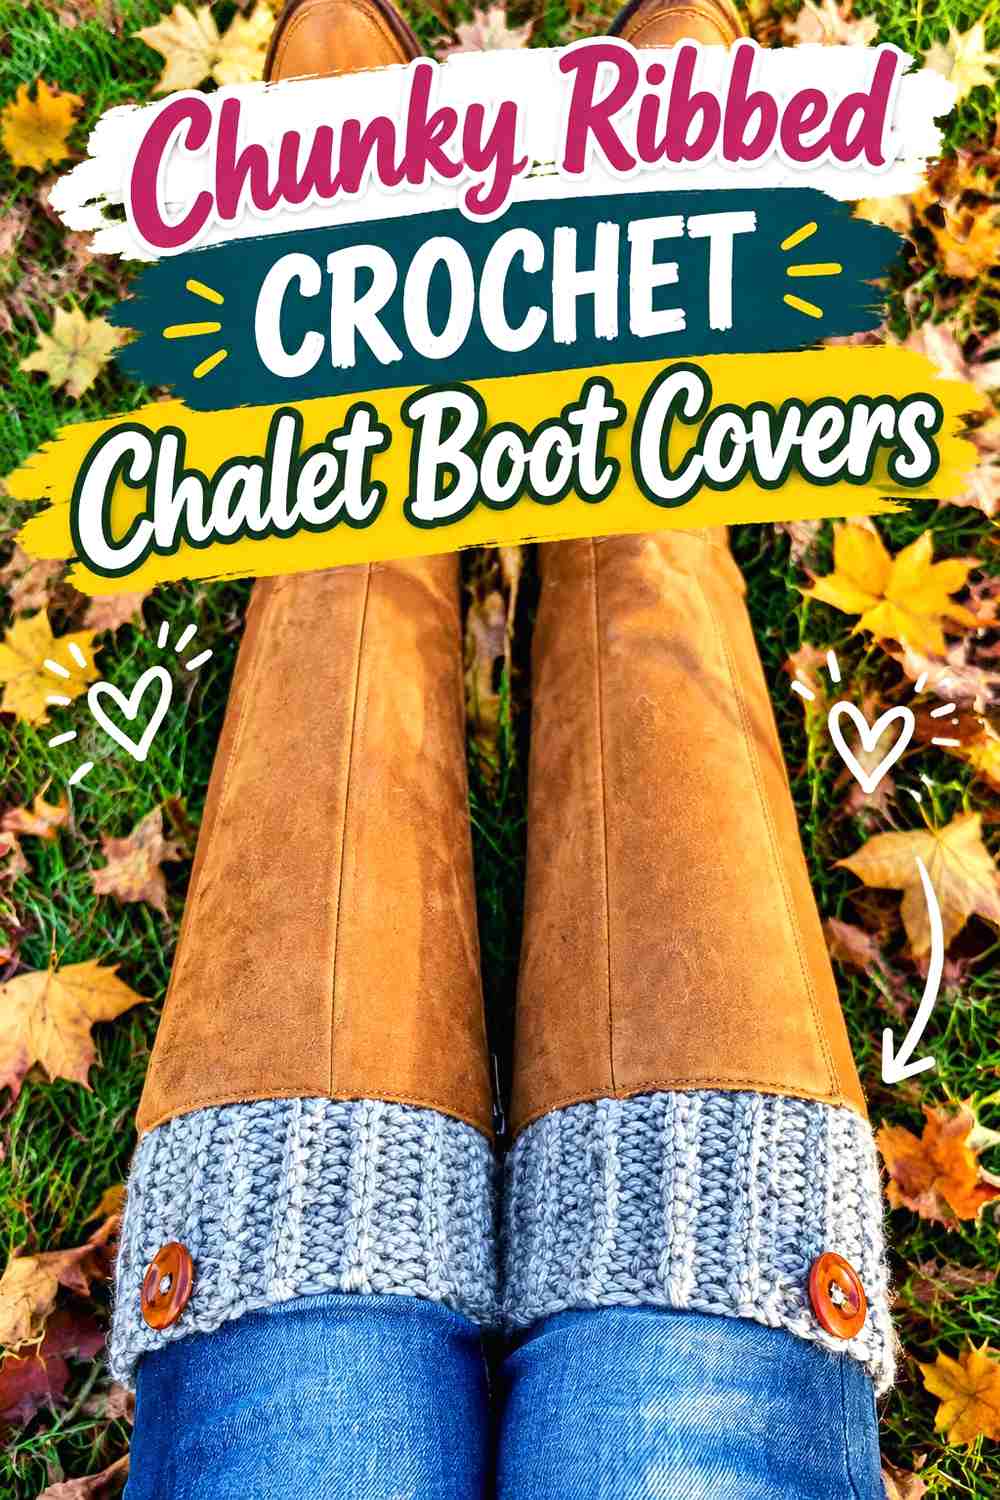
These chunky boot cuffs combine deep ribbing with button accents, making them one of the clearest starting points for a classic chalet look. The tutorial uses bulky yarn and emphasizes a substantial winter texture rather than delicate decoration.
They suit simple leather, suede-look, or outdoor-style boots particularly well because the crochet provides the soft textile contrast.
Deep Ribbing Creates the Sweater-Cuff Effect
Strong vertical ribs make the exposed crochet look more like the top of a heavy winter sock.
That is useful when you want the boots to appear layered without putting a full chunky sock inside them. Keep enough ribbing visible above the shaft for the texture to read clearly.
Let the Buttons Stay Above the Boot
The buttons provide the main focal detail, so their position should not disappear inside the shaft or rub continuously against a zipper.
Put on the first cuff with the actual boots before deciding which direction should face outward. A small rotation can make the detail much more visible.
Give Bulky Fabric Enough Clearance
Thicker yarn occupies real space even when it stretches.
If your boots already fit closely around jeans or leggings, minimize how much of the bulky cuff sits inside them. A topper cannot improve an outfit if it makes the footwear uncomfortably tight.
Creator Credit: MJ’s Off The Hook Designs
2. Ribbon-and-Button Crochet Chalet Boot Covers
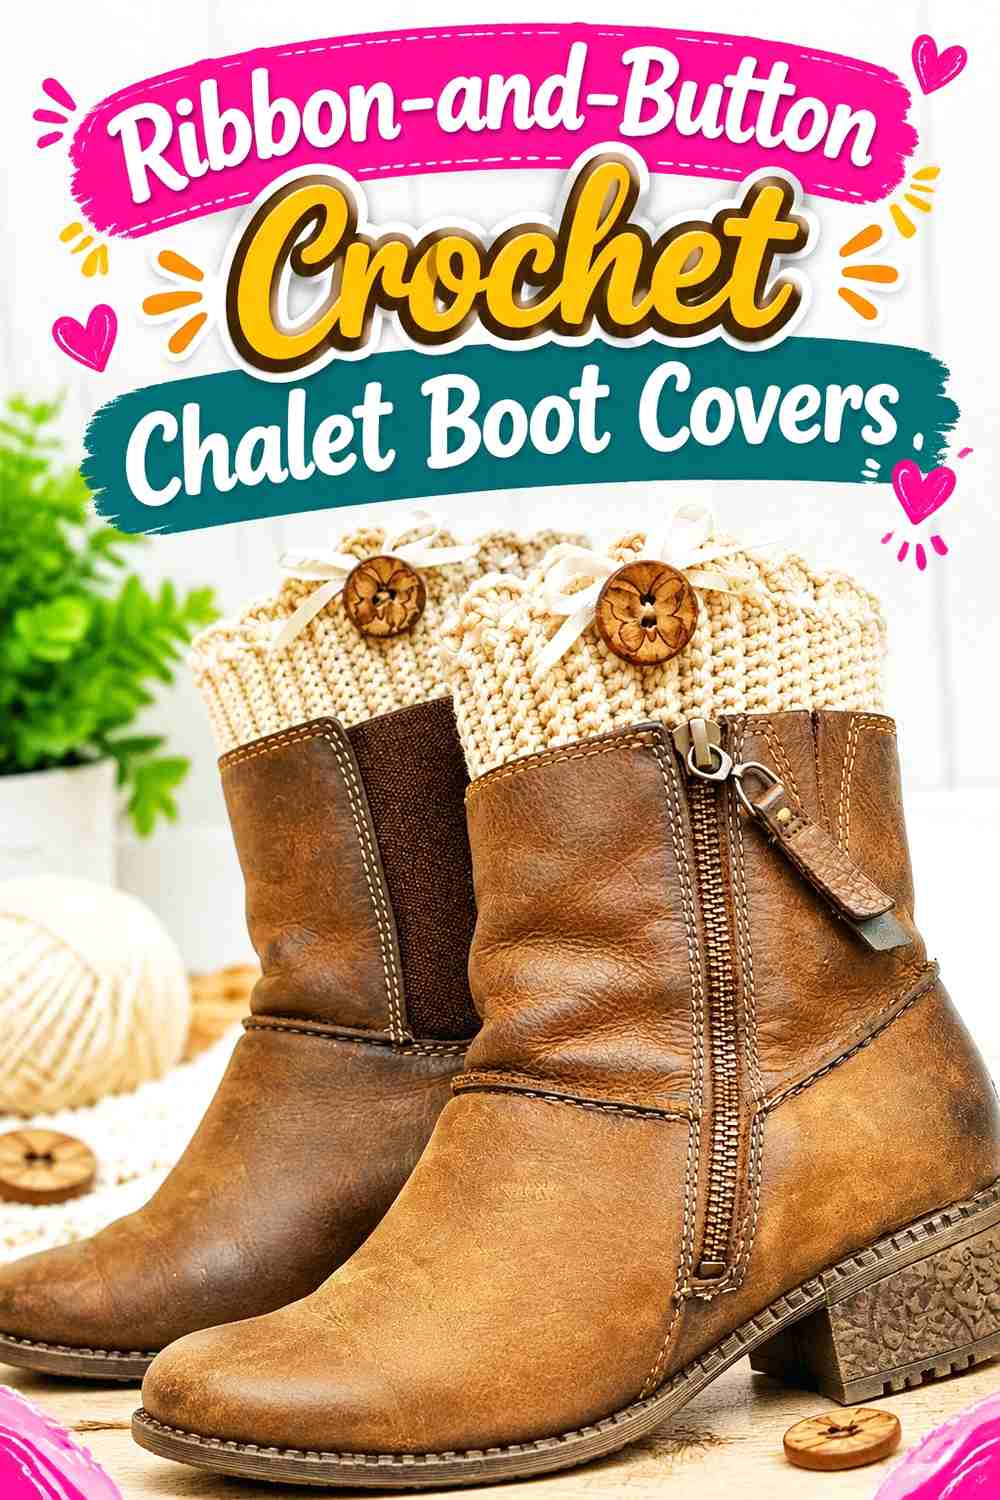
This project combines crochet boot cuffs with satin ribbon and button details, giving the winter boot-cover idea a softer, more decorative direction. The source specifically presents the cuffs as a cold-weather fashion accessory.
Choose this option when you want après-ski styling to feel polished or slightly romantic instead of purely rustic.
Ribbon Creates Contrast Without More Crochet Bulk
A narrow ribbon can introduce another color or texture without requiring a thick additional crochet band.
That can be useful with fitted boots where there is limited room for dimensional stitches. Keep the ribbon positioned where it will remain visible rather than trapping it beneath the shaft.
Buttons Should Not Interfere With Hardware
A decorative button and a boot zipper can easily end up occupying the same area.
Temporarily position the finished cuff before attaching any optional embellishment permanently. Check both the inner and outer sides of each boot because hardware placement may not be symmetrical.
Coordinate the Trim With the Boot, Not Only the Yarn
The accessory sits directly between footwear and clothing, so three colors may be visible at once: boot, cuff, and pants or tights.
A ribbon that looks perfect beside the crochet yarn can create a very different effect once placed against brown, black, or colored boots.
Creator Credit: Gloriarte
3. C2C Textured Crochet Alpine Boot Covers
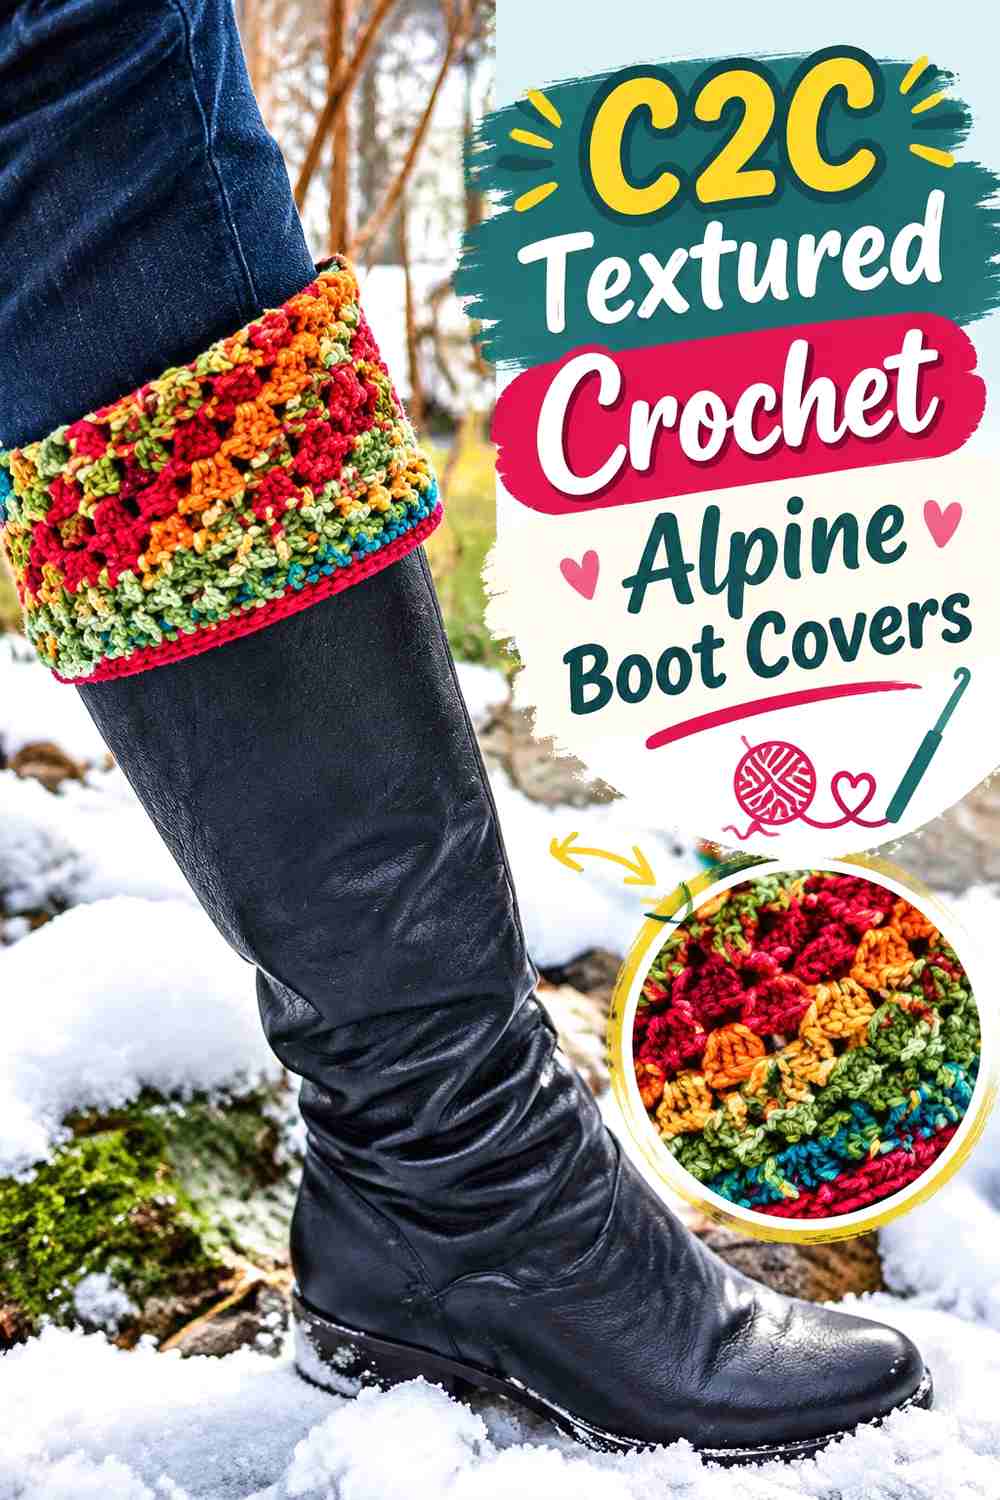
Corner-to-corner construction gives these boot cuffs a block-like diagonal surface instead of conventional straight ribbing. The tutorial is specifically devoted to C2C boot cuffs for winter accessorizing.
That directional texture makes this a good choice when the crochet itself should be the main visual feature.
Diagonal Texture Separates These From Sock-Look Cuffs
Most chalet boot toppers rely on vertical lines to mimic knit socks. C2C changes that visual direction.
The result can feel more handmade and graphic, especially in a yarn where the individual blocks remain visible.
A Structured Texture Needs Its Own Fit Test
C2C fabric does not necessarily stretch like deep ribbing.
Do not use the fit of another boot-cuff pattern as a shortcut. Check whether the first cuff passes comfortably into place and whether the shaft compresses the textured surface.
Keep a Busy Yarn From Hiding the Construction
If the diagonal blocks are the reason you chose the design, very rapid color changes may compete with them.
A solid, heathered, or slower-changing yarn can allow the texture to provide the visual interest instead of forcing color and stitch pattern to compete.
Creator Credit: The Crochet Crowd
4. Reversible Tunisian Crochet Chalet Boot Covers
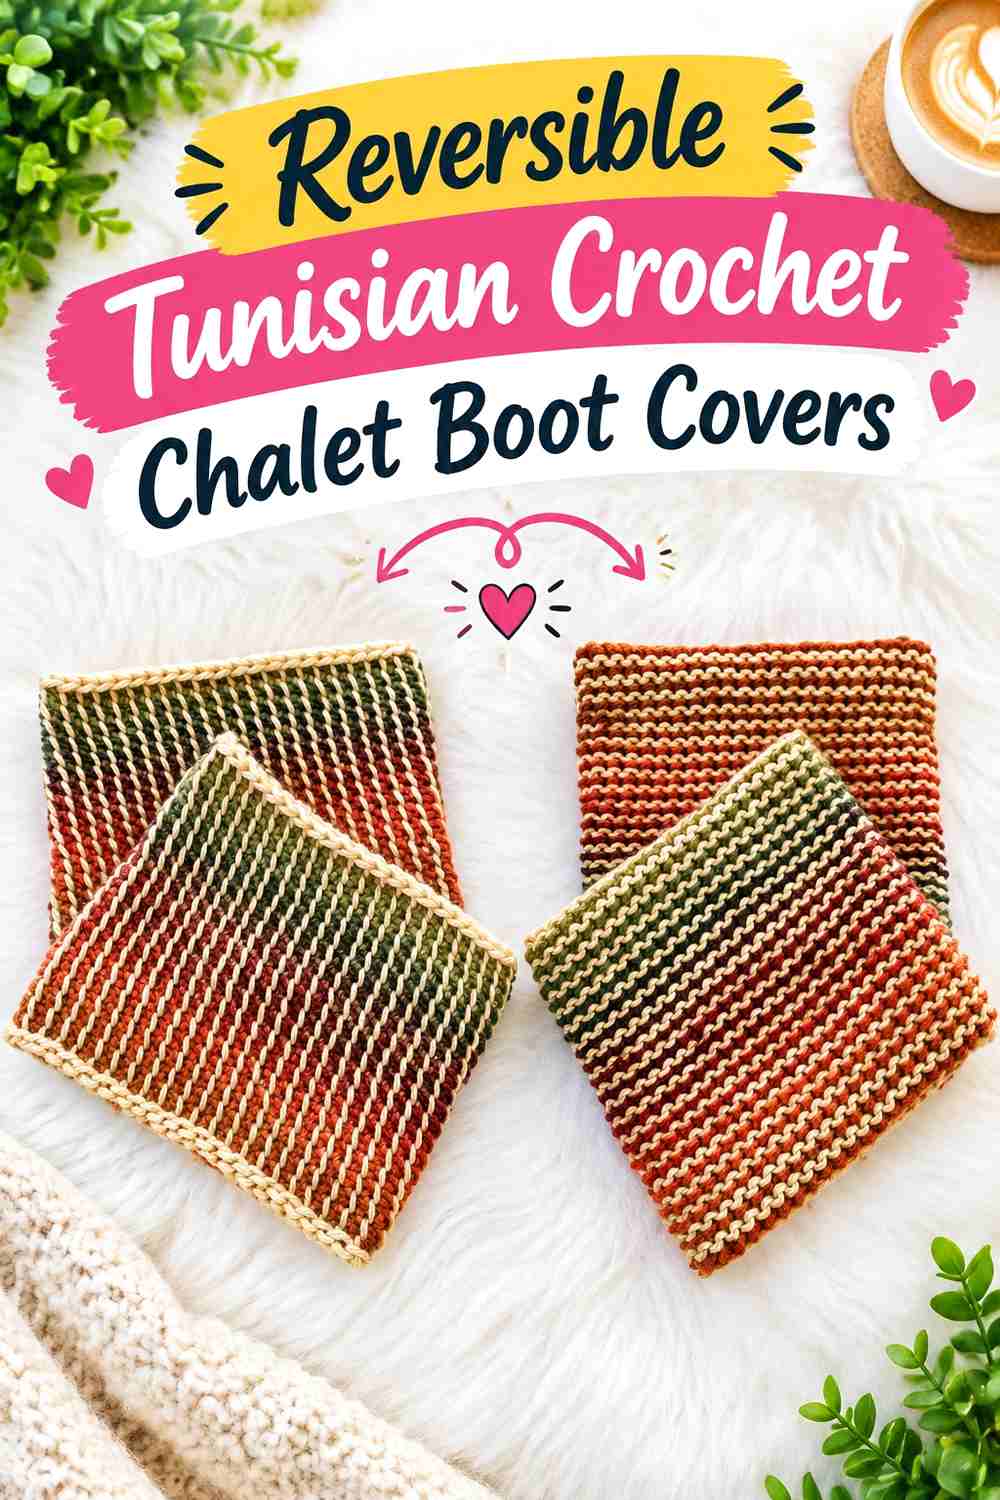
This tutorial uses a double-ended hook to create reversible Tunisian boot cuffs with two usable surfaces. That makes it structurally different from standard crochet cuffs and gives you more than one way to coordinate the same pair with winter boots.
The denser, fabric-like result is particularly suited to a tailored chalet outfit where you want the topper to look substantial rather than lacy.
Two Sides Give You More Styling Flexibility
A reversible cuff can change character depending on which surface faces outward.
If you use contrasting yarns, choose colors that still work with your footwear from both directions. Reversibility is most useful when both sides look deliberately wearable.
Tunisian Fabric Can Feel More Substantial
The construction differs from loose ribbing or lace and may occupy more room at a boot opening.
Check the first cuff with your boots before completing its pair, particularly if the shaft is fitted around the calf.
The Tool Requirement Matters
This tutorial relies on a double-ended crochet hook rather than treating Tunisian texture as a decorative stitch added to an ordinary cuff.
Confirm that you want that construction method before choosing yarn or planning matching winter accessories.
Creator Credit: B.Hooked Crochet
5. Knit-Look Crochet Ski-Lodge Boot Covers
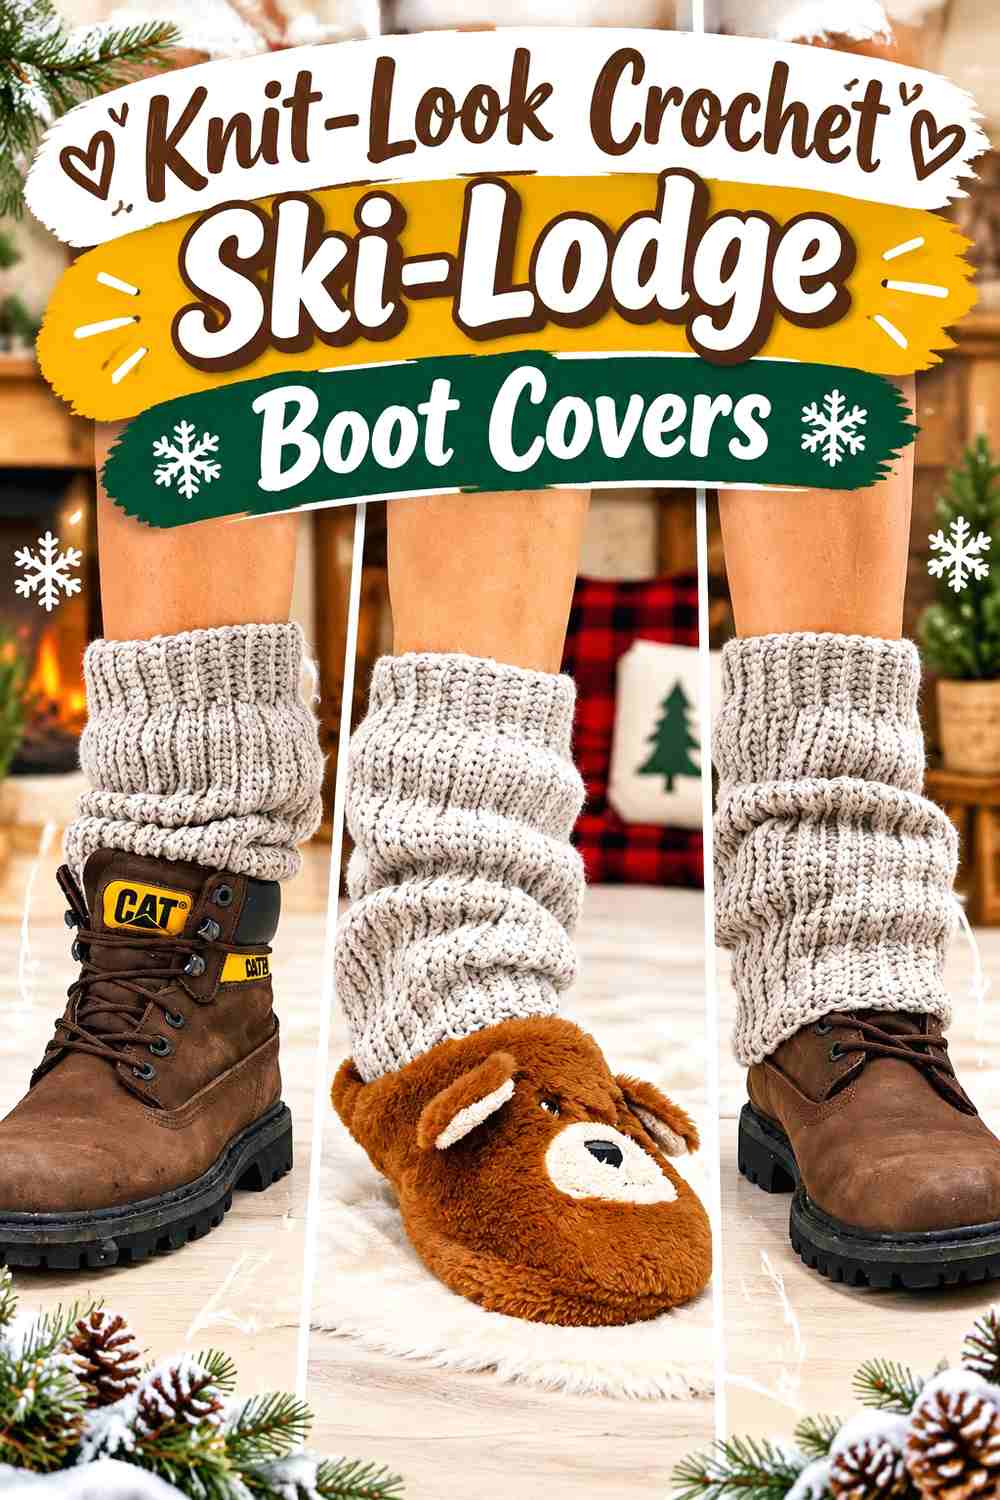
This design deliberately sits between a boot cuff and a leg warmer and uses crochet to create a knit-inspired surface. The tutorial presents the accessory in both of those roles, which makes it particularly useful for chalet styling where height can change the whole outfit.
Keep it shorter for tall boots or let more fabric show over ankle and mid-calf styles.
Decide on Height Before You Decide on Slouch
A taller warmer gives you enough fabric to create visible folds. A shorter cuff works better as a clean strip above a high boot.
Choose the job first. Adding extra height has little value if almost all of the additional crochet will be hidden inside the footwear.
The Knit-Look Surface Benefits From Even Tension
A relatively simple surface makes inconsistencies easier to notice.
Pause occasionally and let the fabric relax before judging it. If some sections look noticeably tighter, correcting the issue early is easier than trying to make a mismatched pair look identical after finishing.
Taller Versions Need More Than One Circumference Check
The leg can become wider as the warmer travels upward.
If you decide on a taller chalet version, evaluate the lower and upper areas instead of assuming one calf measurement describes the entire piece.
Creator Credit: Sirin’s Crochet
6. Super-Ribbed Crochet Chalet Boot Toppers
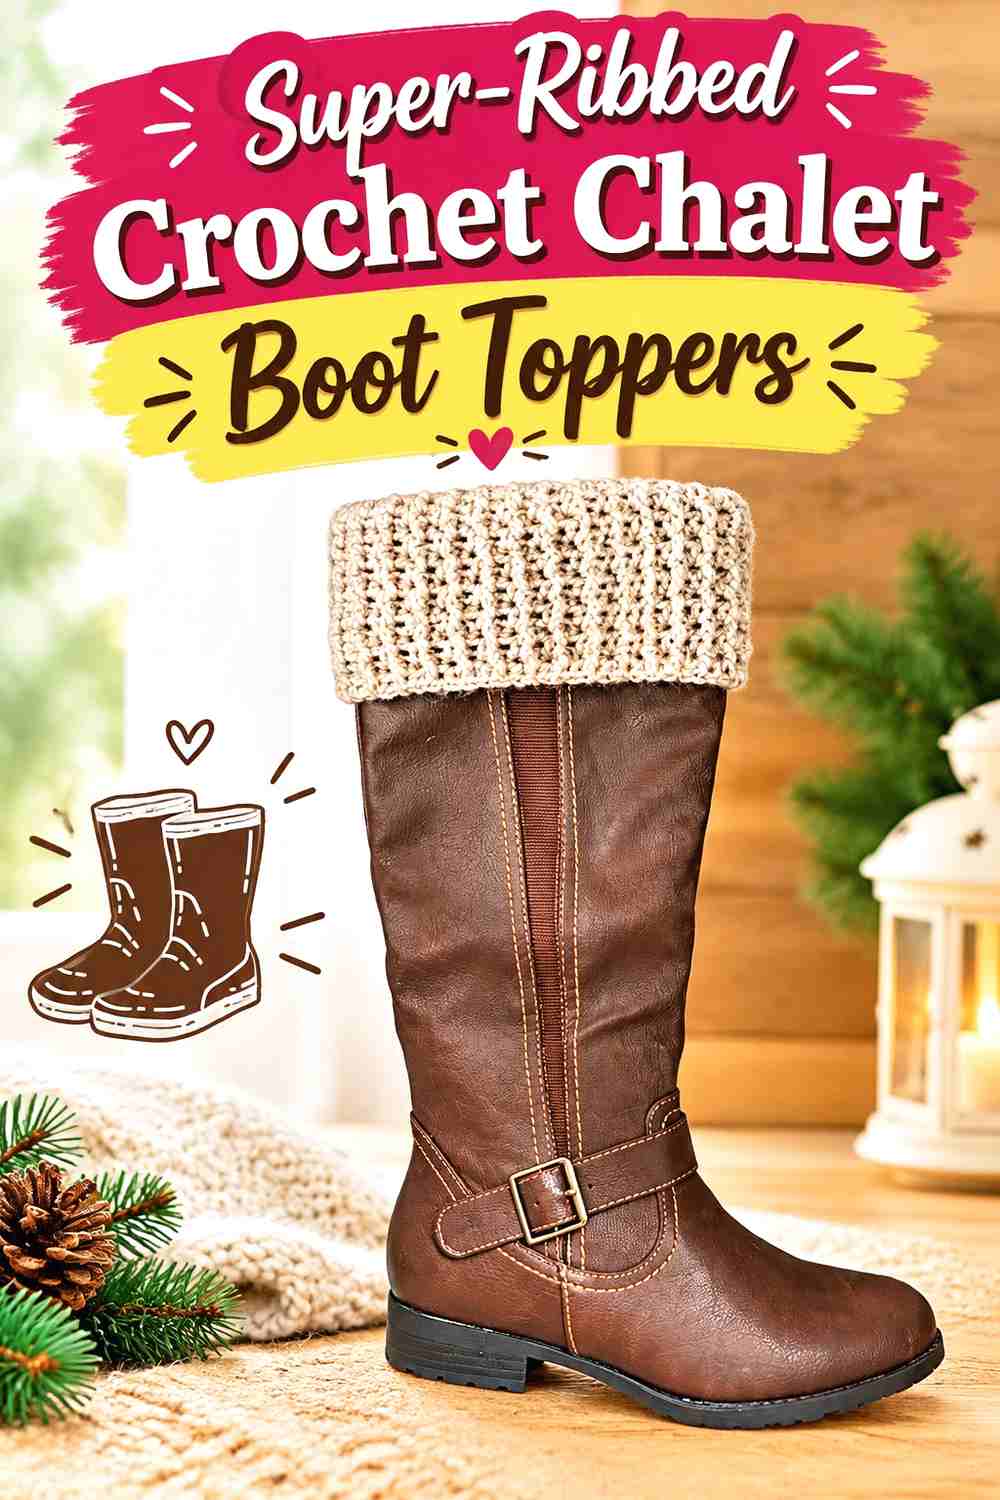
Continuous raised ribbing makes this topper look deliberately substantial from edge to edge. The tutorial is specifically designed as a super-ribbed crochet boot cuff and allows the texture, rather than buttons or lace, to carry the design.
This is one of the easiest styles to coordinate with the familiar chunky-sweater aesthetic of an après-ski wardrobe.
Full Ribbing Creates a Clean Alpine Silhouette
Because the entire visible surface is textured, there is no need to add several separate decorative features.
A cream, charcoal, camel, or deep winter tone can keep attention on the raised lines and the relationship between the cuff and boot.
Stretch Needs to Recover
A cuff may expand enough to pull over the foot or calf yet still be unsuccessful if it remains stretched afterward.
Test the first piece by putting it on and removing it several times. If the ribbing loses its shape quickly, reconsider fit or yarn before duplicating the result.
Try the Cuff With the Exact Boot Opening
Deep ribs can compress differently inside a shaft than they feel on the leg alone.
If clearance is tight, keep more of the ribbed fabric above the boot rather than forcing the decorative texture downward.
Creator Credit: Make, Do & Craft – Crochet
7. Puff-Stitch Crochet Après-Ski Boot Covers
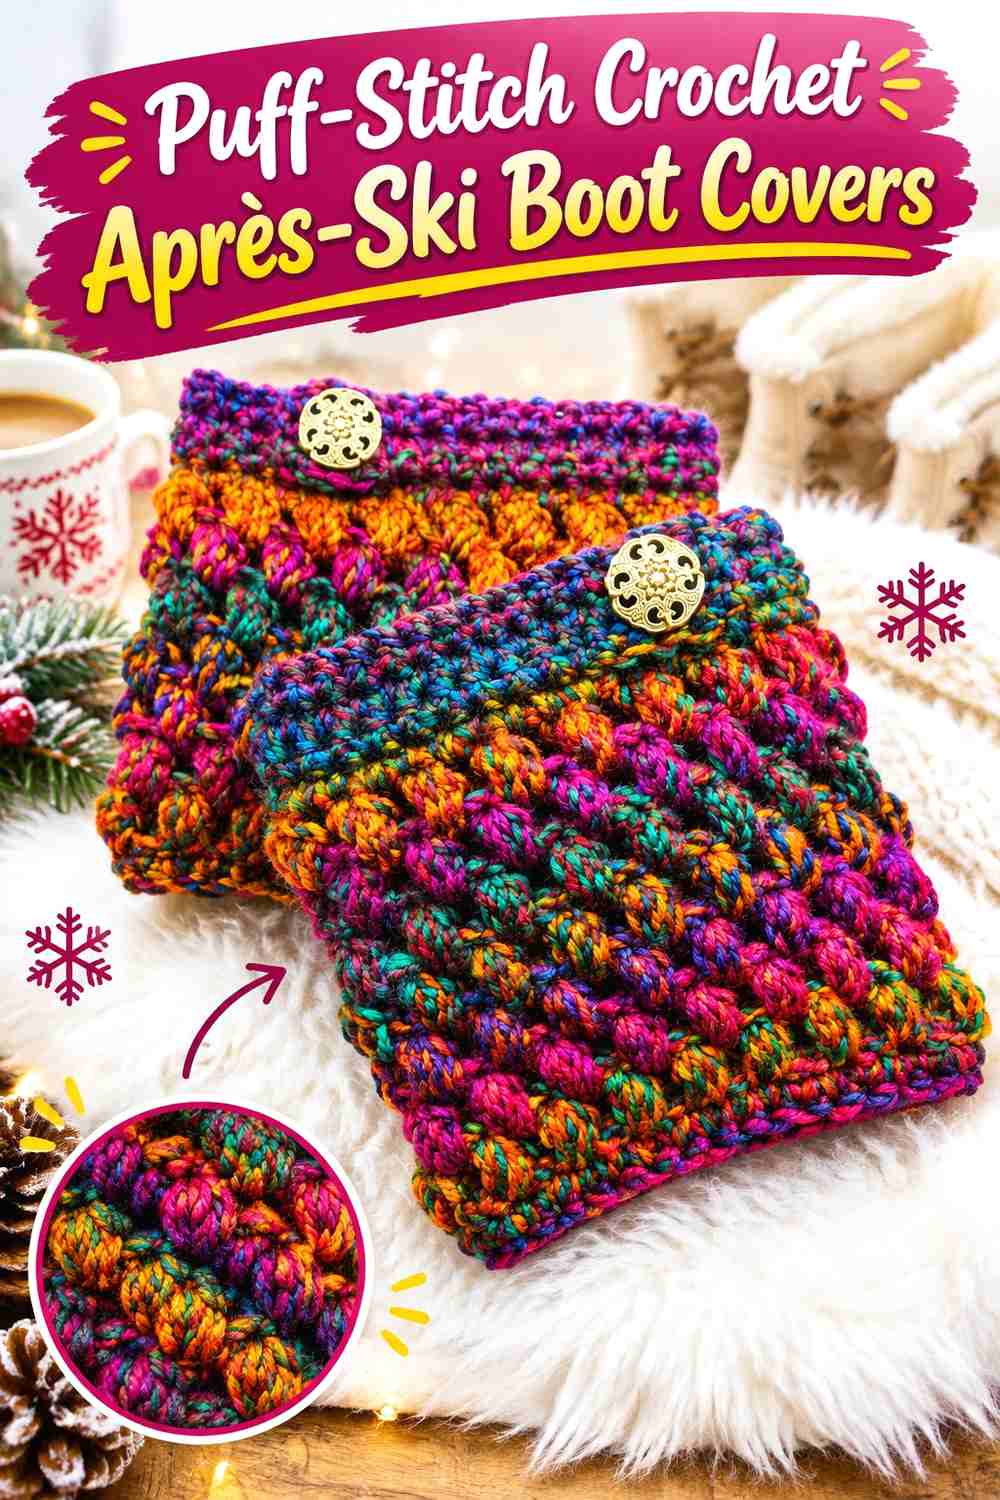
Puff stitches create raised pockets of texture that can make a solid-color cuff look rich and dimensional. Bag-O-Day Crochet’s tutorial focuses specifically on puff-stitch boot cuffs.
This option is useful when you want the crochet to resemble a textured winter textile rather than a plain sock top.
Puff Stitches Need Space to Stay Visible
If the dimensional portion is squeezed tightly inside the boot shaft, much of the effect disappears.
Position the cuff so most of the raised area remains above the opening. This is especially important with narrow boots.
A Calm Yarn Lets the Shadows Do the Work
Puff stitches already create light and shadow.
A strongly variegated yarn can produce an entirely different appearance, while a more consistent shade lets the texture remain the focal point. Work a small sample if you are unsure which feature you want to dominate.
Check the Side View as Well as the Front
Dimensional crochet projects outward.
Once the first cuff is made, inspect it from the side with the boots on. The extra thickness may affect where you prefer the cuff to sit.
Creator Credit: Bag-O-Day Crochet
8. Ruffled Crochet Romantic Chalet Boot Covers
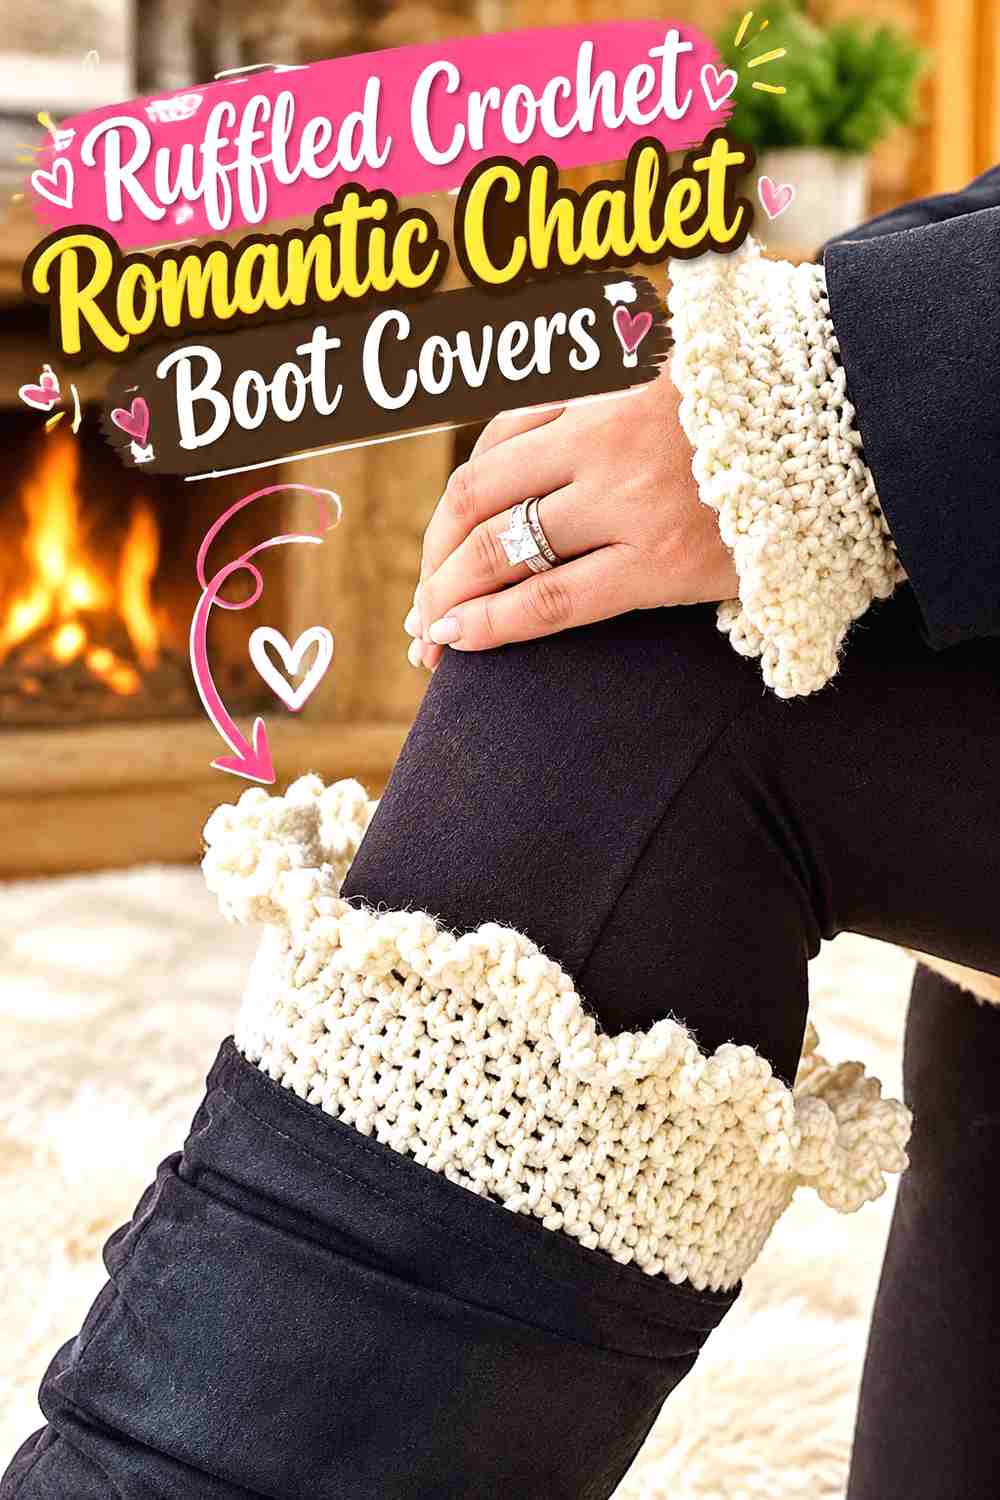
Ruffled boot cuffs create a much softer silhouette than straight ribbing. The source tutorial is specifically built around a pronounced ruffled upper edge, making this a genuinely different option rather than a standard cuff with a minor trim change.
They work particularly well for an après-ski outfit with sweater dresses, tights, or simple boots where a decorative edge can remain visible.
The Ruffle Needs Clear Space Above the Boot
A flounce cannot open properly if it is crushed by the shaft.
Position the transition into the ruffle above the boot edge. If that leaves too much lower fabric inside the shaft, a different cuff height may suit those boots better.
Match Ruffle Scale to Footwear Scale
Large folds can become the focus of plain boots.
On footwear that already has faux-fur trim, buckles, straps, or decorative stitching, a smaller visible ruffle may produce a more balanced combination.
Keep Loose Edges Clear of Closures
Ruffles create more exposed fabric than a straight cuff.
Make sure the flounce cannot catch repeatedly in a zipper or become entangled with boot laces or hooks.
Creator Credit: Made With Love By Glama
9. Bulky Button Crochet Cabin Boot Covers
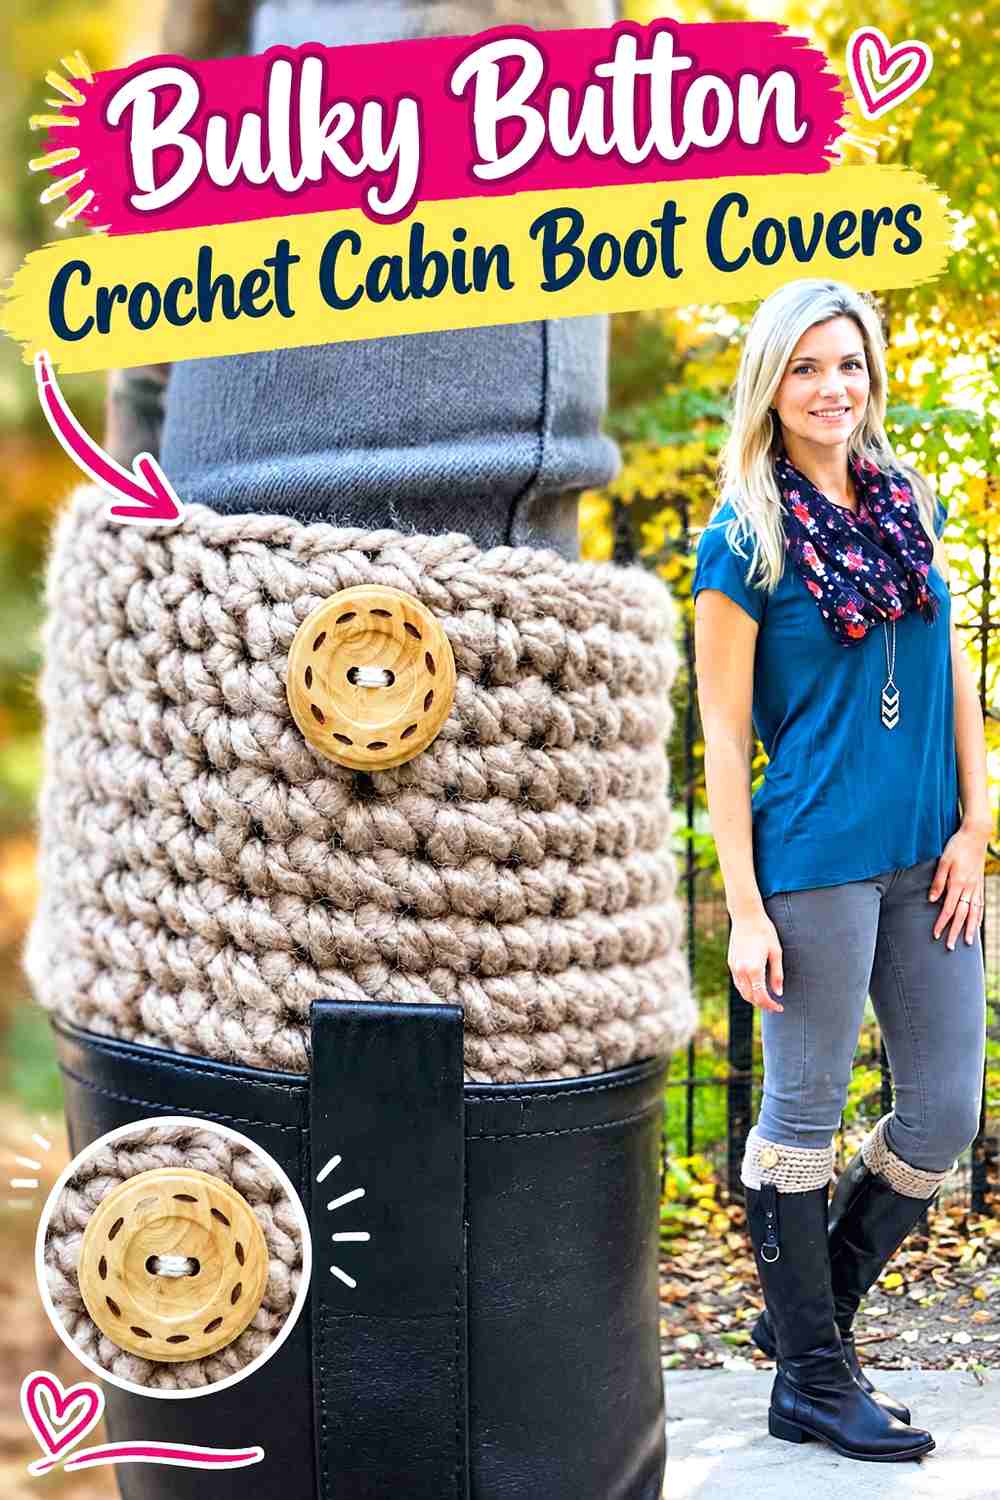
This design takes a quieter route than puff stitches or C2C texture: a substantial simple crochet fabric is paired with decorative buttons. The source uses bulky yarn, making the cuff visually wintery without requiring complicated surface patterning.
It suits cabin-style outfits where rustic buttons, heathered yarn, and straightforward boots already provide enough detail.
Simple Fabric Lets the Button Become the Focal Point
When the body is calm, even a small button attracts attention.
Choose its position after trying the cuff with the boot. It should remain visible without landing directly beside hard footwear hardware.
Bulky Does Not Mean It Should Be Forced Into the Shaft
Heavy yarn can produce a convincing winter look above the boot but too much fabric inside a narrow shaft can become uncomfortable.
Let the visible area do the decorative work and minimize unnecessary hidden bulk.
Heathered Yarn Can Add Chalet Character Without More Embellishment
A tweed-like or subtly mixed yarn can make simple stitches look more rustic.
If you choose a visually active yarn, consider whether the button is still necessary as a strong contrast or whether a quieter embellishment will work better.
Creator Credit: Melanie Ham
10. Open-Lace Crochet Chalet Boot Toppers
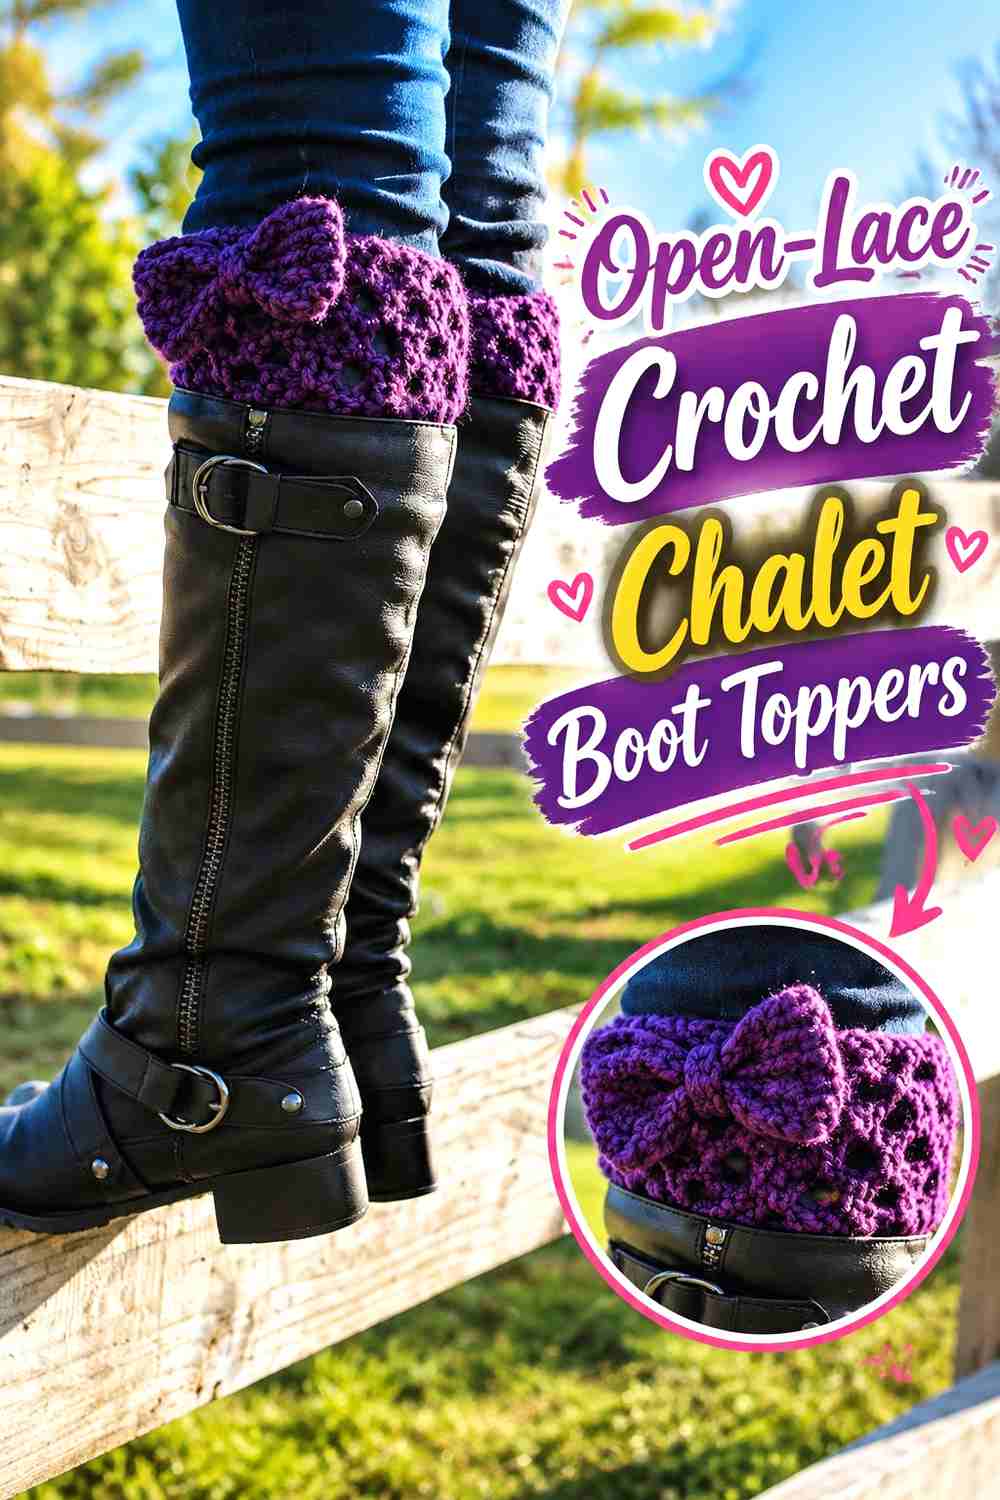
Lace creates a lighter, more delicate topper that works particularly well when après-ski style leans dressy rather than rugged. Jonna Martinez’s source tutorial is specifically devoted to crochet lace boot cuffs.
This is a useful counterpart to the chunky options because the decoration comes from negative space rather than bulk.
Lace Is Better for Decoration Than Maximum Warmth
Open crochet allows more airflow than dense ribbing or puffs.
Choose it because you want a visible decorative topper. If significant lower-leg warmth is the priority, one of the denser or taller designs will make more sense.
Contrast Determines How Clearly the Lace Shows
An ivory lace cuff against ivory leggings may appear subtle, while the same cuff over dark tights becomes much more obvious.
Think about the clothing above the boot as the background for the stitch pattern.
Protect Openwork From Rough Hardware
Lace contains exposed loops that may be more vulnerable to snagging.
Check the top of the boot for buckles, zipper pulls, hook-and-loop fasteners, or rough trim before deciding where the decorative area should sit.
Creator Credit: Jonna Martinez
11. Reversible-Look Lace Crochet Après-Ski Boot Covers
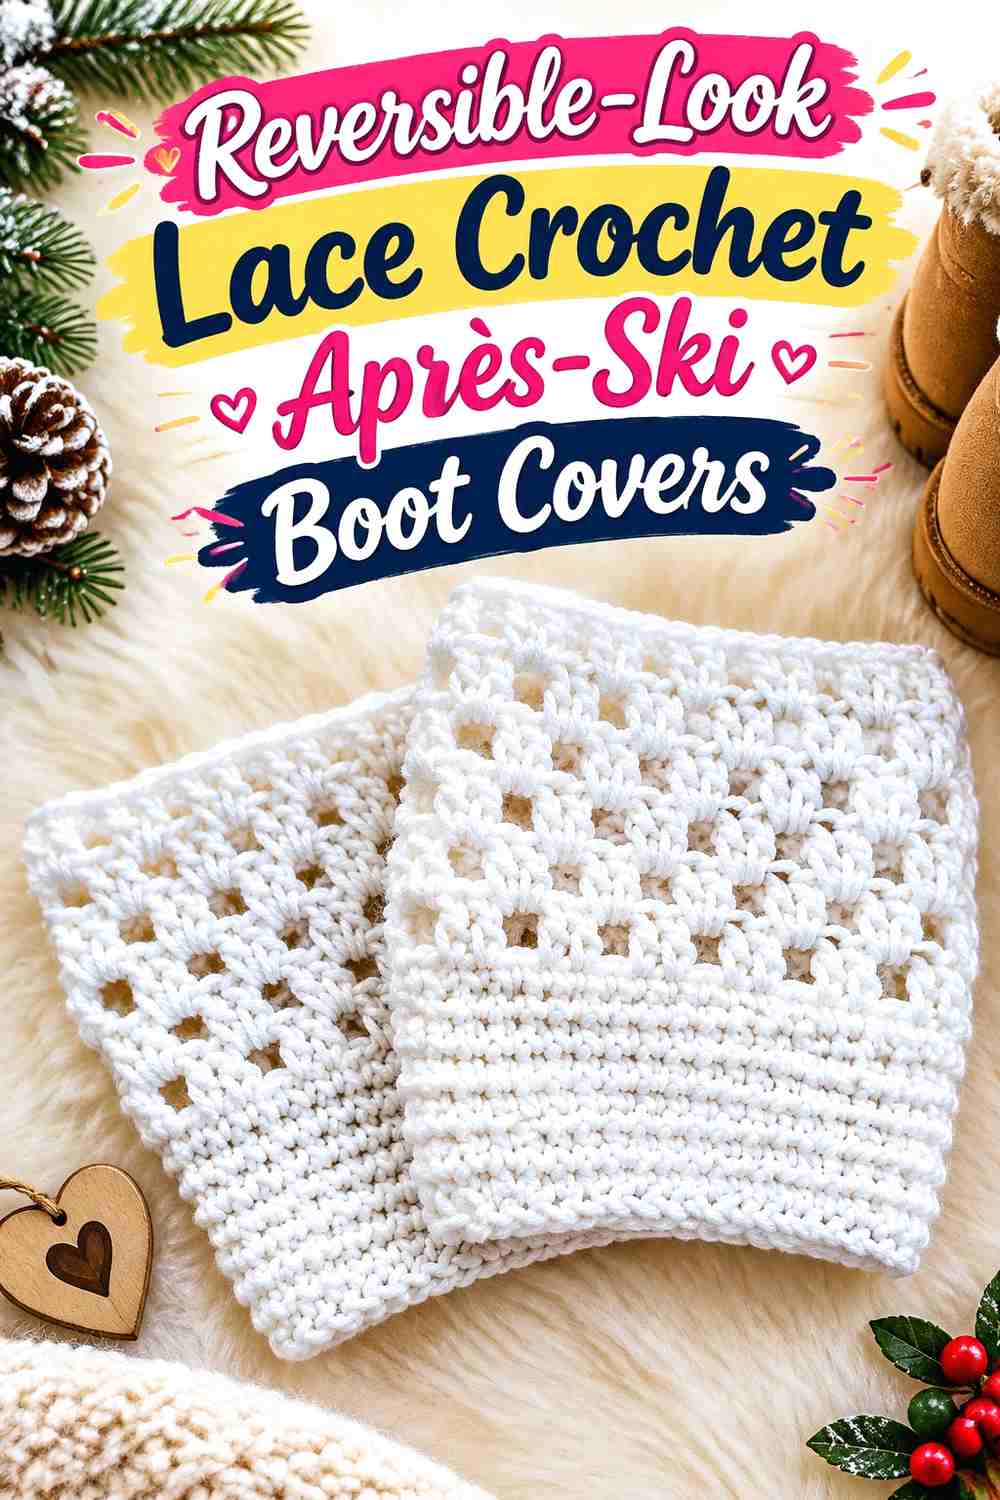
This lace design can be styled with either side showing above the boots, giving it a different kind of versatility from the two-yarn Tunisian pair. The tutorial emphasizes an adjustable lace boot-cuff construction rather than a thick winter sock effect.
It works well for a feminine chalet outfit where the boots are paired with tights, a skirt, or a sweater dress.
Two Presentations Make Finishing More Important
When either side may be visible, areas you would normally treat as the hidden interior deserve more attention.
Neat joining and yarn-end finishing become part of the look rather than something that will always stay against the leg.
Open Texture Should Stay Above the Shaft
The lace is the reason to choose this design.
Avoid burying the majority of it inside the boot. Decide how much pattern you want visible before setting the final wearing height.
Keep a Dressier Cuff Clear of Snow-Contact Areas
Decorative lace works best as an upper-boot accent.
Do not pull it down over the outside of footwear where it can become wet, dirty, or interfere with walking surfaces.
Creator Credit: Rainbow Warrior
12. Vintage Lace Crochet Chalet Boot Covers
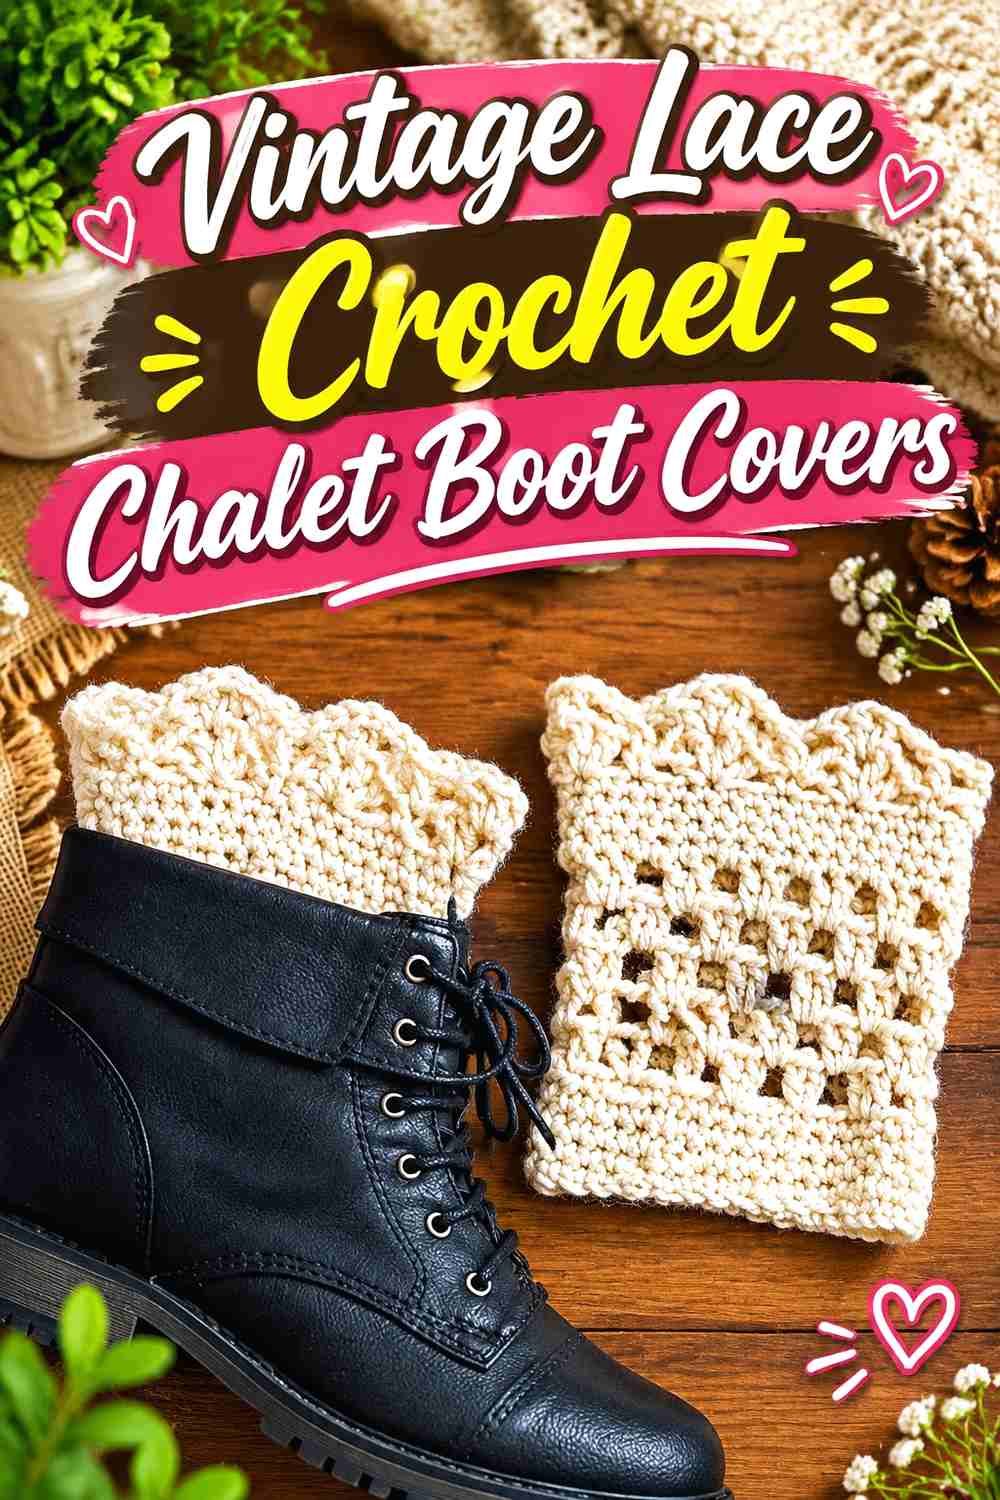
This lace tutorial provides another openwork direction, but the finished style is especially useful for retro winter outfits where you want the boot topper to resemble a decorative sock edge.
Pairing this type of cuff with a relatively plain boot lets the crochet remain visible without competing with several other footwear details.
A Shaped Top Edge Gives the Cuff a Vintage Mood
Decorative lace along the upper line creates more visual movement than a straight band.
That works well with vintage-inspired skirts, long coats, or softer chalet styling where rigid sporty ribbing would feel out of place.
Fine Detail Needs Enough Visible Height
If only a tiny strip remains above the boot, the specific lace construction may be difficult to appreciate.
Try the cuff with your footwear before finalizing height so that the decorative portion is not unintentionally hidden.
Do Not Increase Thickness Just to Make It “More Winter”
A much heavier yarn can change the scale and openness of lace.
If you want this design during colder weather, pairing it with warm tights or socks may preserve the decorative structure better than forcing the pattern into a dramatically thicker material.
Creator Credit: Carolynn Markey
13. Everyday Crochet Ski-Lodge Boot Cuffs
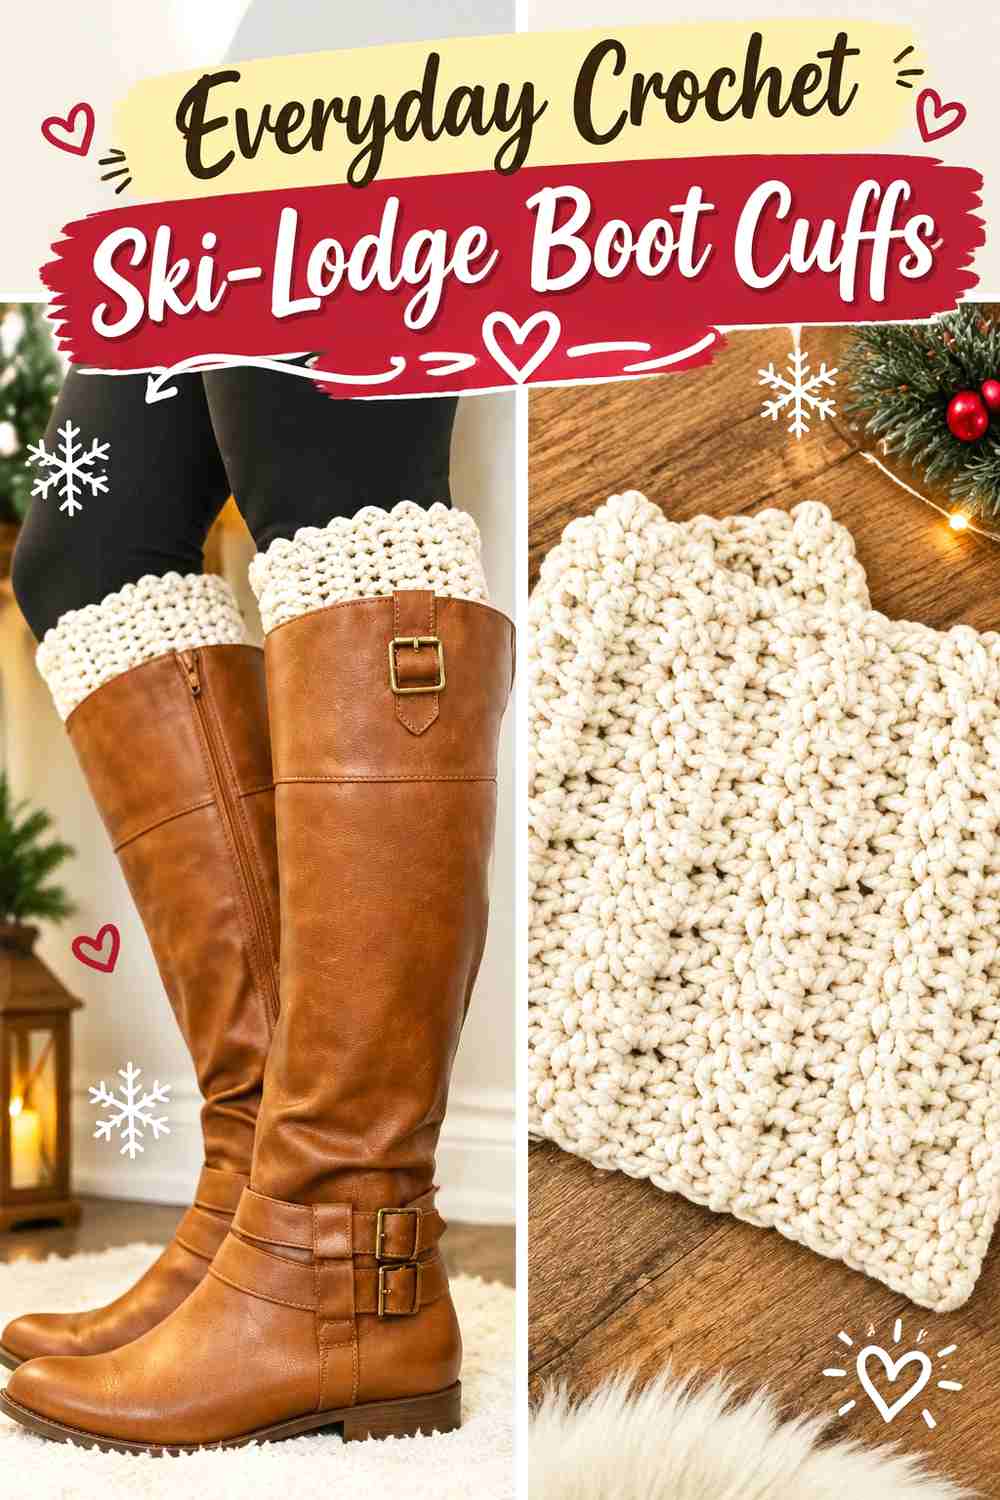
This tutorial uses a straightforward medium-weight boot-cuff approach, making it a useful base when you want an understated accessory rather than ruffles, buttons, or heavy dimensional stitches. The source is specifically a complete boot-cuff tutorial.
Its simplicity also makes it easier to coordinate with patterned winter coats and sweaters.
Medium Weight Can Be Easier With Fitted Boots
A moderate fabric thickness may leave more room inside the shaft than a very bulky design.
That does not guarantee compatibility, but it makes this a sensible place to start if the boot opening is already relatively close to the leg.
Let Color Do More of the Styling Work
Without a large decorative border, color becomes more influential.
A near-match to the boots creates a subtle layered effect, while cream against dark brown or charcoal against tan produces a clear sock-top contrast.
Use This as the Quiet Option in a Busy Outfit
If the coat, sweater, or scarf already features strong pattern or texture, highly decorative boot covers can add too many competing details.
A simpler cuff still creates the chalet layered look while allowing another garment to remain the focal point.
Creator Credit: DIY FROM HOME CROCHET
14. Tall Crochet Chalet Leg-Warmer Boot Covers
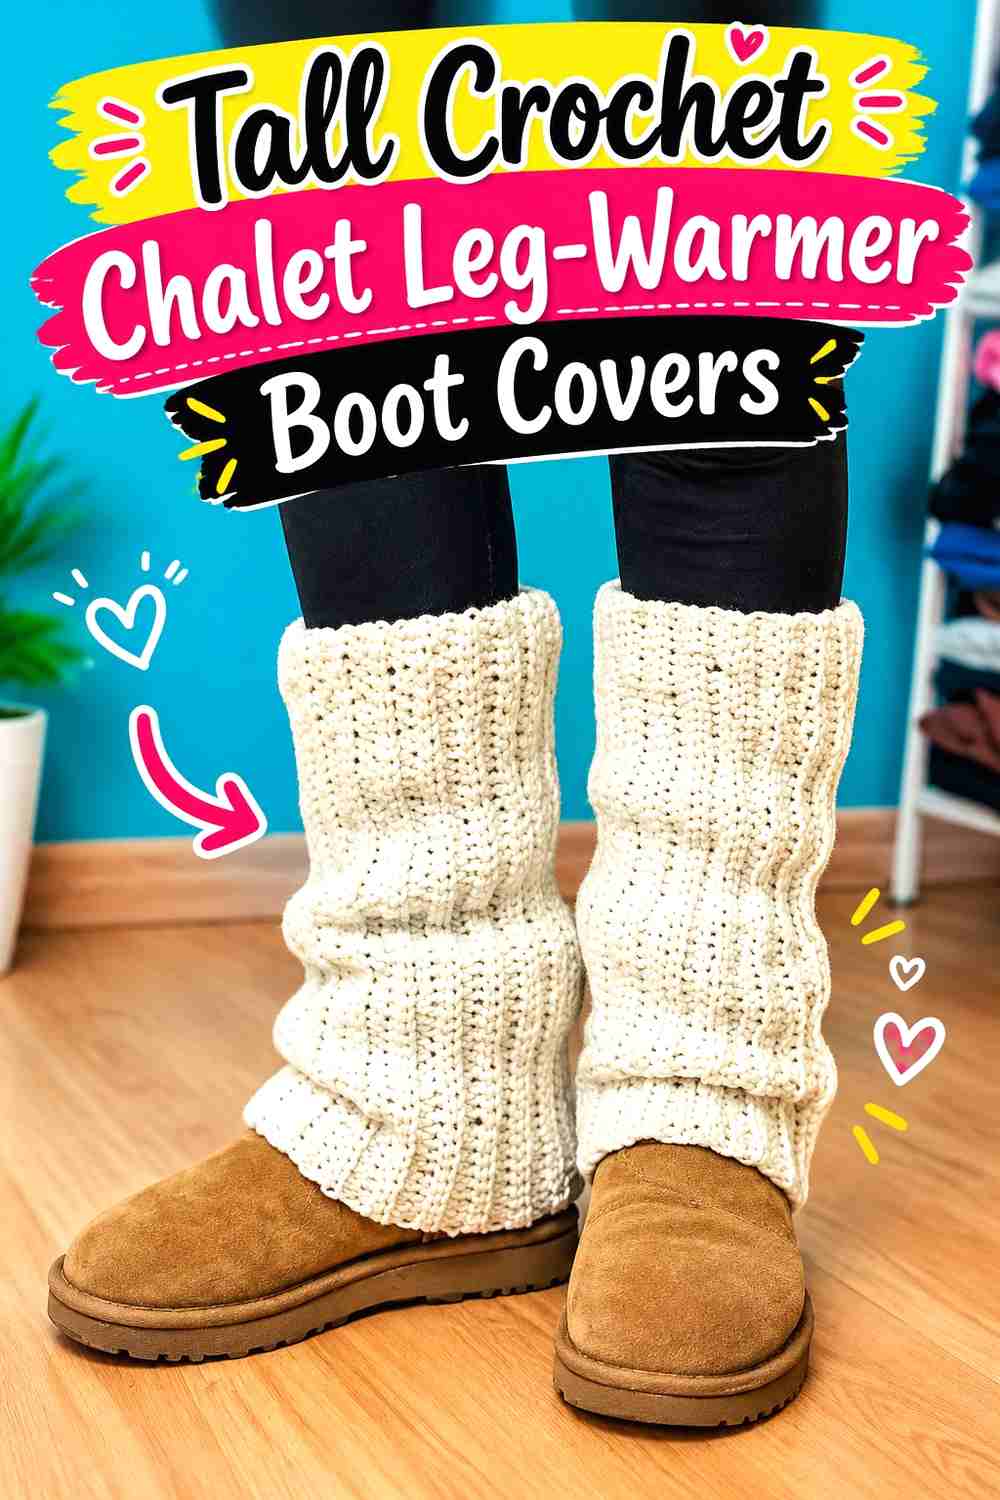
This project moves beyond the short-cuff format and creates a full leg warmer intended as a winter accessory. The tutorial builds a larger panel that is joined into a warmer, giving you much more visible fabric above shorter boots.
Choose this direction when you want the classic après-ski combination of boots, leggings, and a substantial textile layer around the calf.
Extra Height Creates a Stronger Chalet Silhouette
Several inches of visible crochet can transform the boot area much more dramatically than a narrow cuff.
Wear the warmer relatively straight for a cleaner vertical look or allow the fabric to relax naturally if its construction supports a softer silhouette.
The Upper and Lower Circumferences Both Matter
A tall warmer covers more of the leg than a short cuff.
Check the fit at the ankle area and farther up the calf. A tube that works perfectly at one height may behave differently several inches higher.
Keep the Lower Edge Above the Sole and Heel
A longer warmer can tempt you to pull the crochet down over more of the boot.
Stop before the fabric reaches any walking surface. The outsole, tread, heel-contact area, and functional closures should remain unobstructed.
Creator Credit: vivi e cuci
Which Crochet Chalet Boot Cover Style Should You Choose?
| If you want… | Consider… | Main point to check |
|---|---|---|
| A classic chunky chalet look | Projects 1 or 6 | Boot-shaft clearance |
| Rustic buttons | Projects 1 or 9 | Hardware placement |
| Decorative ribbon | Project 2 | Whether trim stays above the boot |
| Strong geometric texture | Project 3 | C2C fit and fabric firmness |
| Reversible fabric | Project 4 | Density inside the boot shaft |
| A knit-look effect | Project 5 | Height and stretch |
| Dimensional winter texture | Project 7 | Space for puff stitches |
| Romantic après-ski styling | Project 8 | Ruffle placement |
| Delicate chalet lace | Projects 10–12 | Snagging and actual visible height |
| A quiet everyday topper | Project 13 | Color relationship with boots |
| Maximum visible leg coverage | Project 14 | Fit at several points on the calf |
Conclusion
For the most recognizable chalet effect, the chunky and ribbed options are the strongest starting point. Projects 1 and 6 resemble substantial sweater or sock cuffs, while Project 5 offers a smoother knit-look version with the option of extra height.
If texture is more important than classic ribbing, Projects 3, 4, and 7 take three very different approaches: C2C blocks, reversible Tunisian crochet, and raised puff stitches. Project 9 keeps the fabric simpler and lets rustic buttons provide the visual detail.
The lace and ruffled versions suit a softer après-ski wardrobe. Projects 8 and 10–12 can work especially well with sweater dresses, tights, and uncomplicated boots where the decorative edge has space to show.
For the most dramatic lower-leg layer, Project 14 moves into full leg-warmer territory. Whatever project you choose, keep the crochet at or above the boot shaft rather than covering the tread, and follow the original creator’s tutorial for exact construction, sizing, and finishing.
Frequently Asked Questions
Are crochet boot covers the same as crochet boot cuffs?
Not always. “Boot cover” can describe several accessories, while a boot cuff or topper is specifically a short band worn around the leg near the top of a boot. Most of the projects in this collection are cuffs or toppers because they create the chalet look without covering functional parts of the footwear.
Can crochet boot covers go over the entire outside of my boots?
For these projects, keep the crochet around the leg and upper shaft. Do not extend it over the outsole, tread, or heel-contact area, and keep it clear of functional laces, hooks, buckles, and zippers. These accessories are decorative textile layers rather than traction or weatherproofing equipment.
Should crochet boot cuffs fit tightly?
They need to stay where intended without feeling uncomfortably restrictive. The correct fit depends on yarn, stretch, stitch structure, and where the boot reaches the leg. Ribbing, Tunisian fabric, lace, and puff stitches can behave quite differently, so test the first cuff with the actual footwear.
Which style gives the strongest après-ski look?
Chunky ribbing, knit-look crochet, tall leg warmers, and substantial textured cuffs create the clearest classic ski-lodge effect. Ruffles and lace produce a more romantic chalet interpretation, while C2C and Tunisian designs emphasize handmade texture.
Can I add faux-fur yarn to a crochet boot cuff?
You can consider a textured trim as an adaptation, but test it first. Faux-fur yarn can be much bulkier than the cuff yarn, hide stitches, and change the way the upper edge sits. Keep any fluffy trim well above the sole and clear of boot closures.
What should I measure before crocheting boot toppers?
Measure your leg at the exact height where the cuff will sit and check the internal room at the boot opening. If you are making a taller leg warmer, compare more than one point because calf circumference can change as the project extends upward.
Can boot cuffs replace warm winter socks?
No. Boot cuffs mainly cover the area around or above the boot opening. They do not provide the complete foot coverage of socks, nor do they replace the insulation, waterproofing, or traction features of footwear designed for winter conditions.