A woodland capelet can lean rustic, fairytale, vintage, or quietly practical depending on its construction. A close-fitting ribbed shoulder layer gives a completely different result from an oversized hooded cape, while open lace, raised cables, plaid colorwork, and chunky collars change both the visual weight and the way the garment layers over winter clothes.
The projects below cover short capelets, adaptable capes, hooded wraps, child-size layers, convertible cowls, paneled lace, arm-slit designs, and more structured statement pieces. Some original tutorials produce a longer cape rather than a strict capelet; those are included where their construction offers a useful basis for a shorter storybook silhouette. Before adapting one, check the creator’s sizing, repeat placement, arm openings, closure, and finishing so shortening the body does not disrupt an important design feature.
Quick List
- Crochet Moss-Lace Hooded Capelet
- Crochet Forest-Errand Hooded Capelet
- Crochet Ribbed Acorn-Stripe Capelet
- Crochet Pocketed Hearthside Capelet
- Crochet Button-Front Evergreen Panel Capelet
- Crochet Entrelac Acorn Hooded Capelet
- Crochet Mountain-Texture Arm-Slit Capelet
- Crochet Plaid Storybook Child Capelet
- Crochet Back-Seam Ribbed Mantle Capelet
- Crochet Tri-Square Enchanted Capelet
- Crochet Zigzag Buttoned Child Capelet
- Crochet Full-Circle Picot Winter Capelet
- Crochet Chunky Cowl-to-Capelet
- Crochet Four-Panel Watercolor Lace Capelet
Choose the Capelet Shape Before Choosing Woodland Details
The strongest storybook effect usually comes from silhouette first. A deep hood creates an immediate fairytale reference, while a high collar feels more practical and restrained. Full-circle construction gives generous movement around the hem; rectangular and side-to-side designs tend to produce cleaner, more architectural lines. Arm slits matter when the capelet will be worn while carrying a bag, holding a mug, or moving outdoors rather than only for photographs.
Length also changes the character of the garment. A true shoulder capelet keeps the outfit beneath it visible, which works well over dresses and fitted coats. A longer cape provides more coverage but may hide waist details and can add considerably more yarn weight. When adapting a cape tutorial, decide where you want the hem to sit before altering repeats, especially when cables, plaid blocks, lace fans, or textured borders have been planned around the original depth.
Think About Drape, Structure, and Winter Layers Together
A storybook capelet still needs to work with the clothing underneath it. Soft, drapey fabric tends to settle around the shoulders and move easily over dresses or slim sweaters. Firmer fabric gives a hood, collar, button band, or sculptural hem more definition, but too much stiffness can make the cape stand away from the body instead of wrapping naturally.
Yarn substitution can change more than appearance. A heavier fiber or denser stitch may increase the pull at the neckline, while a lighter yarn may make a large hood collapse more softly than the sample. Open lace offers visual delicacy but less coverage than solid fabric, so it suits decorative layering differently from a dense winter capelet. Check the original tutorial’s gauge and finished measurements before substituting yarn, and consider the bulk of the coat, dress, or sweater that will normally sit underneath the finished piece.
Treat Hoods, Closures, and Child Details as Functional Parts
Buttons, toggles, ties, decorative clasps, and crocheted cords strongly influence the storybook look, but they also determine how securely a capelet sits. A closure that pulls too tightly can distort the neckline or drag a hood forward. Decorative buttons that do not actually fasten the garment should not be assumed to provide the same stability as a functional closure.
Hoods deserve similar attention. Large hoods add visual drama and fabric weight behind the neck, while close hoods behave more like practical cold-weather accessories. If you add ears, leaves, flowers, or other independent woodland embellishments, make sure they do not distort the hood or become the only thing holding its shape. For children’s pieces, keep age and intended use in mind when choosing buttons, cords, toggles, or detachable decorations. Secure finishing matters, and unnecessary long ties or loose small embellishments are worth avoiding for young wearers.
1. Crochet Moss-Lace Hooded Capelet
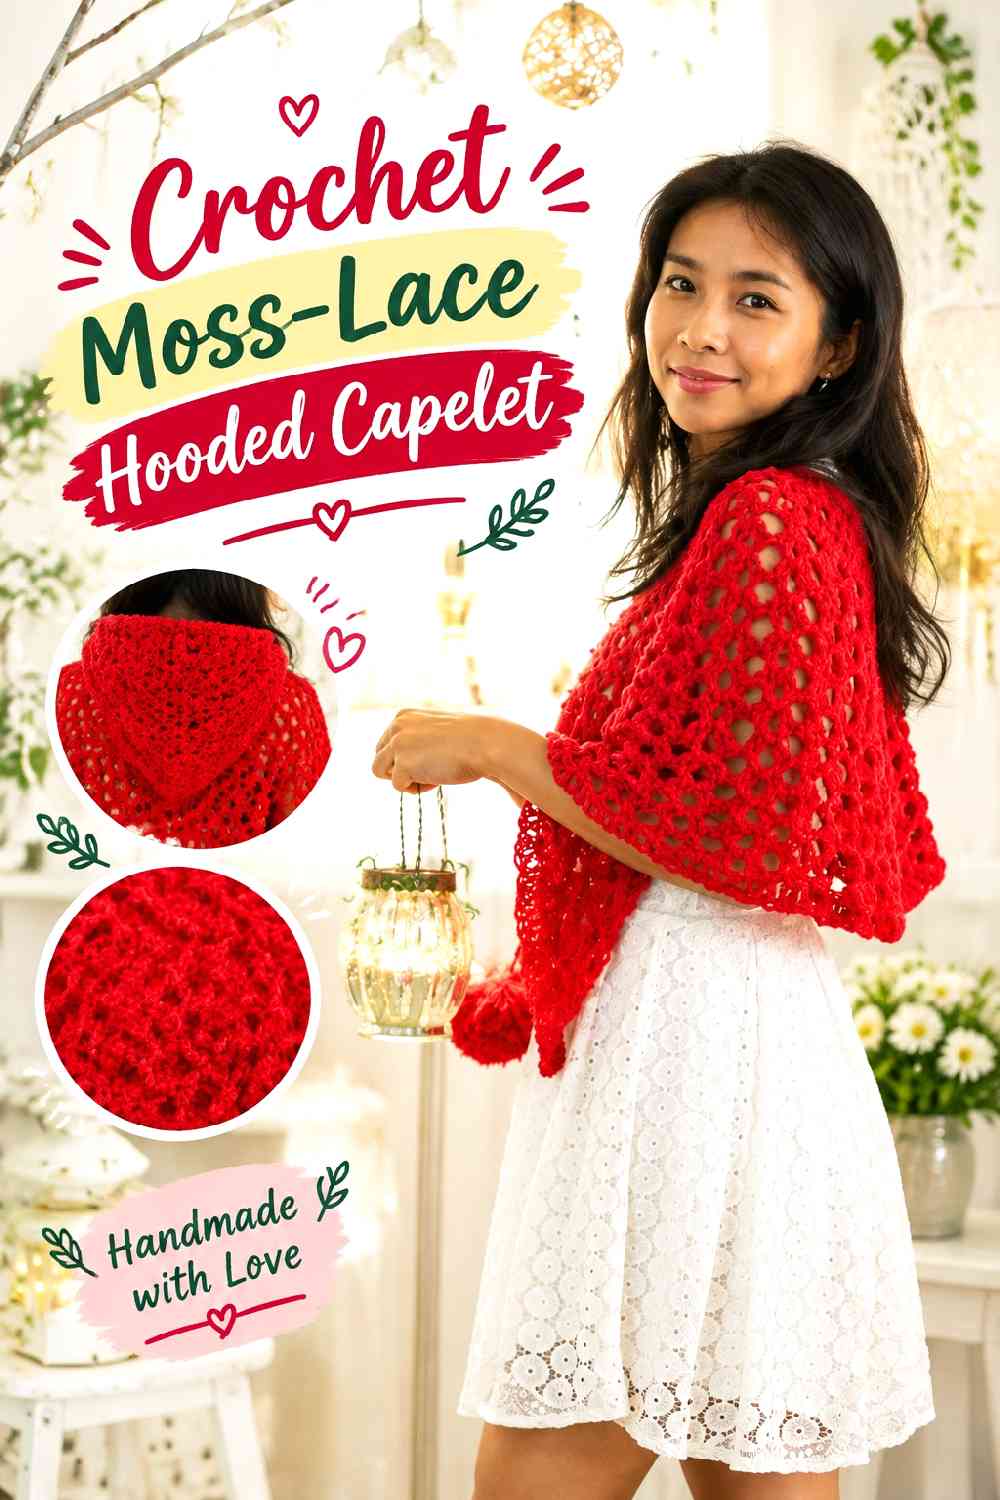
This idea starts with a light hooded cape construction rather than a dense poncho. Jenny and Teddy’s original project uses a simple lace body built from rectangular sections, with the hood made separately and attached afterward. That separation is useful for a woodland outfit because the cape can remain airy while the hood supplies most of the storybook silhouette. The creator also presents the piece as wearable without the hood, giving the underlying wrap more flexibility than a hood-dependent design.
For a woodland interpretation, moss, lichen, bark, or muted berry shades can do most of the styling work without changing the construction. Before choosing it for genuinely cold conditions, remember that visible lace spaces provide different coverage from a tightly stitched capelet.
Let the Hood Carry the Fairytale Character
Because the hood is a distinct component, it can become the visual focal point without requiring extra decoration across the entire body. A deep natural color, contrasting hood edge, or understated woodland trim can be enough.
Keep added weight modest. Heavy appliqués or dense edging can make a separately attached hood pull backward at the neckline, particularly if the body remains light and open.
Check Lace Against the Intended Winter Use
Open fabric works well as an outfit layer, but it should not automatically be treated like a wind-blocking garment. Compare the stitch openness with what the capelet will cover.
If the wearer needs warmth rather than primarily decorative layering, consider what sweater or coat will sit beneath it instead of trying to make the lace perform like dense outerwear.
Preserve the Optional-Hood Advantage
One useful feature of this construction is the ability to think of the body as a wrap in its own right. If you want a less costume-like result after winter, keep that versatility in mind when selecting colors and edging.
A removable-looking aesthetic is easier to achieve when the body does not depend on added ears, tassels, or other hood-specific motifs for its finished appearance.
Creator Credit: Jenny and Teddy
2. Crochet Forest-Errand Hooded Capelet
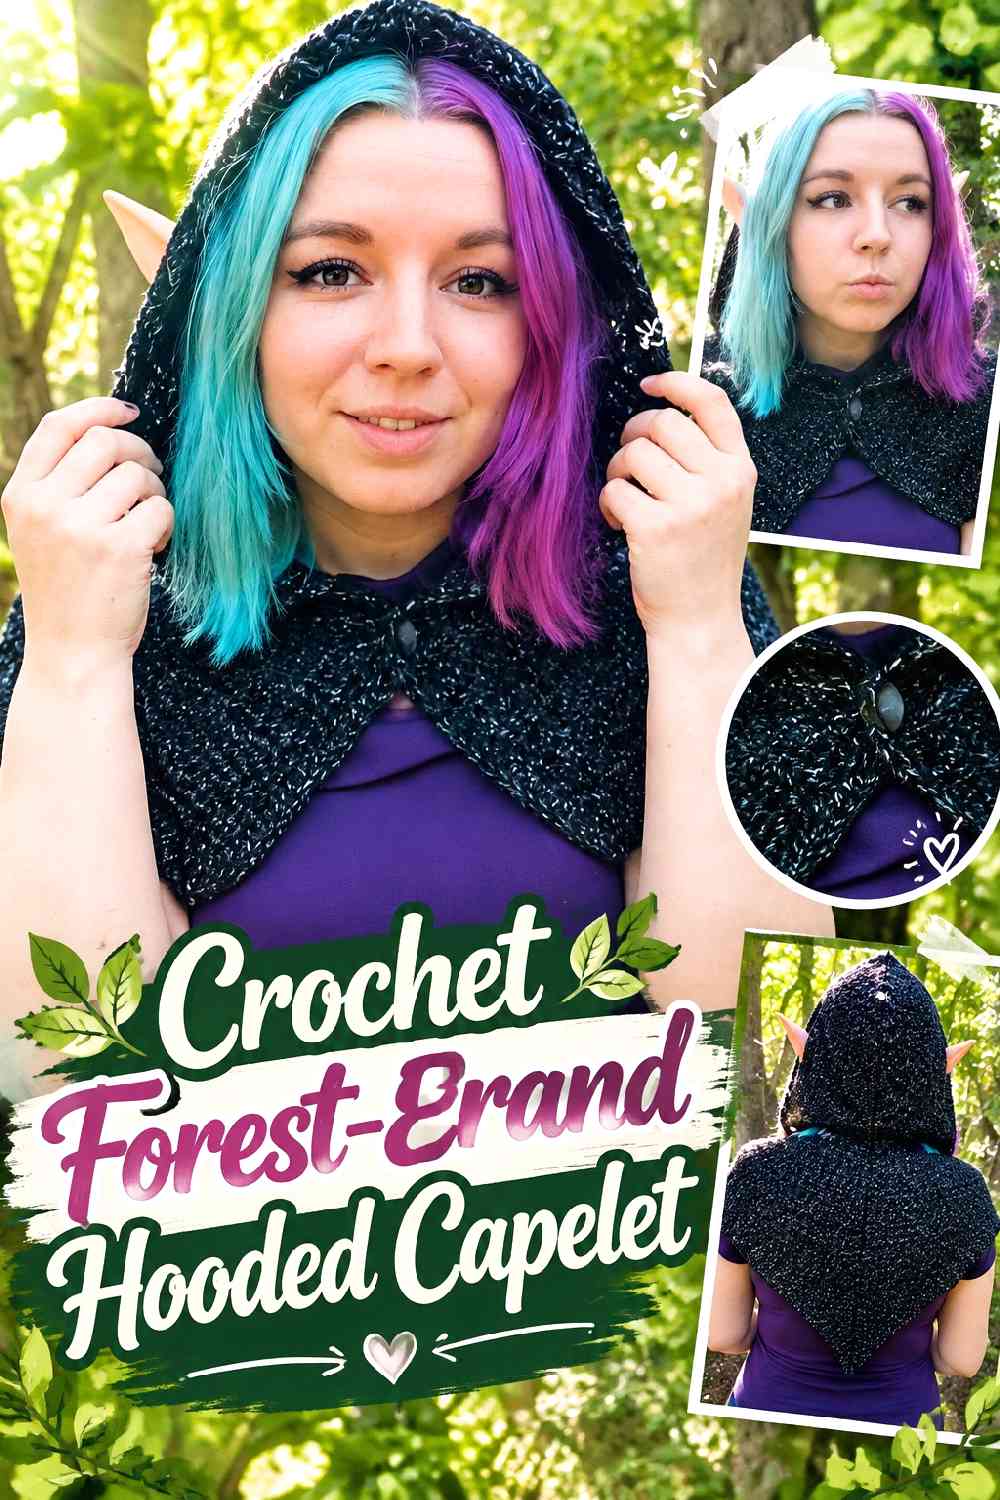
Littlejohn’s Yarn offers a compact fantasy-friendly capelet with a hood, making it a useful choice when you want clear storybook character without the volume of a floor-length cloak. The project is constructed so the body establishes the cape shape first and the upper section becomes the hood, creating a different relationship between hood and garment from a separately attached hood. The original design was conceived with costume and fantasy styling in mind, yet its short scale keeps it wearable as an accessory rather than a full cloak.
This would suit an outfit where the capelet needs to sit over a dress, fitted sweater, or tunic without covering most of the silhouette. Forest green, russet, brown, or charcoal can move it toward a woodland direction without altering the underlying tutorial.
Decide How Much Shoulder Coverage You Need
A short capelet can look balanced over fitted clothing but feel undersized over a bulky coat. Try to evaluate the intended underlayer before settling on width and depth.
If adapting the tutorial, make fit decisions around shoulder coverage rather than simply adding length. A cape can become longer without becoming more comfortable around the upper body.
Keep the Hood Seam From Becoming the Weak Visual Point
Hood shaping and seaming are more noticeable on a compact piece because the hood occupies a large percentage of the finished garment. Even tension and careful joining help the silhouette look intentional.
Before adding decorative edging, make sure the hood already hangs evenly. Trim can emphasize a crooked edge just as easily as it can refine a clean one.
Use Woodland Decoration Selectively
A short fantasy capelet already carries a strong visual identity. It usually needs fewer extra signals than a plain shawl.
One restrained detail—a leaf-shaped clasp, tonal edging, or small embroidered motif—can support the woodland theme without making the cape difficult to combine with ordinary winter clothing.
Creator Credit: Littlejohn’s Yarn
3. Crochet Ribbed Acorn-Stripe Capelet
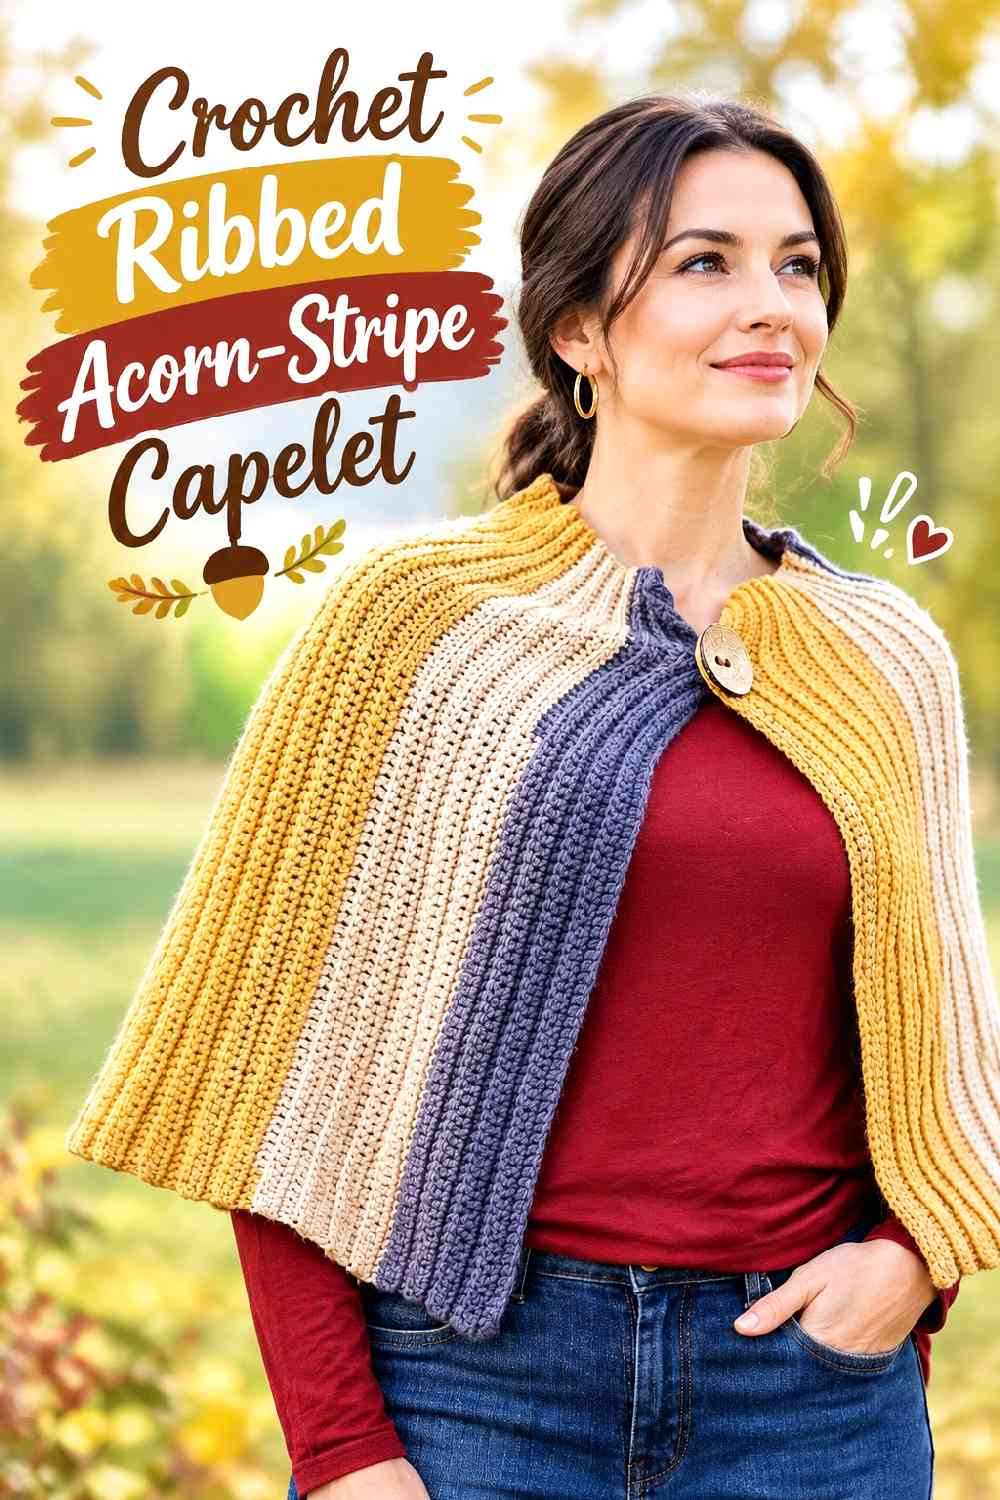
Nana’s Crafty Home teaches a one-piece capelet worked side to side with back-loop stitches that create a pronounced ribbed surface. Different stitch heights shape the neckline, shoulder section, and lower portion, while the finished piece is folded at the neck. The sample uses self-striping yarn, but the structural appeal comes from the vertical ribbing rather than color changes alone. The large front button in the original design is decorative rather than a functional closure.
For a woodland wardrobe, the ribbing can resemble bark or gathered leaves when worked in earthy solids or low-contrast striping. It is a useful alternative for someone who likes storybook styling but does not want a hood, elaborate lace, or a heavily embellished front.
Ribbing Changes Both Texture and Stretch
Back-loop fabric can have more give than a dense stitch worked through both loops. That can help a capelet settle around the shoulders, but the amount of stretch still depends on yarn and tension.
Check the finished width rather than assuming the fabric will relax to the desired size after wear. Excessive stretch around the neck can change how the folded shape sits.
Treat the Button as Styling Unless You Redesign the Closure
The source specifically uses a decorative button, so it should not be relied on as though it were engineered to hold the cape shut.
If your winter outfit needs a functional fastening, choose a closure method deliberately and check whether it pulls through one or two fabric layers without distorting the ribbing.
Side-to-Side Construction Highlights Long Color Changes
Because the cape is worked sideways, striping behaves differently from top-down colorwork. Long self-striping yarn can create vertical movement rather than horizontal bands.
If you prefer a quieter woodland look, a solid or subtly heathered yarn will put more emphasis on the rib texture and less on color transitions.
Creator Credit: Nana’s Crafty Home
4. Crochet Pocketed Hearthside Capelet
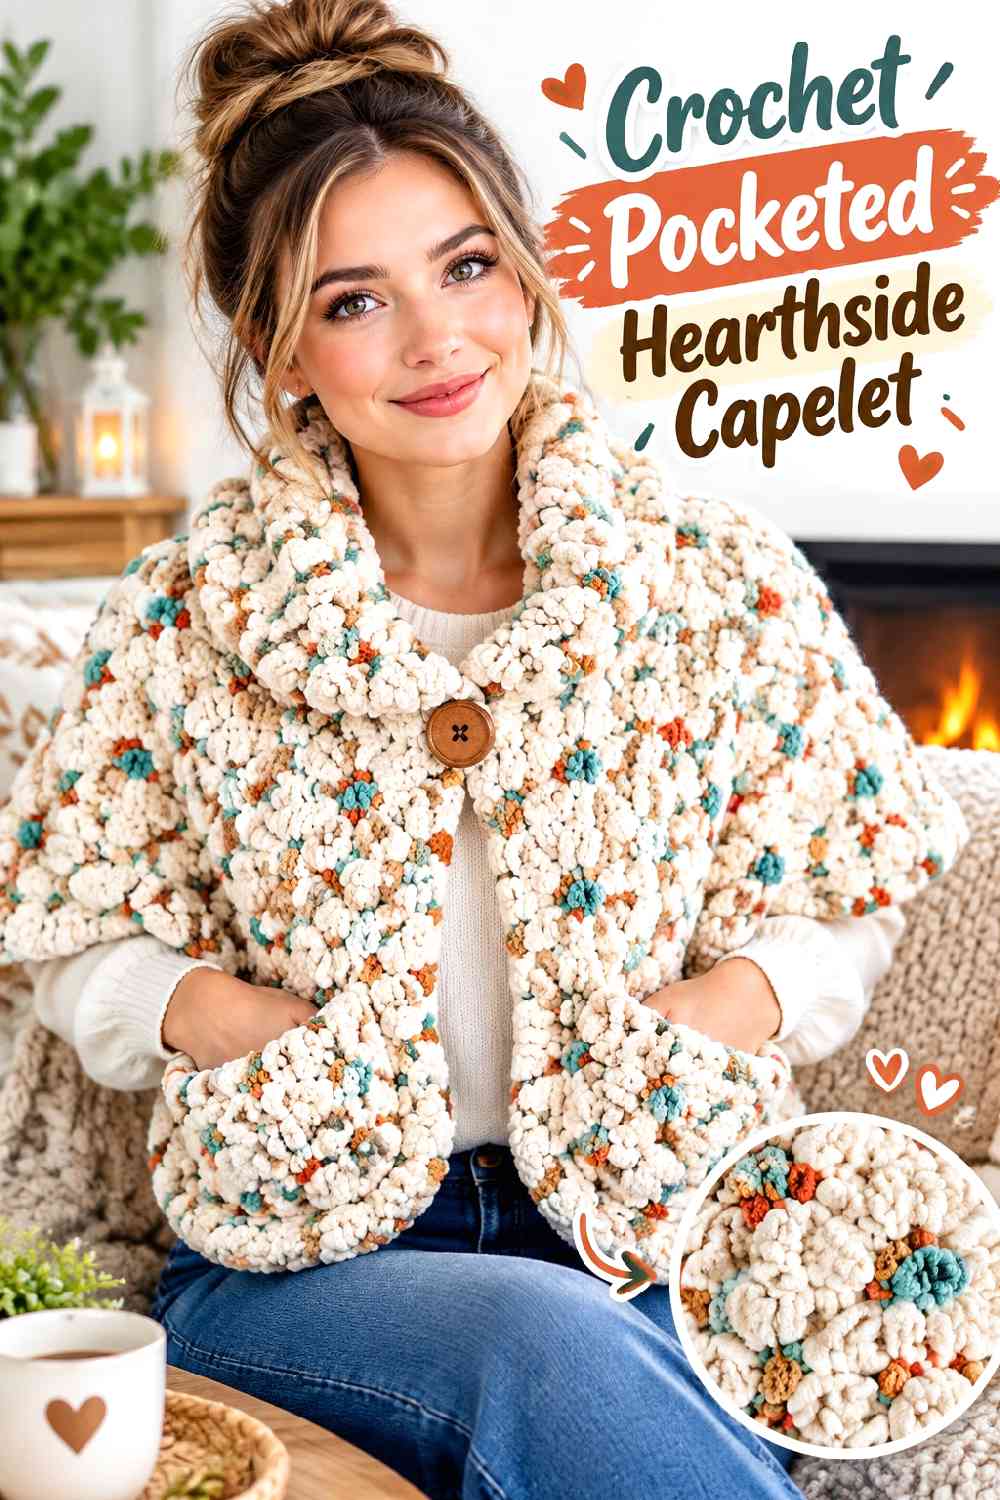
The Golden Hour design from CJ Design Blog brings an unusually practical feature to this category: pockets. The original cape is assembled from two large panels, with a small neckline treatment and separate pockets added to the front. Its substantial, shawl-like silhouette makes it feel closer to a warm outer layer than a decorative shoulder collar.
For a woodland version, imagine the same construction in peat brown, mushroom, dark olive, or warm oat rather than relying on novelty embellishment. This idea suits readers who like the romance of a cape but still want somewhere to warm their hands or carry light everyday items. Before shortening it toward capelet proportions, check where the pockets would fall; their placement is part of what makes the original construction useful.
Pocket Placement Needs Enough Body Length
Pockets require a stable area below the shoulder line. If you shorten the garment too aggressively, they may sit too high or crowd the neckline.
Decide whether the pockets or the short capelet proportion matters more. Removing pockets is usually cleaner than forcing them into a body that no longer has enough vertical space.
Watch Weight at the Front
Bulky fabric, pocket layers, and anything placed inside them all increase front weight. That can change how an open cape settles over the shoulders.
For a shorter adaptation, avoid adding heavy decorative hardware at the same time unless the neckline and shoulder balance still feel comfortable.
Two Panels Create Strong Vertical Lines
Paneled construction can visually lengthen the front even when the garment itself is not especially long. That is useful when styling the capelet over dresses or long skirts.
If you use two woodland shades, keep the panel relationship intentional; random contrast can make the construction look divided rather than cohesive.
Creator Credit: CJ Design Blog
5. Crochet Button-Front Evergreen Panel Capelet
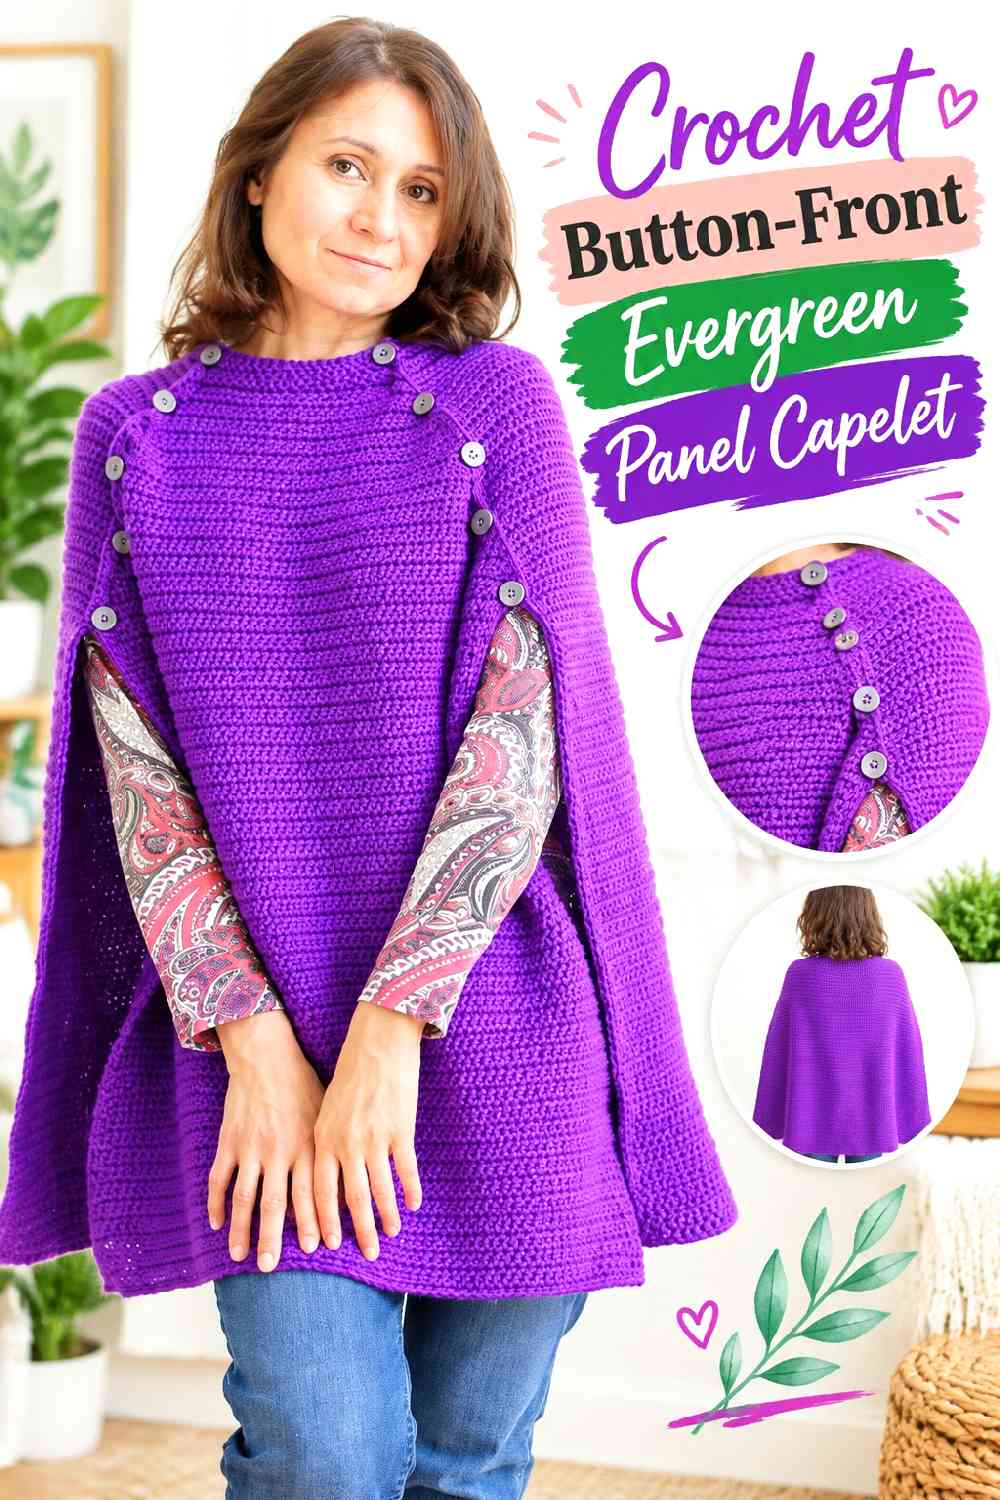
Crazy Cool Crochet’s cape uses a deliberately simple stitch surface so the shaped silhouette and buttoned front receive most of the attention. Separate front and back sections are shaped and joined, while multiple buttons create a strong vertical detail along the front. The designer also explains that the back is intentionally proportioned differently so it can drape over the shoulders.
That clean structure works well for an evergreen-inspired storybook capelet because you can let shape, buttons, and a deep forest shade do the work instead of adding complicated motifs. The source includes a longer cape format, so a shorter interpretation needs planning before the shaping section begins rather than simply trimming fabric away afterward.
Choose Length Before the Major Shaping
When a panel changes width as it approaches the neck, the shaping and total length are linked. A shorter capelet needs its proportions considered before that transition.
Mark the intended hem position against the wearer while accounting for shoulder drape, then compare it with the creator’s shaping logic before adjusting.
Multiple Buttons Create a Strong Focal Line
A row of buttons can make a plain fabric look intentional and tailored. It can also become visually busy if paired with high-contrast edging, embroidery, and variegated yarn.
For a woodland version, consider allowing the buttons to be the main decorative feature rather than one embellishment among many.
Panel Joining Deserves Careful Finishing
A smooth stitch surface does not hide uneven seams as readily as heavy texture does. Matching corresponding edges helps the cape sit symmetrically.
Check the shoulders before adding buttons. If the two sides are uneven, the front closure will make that imbalance more obvious.
Creator Credit: Crazy Cool Crochet
6. Crochet Entrelac Acorn Hooded Capelet
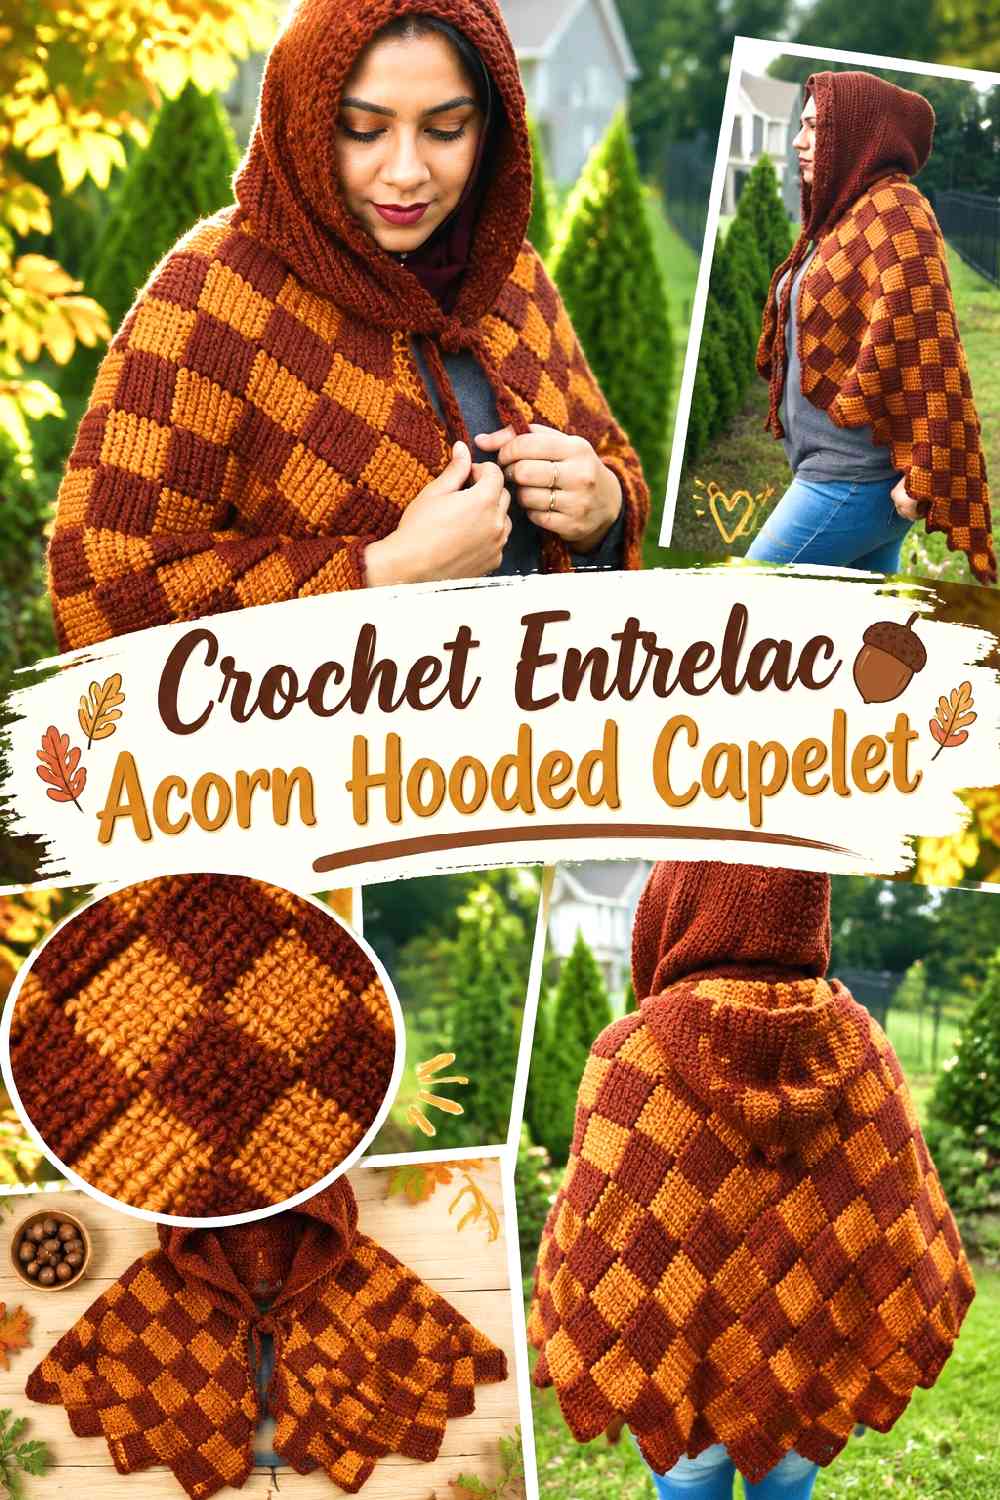
Noor’s Knits uses Tunisian entrelac blocks to create a hooded cape with a distinctive stepped, geometric surface. The tutorial includes an optional oversized hood, and the hood itself introduces additional Tunisian texture. The block construction gives the body a visual rhythm that is quite different from ordinary rows of double crochet.
For woodland styling, entrelac lends itself naturally to acorn, bark, moss, rust, and cream color combinations because the color changes can reinforce the block layout. This is a better choice for someone who wants the stitch structure to be noticeable from across the room rather than a plain garment waiting for embellishment. The optional hood also means the piece can lean either strongly fantastical or more like a graphic shoulder wrap.
Plan Color at the Block Level
Entrelac creates visible units, so color changes are more structural than they would be in random striping. A palette with too many equally strong colors may hide the shape of the blocks.
For a woodland effect, assign roles to shades—main ground, contrast, and perhaps one accent—before beginning.
Decide on the Hood Early
An oversized hood changes yarn requirements, weight distribution, and visual balance. It is not merely a small finishing detail.
If you prefer a compact capelet, compare the body both with and without a large hood in mind. A dramatic hood may call for a slightly more restrained lower section.
Keep the Stepped Edges Intentional
Entrelac naturally produces a different edge character from smooth circular crochet. Borders can either emphasize that geometry or visually calm it.
Before adding decorative leaves or tassels, look at the finished block edges. The stitch architecture may already provide enough detail for the woodland theme.
Creator Credit: Noor’s Knits
7. Crochet Mountain-Texture Arm-Slit Capelet
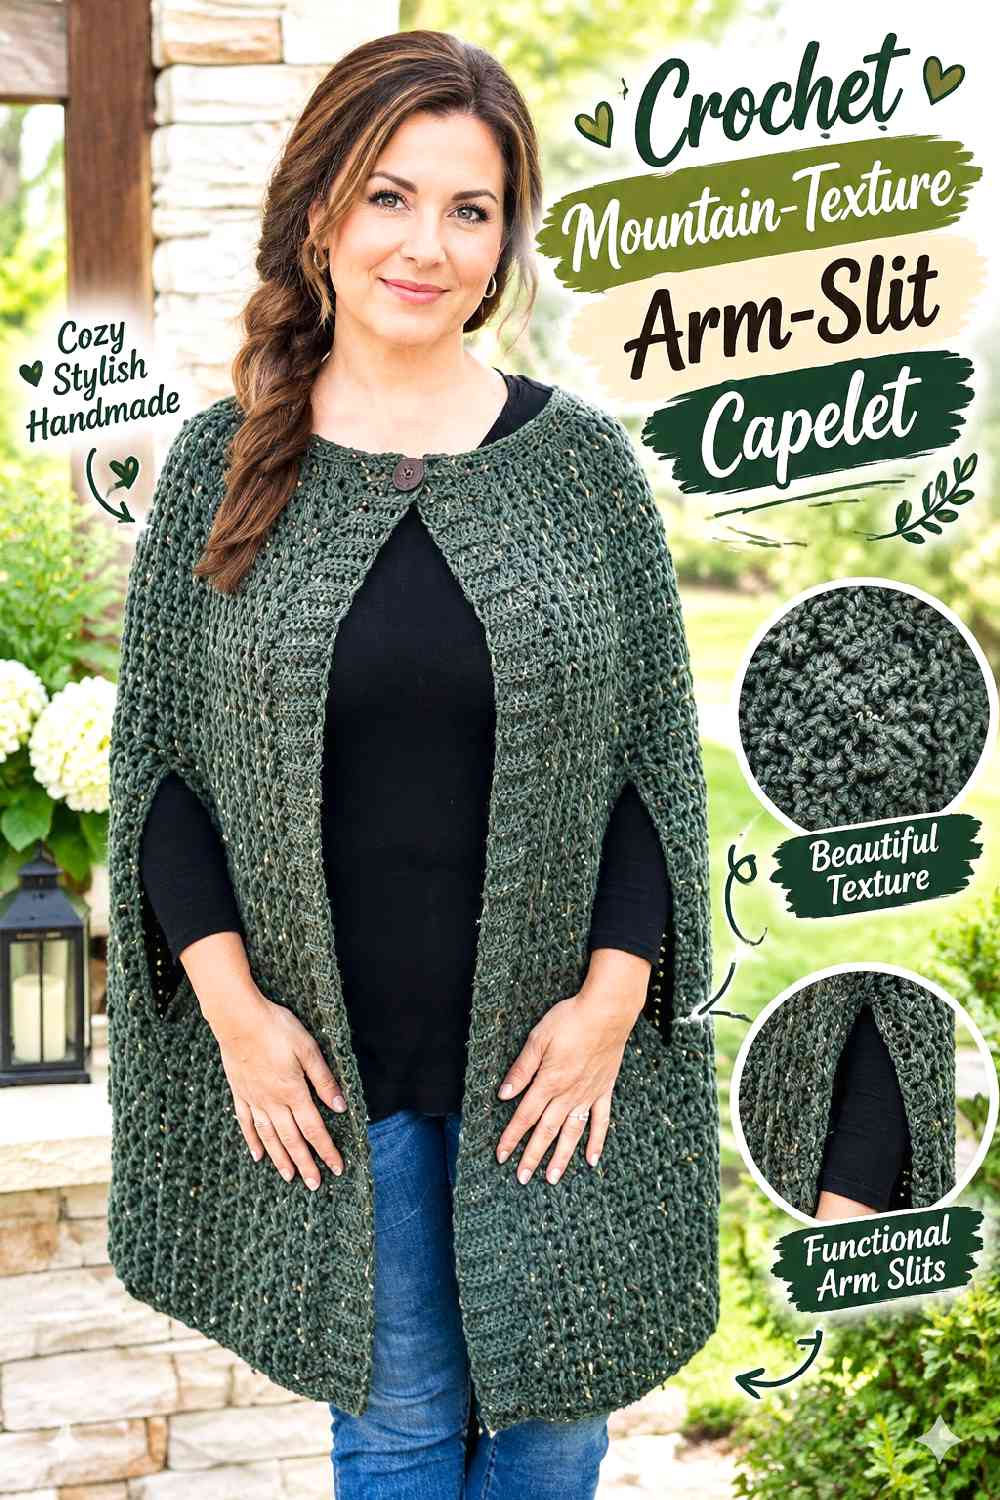
Heart Hook Home’s Cordillera Cape is a substantial one-piece design with arm openings and a textured stitch surface. Its original form extends farther than a conventional capelet, but the arm-slit construction makes it a valuable reference for readers who want a shorter woodland layer that still allows practical hand and arm movement.
A shortened interpretation could work well over a sweater dress or fitted winter layers, particularly in dark green, lichen gray, or mountain brown. However, the arm openings and edging are integrated into the design. Shortening should therefore be planned around their position rather than achieved simply by omitting fabric from the bottom.
Armholes Set a Minimum Useful Depth
Once a cape incorporates arm openings, there must be enough vertical space above and below them for the garment to remain balanced.
If your preferred capelet length would crowd those openings, choose another source rather than forcing a long-cape feature into too little fabric.
Texture Adds Visual Weight Without Extra Pieces
A raised or patterned surface can make a solid-colored garment feel detailed enough for storybook styling. That reduces the need for applied leaves, fringe, or contrasting motifs.
This is especially useful when the garment will be worn often and simpler care is desirable.
Reinforce Areas That Take Repeated Movement
Arm-slit corners can experience more handling than an uninterrupted hem. The original tutorial includes finishing around these openings, and that area deserves attention.
When changing yarn or scale, check the corners for stretching rather than assuming the surrounding fabric will automatically support them.
Creator Credit: Heart Hook Home
8. Crochet Plaid Storybook Child Capelet
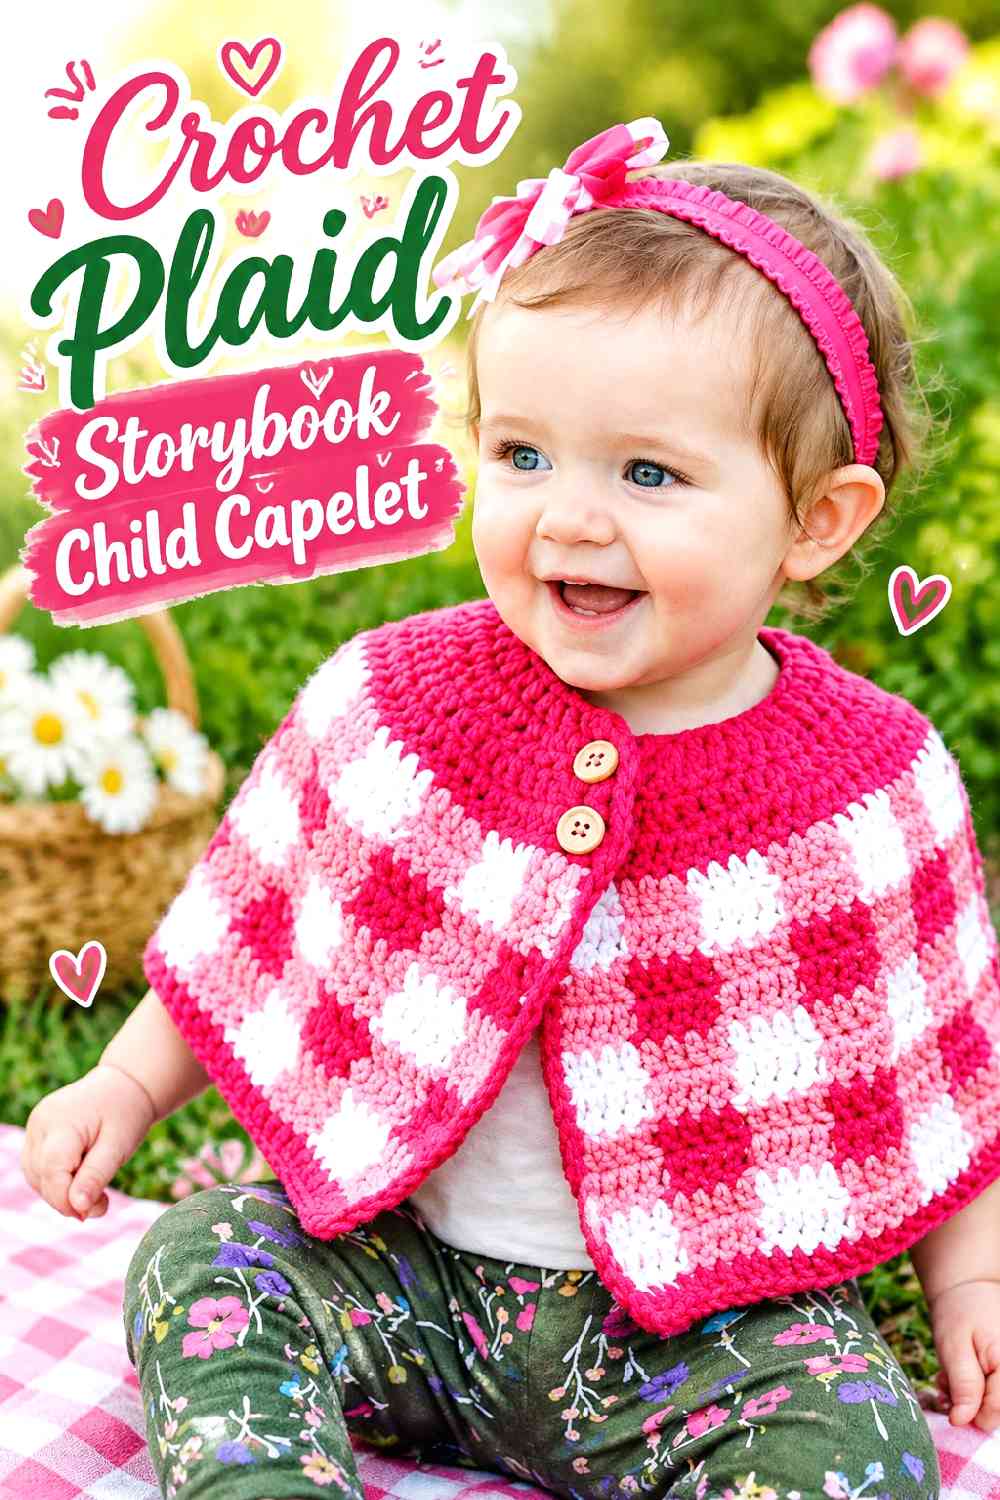
Winding Road Crochet’s child cape uses three-color plaid worked directly into the fabric and finishes with two buttons near the neckline. The tutorial includes baby, toddler, and girl sizing, so the proportions are designed specifically for younger wearers rather than scaled down casually from an adult piece.
Plaid is a useful woodland alternative to animal ears or novelty appliqués. Deep evergreen with moss and cream, brown with oatmeal and rust, or muted berry tones can suggest forest clothing while keeping the piece recognizable as an everyday cape. Because color changes are central to the design, yarn management and consistent tension matter more here than on a single-color capelet.
Plaid Depends on Consistent Color Blocks
A repeated plaid pattern exposes differences in tension and color-change placement quickly. Uneven blocks can make the entire fabric appear skewed even when the overall size is correct.
Work a meaningful swatch in the actual color sequence if you are substituting yarn with noticeably different thickness or texture.
Check the Closure for the Child’s Age
Buttons contribute strongly to the finished appearance, but they are still small attached components. Make sure they are securely sewn and appropriate for the intended wearer.
For very young children, avoid adding unnecessary dangling cords or extra detachable decorations simply to increase the fairytale effect.
Keep the Underlayer in Mind
Children’s winter clothes can be bulky relative to their body size. A capelet that fits over a thin dress may behave very differently over a sweater or coat.
Use the tutorial’s sizing information and gauge rather than choosing a size solely from the child’s age label.
Creator Credit: Winding Road Crochet
9. Crochet Back-Seam Ribbed Mantle Capelet
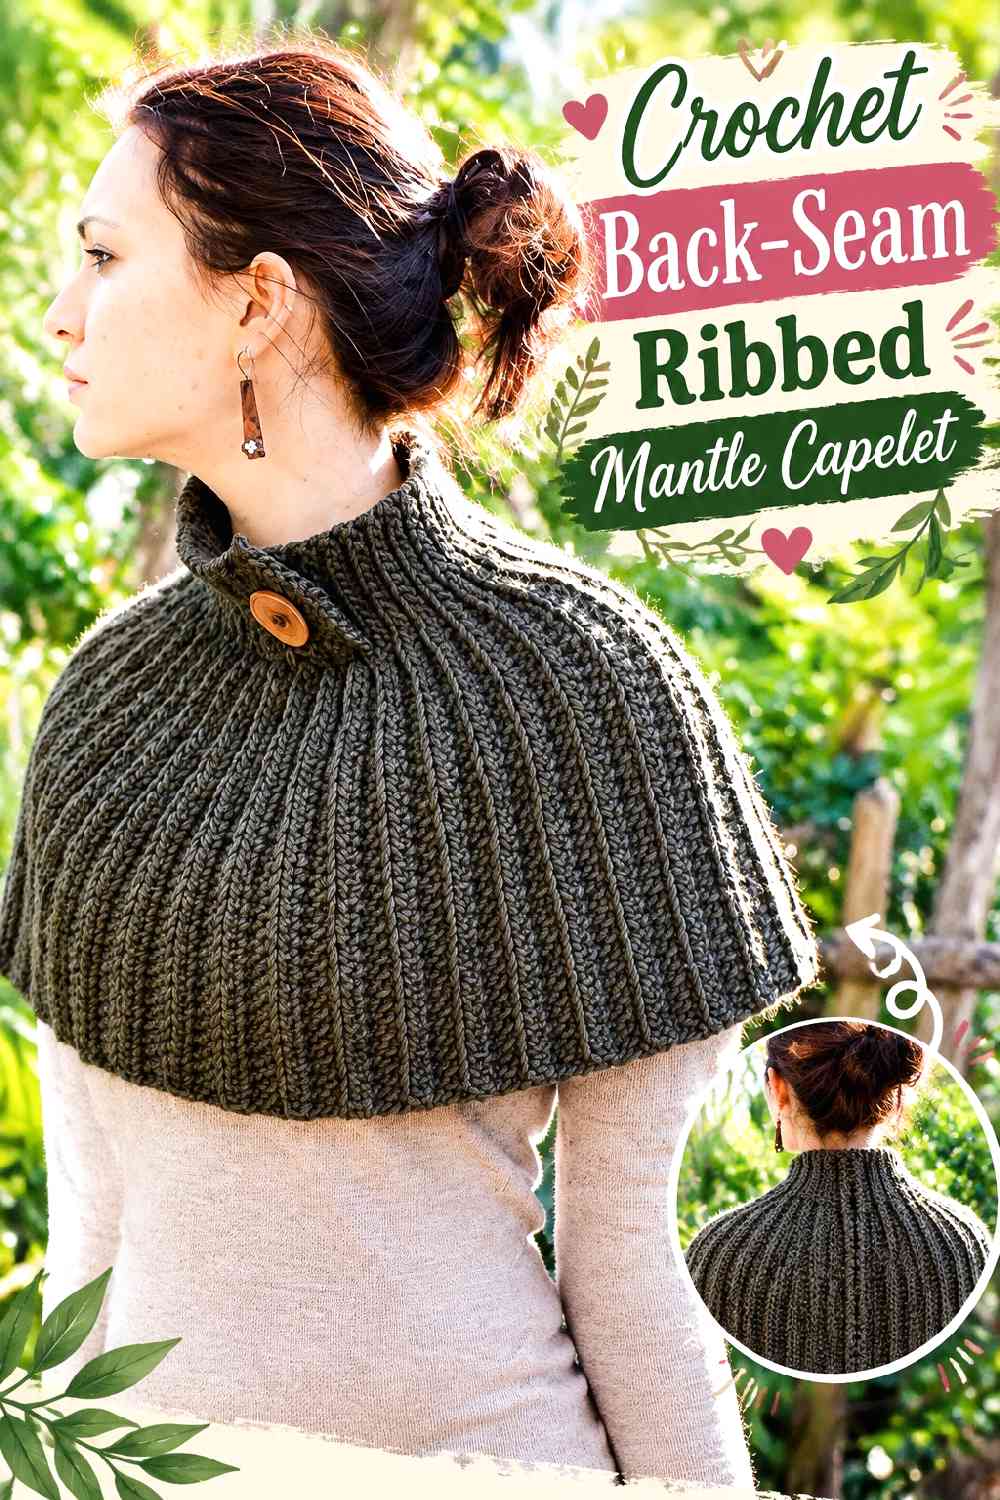
Airali Design’s Mantella takes a particularly economical construction approach: a ribbed rectangle is worked back and forth, then joined along the back to create the cape shape. The designer explains that the circumference can be adjusted depending on whether the garment is intended to sit over a coat or over lighter clothing.
That makes this a strong woodland choice for readers who want texture and shape without a hood, complicated motif layout, or several separate components. The ribbing gives the surface enough character for solid moss, bark, mushroom, or heathered yarn to feel deliberate. Its simple geometry also makes the difference between fit and fabric behavior especially important—the rectangle may be straightforward, but the finished drape still depends on tension and circumference.
Size for the Real Underlayer
The original design specifically recognizes that a cape worn over a coat needs different room from one worn over a shirt. That distinction is worth deciding before the rectangle grows large.
Measure around the intended layers rather than using a favorite capelet that is worn in a different season.
Back Seaming Controls the Final Fall
A rear seam converts a flat piece into a three-dimensional garment. If it twists or is joined under uneven tension, the lower edge may not hang symmetrically.
Align the rib columns carefully before closing the piece, then check the mantle on the wearer before adding optional trim.
Ribbing Makes a Quiet Woodland Texture
A solid natural color can look more complex when the ridges catch light and shadow. That is useful if you want a wearable woodland piece rather than obvious costume styling.
Avoid covering the ribbing with too many appliqués; surface additions can interrupt the feature that gives this construction its identity.
Creator Credit: Airali Design
10. Crochet Tri-Square Enchanted Capelet
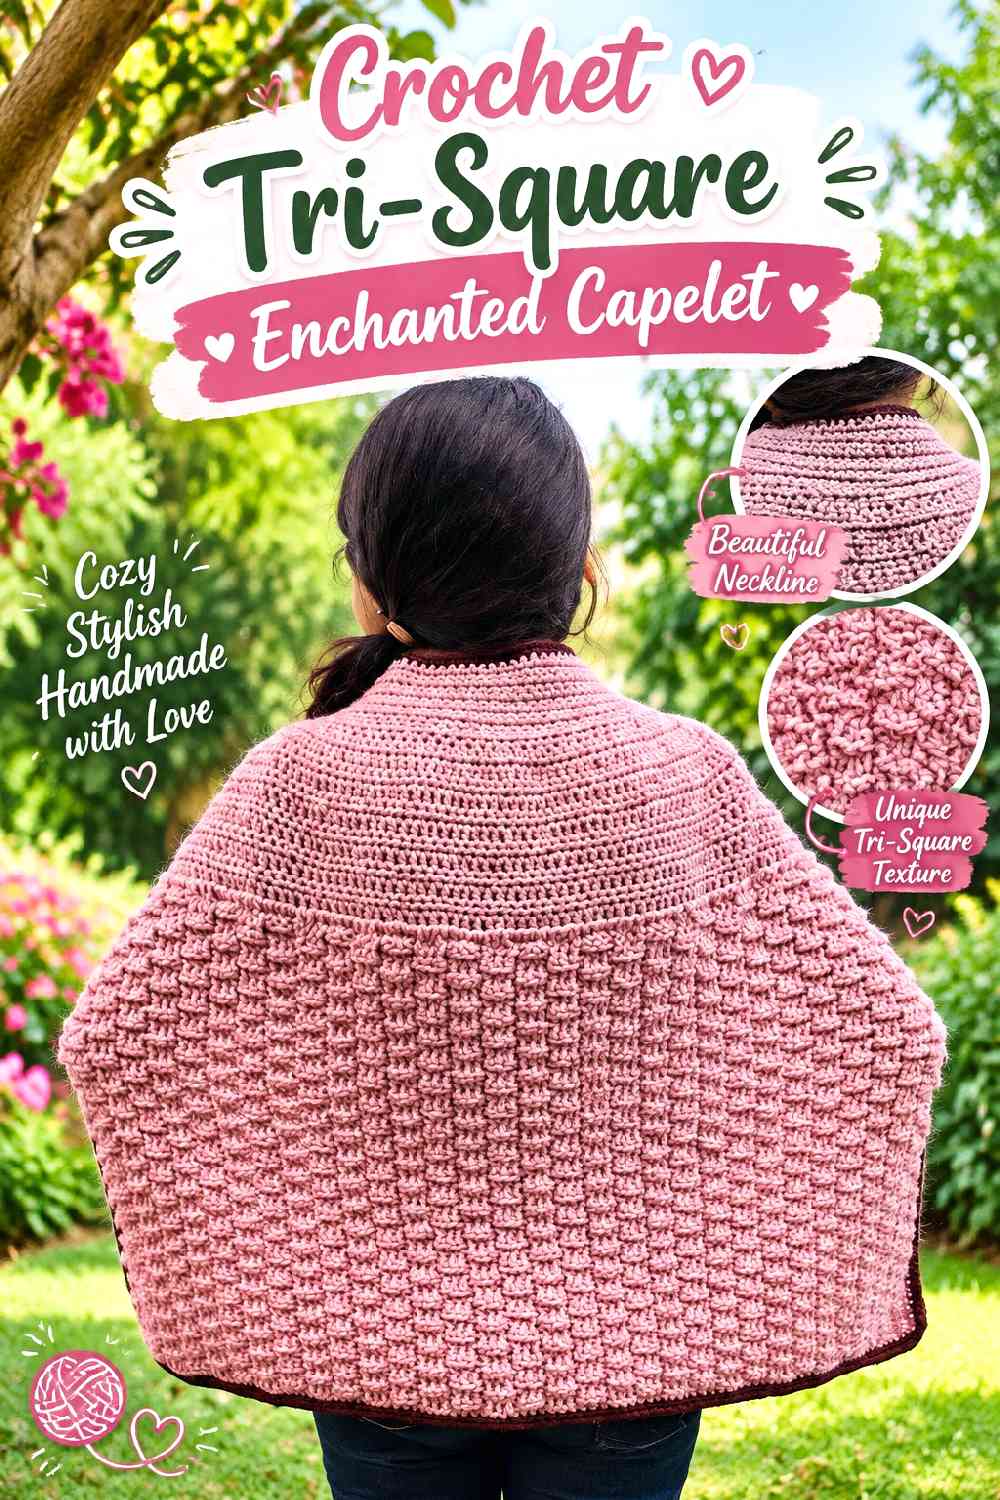
Two Brothers Blankets’ Enchanted Dreams Cape combines a top-down shape with a strongly textured post-stitch section, a collar, contrasting trim, and a decorative buckle-style front treatment. The original tutorial includes both adult and child size ranges, making it unusually broad compared with many one-size cape patterns.
The textured section gives this project an old-world quality that works naturally with storybook winter outfits. For a capelet interpretation, the main question is where the textured body can end without compressing the design into too little space. Rather than changing every feature at once, keep the collar and front treatment recognizable and use earthy color contrast to introduce the woodland direction.
Texture Needs Enough Length to Develop
A repeating post-stitch surface can look cramped if only a small fragment appears below the yoke. Before shortening, identify how much of the textured section is needed for the design to read clearly.
A slightly longer capelet with a complete repeat will usually look more intentional than an ultra-short version that cuts the texture abruptly.
Collar and Buckle Should Work as a Pair
The front treatment draws the eye directly to the neckline. If you replace the original closure or buckle concept, consider how the collar will look without it.
A woodland-style clasp can work, but it should fit the spacing and weight of the existing front rather than being attached only for decoration.
Child and Adult Versions Need Different Styling Decisions
A dramatic texture that feels sophisticated on an adult can read more costume-like at child scale. Conversely, oversized embellishments can quickly dominate a smaller garment.
Use the source’s age-appropriate sizing and keep added decorative pieces proportional to the wearer.
Creator Credit: Two Brothers Blankets
11. Crochet Zigzag Buttoned Child Capelet
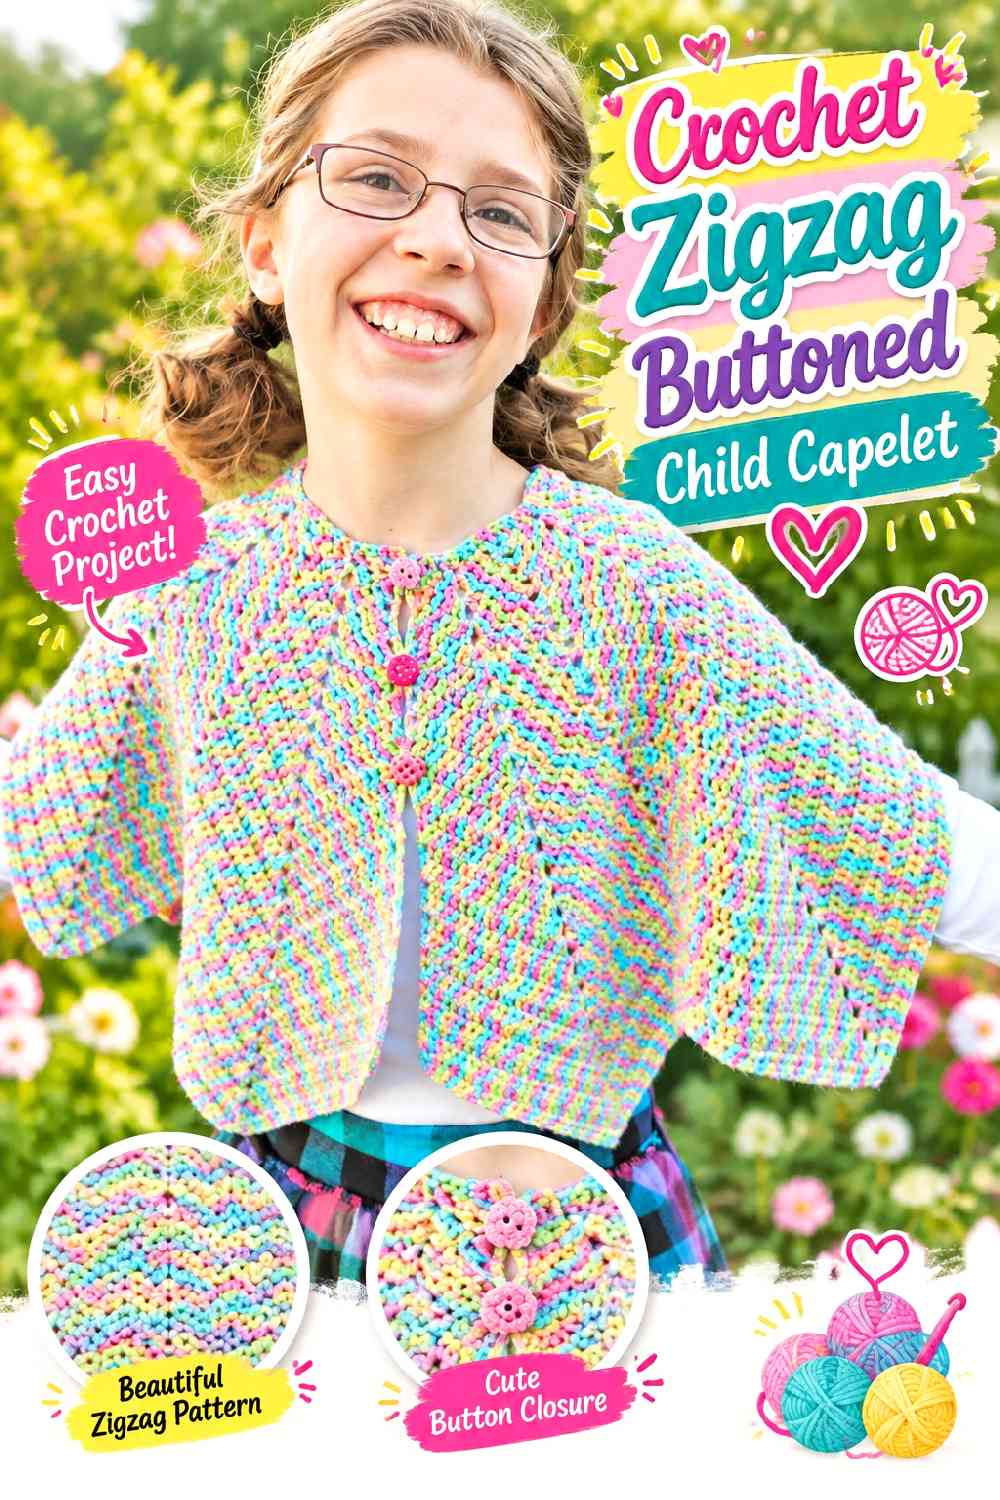
Jessie At Home’s Rainbow Hero Cape uses strategically placed increases to create a pointed, zigzagging lower shape rather than a conventional smooth circular hem. The original project is child sized, fastens with buttons, and can be extended in length by continuing the established pattern.
That pointed silhouette translates naturally to a woodland storybook theme because the hem already resembles stylized leaves or little peaks. A tonal forest palette could emphasize the shape without depending on rainbow color changes. This option is especially useful when a hood is unnecessary but the garment still needs a fantasy quality that distinguishes it from an ordinary shoulder wrap.
Let the Pointed Hem Be the Main Motif
The zigzag edge is already visually active. Adding fringe, scallops, large appliqués, and strong striping at the same time may obscure the clean rhythm of the points.
For a woodland version, consider using color to support the geometry rather than layering new shapes over it.
Length Changes Affect the Scale of the Points
Continuing an increase pattern does more than make the garment longer; it also changes the overall spread and visual scale.
Check the cape periodically on the wearer so that added length does not produce more width than the intended outfit can comfortably accommodate.
Buttons Need Secure Finishing
Natural spaces in crochet can sometimes function as buttonholes, but the fabric around them still experiences repeated pulling.
For a child’s cape, check the button attachment and surrounding stitches regularly, and keep additional small decorative pieces to a minimum.
Creator Credit: Jessie At Home
12. Crochet Full-Circle Picot Winter Capelet
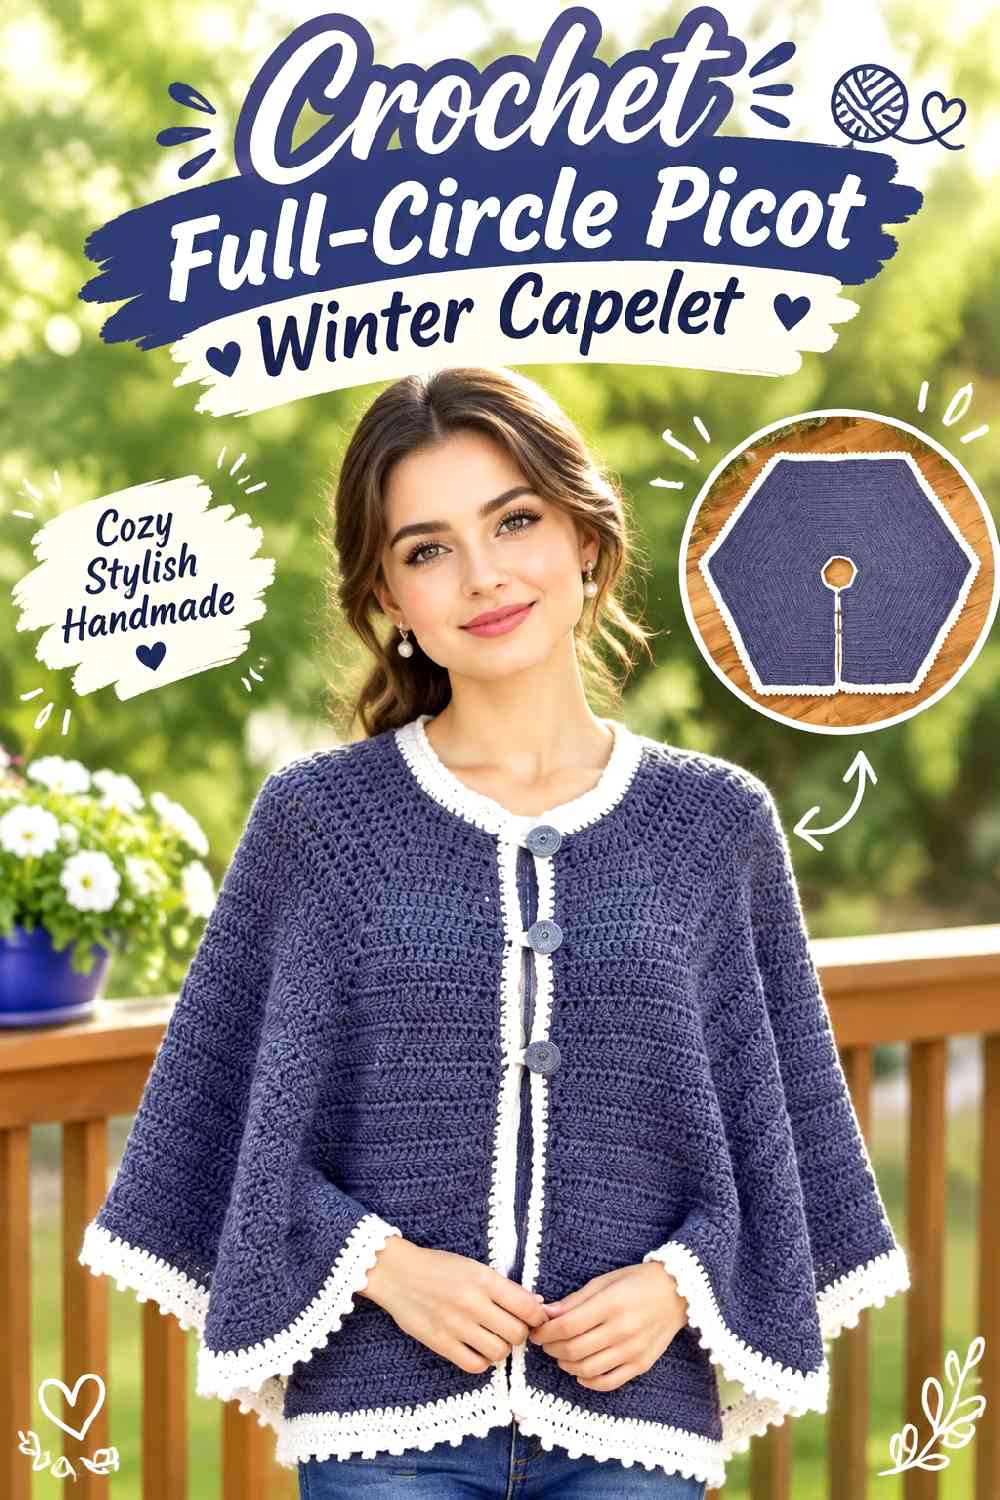
Stitches n Scraps’ Icing on the Cape uses a full-circle construction to create generous movement around the body, then emphasizes the lower edge with a contrasting border and picot finish. The circular shape distinguishes it from straight wraps and paneled capes because the fabric naturally spreads around the wearer rather than hanging from two main vertical sections.
For a woodland palette, the contrasting lower section could resemble frost along moss, pale lichen against bark, or snow at the edge of a dark forest color. The circular construction provides enough visual drama that the project does not need a hood to feel storybook-inspired.
Full-Circle Fabric Needs Room to Move
A generous circumference creates swing and drape, but it also uses more fabric around the body than a narrow capelet.
Check how the hem behaves near chair arms, bags, and coat sleeves if the garment will be worn for everyday activities rather than mainly for occasions.
Contrast Works Best When the Border Has a Clear Job
The original design uses a noticeably different lower edge. For woodland styling, decide whether the border should suggest frost, leaf litter, bark, or simply frame the silhouette.
Choosing one purpose helps prevent the color scheme from becoming an arbitrary collection of earthy shades.
Picots Add Detail Without a Heavy Fringe
Small points create a decorative outline while keeping the hem visually light. That suits a circular cape because the edge is already long and prominent.
If your yarn is very fuzzy or highly variegated, check whether the picots remain visible enough to justify the extra finishing work.
Creator Credit: Stitches n Scraps
13. Crochet Chunky Cowl-to-Capelet
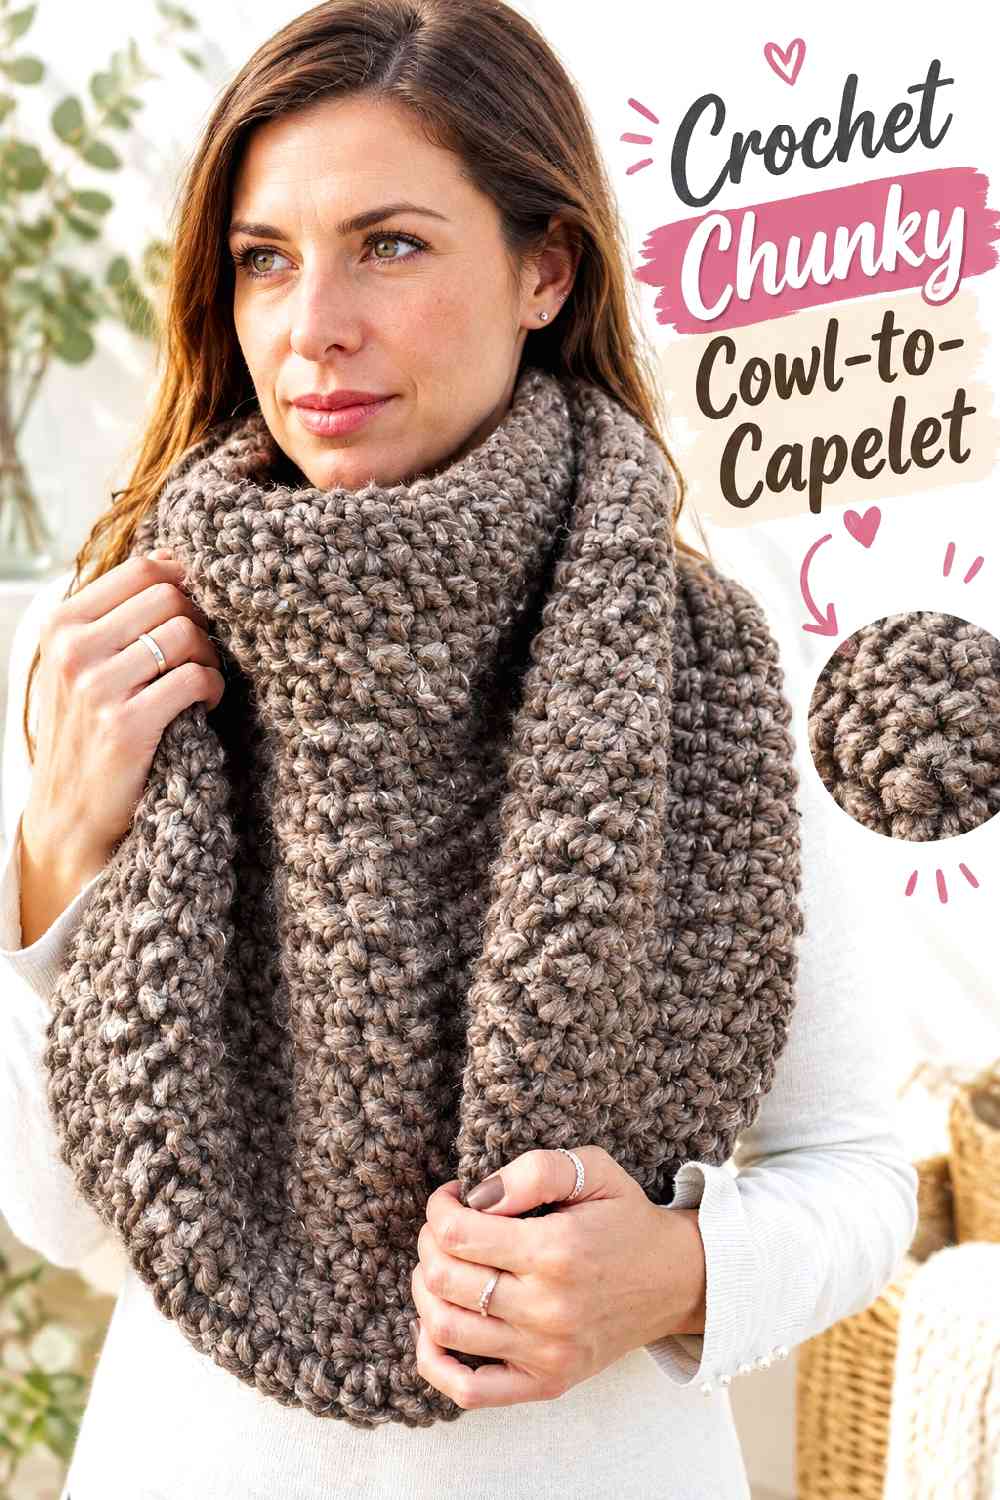
The Make A Hug design from mallooknits sits between an oversized cowl and a shoulder capelet. It is worked in joined rounds, expands to fit over the shoulders, and can be worn raised around the neck or opened lower as a compact capelet. The original tutorial also explains how to check the shoulder reach when adjusting size.
This is one of the simplest woodland silhouettes in the collection, but that simplicity can be useful. In a thick heathered brown, spruce, oatmeal, or stone yarn, the broad collar itself becomes the visual feature. It suits readers who want a warm-looking storybook layer without a hood, buttons, pockets, multiple panels, or complicated finishing.
Shoulder Fit Is the Key Checkpoint
Because the piece transitions from neckwear to capelet, the increase section determines whether it actually reaches the shoulders correctly.
Follow the creator’s fit-check approach rather than adding rounds automatically. Too little expansion restricts the capelet; too much can make it fall away from the body.
Chunky Yarn Adds Volume Quickly
Thick yarn creates a substantial silhouette with relatively little fabric depth. That is ideal for a compact winter layer, but it can also feel bulky beneath a close-fitting coat.
Think of this as a top layer over a sweater or dress unless your outerwear has enough room to accommodate it.
Minimal Construction Invites Better Yarn Choices
With no elaborate motif competing for attention, fiber texture and color become especially visible.
A tweedy, marled, or gently heathered yarn can add woodland complexity without requiring extra crochet decoration.
Creator Credit: mallooknits
14. Crochet Four-Panel Watercolor Lace Capelet
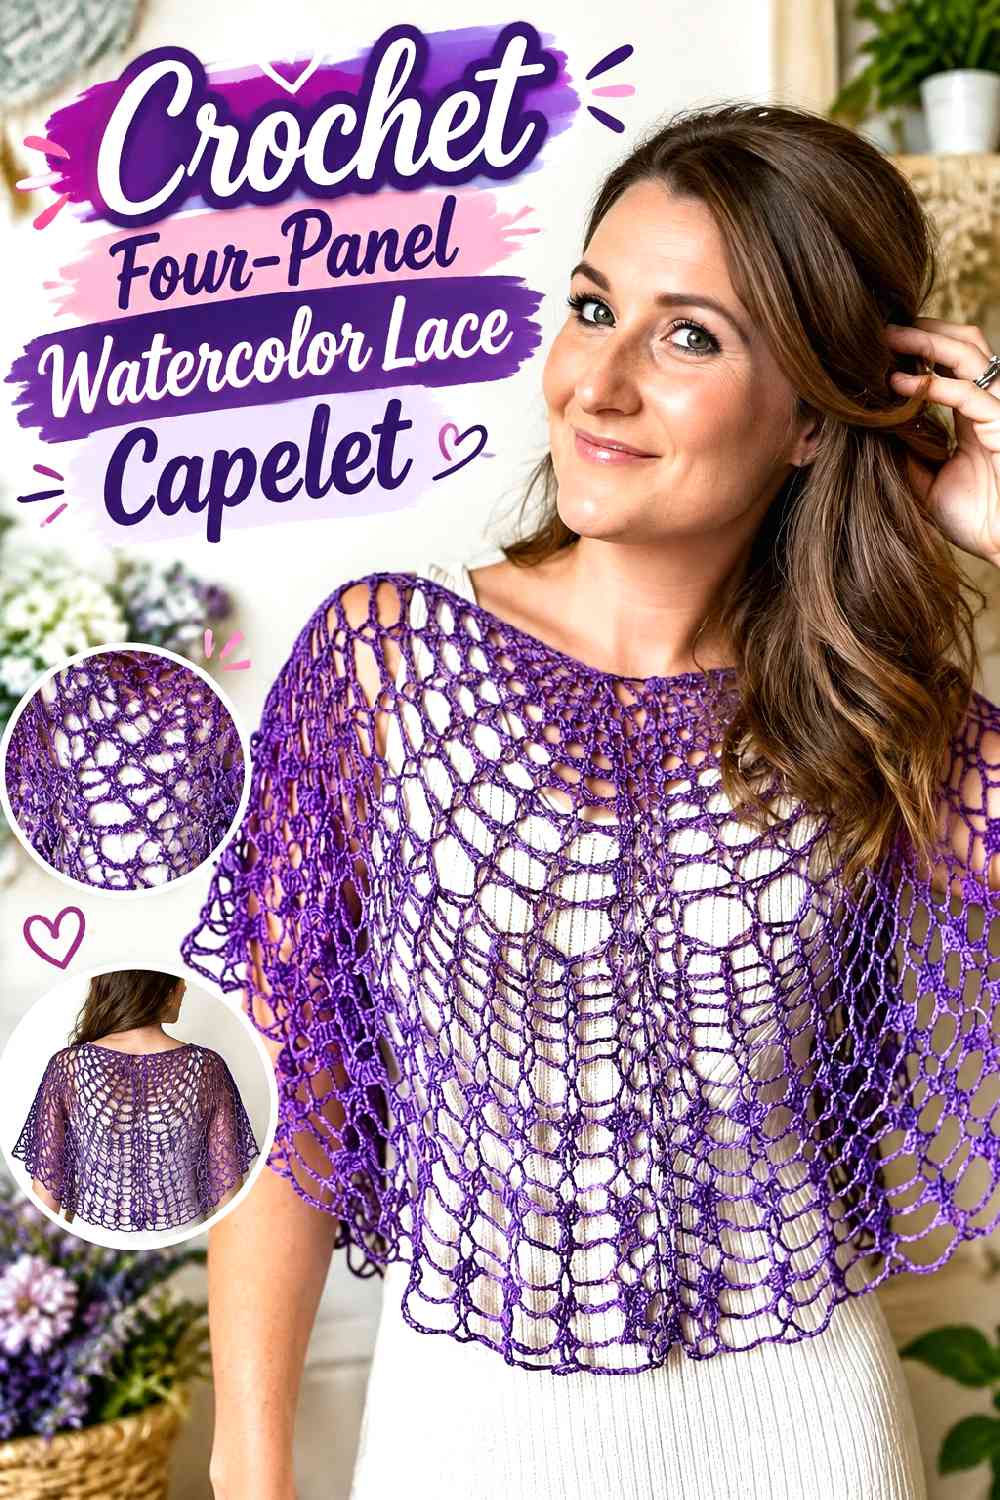
HanJan Crochet’s lace cape is built from four matching quarter-circle panels that are joined and tied to create several wearable configurations. The same components can function as a traditional cape, a different top-like arrangement, or a shawl, so construction and styling are unusually intertwined.
For a woodland winter outfit, this is the lightest and most ethereal direction in the list. Work it as a decorative layer over a warmer dress or sweater rather than expecting the open lace itself to provide substantial insulation. The quarter-circle construction is also useful for crocheters who would rather manage several smaller lace pieces than one very large expanding semicircle.
Matching Panels Matter More Than Individual Perfection
When repeated pieces are joined, small differences in size become visible along the seams and outer curve.
Block or measure the panels consistently before joining them. Correcting one noticeably larger section is easier before the cape has been assembled.
Ties Allow Styling but Need Deliberate Placement
The tie system is part of what makes several configurations possible. Changing tie length or location can alter how the cape closes and where the panels sit.
Test the intended storybook arrangement before making decorative replacements such as ribbons or cords.
Lace Yarn Substitution Can Change the Entire Mood
A fine, fluid yarn produces a very different cape from a thicker, more rustic substitute. Increasing yarn weight can reduce the delicate negative space and enlarge each panel.
If you want a warmer-looking woodland effect, use color and underlayers first rather than assuming a much heavier yarn will preserve the original proportions.
Creator Credit: HanJan Crochet
Comparing the Woodland Capelet Styles
The best choice depends less on a specific woodland color and more on how you want the garment to behave. For maximum storybook drama, compare the hooded crescent, entrelac, fan-lace, and compact fantasy capelets. For practical movement, the arm-slit designs stand apart. The ribbed mantle, chunky cowl, and short Brontë-style cape are better choices when you want an old-world layer without a hood.
Conclusion
Crochet woodland capelets can range from barely-there lace shoulders to chunky cowls, plaid child capes, sculptural cable work, and dramatic hooded layers. Start by choosing the silhouette that fits the intended outfit and use first. A short ribbed or openwork capelet keeps a dress visible, an arm-slit version is easier to move in, and a hood immediately pushes the look toward fairytale territory.
After that, let texture and color create the woodland character. Ribbing can suggest bark, post stitches can resemble vines or branches, lace can feel like frost or foliage, and muted greens, browns, berries, creams, and grays can establish the setting without extra decoration. For exact sizing, repeats, shaping, closures, and construction, follow the linked creator tutorial for the project you choose rather than trying to reconstruct the design from its finished appearance.
Frequently Asked Questions
Can I shorten a crochet cape pattern into a capelet?
Often, but not every cape can simply be stopped at an arbitrary row. Check whether the original design contains a cable motif, lace repeat, arm opening, pocket, border, or shaping sequence that depends on the stated length. Top-down plain designs may offer more flexibility than motif-heavy or paneled constructions. Decide the desired depth first, then identify a natural stopping point within the creator’s construction rather than cutting off a feature that is meant to be completed.
Which capelet shape works best over a winter dress?
A short full-circle, ribbed, or openwork capelet can work well when you want the waist and skirt to remain visible. Hooded shawl shapes provide more storybook drama but can cover more of the upper dress. If the dress has a large collar, embellished neckline, or puffed sleeves, compare those features with the capelet before choosing. The most successful pairing is usually one where the garment frames rather than conceals the details you want to show.
Can I use thicker yarn to make a woodland capelet warmer?
Only when the original pattern and gauge can accommodate the change. A heavier yarn can increase thickness, but it can also make the garment wider, stiffer, and heavier at the neck. Hoods and full-circle capes are especially sensitive to added weight. Instead of automatically moving to a much thicker yarn, consider using a warm underlayer or choosing a tutorial already designed for a substantial yarn. Always compare your swatch with the source gauge and measurements.
Are hooded or collar capelets better for everyday wear?
That depends on how the piece will be used. A hood provides head coverage and a stronger fantasy silhouette, but it also adds weight and bulk behind the neck. A high collar or ribbed cowl is usually more compact and can be easier to layer beneath outerwear. If the capelet will mostly be worn indoors or for occasions, a dramatic hood may be worth prioritizing. For regular layering, a collar-based construction may be easier to combine with coats and bags.
How can I make a capelet look woodland-inspired without adding animal ears?
Use construction and material cues instead of literal costume features. Bark-like ribbing, raised post stitches, fan lace, leaf-shaped texture, heathered yarn, wooden-looking buttons, or restrained natural colors can establish the mood on their own. A moss-and-cream cape can read as woodland even with no appliqués. This approach also makes the garment easier to wear beyond themed occasions and avoids loading a hood or neckline with unnecessary extra weight.
What should I check when making a woodland capelet for a child?
Start with the creator’s sizing and gauge rather than estimating from age alone. Check that the neckline does not depend on a tight fit to keep the cape in place and that arm openings, if present, allow comfortable movement. Buttons, toggles, and other attached pieces should be secured carefully and selected with the intended child in mind. Avoid unnecessary long cords and loose detachable embellishments, particularly for younger children, and supervise costume-style wear when appropriate.