A crochet haunted village becomes much more interesting when every building does not look like the same little house in a different color. Roof shape, height, doorway style, storage function, hanging format, and three-dimensional structure can all change how a finished building contributes to the scene.
The 19 ideas below include an actual Halloween witch house, pumpkin houses, woodland mushroom cottages, miniature ornaments, functional containers, a classic cottage, and several non-Halloween house tutorials that can be adapted through color and styling. Those adaptation projects are identified as such rather than presented as original haunted-house tutorials.
Think of the collection as a set of architectural starting points. A warm gingerbread cottage can become an abandoned candy shop with charcoal walls and acid-green trim. A cheerful mushroom home can move into a witchy forest when surrounded by dark leaves and miniature pumpkins. A conventional cottage can become the quiet old house at the edge of the village simply by changing the palette and surrounding display.
For exact construction, measurements, materials, and assembly, follow each original creator’s tutorial.
Quick List
- Crochet Witch’s Treat House Centerpiece
- Crochet Jack-o’-Lantern Fairy House
- Crochet Spotted Mushroom Haunted Cottage
- Crochet Mushroom House Storage Basket
- Crochet Mini Mushroom House Pouch
- Crochet Lidded Mushroom Accessory House
- Crochet Pumpkin House Pot
- Crochet Gnome Home Drawstring Cottage
- Crochet Classic Haunted Seaside Cottage
- Crochet Crooked Gable Haunted House
- Crochet Tall Gothic Village Manor
- Crochet Mini Candy-Style Haunted House Ornament
- Crochet Old-Fashioned Haunted Gingerbread Cottage
- Crochet Detailed Haunted Candy Mansion
- Crochet Stuffed Mini Haunted House Ornament
- Crochet Flat Haunted House Appliqué
- Crochet Haunted House Treat Box
- Crochet Tiny Haunted House Garland Ornament
- Crochet Narrow Hanging Haunted Cottage
Build the Village Around Shape, Not Matching Patterns
A convincing haunted village usually benefits from an obvious visual hierarchy. Pick one substantial house as the main building, add two or three medium-height cottages, then fill the foreground with smaller ornaments or low mushroom and pumpkin homes. If every building has the same height and roof pitch, the finished scene can resemble a row of copies rather than an old settlement that grew over time.
Place houses together temporarily as you finish them. A wide mushroom cap may occupy more visual space than a taller narrow cottage, while a dark house can appear heavier than a similarly sized pale one. Actual visual balance matters more than trying to make every tutorial produce mathematically identical scale.
Rooflines are especially useful for creating variety. Combine pointed gables, rounded pumpkin tops, mushroom caps, traditional pitched roofs, and flatter ornament silhouettes. Doors and windows can then provide repeating details that tie the collection together.
Plan Structure, Lighting, and Seasonal Storage Early
Decide whether your village will be handled or simply displayed. A pouch, basket, treat house, or box needs accessible openings, while a decorative house can be positioned primarily for its best viewing angle. Avoid surrounding functional buildings so tightly that you have to dismantle the scene every time you open one.
If you want glowing windows, treat lighting as a separate display decision rather than assuming every crochet house is designed around a light source. Use only an appropriate cool-running, battery-operated light arrangement, keep it away from loose fibers when required by the product instructions, and never put an open flame inside or beside crochet.
Storage matters too. Flat appliqués and ornaments take little room after Halloween, while stuffed cottages, mushroom roofs, and dimensional embellishments need more protection. If you expect to build the village over several years, leave enough storage space that pointed roofs and attached details are not crushed between seasons.
Turn Cottage and Gingerbread Tutorials Into Halloween Houses Without Hiding the Architecture
Several tutorials in this collection teach fairy houses, conventional cottages, or gingerbread houses rather than Halloween buildings. Their value is the construction: walls, rooflines, boxes, ornaments, and miniature architectural forms that can become part of a spooky village through reversible styling choices.
Start with color rather than structural changes. Charcoal, faded purple, brown, olive, rust, cream, dark red, and muted orange can shift a sweet cottage toward Halloween while keeping the creator’s construction intact. Bright contrasting windows can suggest an illuminated interior without requiring you to alter the house pattern.
Be careful with excessive embellishment. Covering every surface with webs, pumpkins, bats, and ghosts can obscure the building shape. One crooked-looking door color, a dark roof, a contrasting window treatment, or a few separately made village props can establish the theme while letting the original house remain recognizable.
1. Crochet Witch’s Treat House Centerpiece
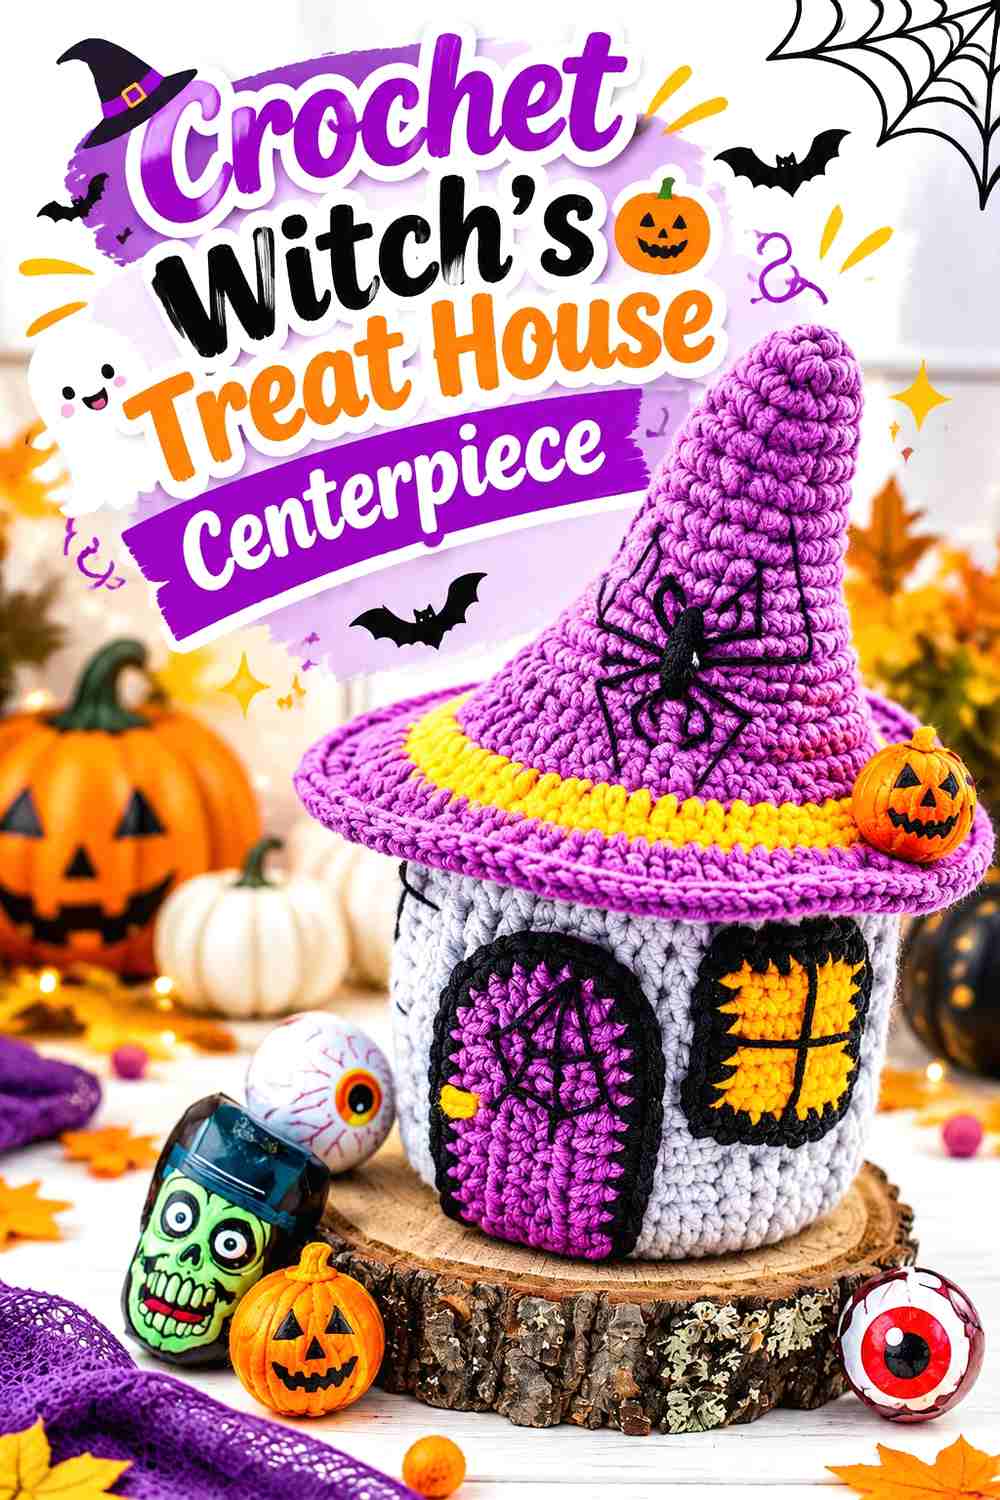
This three-dimensional witch house is the most direct haunted-village starting point in the collection because the original project is already designed as Halloween decor. The defined base, roof, windows, doorway, and spooky exterior details give it enough architectural presence to work as the village’s main building rather than another small background cottage.
The house also has treat-holding potential in the creator’s design. That makes it useful for a Halloween entry table or party display where one building can serve both decorative and practical roles.
Let This House Set the Village Scale
Complete the centerpiece before committing to several other houses if possible. Once it is on the shelf, you can judge whether later cottages need thinner yarn, a smaller footprint, or simply a lower position in the display.
Avoid lining every building up against the facade. Give the main roof enough open space to remain visible, then stagger small houses or village props toward the sides and foreground.
Keep the Openings Visible in a Dark Palette
Deep gray, black, plum, and dark brown can create an effective haunted palette, but using several similar dark values together may cause the door, roof, and windows to merge.
If you want a nearly black house, preserve enough contrast around one or two architectural features. A lighter or brighter window area can often communicate the spooky-house idea more clearly than adding numerous small embellishments.
Treat Access as Part of the Display
If you plan to use the house for treats, do not bury its usable opening behind other crocheted buildings. Keep enough clear space to reach it without knocking over the village.
If it will be display-only, you have more freedom to rotate it toward the strongest facade and position smaller props near the entrance.
Creator Credit: KnittingKitty
2. Crochet Jack-o’-Lantern Fairy House
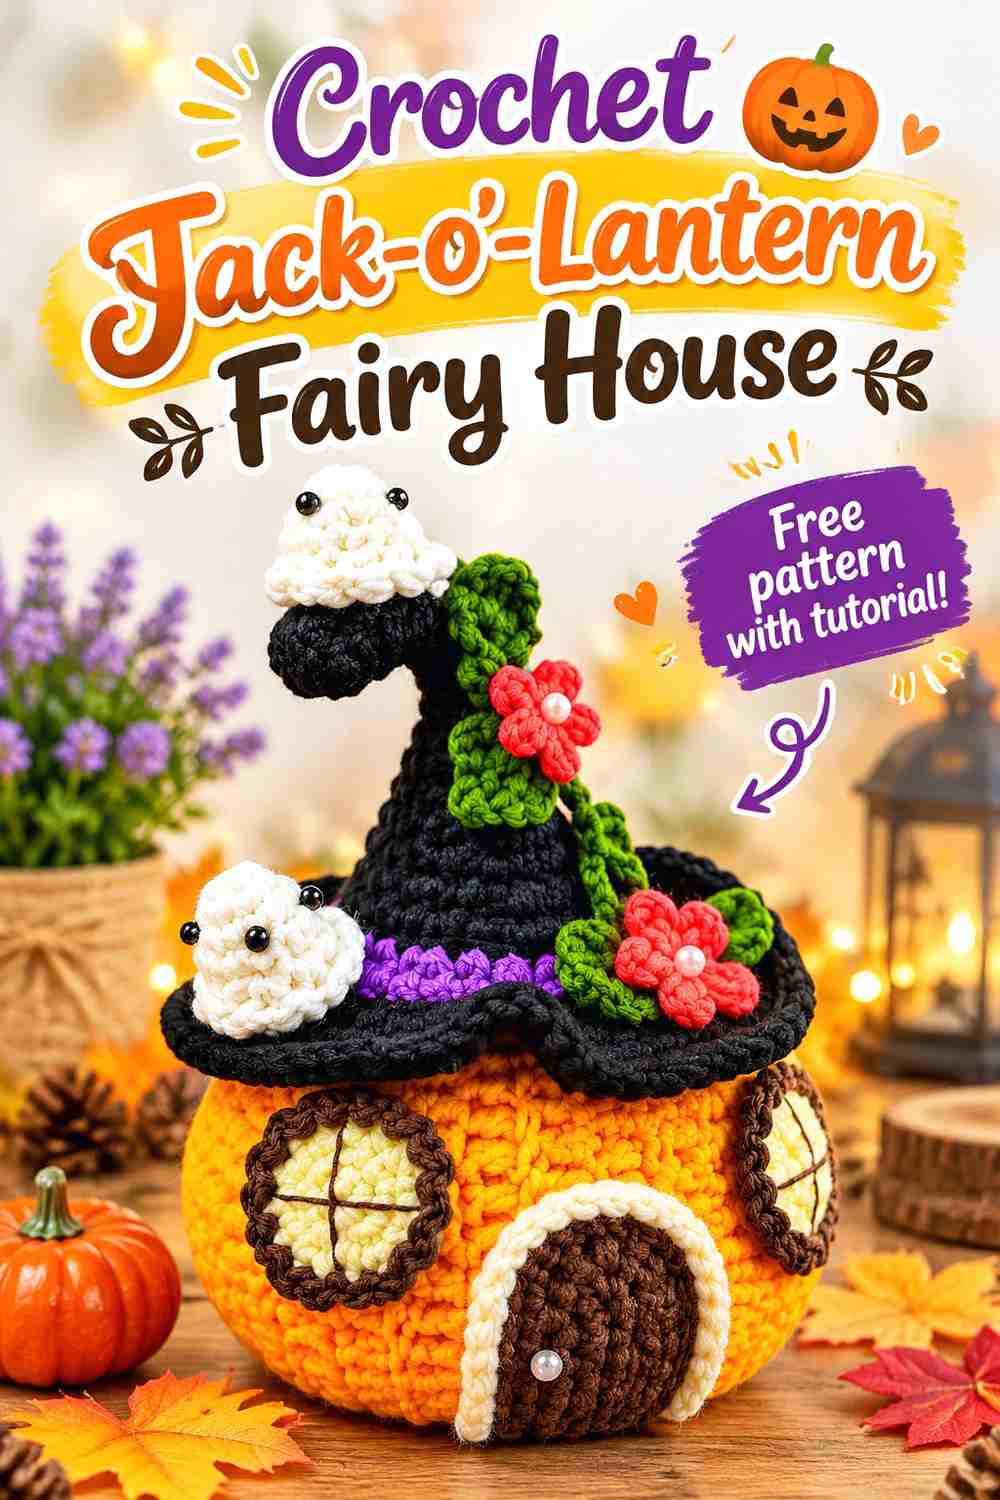
A pumpkin transformed into a tiny home gives a Halloween village an entirely different silhouette from a conventional cottage. The rounded body reads as seasonal immediately, while the doorway turns the pumpkin from a generic autumn decoration into a piece of miniature architecture.
This works especially well near the edge of a village where you want the buildings to transition into a pumpkin patch, witch garden, or woodland area.
Make the Door Read Before the Pumpkin Details
The house identity depends heavily on the doorway and other architectural details. If the front becomes visually crowded, viewers may see only a decorated pumpkin.
Step back from the display while planning colors. The door should still be recognizable from normal viewing distance even when the pumpkin body is the dominant shape.
Use the Rounded Shape to Break Up Straight Rooflines
A row of rectangular houses can become visually rigid. Placing this pumpkin home between two pitched-roof cottages gives the skyline a useful dip and creates the impression that different kinds of creatures inhabit the village.
It can also sit slightly forward because its low, broad form is less likely to hide the roof of a taller building behind it.
Decide Whether the Mood Is Cute or Eerie
This project can move in either direction without changing its basic structure. Bright orange and clean contrast create a playful Halloween village, while burnt orange, brown, olive, and darker trim produce a more subdued woodland look.
Choose that direction before making several surrounding buildings so the pumpkin house feels intentional rather than accidentally brighter than everything around it.
Creator Credit: Zan Crochet
3. Crochet Spotted Mushroom Haunted Cottage
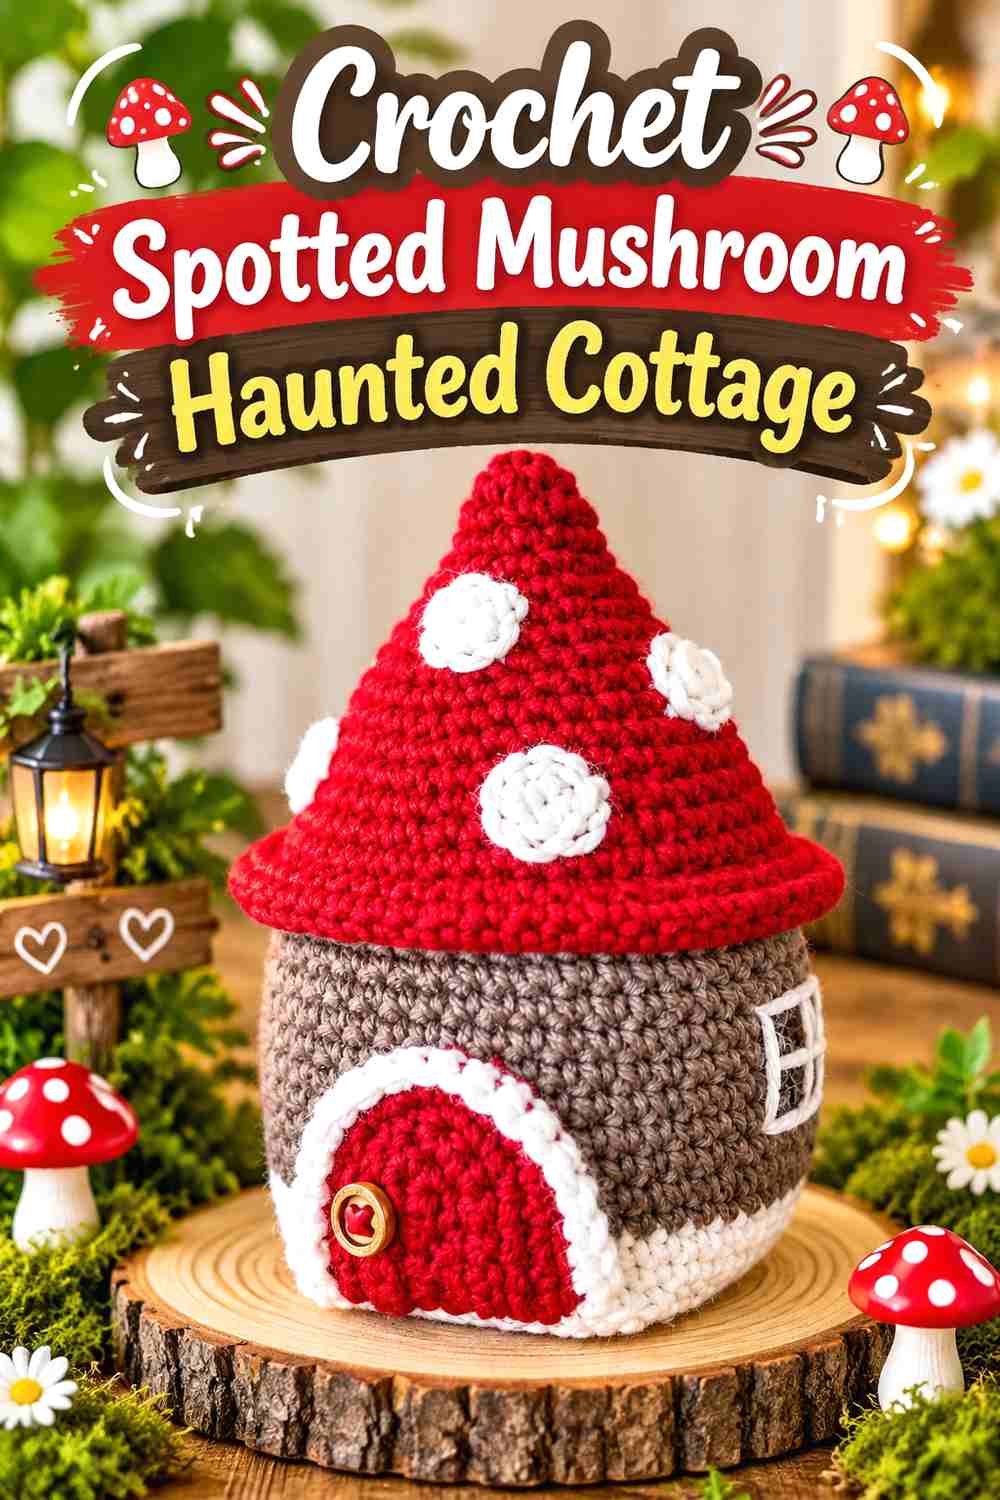
A mushroom fairy house gives the village a woodland section with a roofline no ordinary cottage can provide. The broad cap makes the building feel sheltered and slightly mysterious, particularly when it is placed near crooked trees, tiny pumpkins, or darker forest-inspired pieces.
The original tutorial is a fairy-house project rather than a Halloween-specific design, so the haunted effect comes from palette and placement rather than changing the creator’s construction.
Keep the Mushroom Cap as the Main Silhouette
Avoid adding so much roof decoration that the characteristic mushroom shape disappears. The rounded cap is already the project’s strongest architectural feature.
For a haunted interpretation, a dark red, brown, plum, gray, or muted green cap can do more than a large collection of added motifs. Smaller contrasting spots can remain visible without turning the roof into the busiest object in the village.
Build a Woodland District Around It
This house is particularly useful when you do not want every building to look urban or Victorian. Place it beside the other mushroom cottages, then let pumpkin houses form the transition back toward more traditional village buildings.
That grouping creates a believable change in scenery while keeping the entire display crochet-based.
Watch the Relationship Between Roof and Base
The roof is visually wider and heavier than the house beneath it. Give the piece enough surrounding room that another object does not cut across the cap outline.
A small amount of negative space can make this house look more substantial than squeezing several tiny props against its walls.
Creator Credit: Darya CrochetLife
4. Crochet Mushroom House Storage Basket
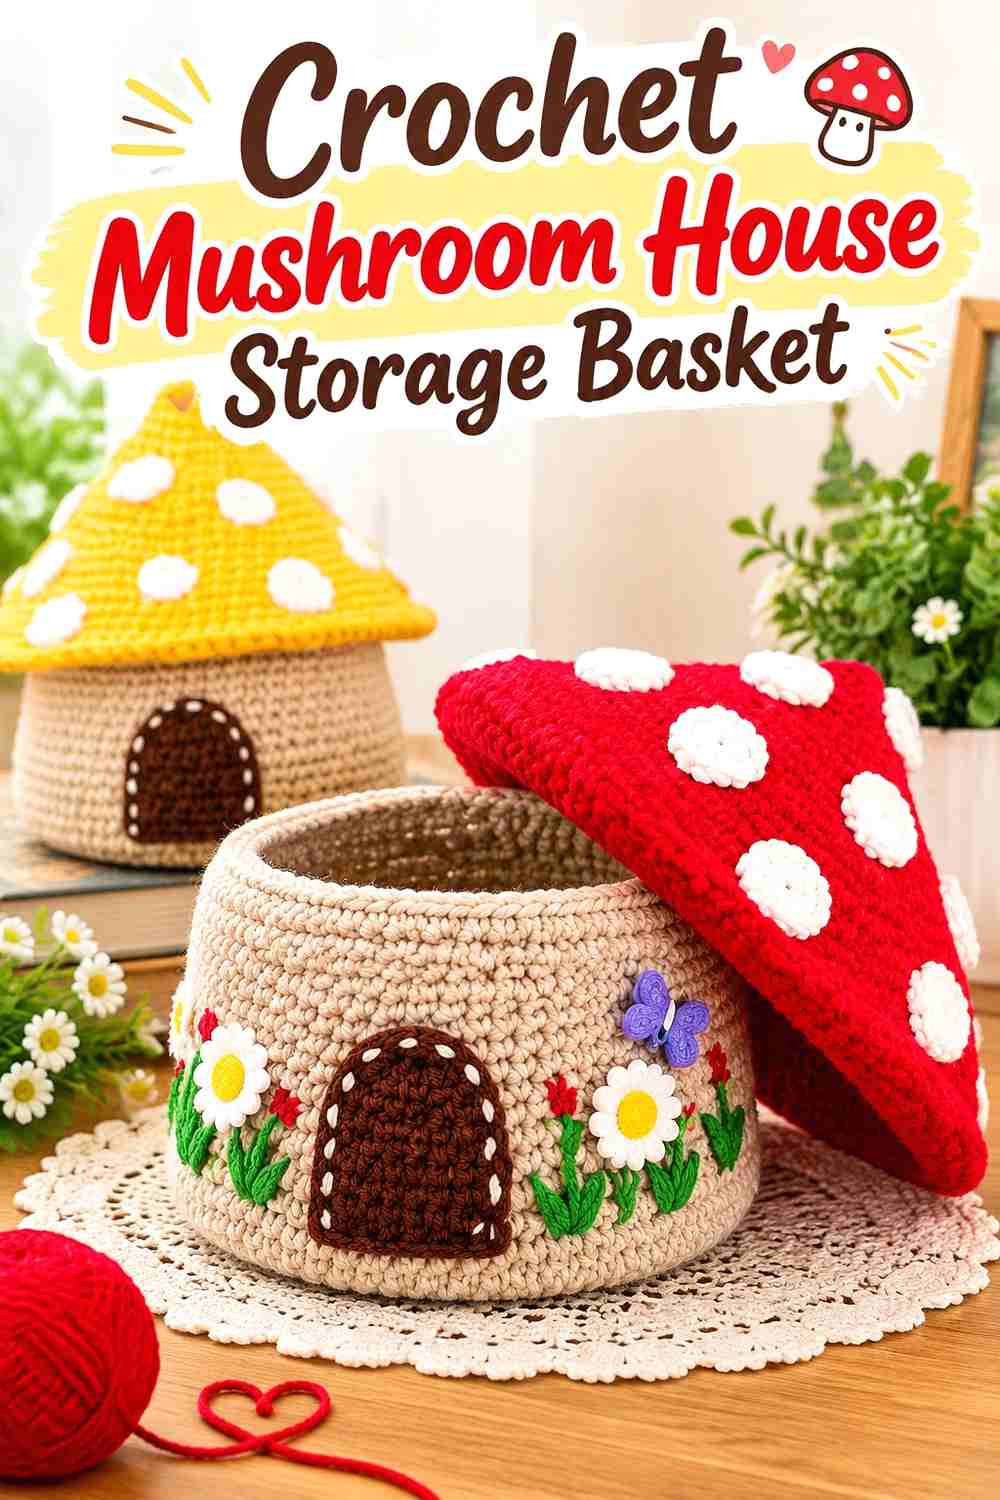
This mushroom house introduces useful storage into the village. The original design is a storage basket with a mushroom-house appearance, so it can hold small, lightweight items while still reading as part of a woodland settlement.
Its wider container form also gives the display a grounded building that contrasts nicely with tall hanging ornaments and narrow cottages.
Keep the Opening Practical
If you actually want to use the basket, place it somewhere the top remains accessible. A dramatic cluster of miniature trees around it may look appealing but can turn opening the container into an awkward process.
For display-only use, you can prioritize the front door and cap angle instead.
Let Function Decide Its Position
Storage buildings usually make more sense toward the side or front of the village than directly behind several delicate objects. That gives you access without rearranging everything.
It can also work as the village “shop” or woodland supply house simply through surrounding scenery, without modifying the underlying pattern.
Avoid Assuming It Can Hold Heavy Objects
A crochet basket may look sturdy in a photograph while still being intended for light storage. Check the creator’s information before choosing what to put inside.
For village use, small wrapped treats, lightweight craft notions, or seasonal props make more sense than relying on an unverified weight capacity.
Creator Credit: TLH Patterns
5. Crochet Mini Mushroom House Pouch
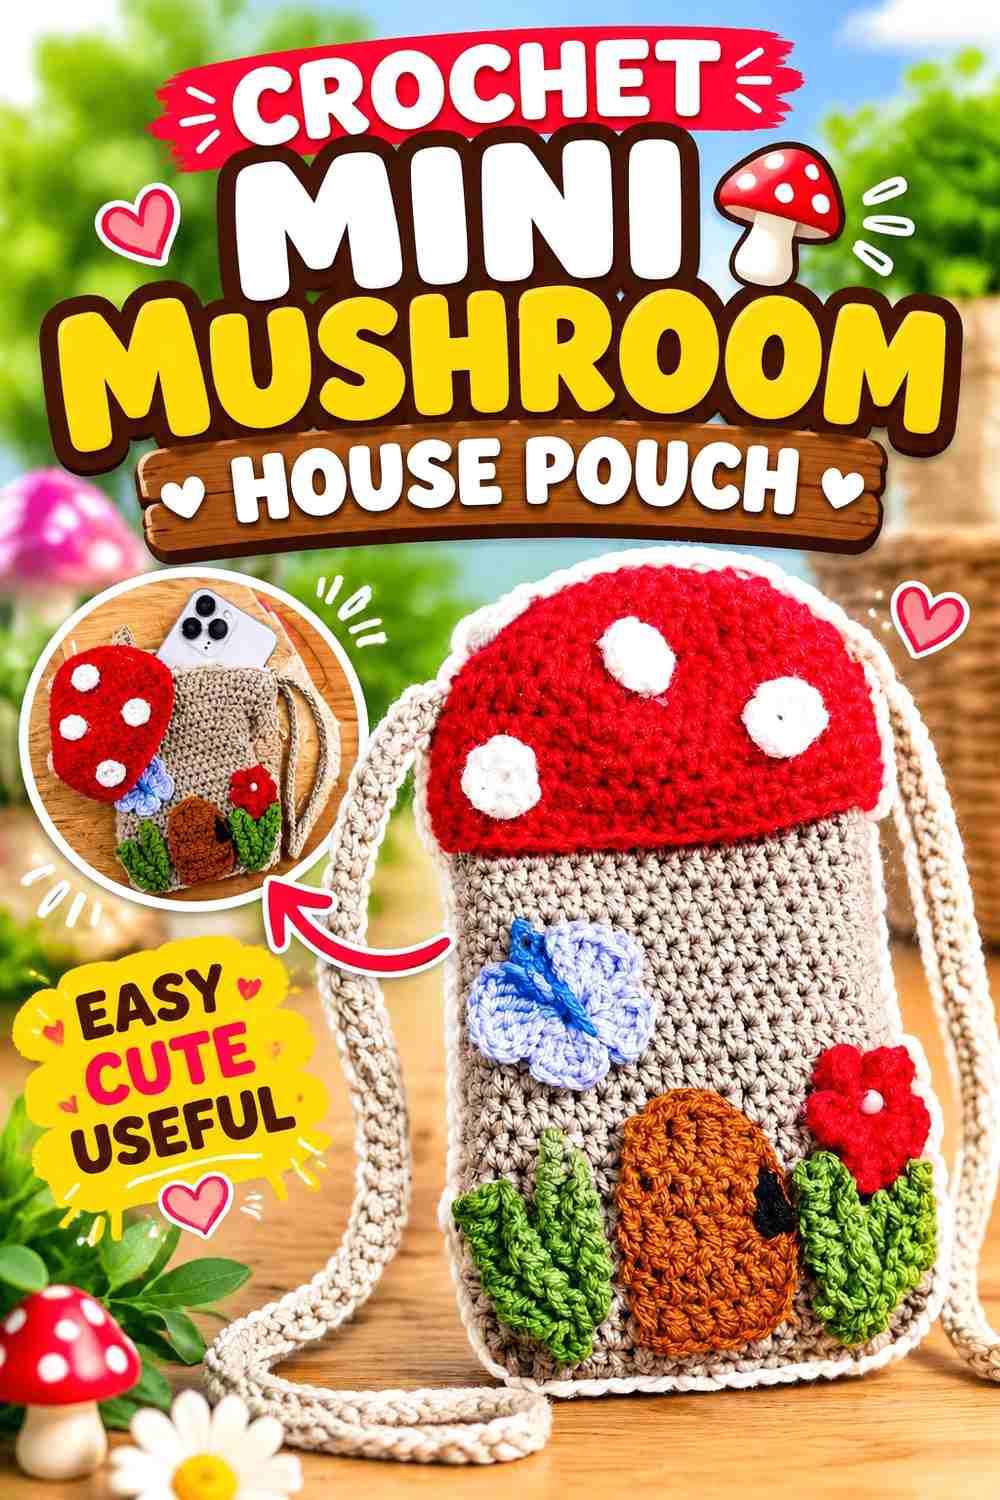
The pouch format makes this cottage different from a stationary basket. It combines a tiny mushroom-house appearance with a portable small-container shape, which can be useful for Halloween favors or as a building that can be removed from the display and used separately.
Within the village, its compact scale is useful near the foreground where large buildings would block the scene behind them.
Treat the Opening as a Functional Feature
Before deciding what to store inside, check the tutorial’s finished opening and closure. A miniature pouch is not automatically suitable for every small object simply because something physically fits through the top.
For decorative use, keeping it lightly filled can help the house retain its intended silhouette.
Keep Front Details Unobstructed
Small windows and doors carry much more visual responsibility on a miniature house. Avoid positioning a pumpkin, fence, or other prop directly across the front.
If the pouch will be photographed as part of a finished Halloween display, test the arrangement through the camera before attaching or placing extra scenery.
Use Portability to Your Advantage
Because this house has a pouch format, it can double as a small Halloween gift presentation rather than remaining on a shelf all season.
That gives it a different purpose from the larger storage basket: one feels like village furniture, while this one can function as a removable little house.
Creator Credit: The Crochet Nest | Yarn and Hook Studio
6. Crochet Lidded Mushroom Accessory House
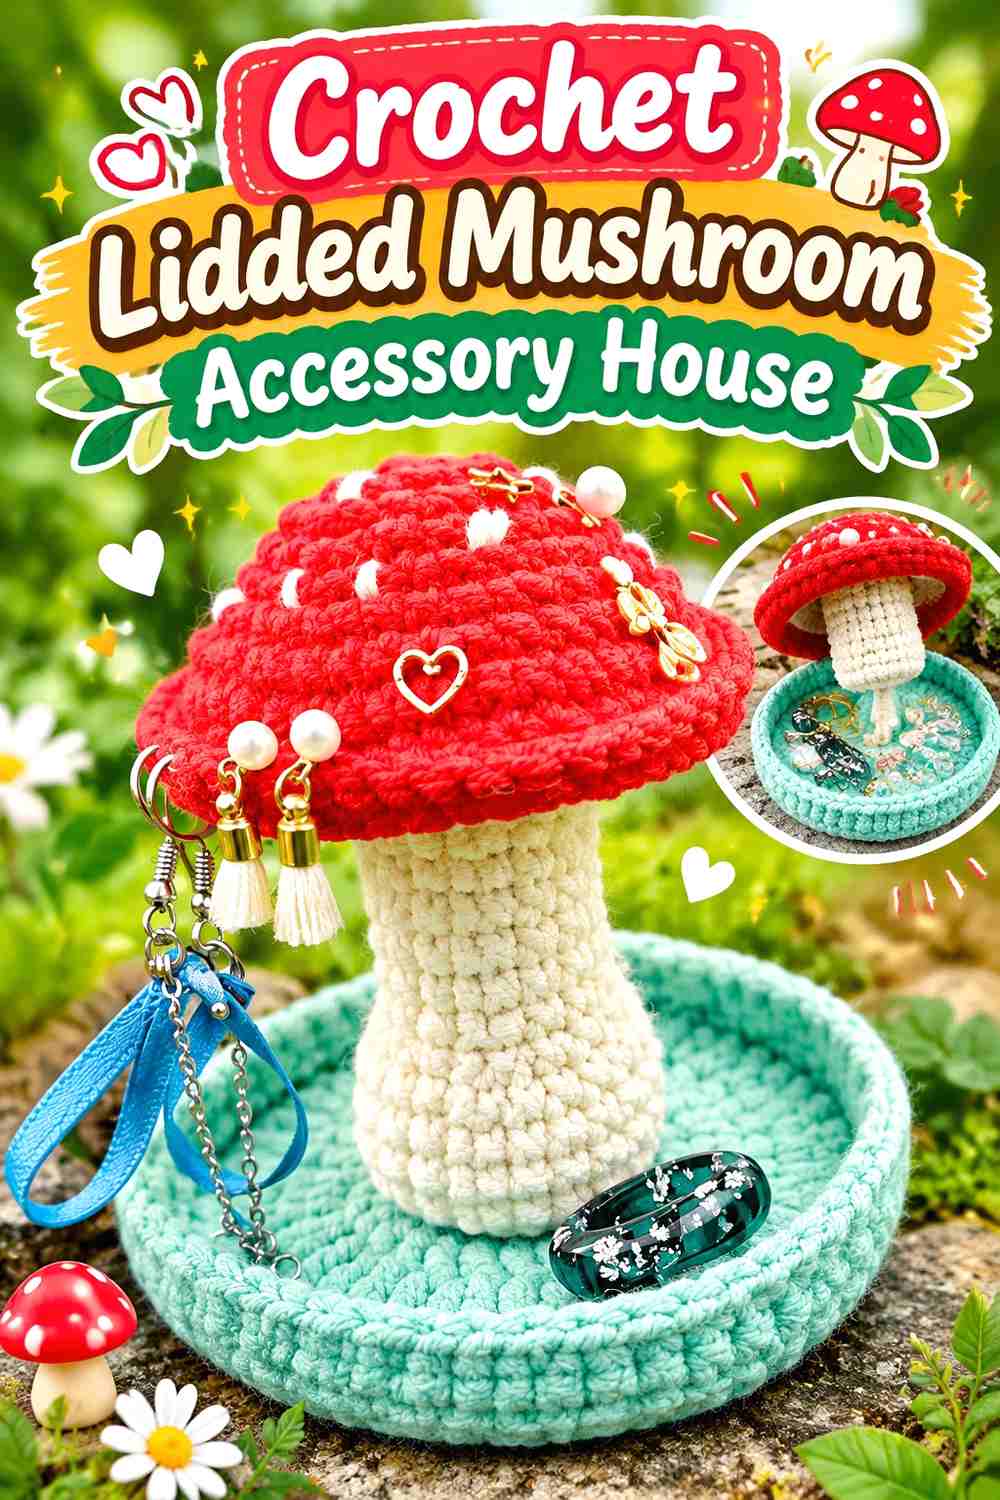
Another mushroom home earns its place here because the container arrangement is different. This version works as an accessory-storage piece, making the roof and body relationship part of the practical design rather than simply creating a stuffed woodland ornament.
For Halloween styling, it can become the witch’s trinket shop, potion-supply cottage, or tiny apothecary building in the village.
Think About Repeated Opening and Closing
A decorative house may be touched only when it is put away. A container can be handled much more often.
If you intend to use it regularly, inspect how the upper section relates to the base and follow the creator’s finishing guidance carefully rather than changing the structure for appearance alone.
Give Small Details a Clear Background
Mushroom houses often combine cap spots, doors, windows, and other tiny elements. In a dark Halloween palette, too many low-contrast colors can cause these features to disappear.
Choose one or two strong points of contrast and let the remaining palette stay restrained.
Separate Practical Storage From Display Styling
The items surrounding the house do not have to be attached to it. A removable spider, miniature sign, or small pumpkin placed nearby can establish Halloween context without interfering with how the container opens.
That makes the piece easier to return to a woodland or fall display after Halloween if you prefer.
Creator Credit: Let’s Do Do Studio
7. Crochet Pumpkin House Pot
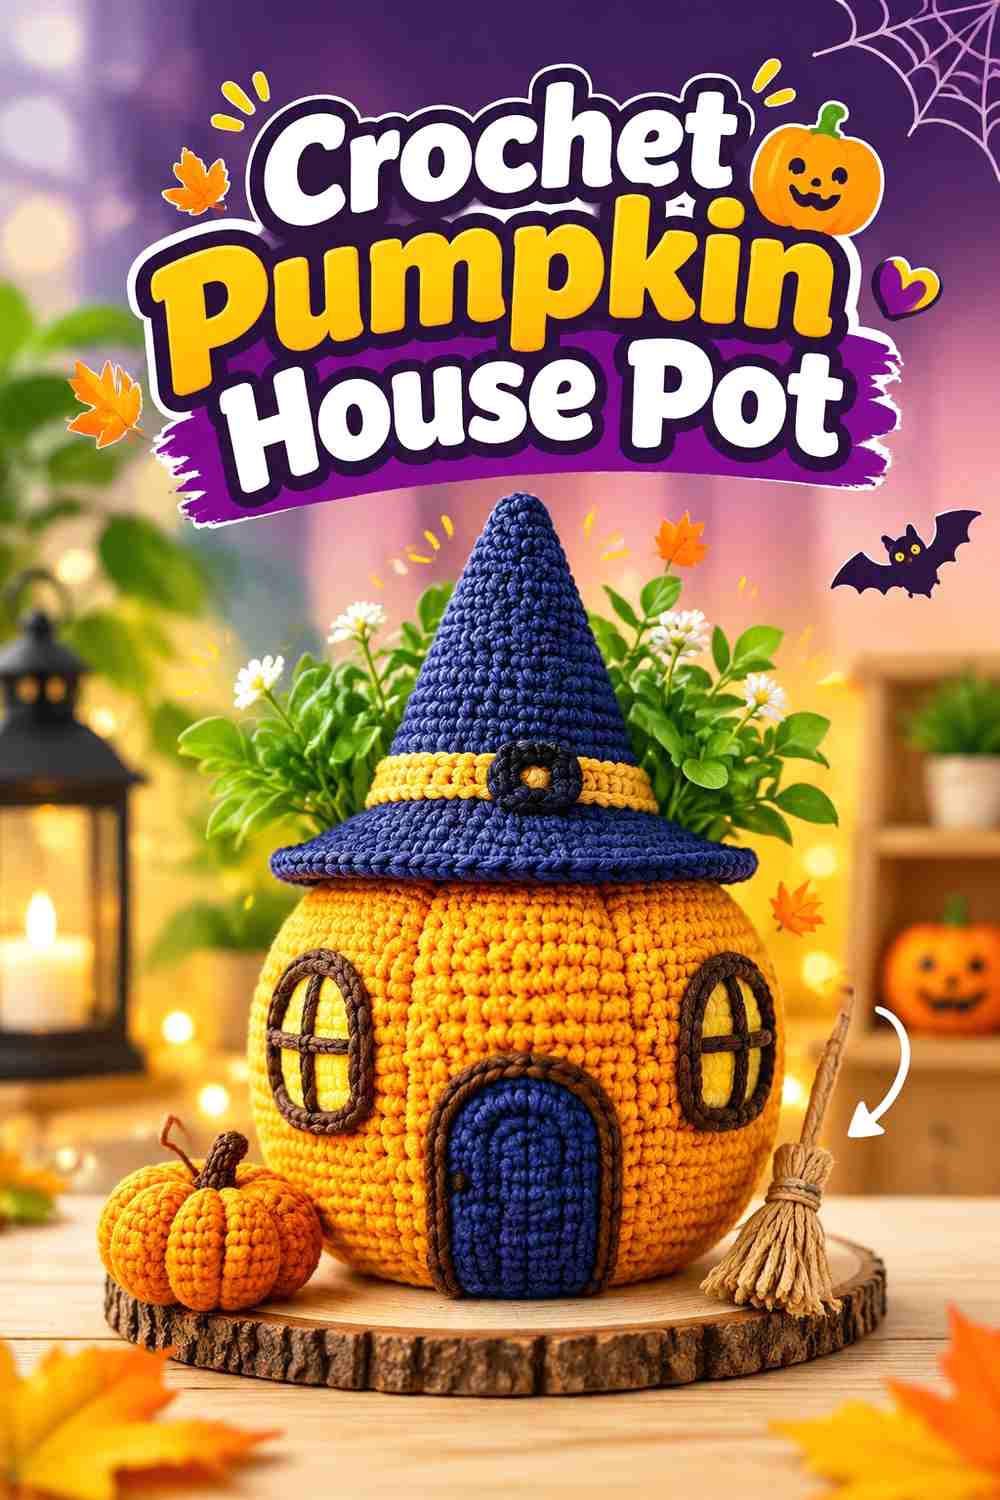
A pumpkin house pot brings seasonal shape and container function together. It differs from the decorative jack-o’-lantern-style house because the pot concept makes the opening and top arrangement part of how the finished project is used.
Place it near a market area, witch’s garden, or front edge of the display where its rounded base remains visible.
Decide What the Pot Is For Before Styling Around It
A purely decorative pot can sit behind tiny fences and props. A container you expect to open should remain accessible.
Choosing between those roles early prevents you from building an elaborate scene that later has to be dismantled each time the house is used.
Keep the Pumpkin Shape Recognizable
Darkening the palette for Halloween does not mean eliminating all definition. The curves of a pumpkin can disappear when the body, seams, door, and surrounding background are all similarly dark.
Use value contrast strategically so the piece still reads as a pumpkin home rather than an indistinct round object.
Pair It With Taller Buildings
Its low, broad shape makes it valuable in front of a narrow cottage or tall manor. This creates layered depth without hiding much of the background structure.
It can also act as a visual bridge between the more natural woodland houses and the architectural buildings later in the list.
Creator Credit: Handmade by DEP
8. Crochet Gnome Home Drawstring Cottage
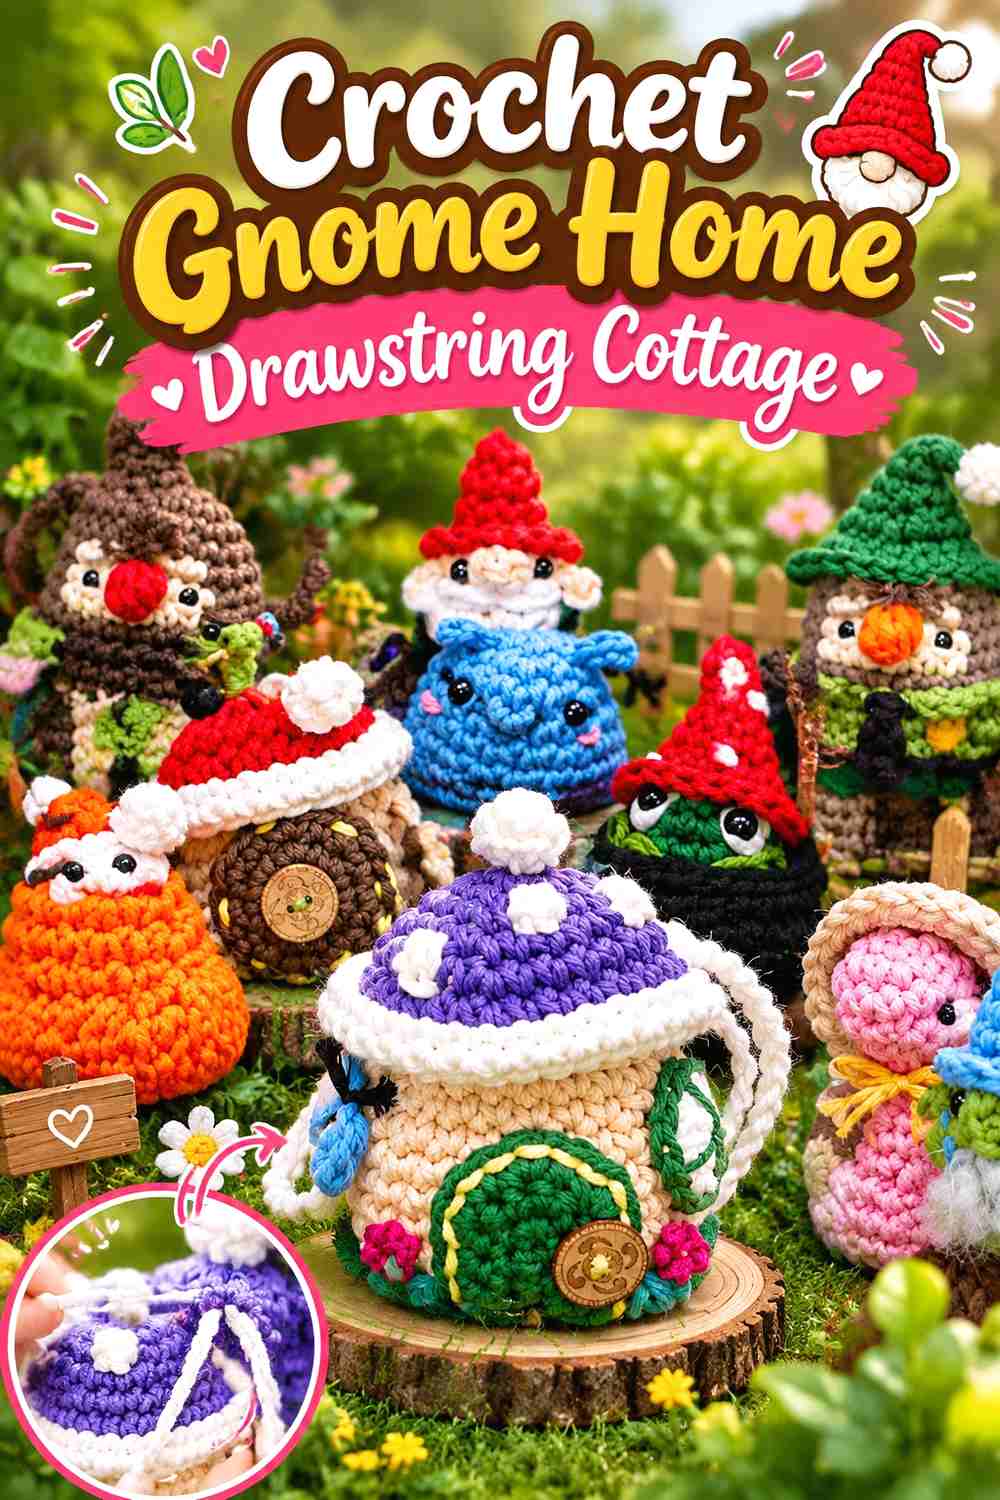
Club Crochet’s gnome-home concept adds a playful cottage that also functions as a pouch. The mushroom-inspired form and drawstring purpose make it useful for a fantasy section of the village while keeping it substantially different from an ordinary stuffed house.
For Halloween, it could sit in a goblin, gnome, or enchanted-forest district instead of being forced into a conventional haunted-mansion role.
Let the Drawstring Feature Stay Usable
If the pouch function matters, avoid covering the upper area with permanent Halloween embellishments that interfere with opening or closing it.
Use surrounding pieces for extra atmosphere. A few loose miniature pumpkins or a neighboring cauldron can establish the scene without changing the functional construction.
The Village Does Not Need One Architectural Style
A gnome home beside a Gothic manor may sound mismatched, but that contrast can be exactly what prevents the display from becoming repetitive.
Connect the two through a repeated palette or window color rather than trying to make their shapes identical.
Review the Crochet-Along Format Before Starting
The source is presented as a crochet-along, so its teaching rhythm may differ from a tightly edited start-to-finish tutorial.
Preview the source and confirm that the format works for the way you prefer to follow a project, especially before making it under a Halloween deadline.
Creator Credit: Club Crochet
9. Crochet Classic Haunted Seaside Cottage
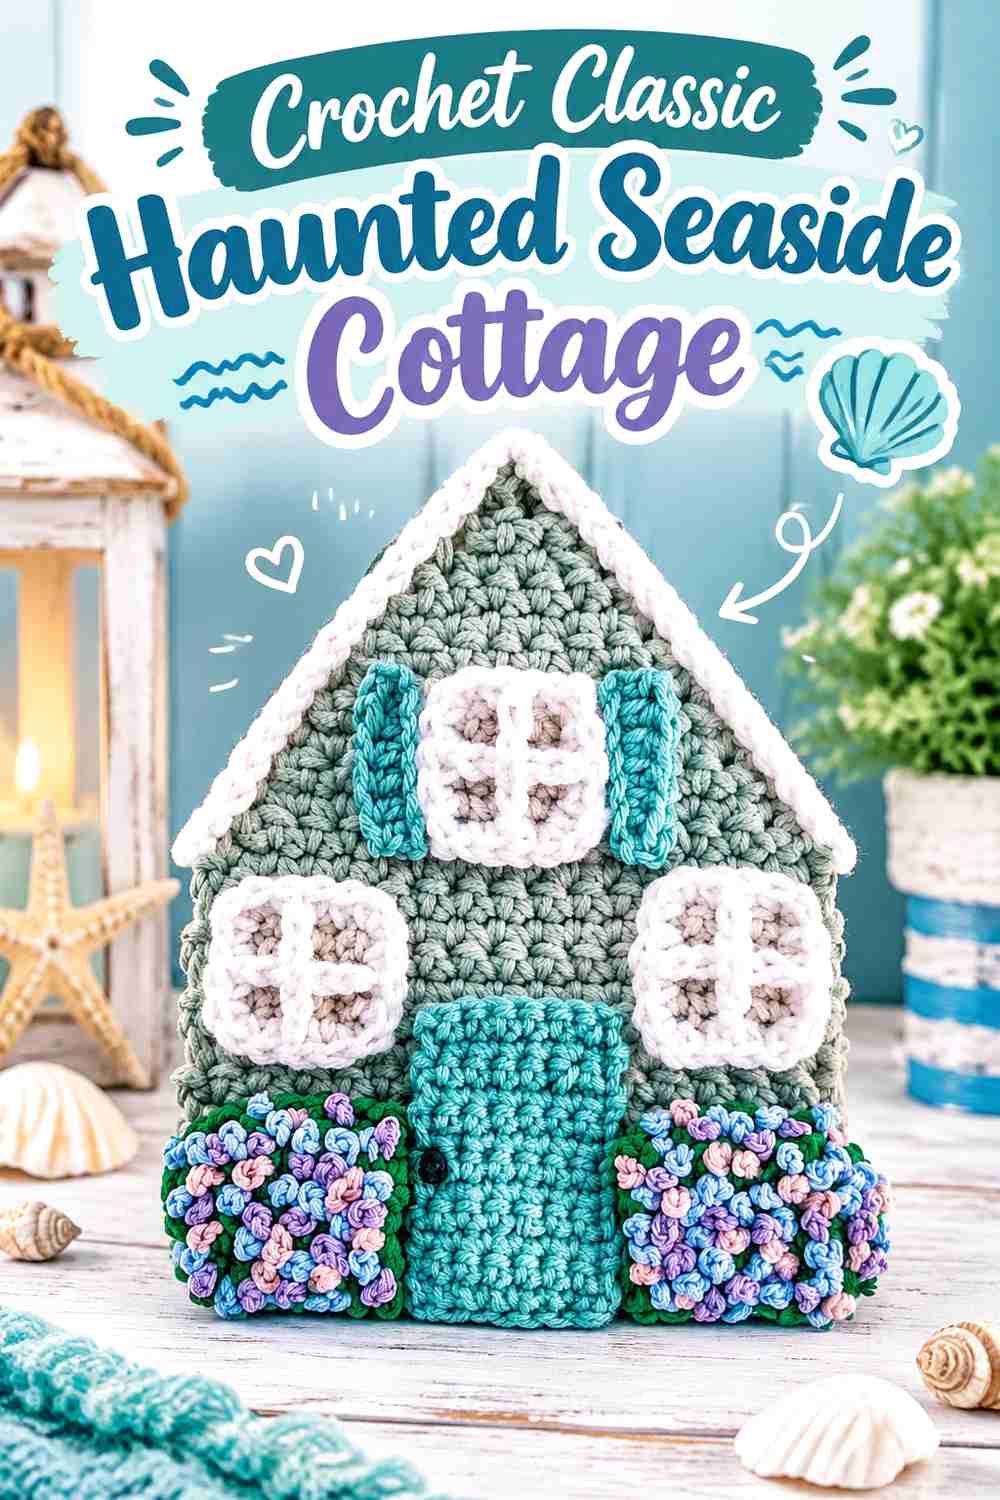
A traditional cottage gives the haunted village an important visual pause after several rounded pumpkin and mushroom buildings. Straight walls and a recognizable pitched roof help the scene feel like an actual settlement instead of a collection made entirely from novelty shapes.
The original tutorial is a Nantucket-inspired cottage, not a Halloween house, so this idea depends on styling rather than presenting the source as something it is not.
Use the Conventional Shape as an Anchor
A classic cottage can sit in the middle of more exaggerated buildings and make them look even more whimsical by comparison.
Try placing it between a pumpkin house and a tall manor. The straightforward roofline gives the viewer a visual reference point before the skyline changes again.
Haunted Does Not Have to Mean Black
Weathered gray, faded blue, brown, dirty cream, muted green, or deep burgundy can give this conventional cottage an eerie old-house mood without erasing its architectural details.
Choose trim with enough contrast for the windows and roof edges to remain readable in normal room lighting.
Adapt the Setting Before the Structure
Because the source is already a complete cottage design, the simplest Halloween transformation may happen around it rather than on it.
Place it beside darker trees, a miniature pumpkin patch, or the flat haunted-house appliqué later in this list. That preserves the creator’s house construction while changing the story surrounding it.
Creator Credit: Crochet by Colleen
10. Crochet Crooked Gable Haunted House
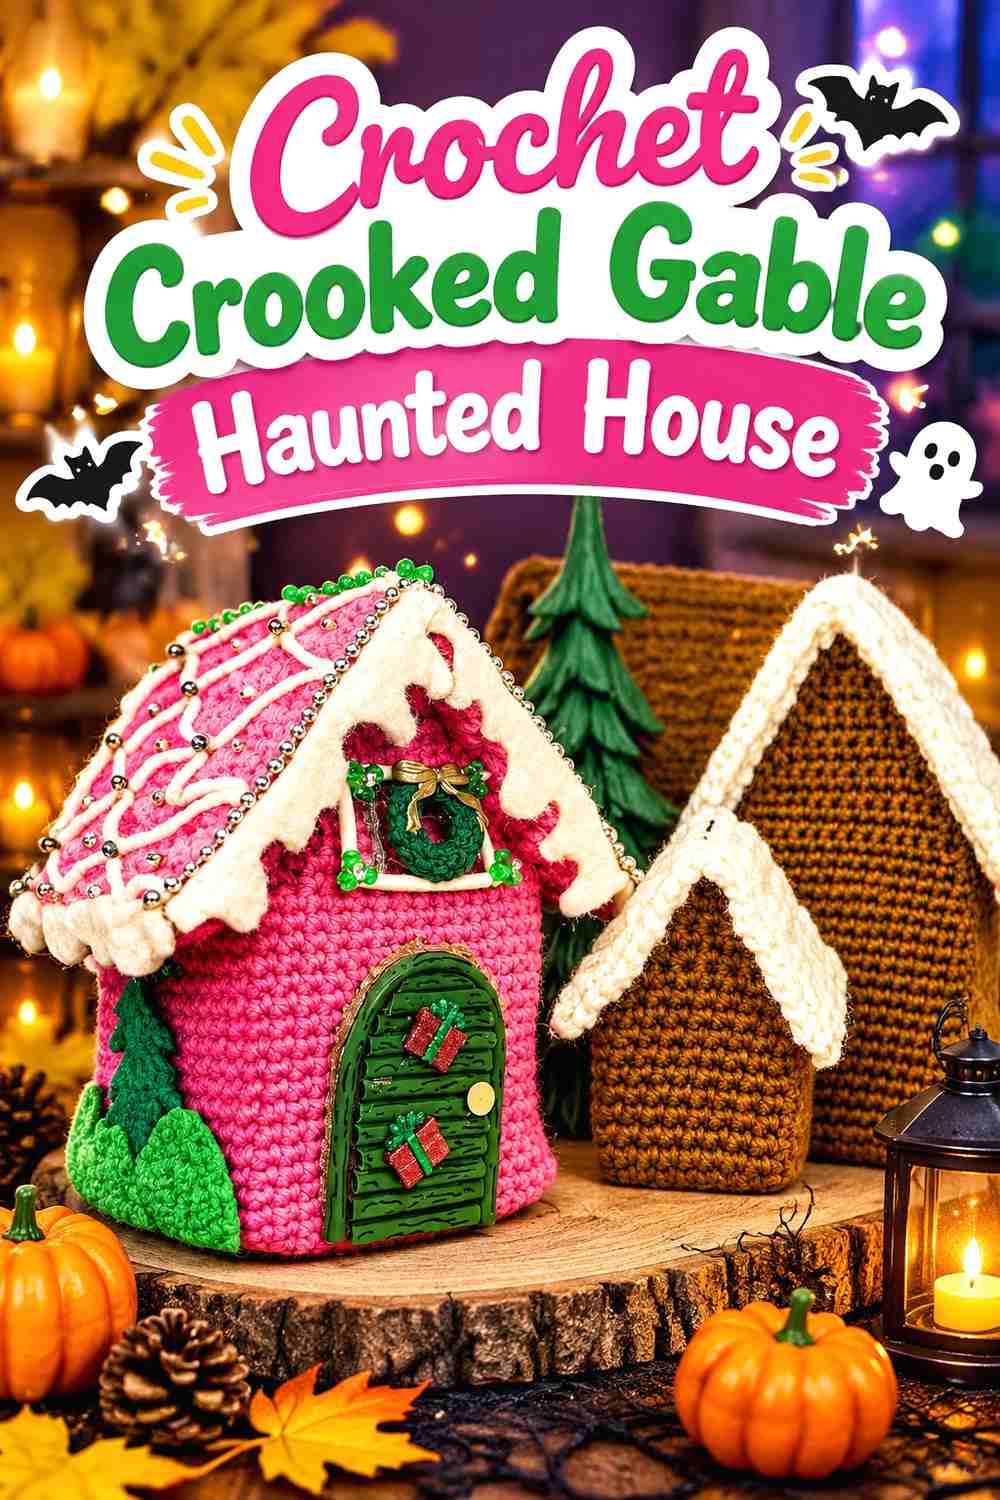
A customizable gingerbread-house construction can become a strong Halloween building when the candy-shop palette is replaced with more ominous colors. The source teaches a complete dimensional house with walls, gables, roof, and assembly, giving you a clear architectural base rather than a flat motif.
This is one of the stronger choices for makers who want another substantial building beside the witch’s treat house.
Let the Gables Do the Spooky Work
You do not need to literally distort the creator’s construction to make the house look haunted. Strong roof peaks already create a dramatic silhouette.
Use asymmetrical color placement in removable decorations or surrounding props if you want a more crooked visual effect without changing structural instructions.
Decide Whether It Is a House or a Shop
A village becomes more engaging when buildings have implied roles. This one could become a haunted bakery, abandoned candy shop, potion merchant, or ordinary residence.
That decision helps you choose exterior colors and neighboring props without requiring pattern changes.
Customize Scale Carefully
The creator describes the project as customizable, but any size change can affect how the building relates to the rest of your village.
Compare the finished dimensions you are planning with an existing house before making a much larger version that unintentionally dominates the entire display.
Creator Credit: Crafters Autonomous
11. Crochet Tall Gothic Village Manor
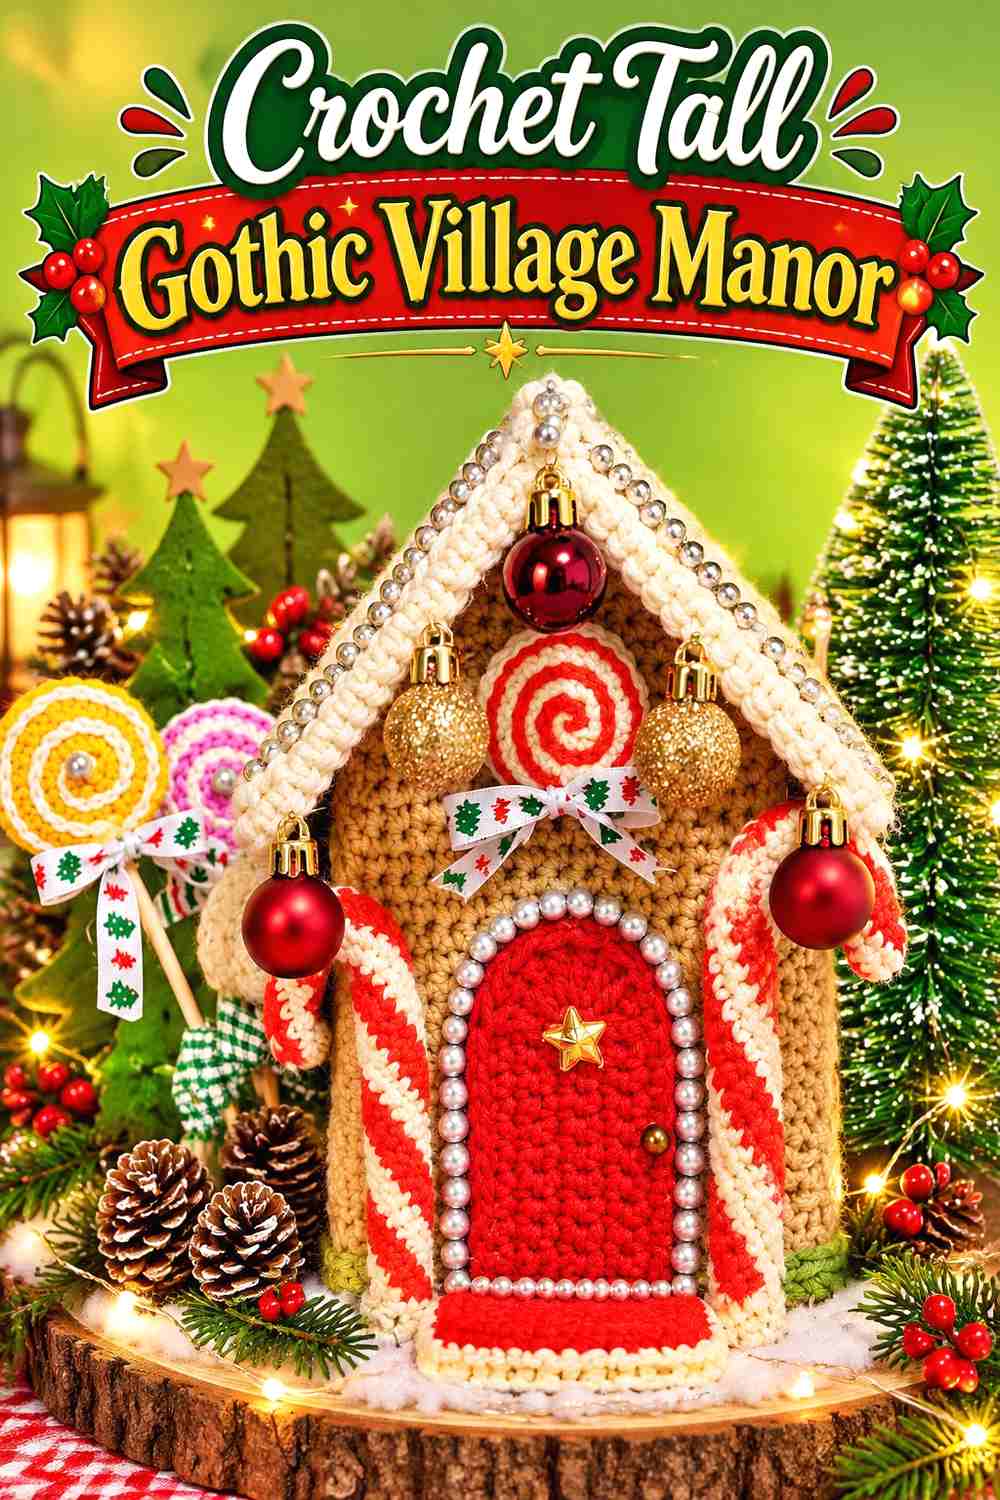
A dimensional gingerbread house can move surprisingly well into gothic Halloween decor because its familiar walls-and-roof structure provides a clean canvas for darker styling. This version works particularly well as the village manor: a more formal house that contrasts with organic pumpkin and mushroom homes.
The original project is Christmas-themed, so keep the structural tutorial intact and treat the Halloween manor concept as an independent color and display adaptation.
Give the Manor More Height in the Scene
A formal house should not disappear behind the low pumpkin buildings. Position it toward the back or on a slightly raised display surface so its roof remains part of the skyline.
You can then bring small cottages forward to create a street effect without needing every project to share identical measurements.
Limit the Number of Competing Trim Colors
Gingerbread houses often invite colorful details. A haunted manor usually reads more clearly when the palette is narrower.
Try one dark wall color, a second roof or trim color, and a brighter window accent instead of assigning a new color to every small feature.
Use Symmetry to Make the Village More Unsettling
Not every haunted house needs to look physically crooked. A perfectly orderly manor surrounded by strange mushroom cottages and pumpkin homes can create an effective contrast.
Let the architecture stay formal and make the surrounding village scene more chaotic.
Creator Credit: uncinettofra
12. Crochet Mini Candy-Style Haunted House Ornament
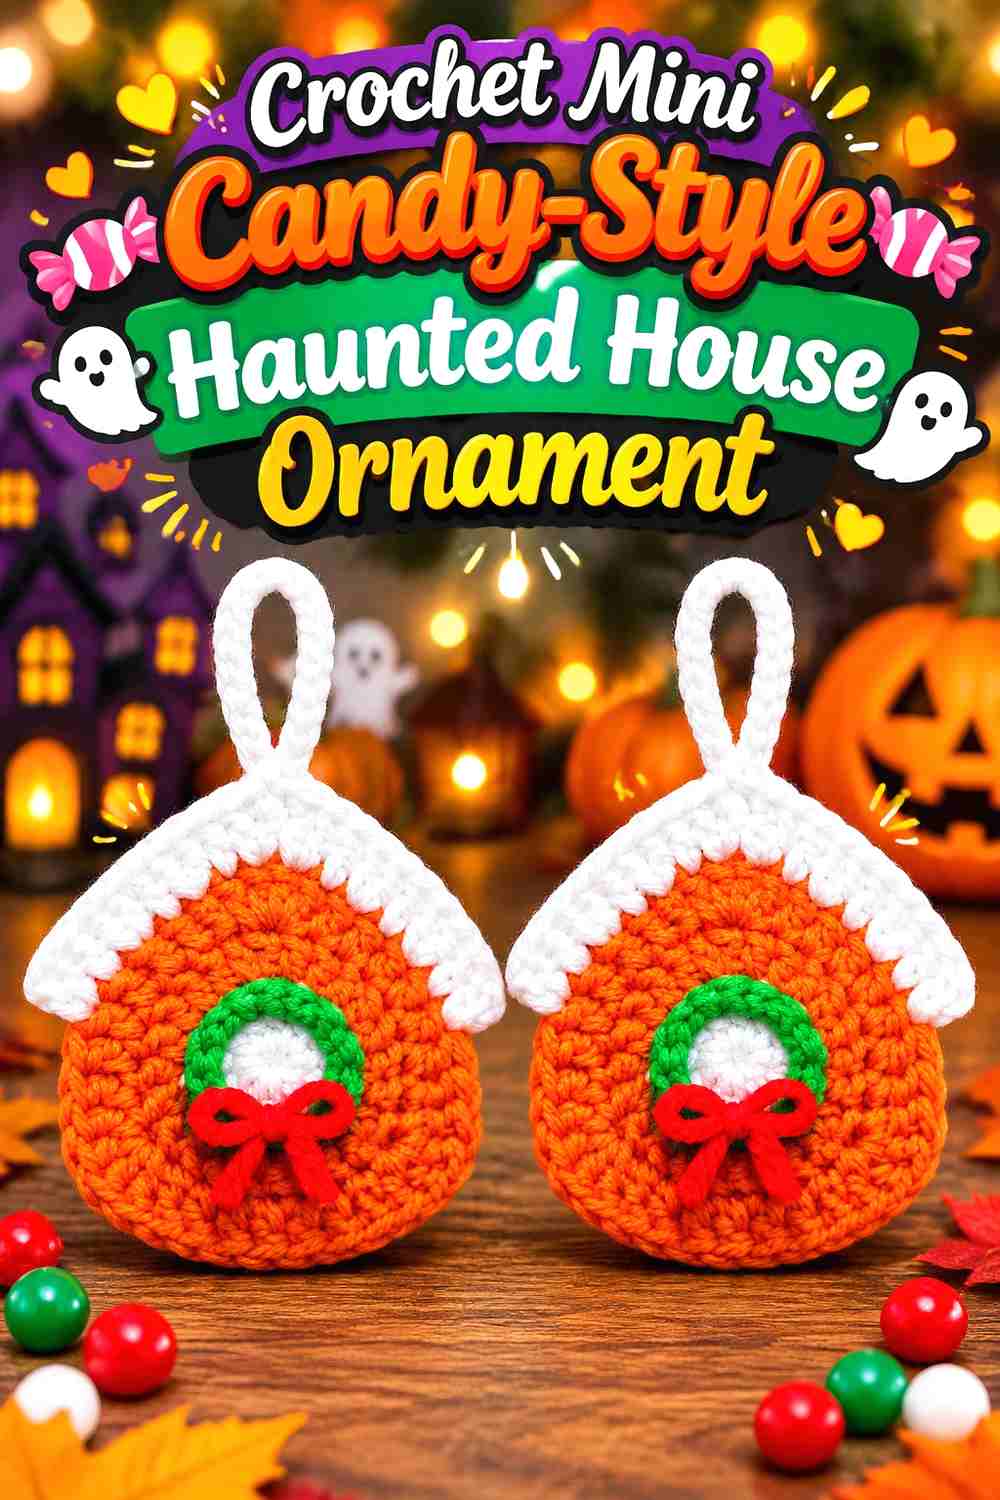
A small house ornament is useful when the main village already has enough large structures. It can hang from a branch positioned behind the display, become a tiny building on a garland, or sit upright among foreground pieces if its construction allows.
The original project is a gingerbread-house ornament. For Halloween, the appeal is the compact house silhouette rather than the Christmas styling.
Small Houses Need Stronger Contrast
Details that are obvious on a large manor may disappear on a small ornament. Keep the roof, wall, and doorway visually distinct instead of relying on subtle tonal differences.
This is one place where a brighter lime, orange, violet, or yellow accent can work particularly well against a dark house body.
Use Several Heights Without Making Several Copies
A miniature ornament does not have to sit at table level. Hang it above the village from a branch, small display tree, or other appropriate support to create vertical interest.
That lets one tiny house contribute to the skyline without duplicating a larger cottage.
Keep Hanging Hardware Separate From Village Styling
If the ornament includes a hanging feature, preserve it if you expect to reuse the piece elsewhere later.
A house that moves from Halloween village to ornament storage is more flexible than one permanently attached to a single display base.
Creator Credit: Pora Pora Crochet
13. Crochet Old-Fashioned Haunted Gingerbread Cottage
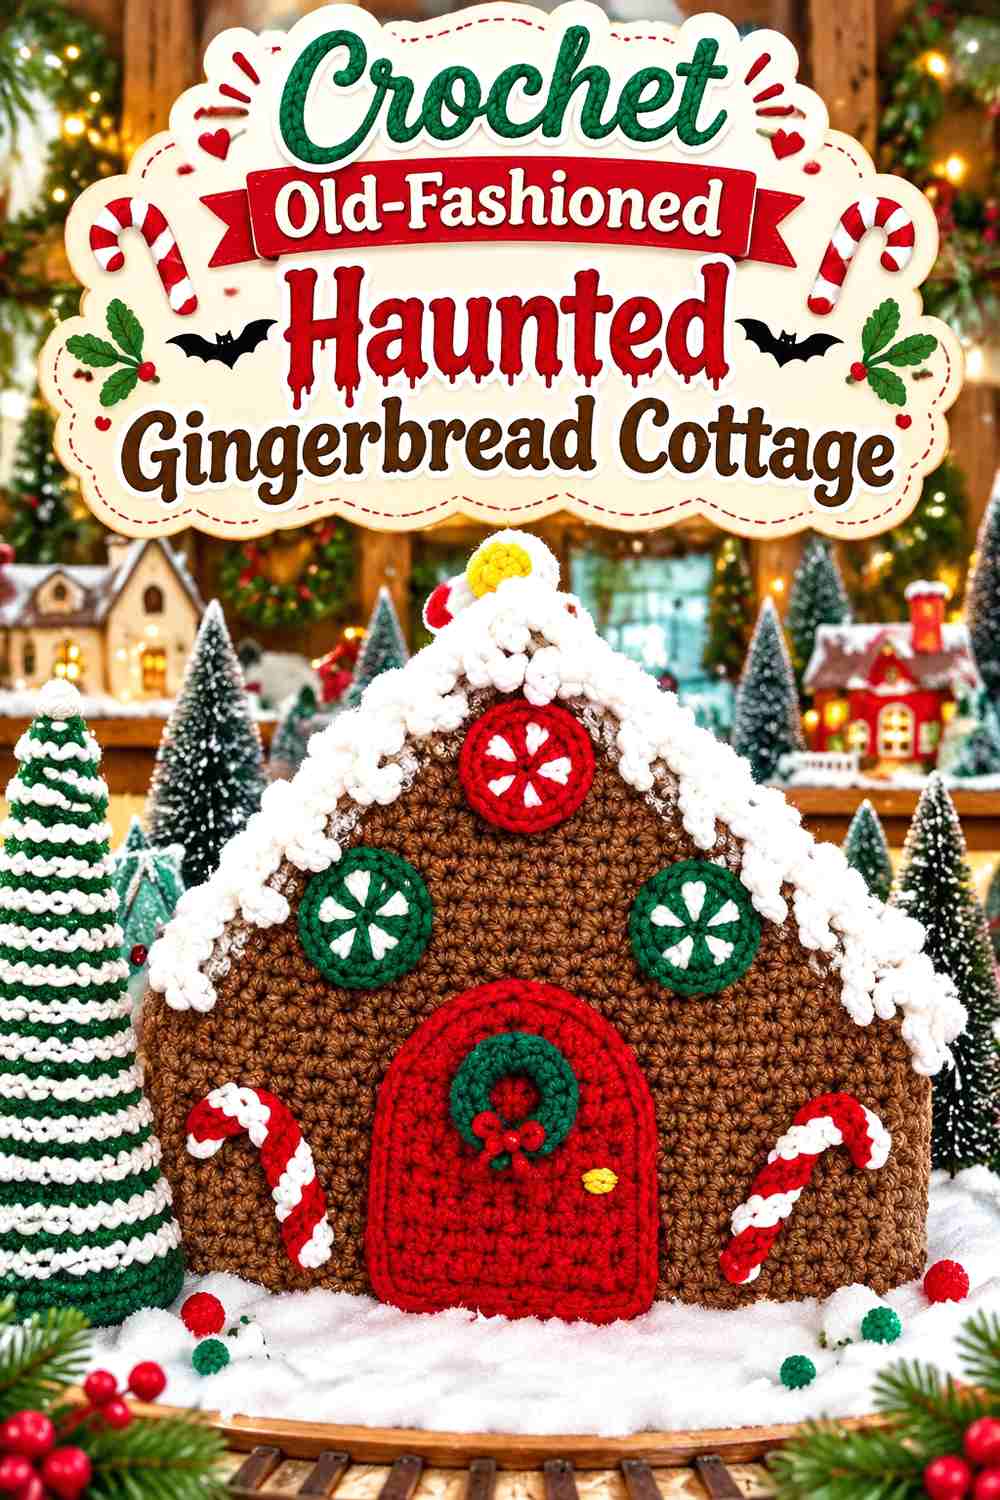
This classic gingerbread-house construction can become the village’s abandoned bakery or aging family cottage. Its traditional house form makes it valuable beside stranger pumpkin and mushroom dwellings because viewers immediately understand its scale and purpose.
The original tutorial is not Halloween-specific. The haunted-cottage treatment comes from your palette and from how the finished house is arranged.
Preserve the Traditional House Outline
An old-fashioned cottage does not need bats attached to every surface. Let the roof, wall shape, and doorway remain the main visual information.
A restrained palette can create an older, slightly faded feeling that may suit a haunted village better than piling on numerous novelty details.
Make It the Abandoned Building
A village needs quieter pieces as well as showpieces. This cottage can sit slightly apart from the main street or at the end of a row.
Leaving more empty space around it can make the building feel intentionally isolated without changing a single structural element.
Check Decorative Changes Against the Finished Front
Before attaching any independent Halloween embellishment, hold it temporarily against the completed facade.
If a web, pumpkin, or sign hides a window or overwhelms the doorway, move that detail into the surrounding landscape instead.
Creator Credit: Sarah Beth
14. Crochet Detailed Haunted Candy Mansion
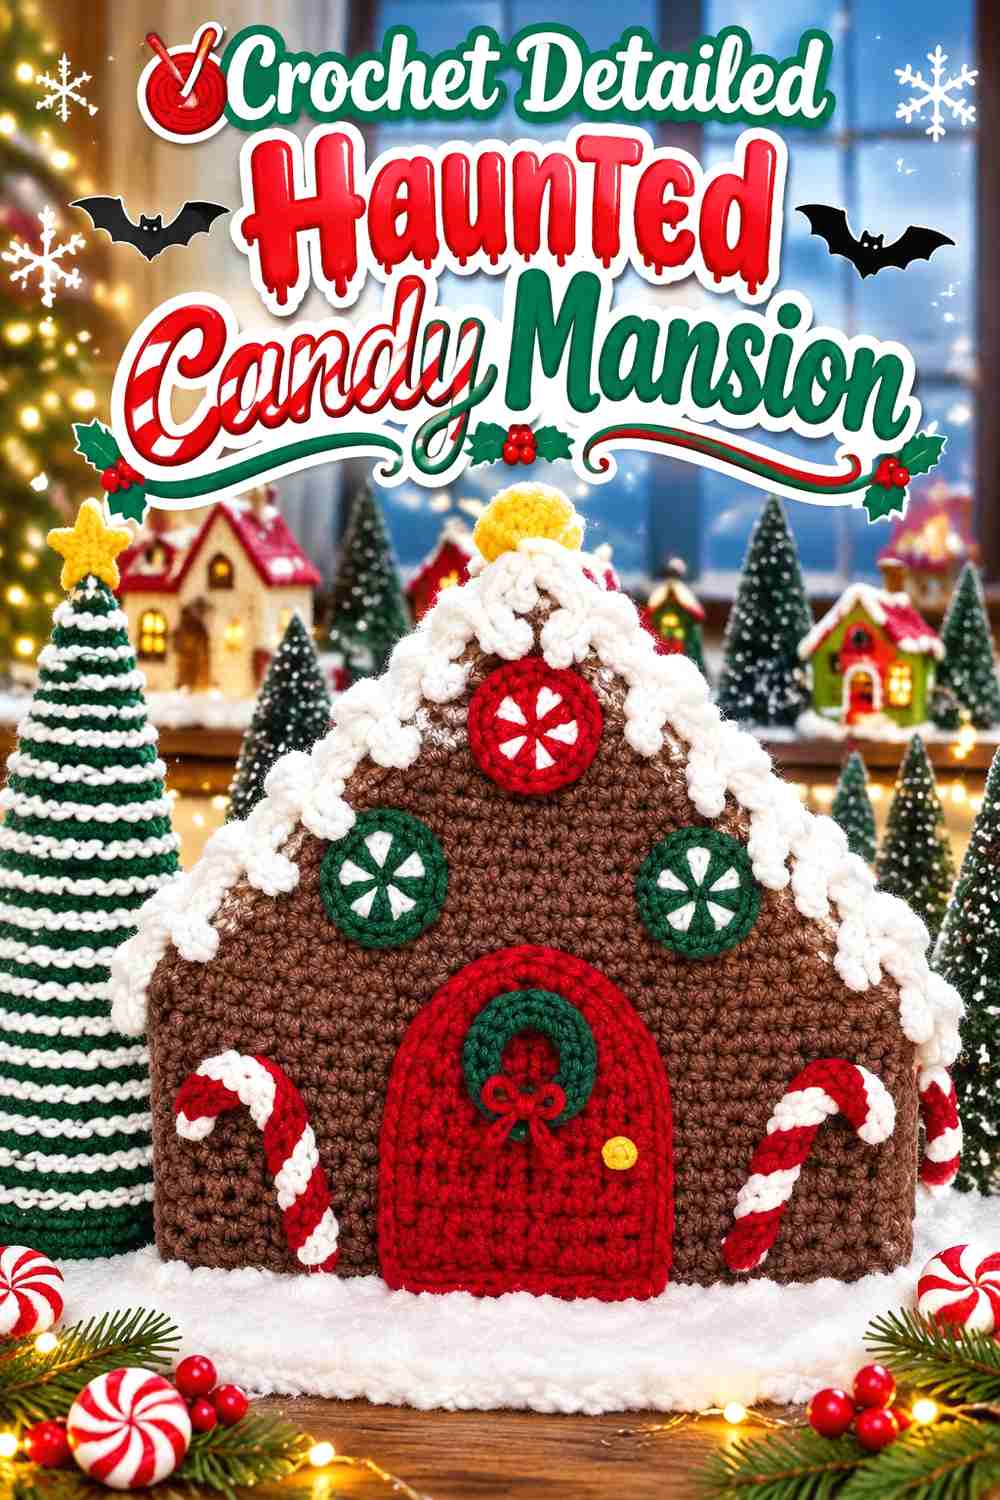
A larger, detailed house project is useful when you want one building to reward close viewing. This two-part source gives the house more visual complexity than a quick ornament, which makes it suitable for a mansion, confectioner’s shop, or elaborate haunted centerpiece.
Because the source is a gingerbread-house project, the Halloween direction should come from independent styling rather than presenting its original decorations as spooky ones.
Review Both Parts Before Choosing a Palette
With a more involved house, later decorative elements may interact with sections made much earlier.
Preview the entire project before deciding which colors to substitute so you do not discover halfway through that a trim color appears in more places than expected.
Let One Detailed House Carry the Decoration
If this becomes your ornate building, nearby houses can remain simpler. Putting intricate trim on every cottage makes the village harder to scan.
Use this project where you want viewers to stop and look closely, then let plainer buildings support it.
Give a Mansion Enough Physical Space
More details need breathing room. A highly decorated facade can become difficult to see when surrounded by tightly packed mushroom caps and pumpkins.
Keep a small open area directly in front of the main elevation and move low props toward the corners.
Creator Credit: Girlybunches
15. Crochet Stuffed Mini Haunted House Ornament
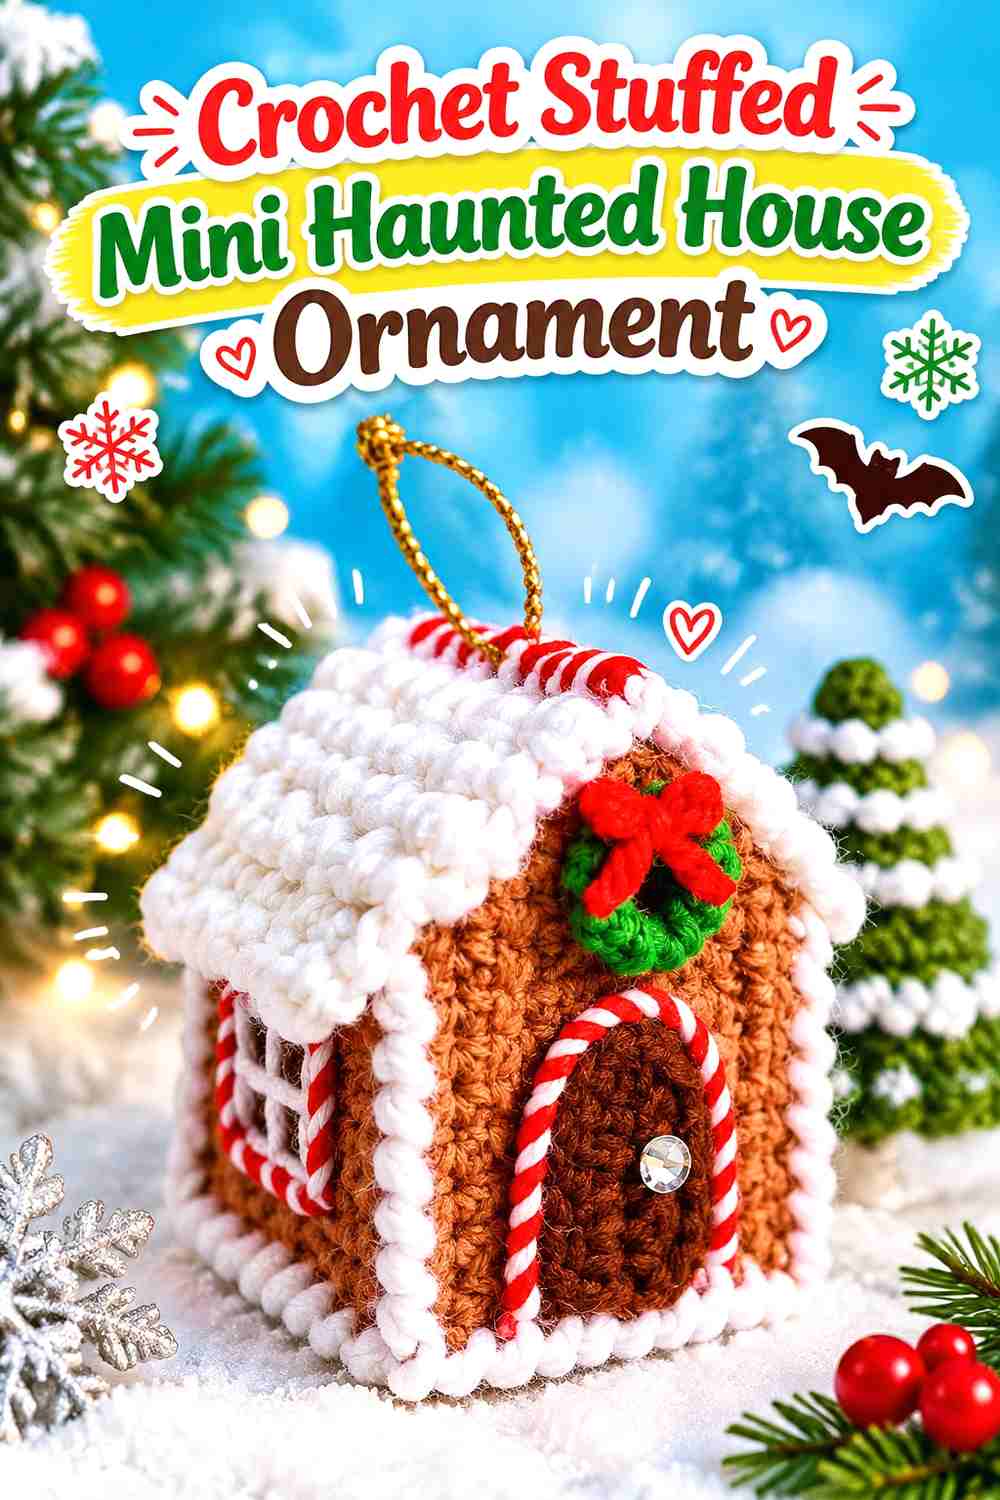
This dimensional amigurumi-style ornament provides a softer miniature house for the village. It has more depth than a flat appliqué but occupies less visual territory than the large centerpiece houses.
That makes it useful for filling an awkward gap between two larger buildings or for creating a tiny house on a separate raised level.
Use Depth to Your Advantage
A dimensional ornament can be angled instead of always facing directly forward. Turning it slightly toward another house makes the village feel more like a scene and less like a catalog lineup.
Check that the most recognizable door and roof details still remain visible from the normal viewing direction.
Avoid Overfilling the Foreground
Small does not mean invisible. Several compact dimensional houses packed into the front row can still block one another.
Leave deliberate gaps and use very low props between them when you need more detail.
Keep Tiny Added Pieces Secure
If you independently add Halloween embellishments, remember that small raised components may be handled during setup and seasonal storage.
Use the original tutorial for the house construction and choose any extra decoration with the intended audience and handling in mind.
Creator Credit: Cute Crochet
16. Crochet Flat Haunted House Appliqué
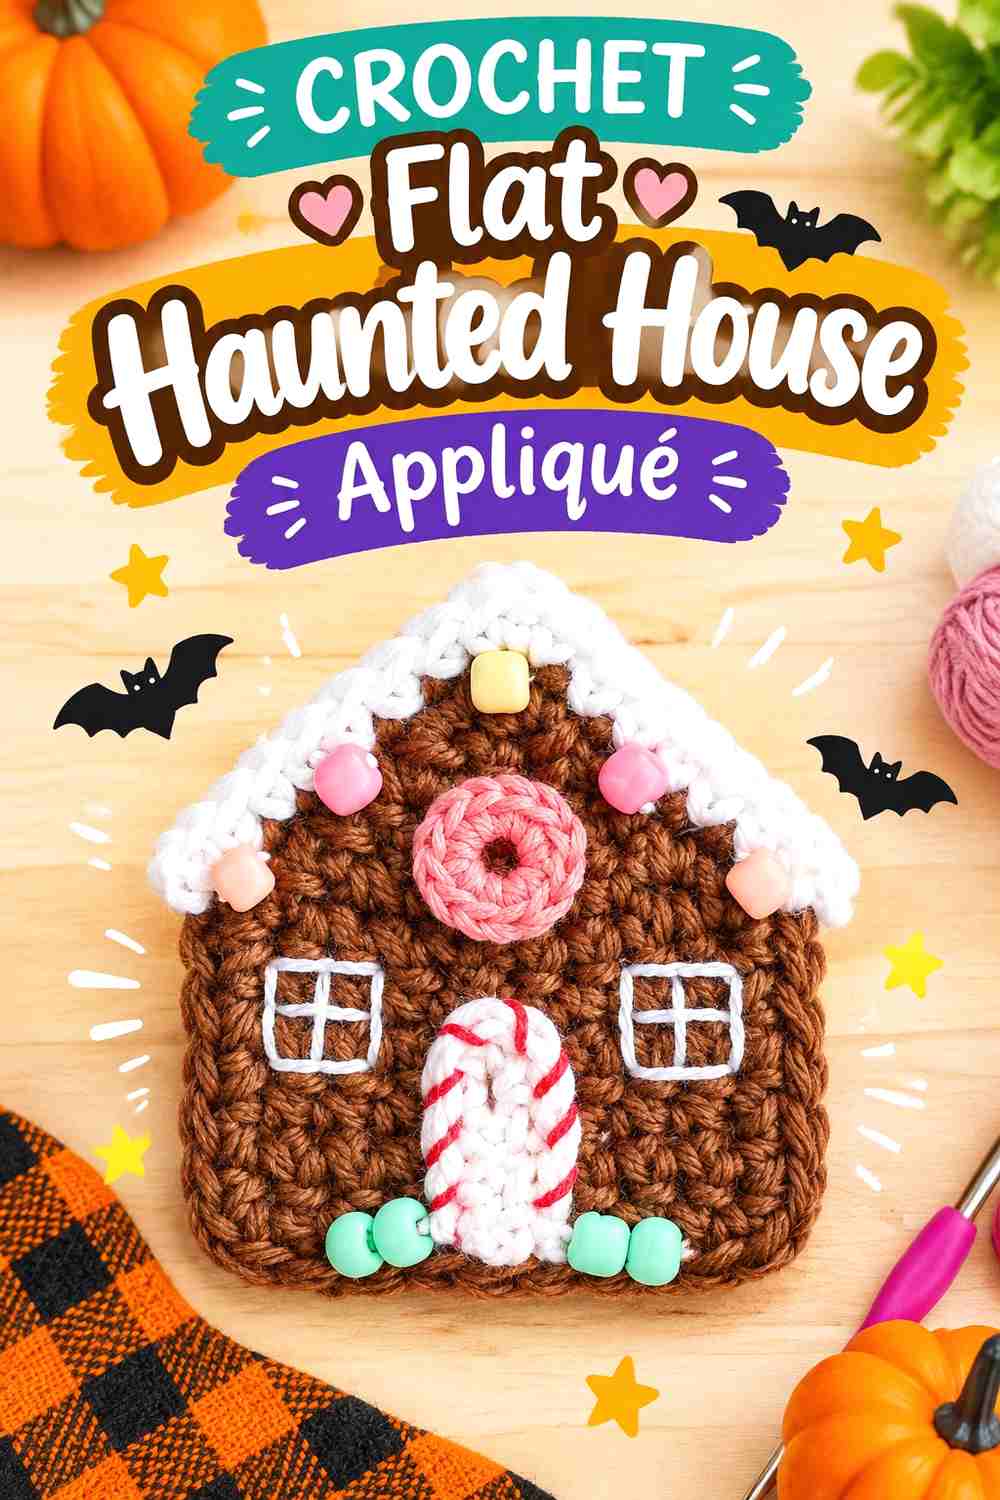
A flat house gives the village something the dimensional projects cannot: an architectural backdrop. The original tutorial teaches a gingerbread-house appliqué, but the basic flat-house format can be styled in Halloween colors and used as a wall panel, banner element, village sign, or background building.
It is particularly useful when shelf depth is limited.
Use Flat Houses to Suggest a Larger Village
A physical display may only have space for five or six dimensional buildings. A flat house behind them can imply another row of architecture without consuming the same depth.
That creates the impression of a denser settlement while keeping the foreground uncluttered.
Crisp Edges Matter More on a Flat Motif
A three-dimensional cottage can rely partly on shadows to define its form. An appliqué depends heavily on its outline.
Before mounting or attaching it, check whether the roof points and outside edges sit the way you want. Any blocking or finishing should follow appropriate guidance for the yarn and project.
Decide Whether Attachment Should Be Permanent
You could use a flat house on a dedicated Halloween banner, removable seasonal panel, pillow cover, or separate wall hanging.
Choose that destination before securing it so you do not turn a flexible motif into an item that can only be displayed one way.
Creator Credit: Ollie + Holly Crochet
17. Crochet Haunted House Treat Box
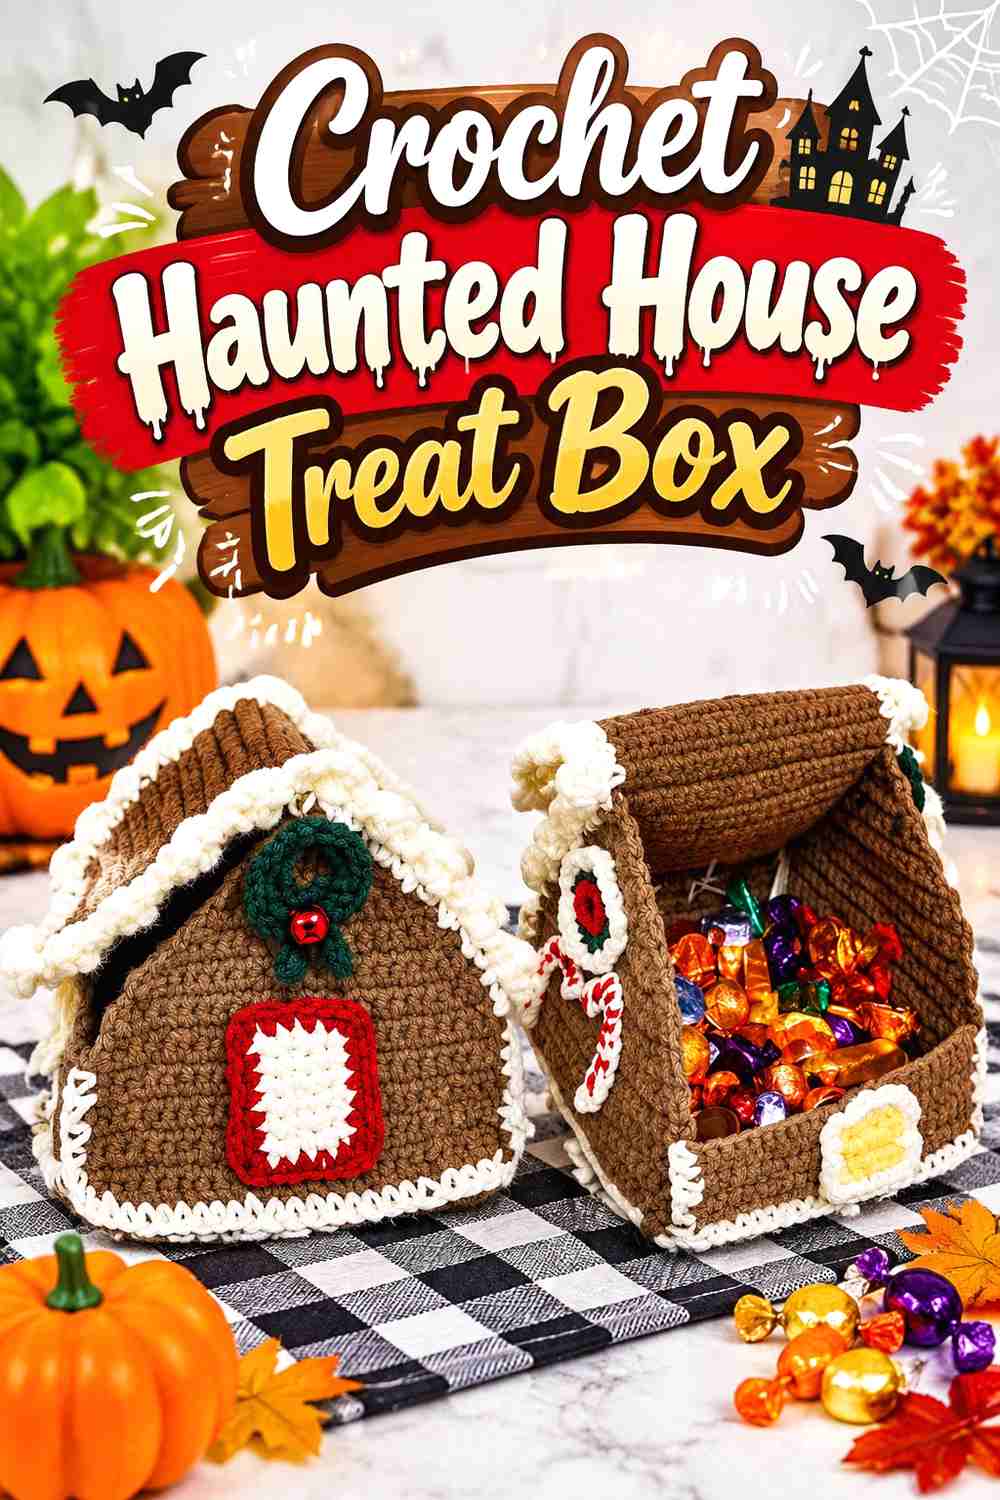
A house-shaped box is one of the most useful structural variations in the collection. The original gingerbread-house project is designed as a box that can hold small gifts or candy, so its interior function is part of the concept rather than an afterthought.
Recoloring the exterior can turn it into the village sweet shop, witch’s supply store, or Halloween treat station.
Keep the Box Opening Reachable
Functional storage should remain functional after decorating. Do not position another house directly over the section that needs to open.
A side position on the village street often works better than the back row, especially if people will actually take treats from it.
Make the Building Role Obvious Through Placement
Put the treat box near the front of the village and it naturally reads like a shop. Move it behind several cottages and the practical function becomes less obvious.
You can create a convincing commercial district simply by grouping the treat box with a pouch house and another container-style building.
Do Not Assume Unverified Capacity
A small crochet house box is useful for lightweight contents, but do not infer a heavy-duty storage capacity from appearance alone.
Check the creator’s project information and use it within the intended scope.
Creator Credit: Heart and Craft Crochet
18. Crochet Tiny Haunted House Garland Ornament
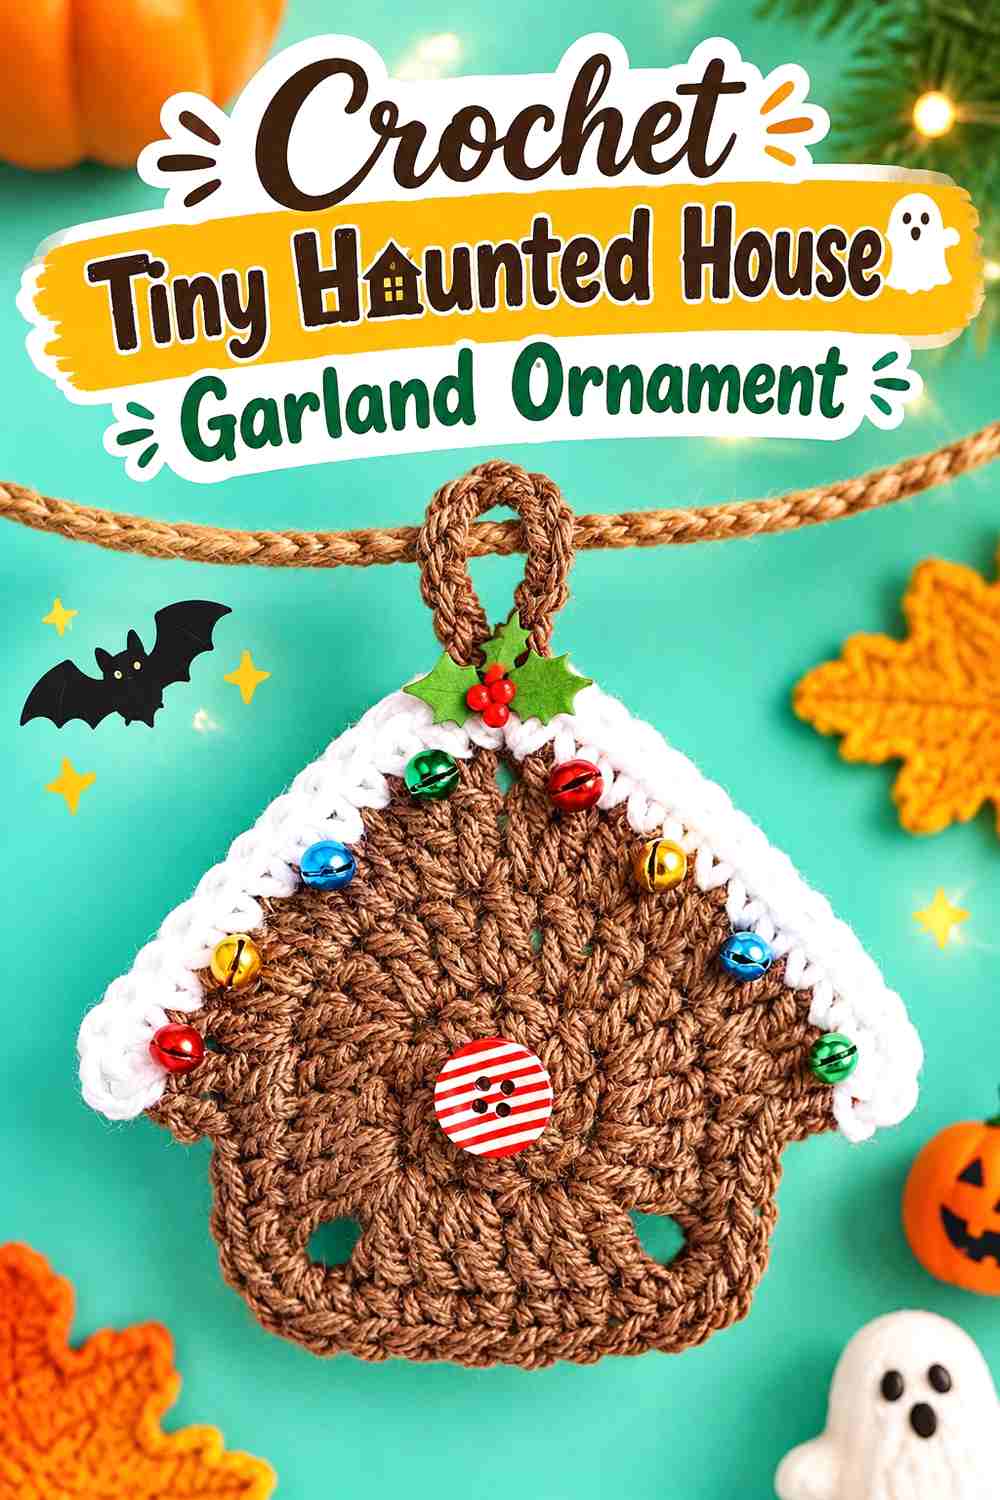
A compact flat ornament is one of the easiest ways to make the haunted village look larger without filling the shelf. Several small houses can become a hanging street above the dimensional display, while a single one can work as a tiny foreground building or gift accent.
The source project is a gingerbread ornament, so Halloween comes from color and independent styling.
A Garland Creates a Second Village Layer
Hanging small houses above the main buildings adds architecture without using table space.
Keep the strand high enough that the ornaments do not overlap the roofs below. The goal is to create a background layer, not to hide the dimensional village.
Small Decorative Additions Can Dominate Quickly
An ornament has limited surface area. Oversized buttons, bows, or other embellishments can overwhelm the house silhouette.
For a haunted adaptation, a restrained roof contrast or tiny door accent may communicate more clearly than several competing decorations.
Make Repeated Houses Different Through Placement
If you make more than one, they do not need completely different patterns to avoid repetition. Vary how they are positioned within the display and reserve the more unusual constructions for the main shelf.
This lets a garland form a coherent background while the larger houses provide variety.
Creator Credit: Repeat Crafter Me
19. Crochet Narrow Hanging Haunted Cottage
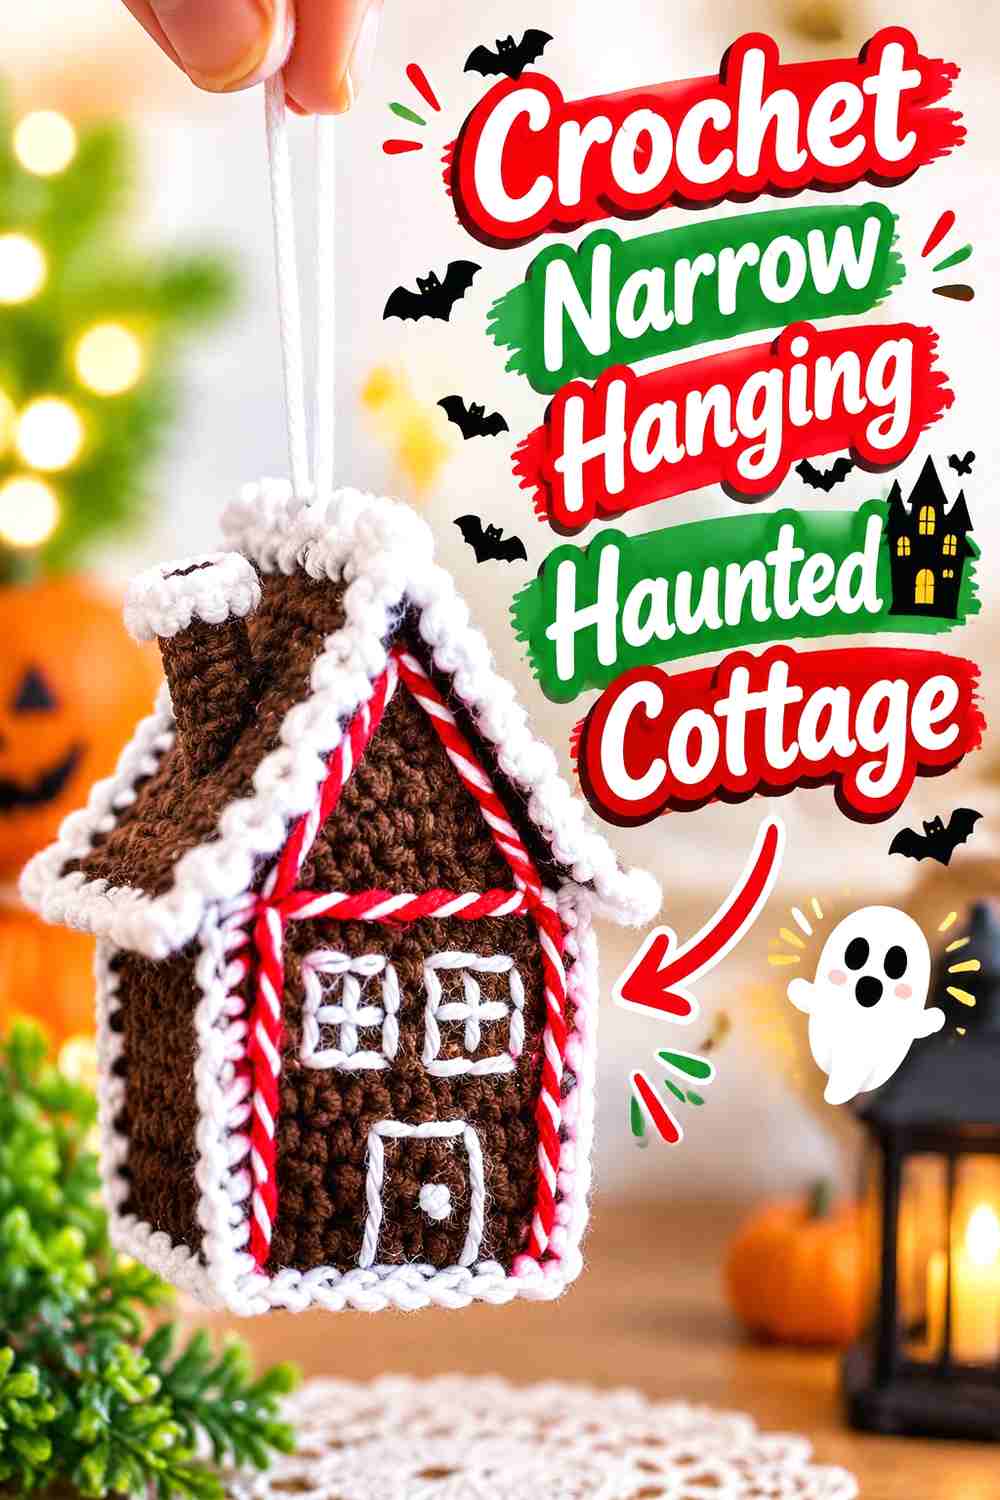
A taller hanging house makes a useful final addition because its proportion differs from the wider tiny ornament. The original project is a gingerbread-house hanging ornament that can also function as a wall decoration or appliqué-style piece.
For a haunted village, use the narrow silhouette where you need height without adding another bulky structure.
Put Narrow Houses Into Awkward Spaces
A slim cottage can occupy the visual gap between two wider mushroom roofs or hang beside a larger backdrop.
This is particularly useful on narrow mantels where every additional dimensional building consumes valuable depth.
Keep the Roof and Door Separated by Contrast
On a narrow house, architectural features sit closer together. If the roof, wall, trim, and door all use similar dark tones, the finished object can lose definition.
Choose one feature to stand out clearly and let the remaining colors stay subdued.
Take Advantage of Its Multiple Display Options
A hanging cottage does not have to remain part of the tabletop village every year. It can move to a Halloween branch display, wall arrangement, garland, or door decoration when the main village changes.
That flexibility makes it a practical final project if storage space is becoming limited.
Creator Credit: Just A Little Crochet
Which Crochet Haunted Village House Should You Make First?
For the clearest Halloween centerpiece, start with the Crochet Witch’s Treat House Centerpiece. It already has a spooky architectural identity and can establish the scale for everything that follows.
For a woodland village, combine the Spotted Mushroom Haunted Cottage, Mushroom House Storage Basket, and Gnome Home Drawstring Cottage with one of the pumpkin houses. Those shapes create enough roof variation that the scene will not depend on color alone.
For a more traditional haunted neighborhood, use the Classic Haunted Seaside Cottage, Crooked Gable Haunted House, Tall Gothic Village Manor, and Detailed Haunted Candy Mansion as the main architecture. Add only one or two rounded woodland houses so they feel like unusual properties at the edge of town.
If space is limited, focus on the Flat Haunted House Appliqué, Tiny Haunted House Garland Ornament, Mini Candy-Style Haunted House Ornament, and Narrow Hanging Haunted Cottage. They can create an entire Halloween neighborhood vertically rather than occupying a deep shelf.
For a functional party display, the Witch’s Treat House, Mushroom House Storage Basket, Pumpkin House Pot, and Haunted House Treat Box give the village practical roles as well as decoration.
Conclusion
The strongest crochet haunted village will usually come from mixing building types instead of making nineteen versions of one cottage. Start with a substantial architectural anchor, add a few different rooflines, and then use pumpkin homes, mushroom cottages, containers, appliqués, and hanging houses to create changes in height and depth.
You also do not need nineteen projects on the same shelf. A smaller display might use one large haunted house, one traditional cottage, one pumpkin home, one mushroom house, and two miniature background pieces. The remaining ideas can become future additions as the village grows from one Halloween to the next.
Where a tutorial was originally designed as a fairy, cottage, or gingerbread house, keep the creator’s construction as the source and use color, placement, and separate seasonal props for the haunted adaptation. Refer to the original tutorials for the exact materials, construction details, measurements, and finishing methods.
Frequently Asked Questions
Can I turn a crochet gingerbread house tutorial into a Halloween haunted house?
Yes, without claiming that the original tutorial is a Halloween pattern. Follow the creator’s house construction and treat the haunted version as your own styling adaptation. Wall, roof, door, and trim colors can change the mood dramatically without requiring you to rewrite or alter the underlying pattern.
How can I make different crochet house tutorials look like one village?
Repeat a limited group of colors across the collection. For example, the same window yellow, roof charcoal, muted purple, or rusty orange can appear on several buildings even when their shapes are unrelated.
Placement also helps. Houses grouped on the same base or displayed with repeated trees, pumpkins, paths, or background elements will usually feel more connected than projects scattered around a room.
Do all of my crochet Halloween village houses need to be the same scale?
No. Slight scale differences can make the village more interesting, especially when larger buildings sit toward the back and smaller ones occupy the foreground.
Problems appear when the difference is so large that a supposed cottage looks enormous beside the main manor. Finish one anchor building first and compare later projects visually before making multiples.
What is the easiest way to add depth to a crochet haunted village?
Use three visual layers: tall or substantial houses toward the back, medium cottages in the middle, and small ornaments or low pumpkin homes toward the front.
A flat appliqué or hanging-house layer behind the shelf can make the village feel much larger without occupying more tabletop space.
Can I put lights inside crochet haunted houses?
Only when the specific light arrangement is suitable for the project and used according to its safety instructions. A cool-running battery-operated LED can be considered for some displays, but never place an open flame inside or beside crochet.
Do not assume a creator’s house is designed for lighting unless the original source specifically addresses it.
How should I store a crochet Halloween village after October?
Protect the shapes that are easiest to crush first: pointed roofs, mushroom caps, doors, and dimensional embellishments. Avoid packing bulky houses tightly together just to fit them into one container.
Flat appliqués and ornaments can often be stored separately from dimensional houses. Labeling the storage box and keeping any removable supports or display hardware with the corresponding pieces can make setup easier the following year.
What makes a crochet haunted village look more intentional rather than crowded?
Use fewer focal points. One large haunted house and one unusual pumpkin or mushroom cottage are usually enough to command attention. Let the remaining buildings support them through simpler color and placement.
Leave some empty space between major silhouettes, keep important doors and roofs visible, and avoid placing a detailed prop in front of every building. A little visual breathing room often makes the entire handmade village easier to appreciate.