Crochet trapper hats can take several forms. Some closely copy the familiar cold-weather silhouette with a front flap, substantial ear coverage, and fuzzy trim. Others start with a simpler earflap or aviator hat and rely on texture, edging, ties, or color blocking to create the same rugged feel.
That range is useful if you want a bold fall 2026 accessory without making 15 versions of essentially the same hat. The ideas below include true trapper constructions, ushanka-inspired shapes, streamlined aviator hats, ribbed designs, cable texture, braided ties, chunky yarn, and baby-size options.
Not every tutorial is an exact traditional trapper hat. Several teach adaptable earflap constructions instead, so pay attention to the notes on what creates each silhouette before choosing one.
Quick List
- Crochet Furry Pocket Ushanka Trapper Hat
- Crochet Flat Seamed Unisex Trapper Hat
- Crochet Side To Side Contrast Trapper Hat
- Crochet Faux Fur Adult Trapper Hat
- Crochet Adjustable Aviator Trapper Hat
- Crochet Post Stitch Ribbed Trapper Beanie
- Crochet Double Strand Adult Earflap Trapper Hat
- Crochet Size Inclusive Aviator Trapper Beanie
- Crochet Thick Yarn Pom Earflap Trapper Hat
- Crochet Classic Adult Earflap Trapper Hat
- Crochet Size Inclusive Double Crochet Earflap Hat
- Crochet Braided Strap Earflap Trapper Cap
- Crochet Minimal Bonnet Style Trapper Hat
- Crochet Cable Trapper Beanie
- Crochet Chunky Baby Earflap Trapper Hat
What Makes a Crochet Hat Read as a Trapper Hat?
Ear coverage is the strongest starting point, but earflaps alone do not automatically create a trapper silhouette. Traditional-looking versions usually have more visual weight around the sides of the head, and many add a forehead flap, visor-like section, turned-up panel, or contrasting fuzzy trim.
Proportion matters. A very small decorative front panel can disappear against a deep crown, while an oversized flap can dominate the face. If you adapt a standard earflap tutorial, sketch or pin the proposed front detail in place before permanently attaching anything.
Texture can do part of the design work too. Fuzzy yarn suggests a lined trapper hat, while dense ribbing or a thick double-strand fabric can create a more streamlined outdoorsy version without faux fur.
Fit, Yarn, and Trim Choices That Change the Look
Start with head fit before adding decorative trapper details. A brim, fuzzy edging, heavy front flap, or wide earflaps can all alter how the finished hat sits, so matching the tutorial’s gauge and checking the intended size matter more than choosing a dramatic accent color.
A structured yarn can make an aviator or ushanka shape look more defined, while a softer fabric may collapse closer to the head. Neither effect is automatically better; the right choice depends on whether you want a crisp statement hat or a softer everyday accessory.
Also consider what the hat will be worn with. Extra bulk around the ears can compete with a high coat collar or fitted hood. Long braids and ties change both the look and practicality, particularly on children’s hats.
1. Crochet Furry Pocket Ushanka Trapper Hat
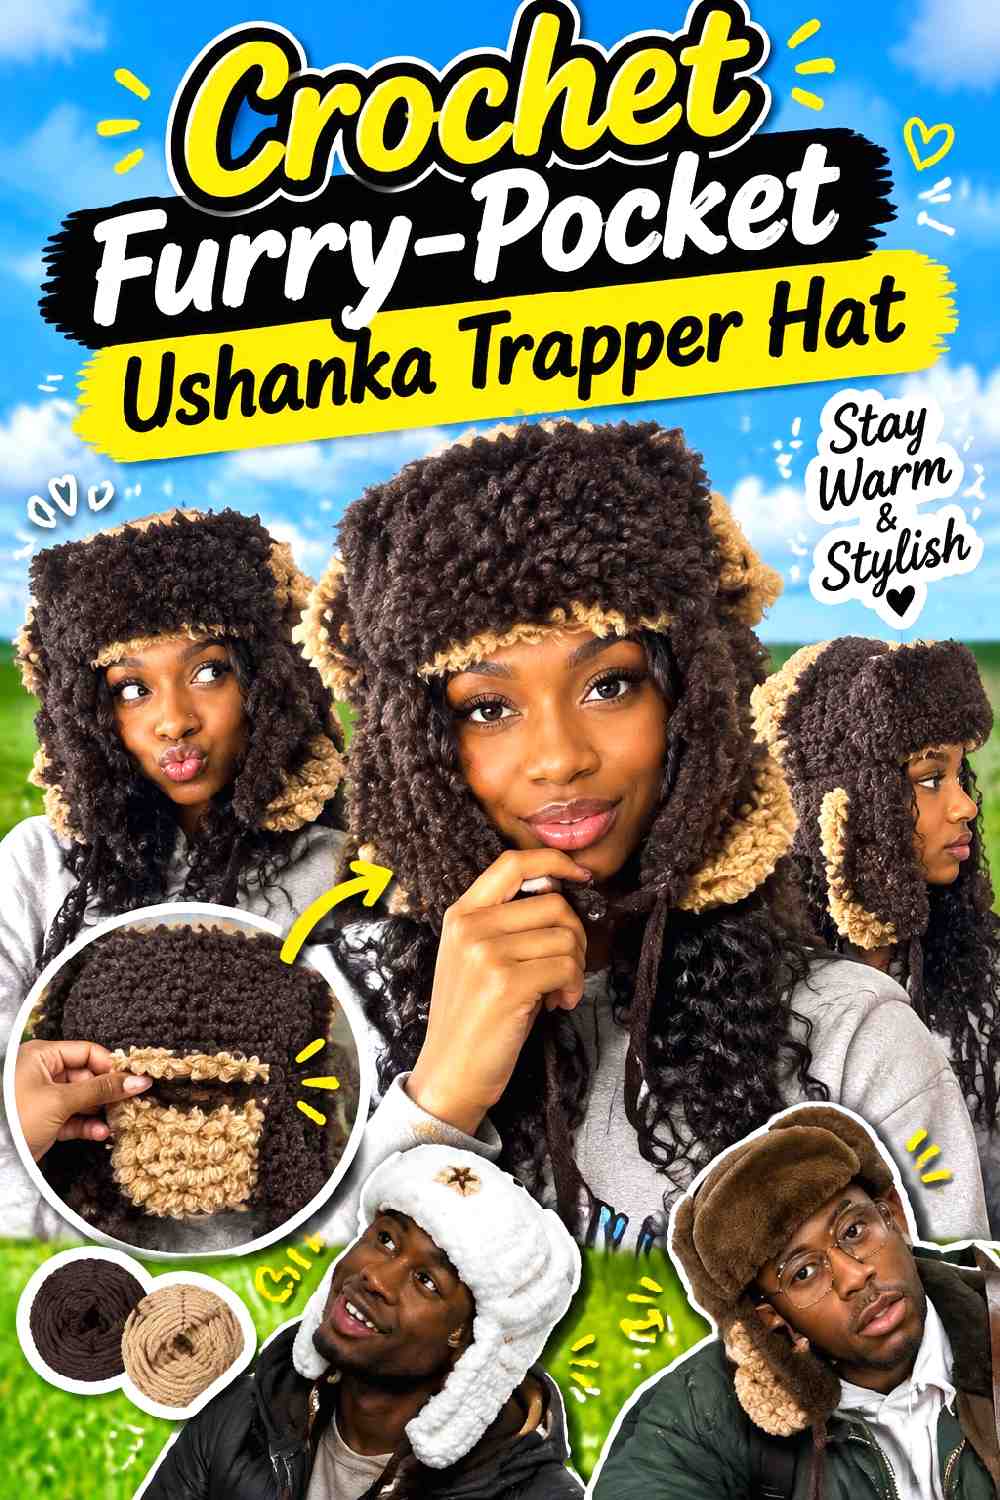
This version leans strongly into the classic ushanka look. Indiepop’s tutorial includes a front flap, substantial side sections, fuzzy edging, and buttoned details, giving the finished hat much more structure than a standard earflap beanie.
Choose this direction when you want the trapper identity to be obvious even in a simple color palette. The silhouette and contrasting textures already provide plenty of visual interest.
Fuzzy Trim Should Frame the Shape
A furry border can quickly become the dominant element. Before substituting a thicker novelty yarn, consider how much width it will add around the forehead and sides.
The goal is usually to emphasize the outline rather than hide it. A very deep fuzzy edge may make carefully shaped flaps appear smaller.
Side Details Need Symmetry Before Finishing
Buttons and pocket-like flap details draw attention to alignment. Lay both sides flat and compare their position before securing decorative elements.
Small differences are much easier to correct at this stage than after every finishing detail has been attached.
A Defined Crown Strengthens the Ushanka Profile
This style benefits from a crown that holds a recognizable shape rather than disappearing under the lower trim. If you change yarn, compare the new fabric’s firmness with the original before assuming the substitution will produce the same outline.
Creator Credit: Indiepop
2. Crochet Flat Seamed Unisex Trapper Hat
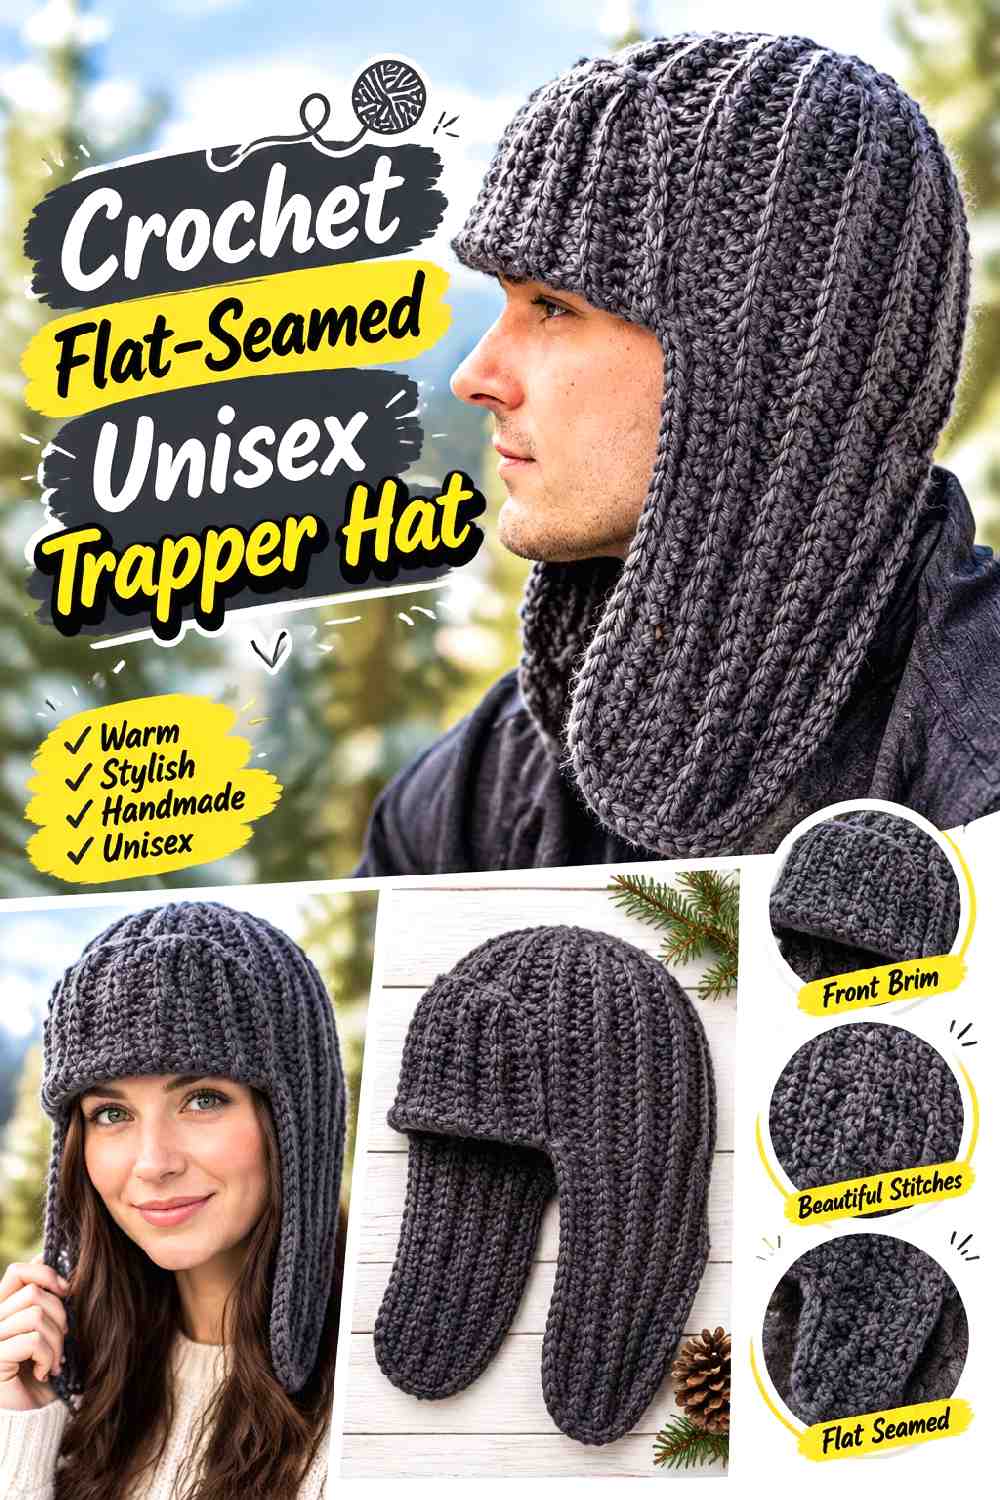
Crochet Bits offers a trapper hat built as a worked-flat, seamed project using bulky yarn. The published design is intended as a unisex adult/teen hat, making it a useful alternative to predominantly top-down earflap constructions.
This option suits someone who prefers building and judging a flat piece before closing it into a hat.
Flat Construction Changes Where Fit Errors Appear
With a flat construction, width and depth need attention before seaming. A panel that seems only slightly too wide on the table can become noticeably loose once joined.
Compare the work with the tutorial’s sizing guidance rather than waiting until every finishing element is complete.
The Front Visor Is a Major Alignment Check
A trapper-style front section naturally creates a visual center line. Check that it relates cleanly to the seam and earflap placement before finishing.
An otherwise well-made hat can appear twisted if those major visual landmarks are offset.
Bulky Yarn Can Exaggerate the Lower Edge
Bulky yarn helps create a substantial cold-weather look, but it also makes edging, seams, and overlaps physically thicker. If you substitute another bulky yarn, compare the finished fabric rather than relying on the category label alone.
Creator Credit: Crochet Bits
3. Crochet Side To Side Contrast Trapper Hat
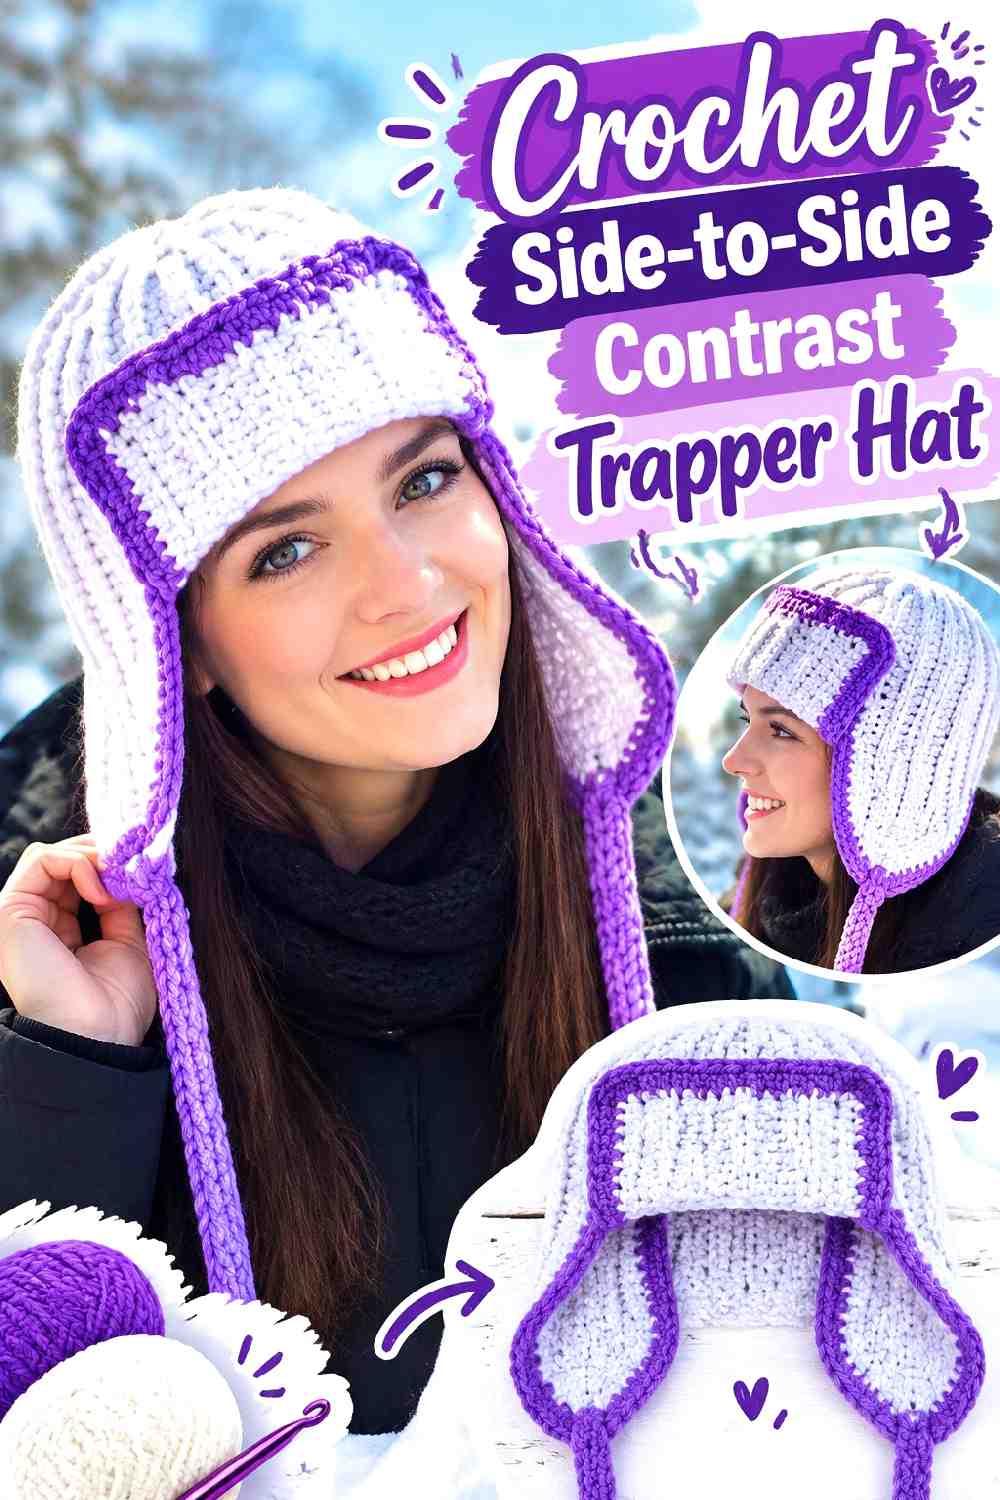
Nebeska Crochet with Love takes a different route by developing the trapper hat in rows from side to side as one connected construction. Earflaps, a front section, contrasting edging, and ties create the recognizable silhouette without relying on a separate fuzzy lining.
It is a useful choice if construction method interests you as much as surface styling.
Width and Crown Depth Need to Stay Balanced
Side-to-side construction makes row length especially important to the final proportions. Before adapting the hat, identify which measurement is controlling circumference and which is creating crown depth.
Changing one dimension without understanding that relationship can alter the whole profile.
Contrast Edging Exposes Uneven Silhouettes
A contrasting border acts almost like an outline around a drawing. It makes attractive shaping clearer, but it also emphasizes uneven edges.
Check the overall contour before adding a high-contrast finish. A same-color border is more forgiving if your priority is a quieter appearance.
Keep Ties Secondary to the Fit
Ties can reinforce the outdoorsy trapper look, but they should not be needed to compensate for a hat that is otherwise too loose. Establish a comfortable crown and earflap position first, then decide how prominent you want the ties to be.
Creator Credit: Nebeska Crochet with Love
4. Crochet Faux Fur Adult Trapper Hat
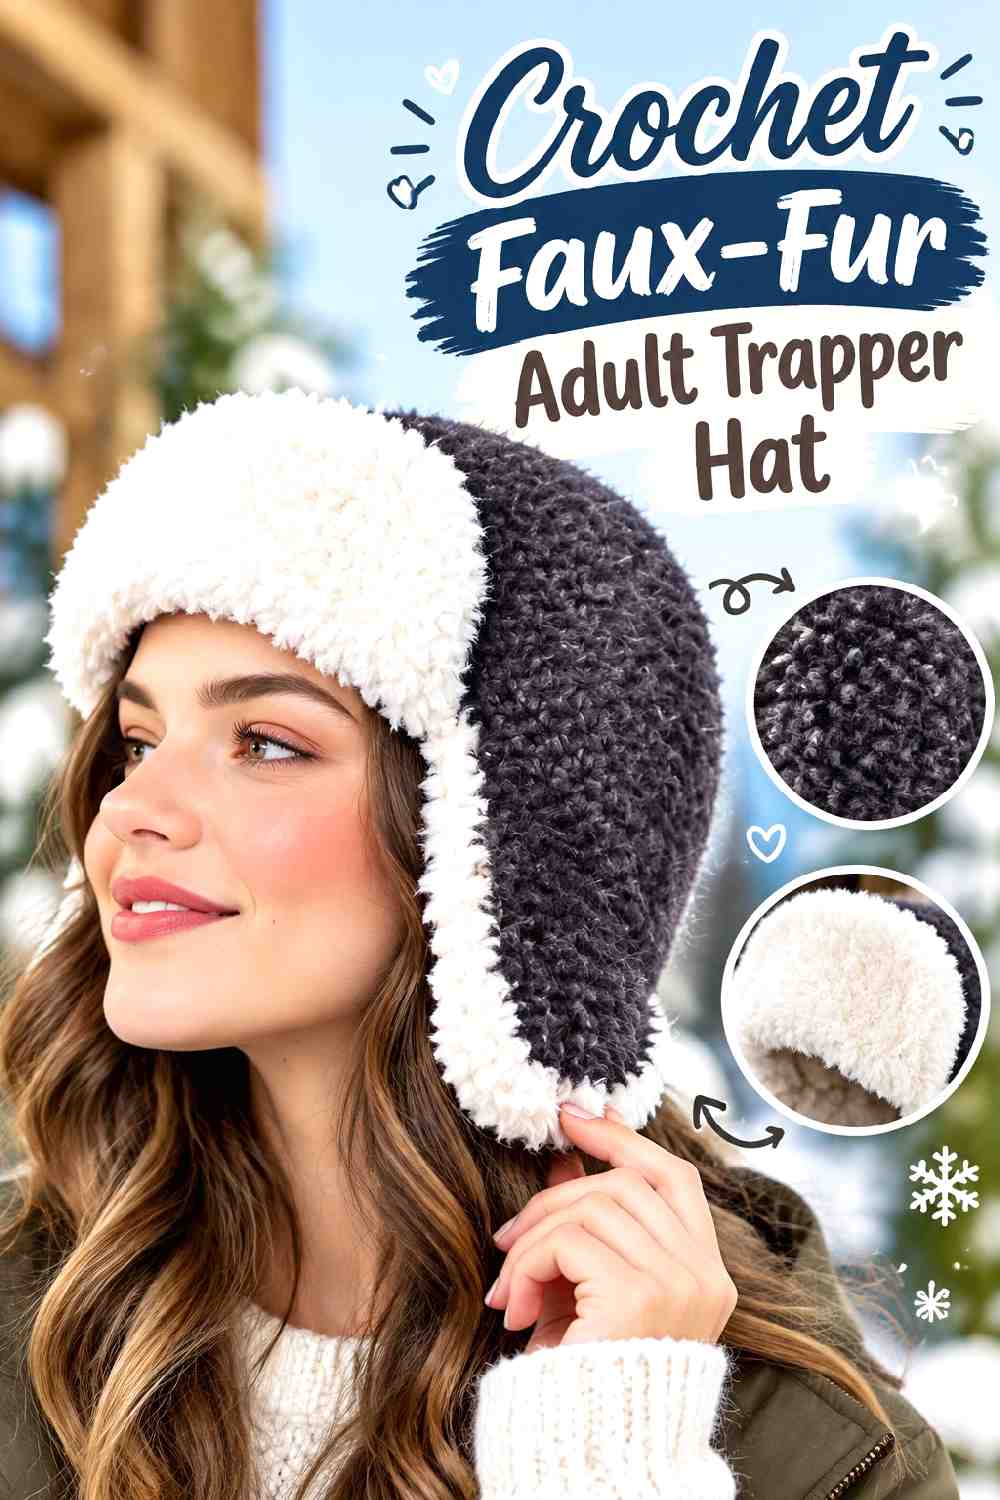
Yarnspirations’ Red Heart design is one of the most literal trapper interpretations in this collection. The tutorial combines a dense crocheted body with fuzzy yarn around the earflaps and brim, producing the visual effect of a soft lining against a smoother exterior.
Choose it when faux-fur contrast is more important to you than cables, stripes, or decorative motifs.
Treat Smooth and Fuzzy Yarn as Different Fabrics
Two yarns can share a project without behaving the same way. A smooth yarn allows stitch definition and shaping to remain visible, while a fluffy yarn can obscure individual stitches and add considerable visual volume.
Test substitutions together rather than selecting each one in isolation.
Fuzzy Sections Can Affect Interior Space
Thick trim around the forehead, cheeks, and ears can make a hat feel more substantial than the smooth crown suggests. If your replacement fuzzy yarn is noticeably fuller than the original, check the fit as you work.
Do not assume the same hook or stitch count will automatically create an equivalent result with a significantly different yarn.
Let the Texture Carry the Statement
Faux-fur-style trim already creates strong contrast. Extra patches, large appliqués, multiple pom-poms, or heavy colorwork may compete with the distinctive trapper outline.
For a bold but controlled fall look, consider letting the smooth-versus-fuzzy contrast remain the primary feature.
Creator Credit: Yarnspirations
5. Crochet Adjustable Aviator Trapper Hat
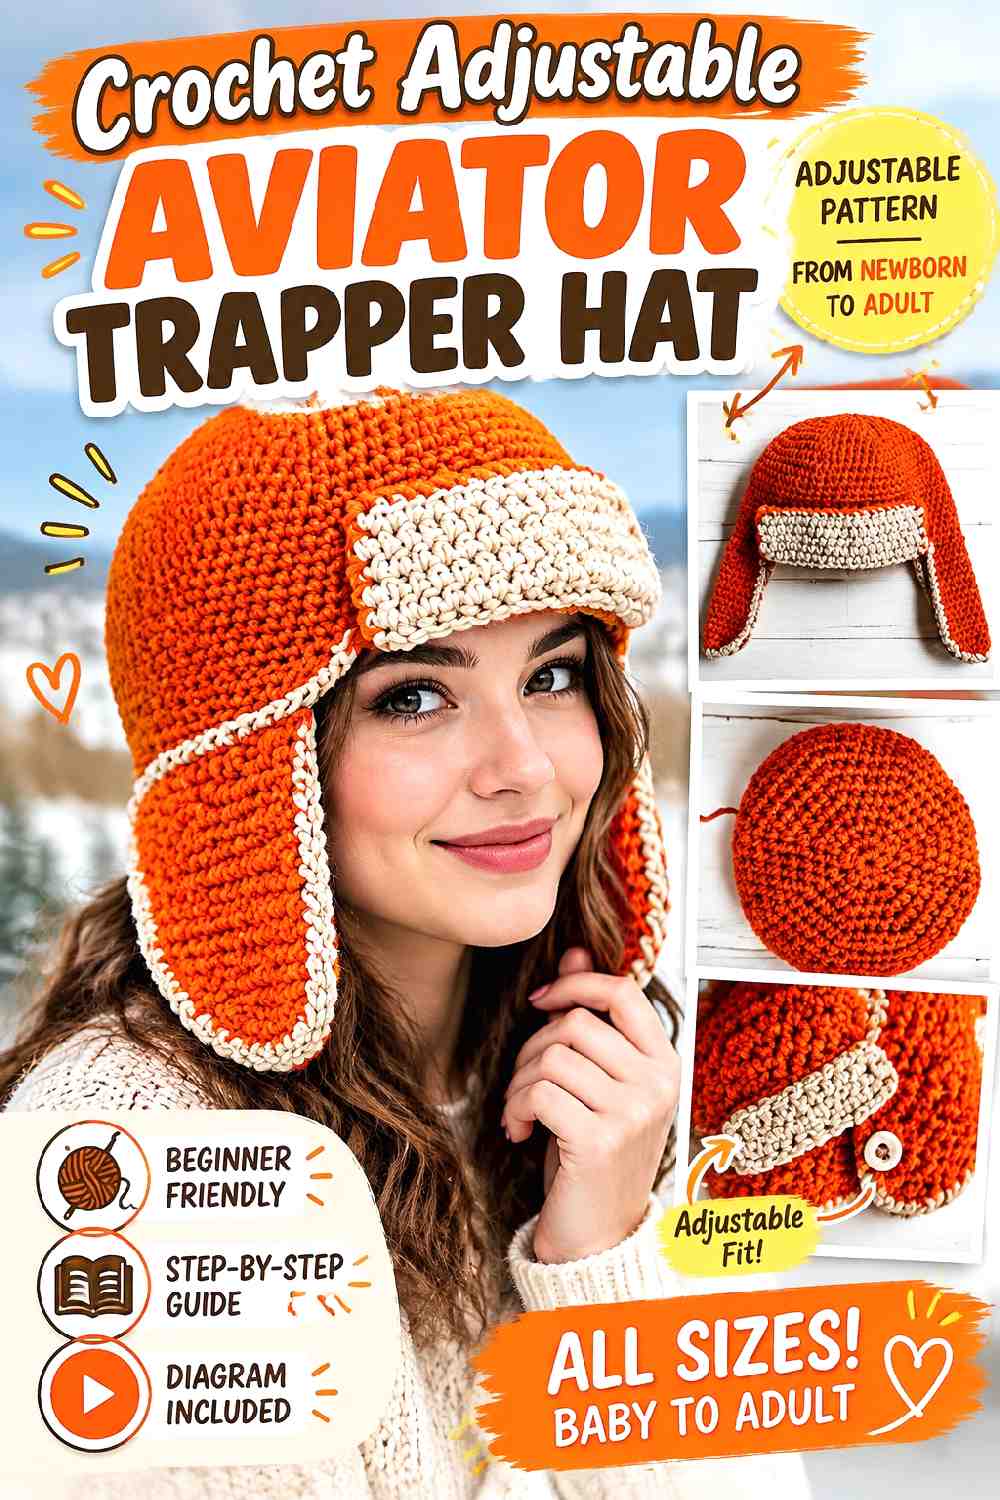
Vivid Yarn Crochet’s aviator construction includes a crown, body, earflaps, front sections, and finishing trim, with the tutorial framed around adapting the hat for different head sizes.
This is a useful bridge between a classic trapper and a cleaner pilot-cap shape. It can look rugged without requiring furry yarn.
Scale the Front Flap With the Crown
A forehead flap has more visual impact than a small embellishment, so its dimensions need to make sense beside the crown. If you resize the hat, avoid treating the front section as an independent one-size detail.
Judge the relationship visually before final attachment.
Use Measurements During Construction
An adaptable hat is still affected by individual tension and yarn choice. Check the developing circumference and depth against the intended wearer rather than relying only on age or general size labels.
That is particularly useful when changing yarn weight or hook size.
Trim Can Clarify the Aviator Outline
A contrasting border can visually separate the front and side elements from the crown. If you prefer a quieter hat, use a tonal edge instead; the construction can still communicate the aviator shape without a sharp color break.
Creator Credit: Vivid Yarn Crochet
6. Crochet Post Stitch Ribbed Trapper Beanie
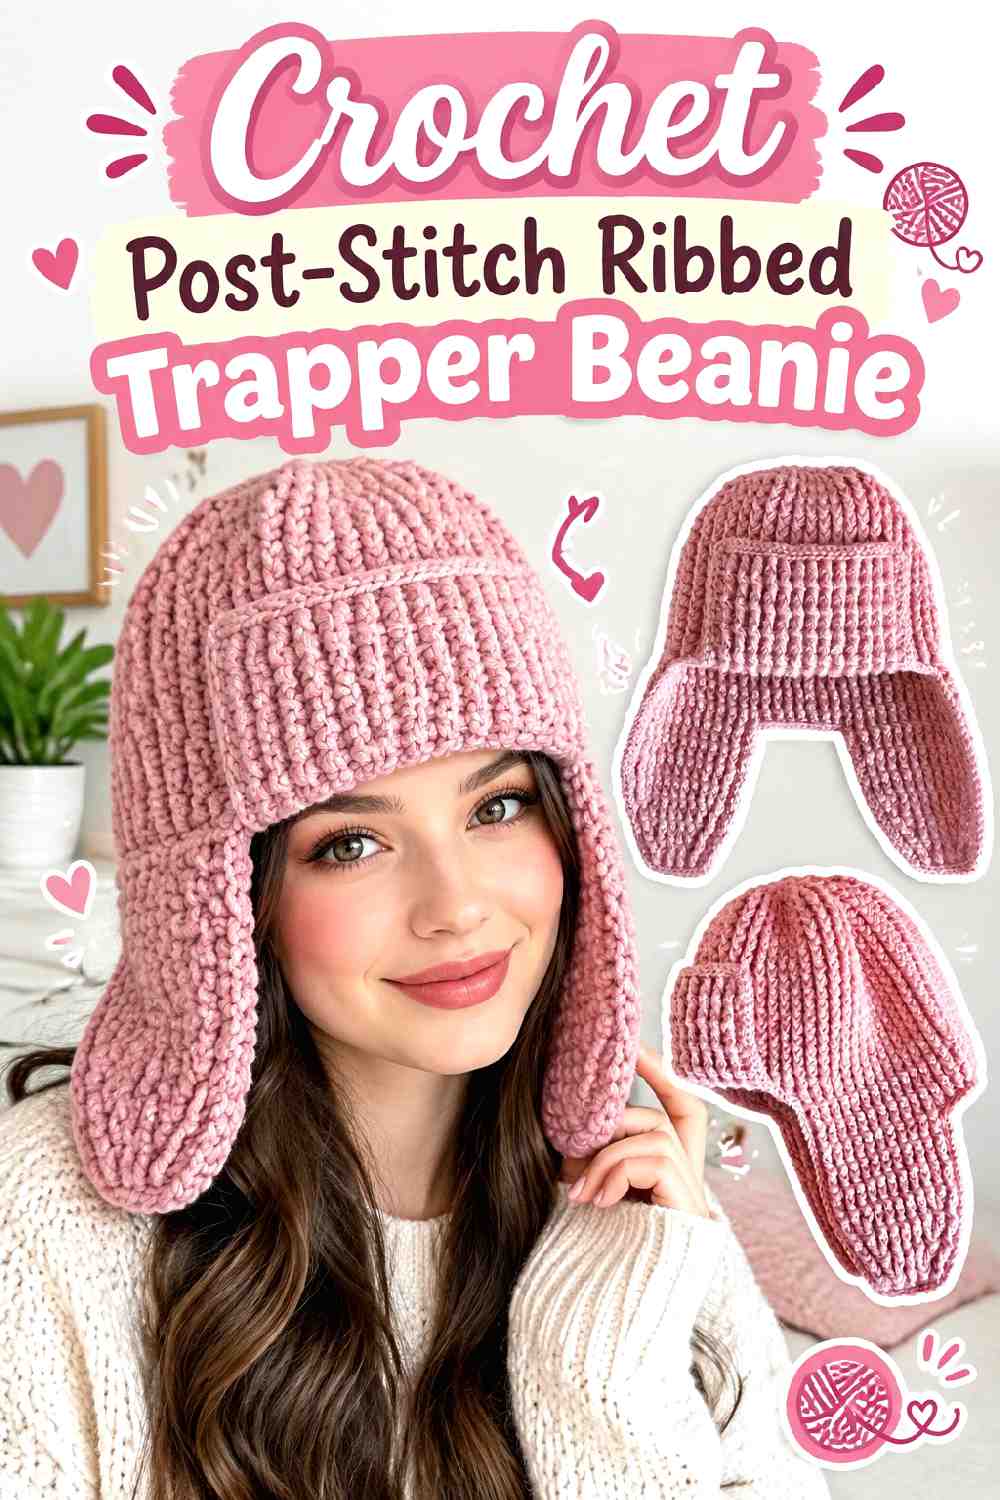
Serafima Crochet & Knitting uses raised post-stitch ribbing to give an earflap hat a pronounced vertical texture. The tutorial includes an adjustable brim and earflap treatment, creating a more fitted trapper-inspired alternative to fluffy aviator styles.
This one is especially useful when texture should be the statement rather than contrasting trim.
Ribbing Adds Give but Does Not Replace Sizing
Ribbed crochet can stretch, but that does not mean a substantially wrong circumference will correct itself when worn. Measure according to the tutorial and consider how much the chosen yarn rebounds after stretching.
A fabric that stretches but does not recover well can lose the close-fitting look this style depends on.
A Deeper Brim Pushes the Shape Toward Trapper Style
Brim depth changes how much visual weight sits around the forehead. A more substantial front area can create a stronger winter-hat profile, while a narrow brim keeps the design closer to a textured beanie.
Make that choice in proportion to the earflaps rather than treating each detail separately.
Check Hood Compatibility Before Adding More Bulk
Raised texture makes the fabric visually and physically thicker. If the hat will regularly sit under a hood, test how the crown and lower edge interact with outerwear before adding optional trim.
Creator Credit: Serafima Crochet & Knitting
7. Crochet Double Strand Adult Earflap Trapper Hat
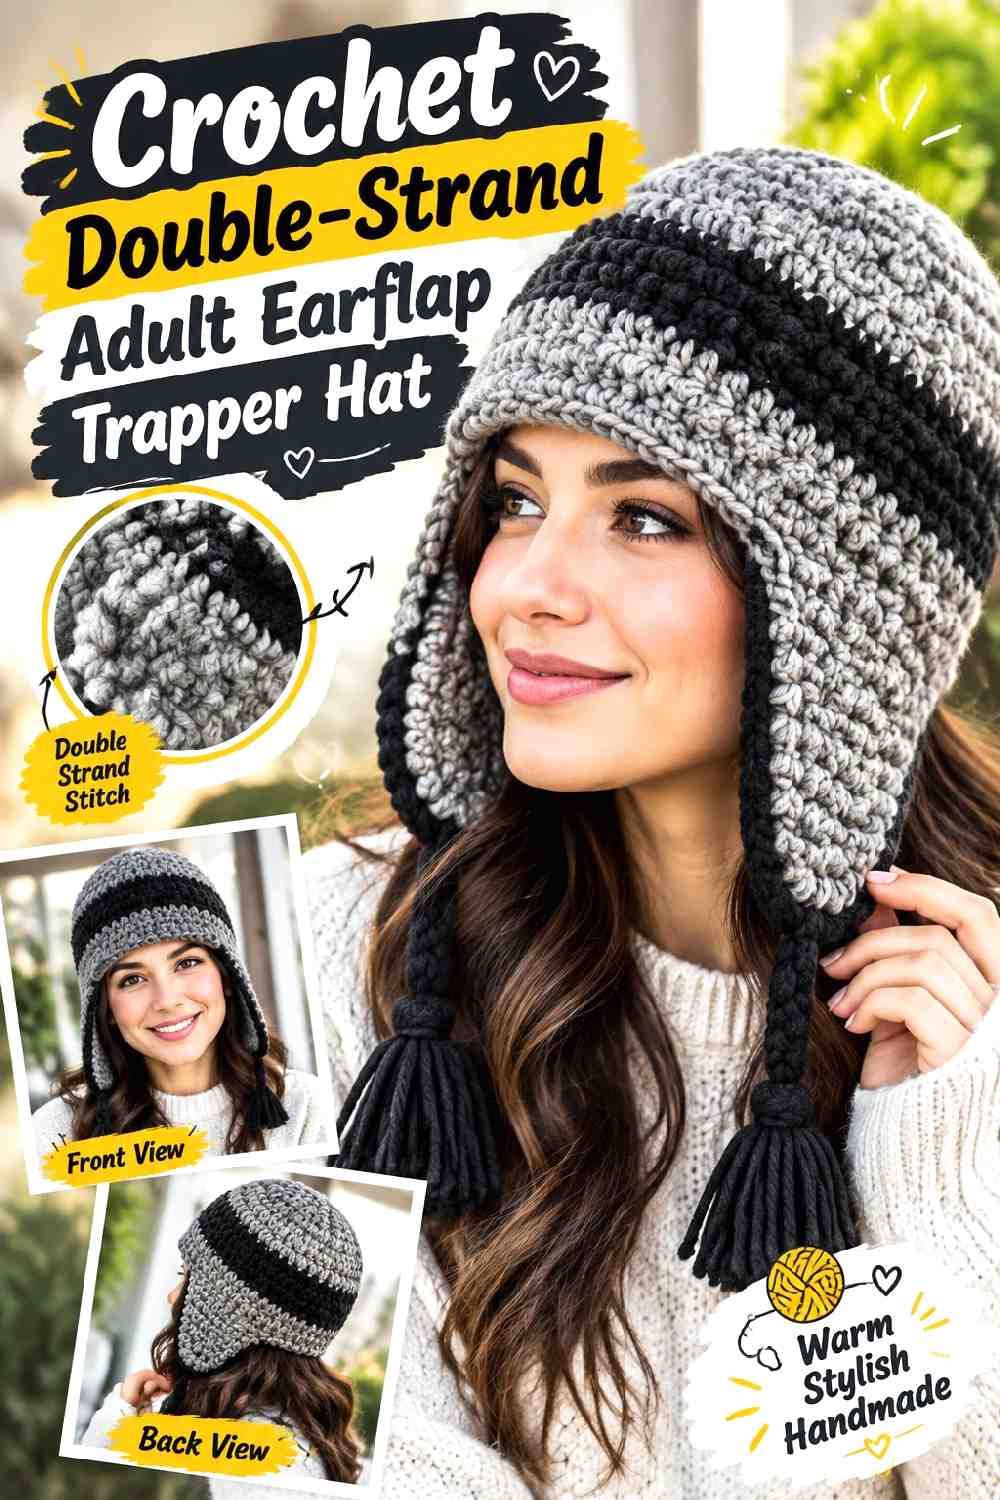
CraftingWithClaudie’s adult earflap hat uses two strands of worsted-weight yarn held together and includes contrasting sections that help define its cold-weather silhouette.
The result is a useful foundation for a heavier, understated trapper look without faux fur.
Two Strands Change More Than Thickness
Holding yarn double affects weight, stiffness, and stitch definition as well as gauge. Replacing the paired yarn with a single bulky yarn may create a similar overall thickness but not necessarily the same drape.
Make the substitution based on the resulting fabric, not just the label.
Broad Earflaps Should Sit Close to the Head
Large earflaps provide much of the visual identity here. If they flare sharply away from the face, check whether the issue comes from sizing, edging tension, or the firmness of the yarn before adding extra decoration.
Contrast Bands Can Reshape the Hat Visually
A strong horizontal band can make a tall crown seem shorter, while a low-contrast band keeps the vertical shape more obvious.
That makes color placement useful for more than decoration. Consider the effect you want before choosing where to introduce contrast.
Creator Credit: CraftingWithClaudie
8. Crochet Size Inclusive Aviator Trapper Beanie
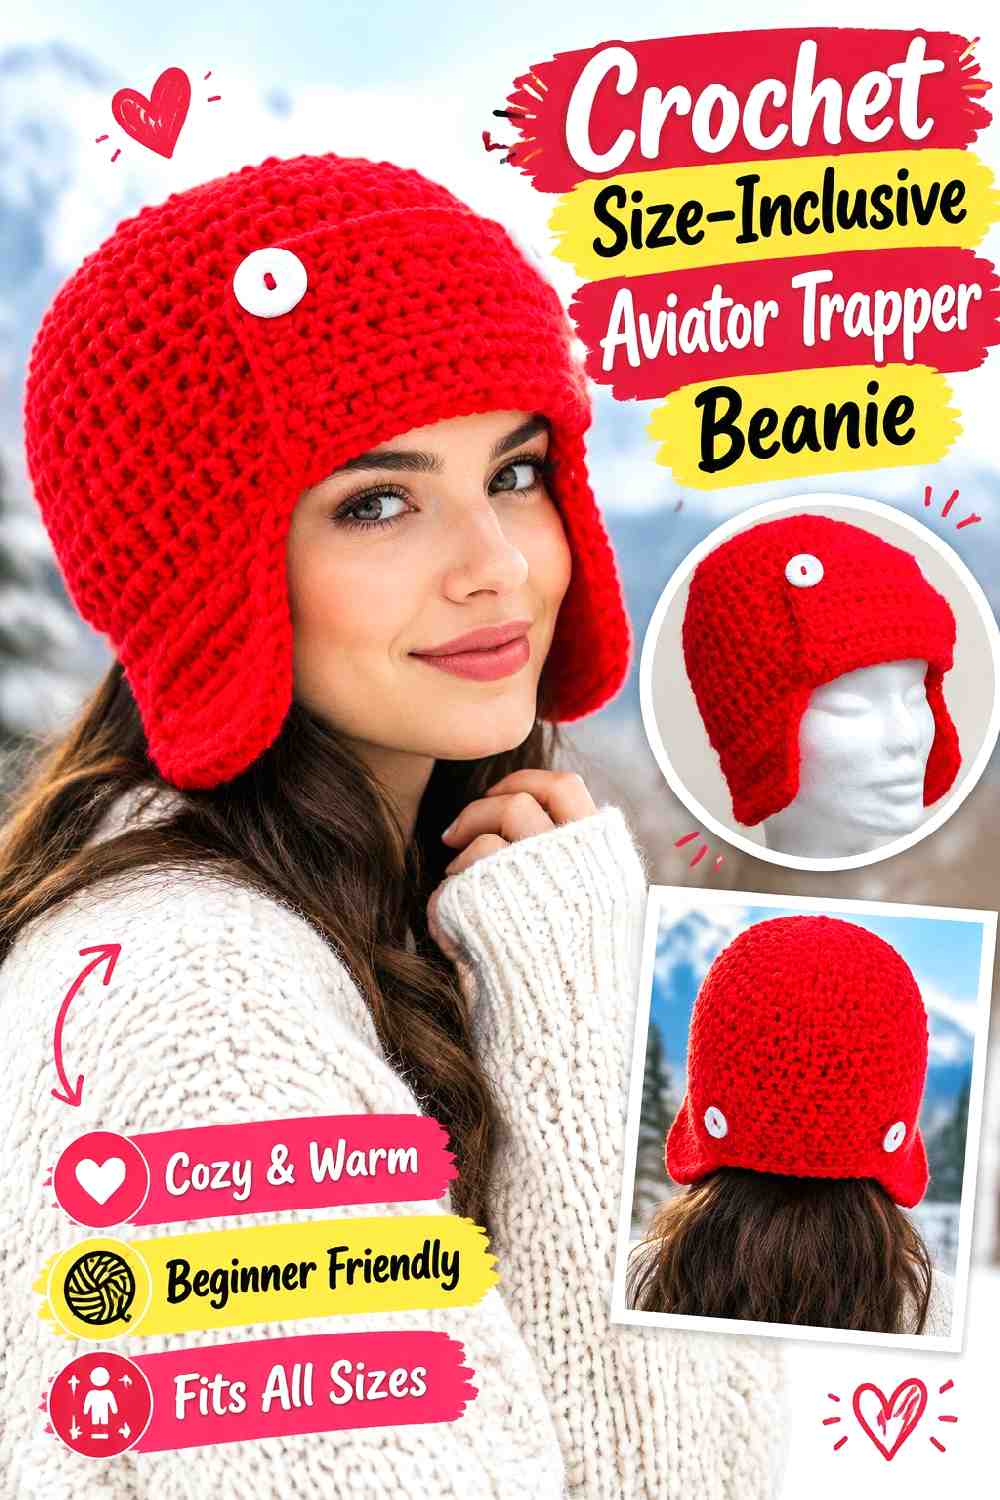
Crochet with Clare’s aviator beanie tutorial covers a broad size range, making the basic construction particularly useful when you want to understand how an ear-covering pilot-style hat changes across different head sizes.
Rather than relying on heavy faux-fur trim, this direction gets its character mainly from the silhouette.
Ear Coverage Carries the Aviator Look
When the crown is simple, earflap shape and placement become the defining features. Before adding goggles, buttons, patches, or other pilot references, see whether the base already gives you enough of the effect.
A restrained finish can make the hat easier to pair with everyday fall outerwear.
Adapt by Measurement, Not Age Label Alone
Age-based sizing is only a starting point because head measurements vary. When possible, use the intended wearer’s actual measurement and compare it with the tutorial’s sizing information.
This is particularly important when making the same style for several people.
Add Pilot Details Sparingly
Aviator styling can move quickly from wearable accessory to costume if every possible motif is added at once. For a fall wardrobe piece, one deliberate detail—such as a contrasting edge or restrained button accent—may be enough.
Creator Credit: Crochet with Clare
9. Crochet Thick Yarn Pom Earflap Trapper Hat
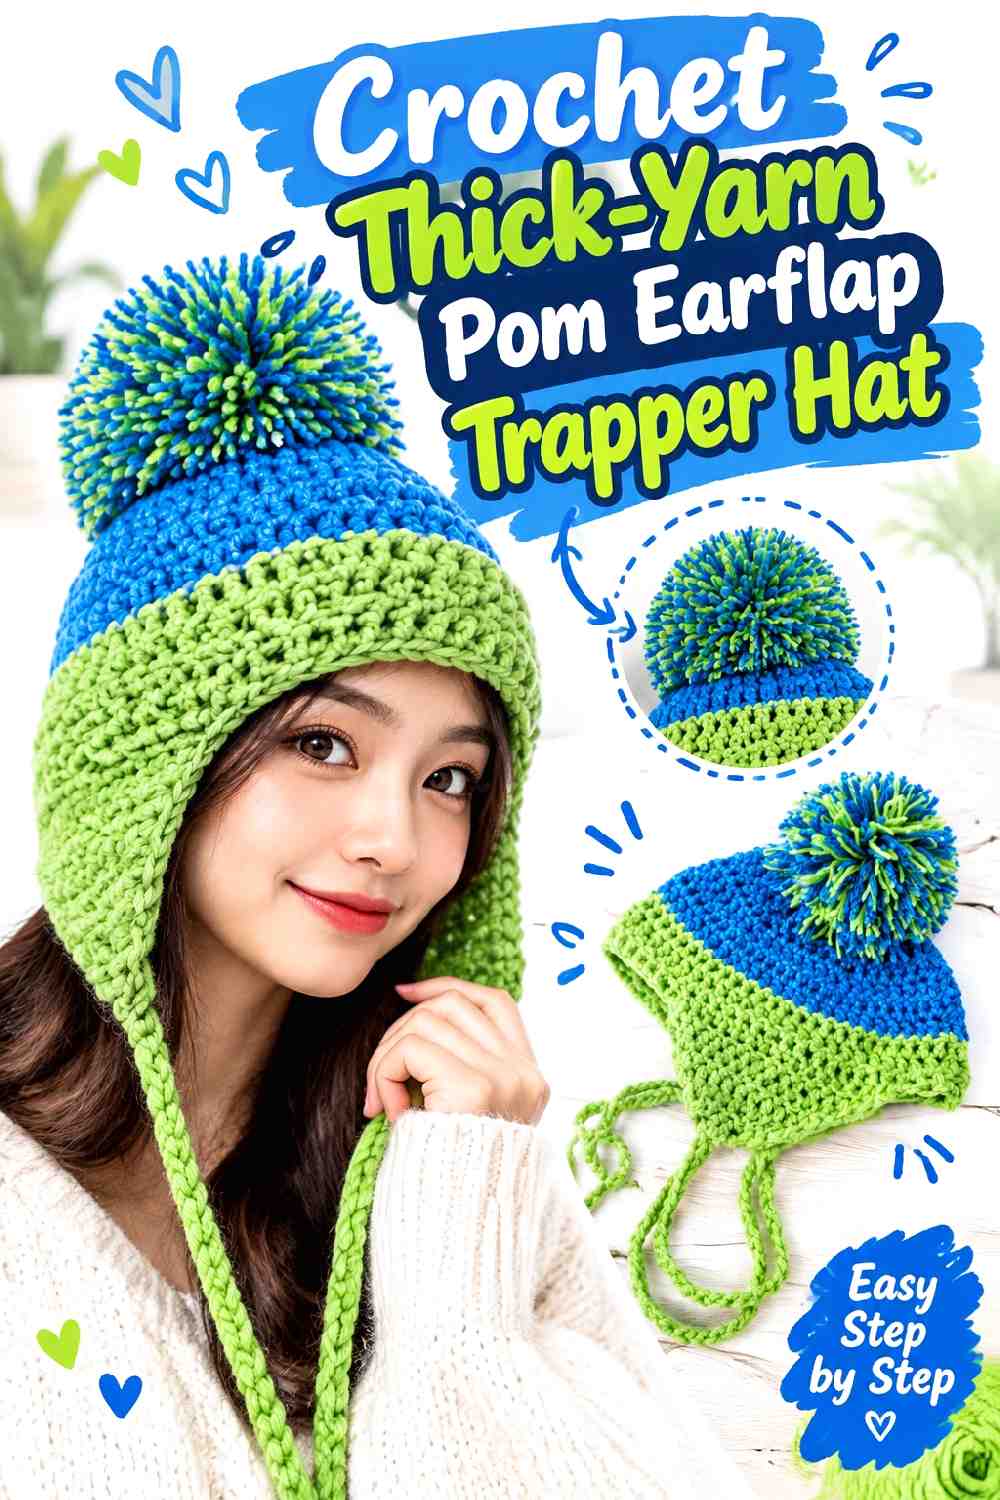
ABoC Studio demonstrates a substantial earflap hat using thicker yarn, with a pom-pom as an optional finishing feature.
This version is less literal than a faux-fur trapper, but the heavy crown and defined earflaps make it a practical base for a bold fall hat.
Thick Yarn Magnifies Small Fit Differences
Large stitches build dimensions quickly. A small difference in tension across several rounds or rows can therefore affect circumference and depth more noticeably than expected.
Check measurements before completing all the finishing.
A Pom-Pom Changes the Top Profile
Adding a pom-pom makes the hat taller and more playful, while leaving it off keeps the shape closer to a practical aviator cap.
Decide which direction supports the rest of your trapper styling rather than treating the pom as an automatic finishing step.
Earflap Angle Matters on a Minimal Crown
Without fuzzy trim or a large front visor, the flaps become the main visual cue. Check them from the front as well as the side so they frame the face evenly.
Creator Credit: ABoC Studio
10. Crochet Classic Adult Earflap Trapper Hat
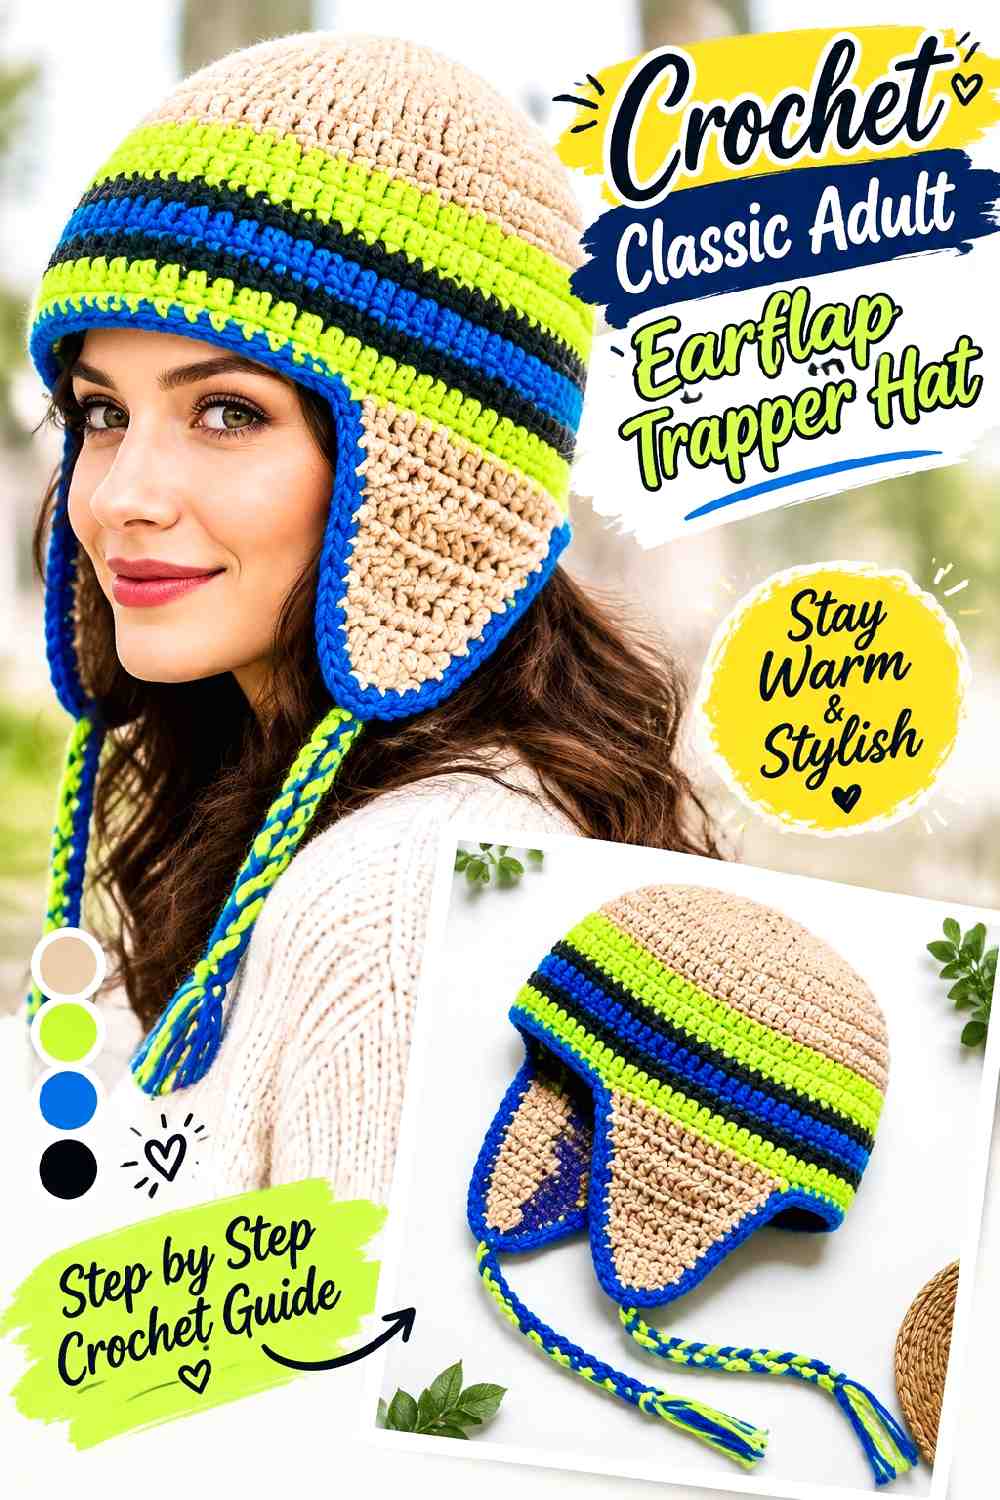
Mariie Crochet’s adult earflap tutorial offers a straightforward foundation that can stay minimal or be adapted toward a more pronounced trapper aesthetic.
This option makes sense if you want the ear coverage but do not necessarily want faux fur, a dramatic forehead flap, or a heavily textured crown.
Keep the Face Opening Balanced
Earflaps that begin too far forward can crowd the cheeks, while flaps positioned too far back may lose the framing effect associated with trapper hats.
Follow the tutorial’s placement carefully before experimenting with extra edging.
A Plain Body Gives You More Styling Freedom
A simple crown can support stronger color blocking, a contrasting lower border, or a small added front detail without becoming visually crowded.
That flexibility makes this a useful base for using up one statement yarn alongside a quieter main color.
Try the Hat On Before Adding Long Finishing Details
Ties, tassels, braids, and heavy borders alter how the lower half of the hat hangs. Confirm the basic fit first so decorative additions do not mask an underlying sizing issue.
Creator Credit: Mariie Crochet
11. Crochet Size Inclusive Double Crochet Earflap Hat
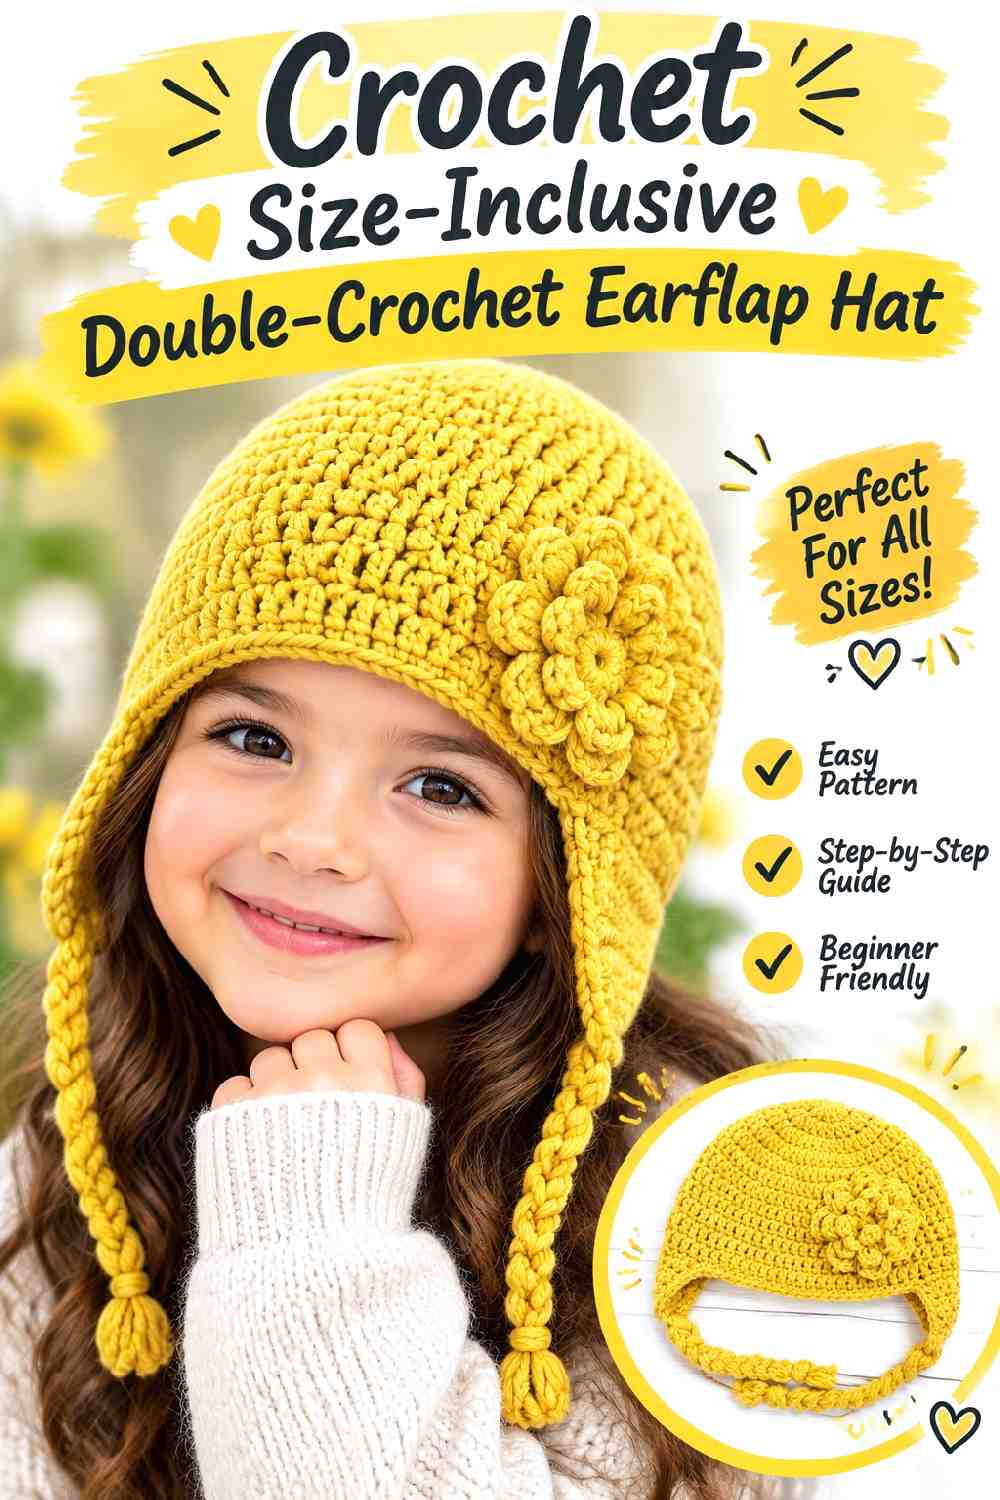
Oombawka Design Crochet provides a simple double-crochet earflap design across multiple sizes and includes optional braided ties in the supporting tutorial.
This is a useful adaptable base when you want trapper-inspired styling but prefer to start with a straightforward earflap silhouette rather than a heavily specialized hat.
Choose the Size Before Styling the Trapper Details
Added front panels and trim should be based on the finished hat, not used to decide its fundamental size. Complete enough of the base to confirm circumference and depth before planning optional trapper-inspired additions.
Front Orientation Matters Before Adding Contrast
Once the basic crown is complete, clearly identify the front and back before placing decorative trim or an added forehead feature.
Earflap placement provides useful reference points, but visual balance should still be checked on the intended wearer.
Braided Ties Are an Option, Not a Fit Correction
Long braids create a strong winter-hat look, but they should not be necessary just to hold an oversized hat in position.
For younger children, also consider whether ties are appropriate for the intended use and outerwear rather than adding them automatically.
Creator Credit: Oombawka Design Crochet
12. Crochet Braided Strap Earflap Trapper Cap
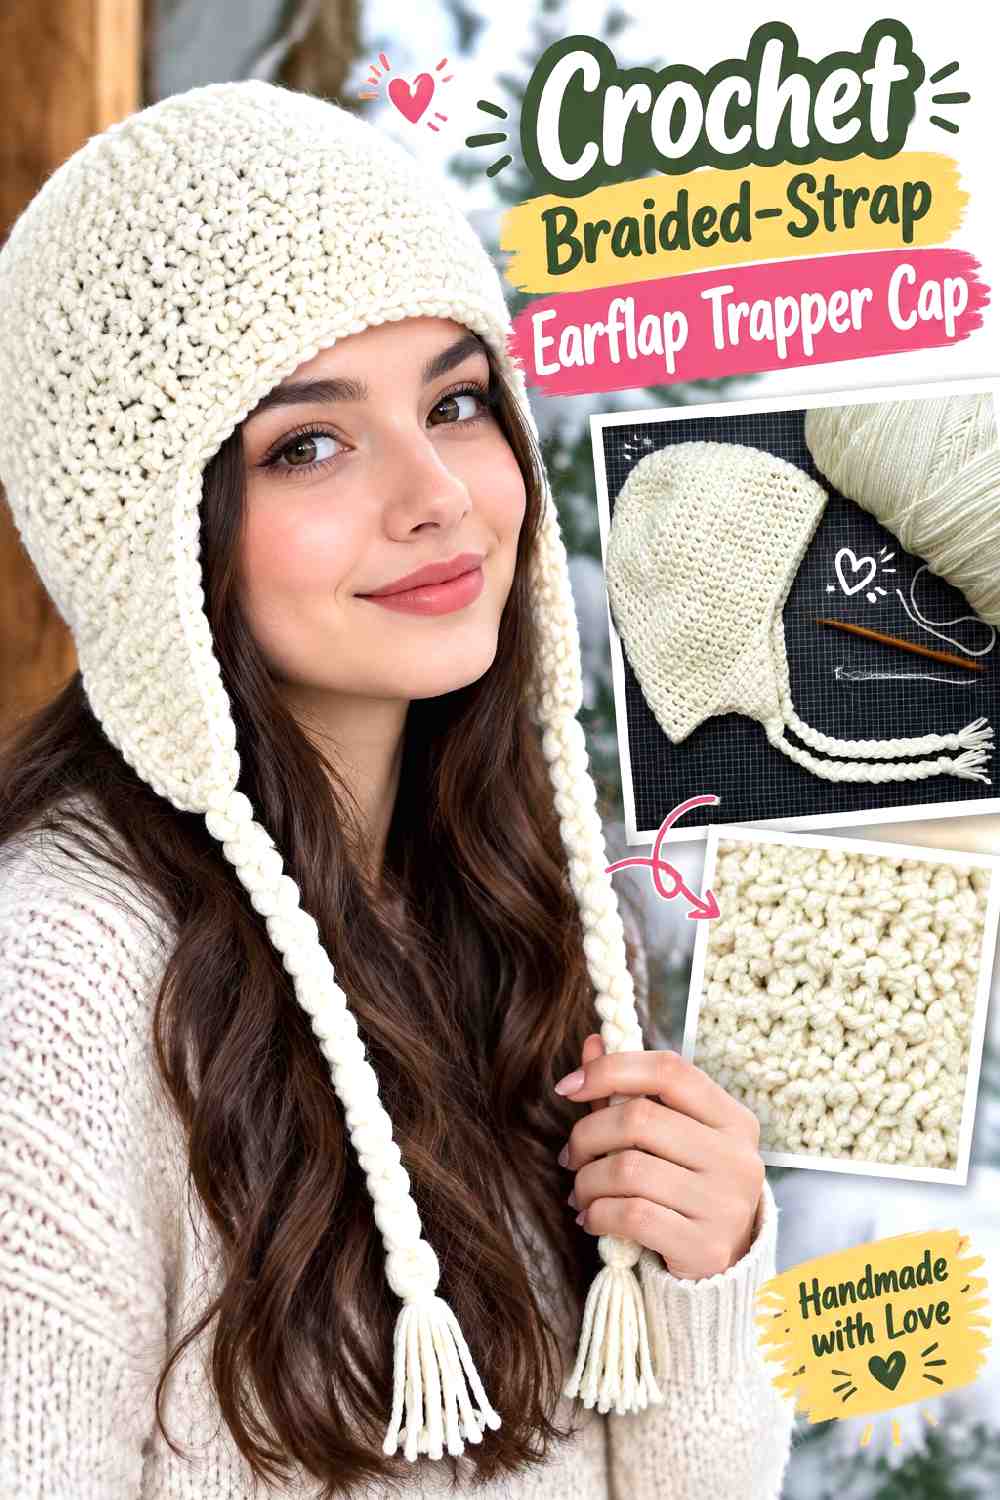
VianneyCreates centers the lower silhouette around defined earflaps and long braided straps, making the hanging details a visible part of the finished hat rather than a minor addition.
This is a good direction for a graphic, youthful trapper-inspired style where movement and contrast below the face matter.
Braids Add Visual Weight Below the Face
Long straps pull the eye downward. That can balance a close-fitting crown, but pairing them with an oversized pom-pom, thick fur border, and large front panel may make the hat feel overloaded.
Choose which feature should dominate.
Keep Both Straps Visually Even
Because braided ties hang freely, differences in length or thickness are easy to notice. Compare them before permanently finishing the ends.
The checkpoint is aesthetic as much as functional.
Use Color Blocking Instead of Extra Hardware
For a bold fall look, changing the earflap, edging, or braid color can create enough contrast without adding buttons or appliqués. This keeps the hat visually strong while preserving the clean earflap shape.
Creator Credit: VianneyCreates
13. Crochet Minimal Bonnet Style Trapper Hat
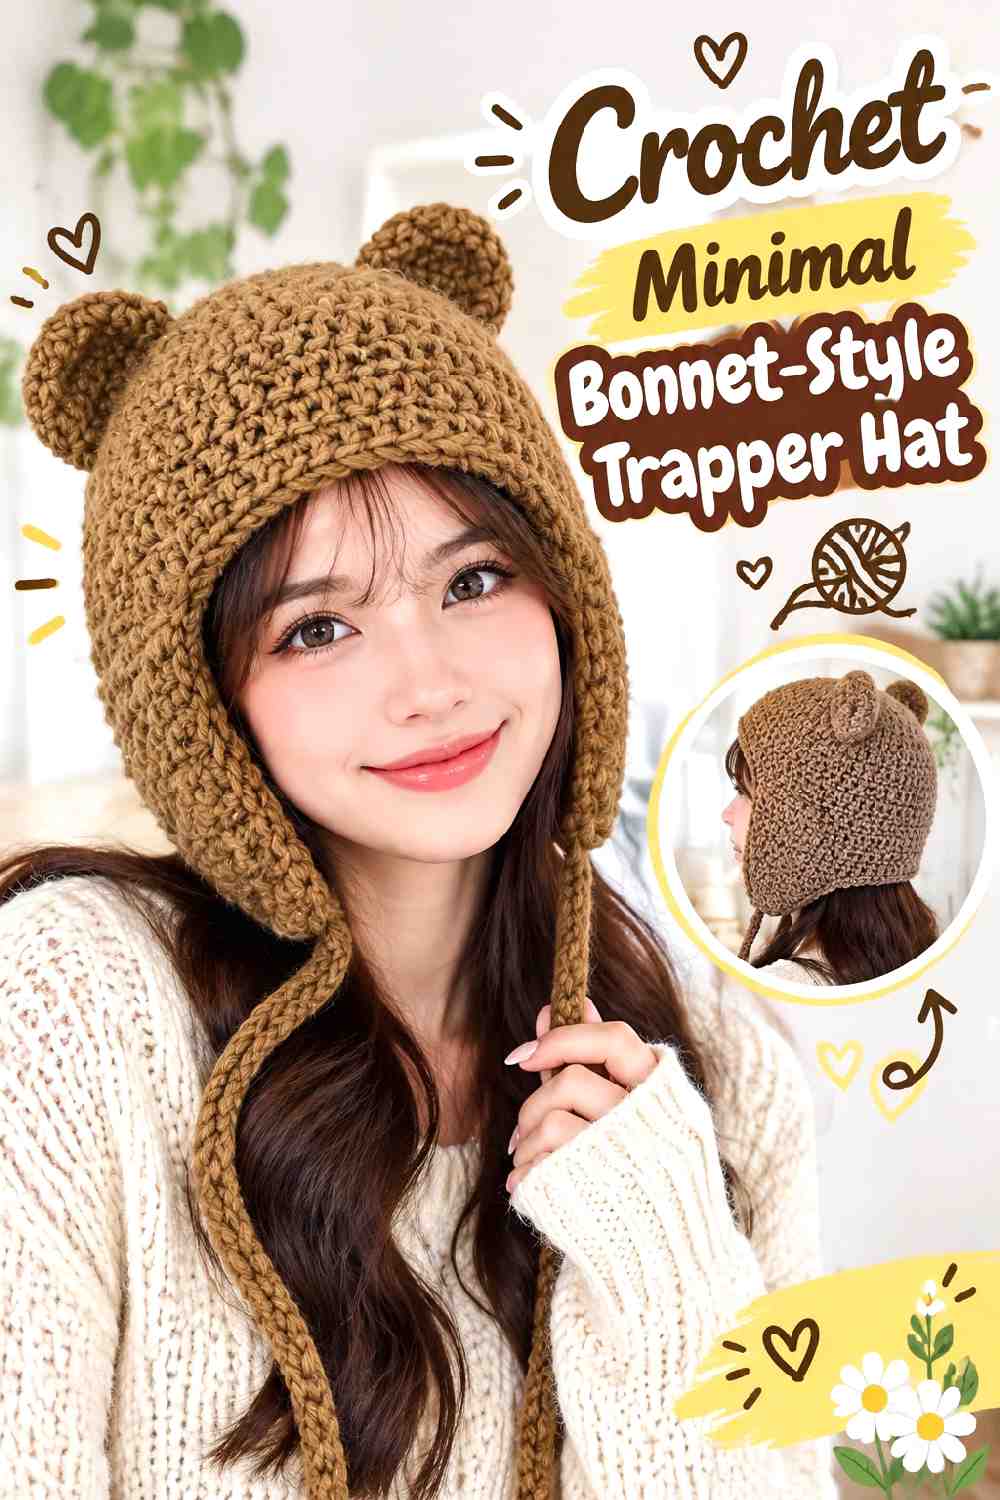
The hook hues tutorial approaches ear coverage with a softer bonnet-like shape rather than a rigid aviator profile.
That makes it the quieter option in this roundup. It still provides the side coverage associated with trapper-inspired hats, but the softer outline works well when you do not want a bulky front flap.
A Softer Crown Creates a Less Rugged Profile
Drape changes the personality of a trapper-style hat. A softer crown reads more relaxed and less structured than a dense ushanka.
If you substitute yarn, decide whether preserving that softness matters before choosing a very firm fiber.
The Earflaps Need Enough Presence
On a minimal design, tiny side extensions can make the piece look more like a conventional beanie. Keeping clear ear coverage preserves the trapper influence without requiring extra decorations.
Face-Framing Drape Needs Control
Soft fabric can sit attractively around the face, but too much looseness may obscure the intended outline. Check how the hat behaves when worn rather than judging it only while flat.
Creator Credit: hook hues
14. Crochet Cable Trapper Beanie
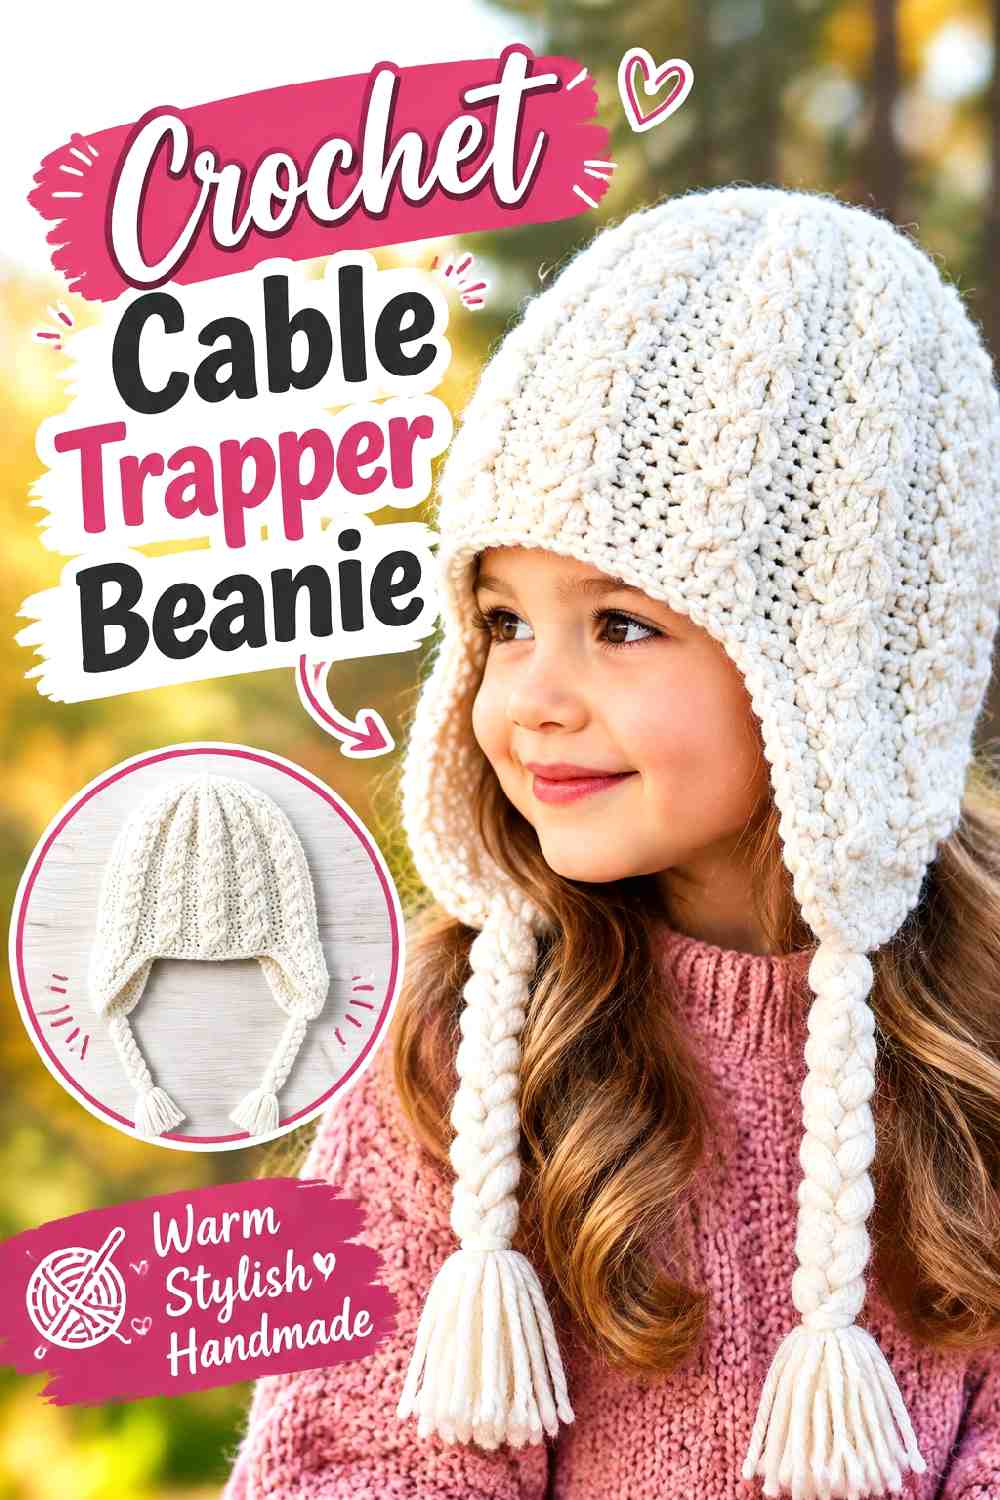
Kay Krochets combines an earflap/trapper-beanie shape with raised cable texture, creating a distinctly different surface from the smoother and fur-trimmed projects above. The tutorial is presented as a baby-size cable trapper beanie.
This idea is useful when you want the crochet itself—not added fuzzy yarn—to create the visual depth.
Cable Texture Creates Bulk Without Faux Fur
Raised stitches make the fabric appear more substantial even when the color scheme is simple. That means the hat can look detailed without needing multiple embellishments.
When substituting yarn, prioritize stitch definition if keeping the cable effect visible matters to you.
Symmetry Is More Noticeable With Raised Stitches
Strong vertical texture gives the eye clear reference lines. Check the relationship between cable placement, crown center, and earflaps as you work.
A slight offset that disappears in plain fabric can be more obvious beside pronounced texture.
Keep Baby Finishing Low Profile
For a baby hat, decorative extras should be considered carefully. Avoid turning a textured design into a collection of dangling or easily detached embellishments simply to make it look more like an adult trapper hat.
Follow the tutorial’s sizing information and consider the baby’s actual head measurement and intended supervised use.
Creator Credit: Kay Krochets
15. Crochet Chunky Baby Earflap Trapper Hat

Little Llama Crochet’s baby earflap tutorial uses chunky yarn to create a compact, substantial hat with clear ear coverage.
It is a practical choice if you want the trapper influence at a small scale without copying the proportions of an adult ushanka.
Chunky Yarn Changes Scale Quickly
On a baby-size project, a thick yarn occupies a large percentage of the overall dimensions. Small changes in tension or yarn thickness can therefore make a noticeable difference.
Check the tutorial’s sizing guidance rather than substituting yarn purely by appearance.
Earflaps Should Not Crowd the Face
More coverage is not automatically better on a small hat. The side sections should work with the baby’s proportions rather than extending into the face simply to imitate an oversized adult trapper style.
Keep Added Decoration Minimal
A chunky texture already has visual presence. If you adapt the design, restrained color blocking or a simple border can provide the fall styling without introducing unnecessary loose or detachable pieces.
For baby items, prioritize secure finishing and age-appropriate use over decorative complexity.
Creator Credit: Little Llama Crochet
Which Crochet Trapper Hat Style Fits Your Fall 2026 Look?
For the most recognizable trapper silhouette, start with the Indiepop, Crochet Bits, Nebeska Crochet with Love, Yarnspirations, or Vivid Yarn Crochet options. Their substantial side coverage, front details, trim, or aviator shaping do more of the visual work before color is even considered.
If texture is the priority, the ribbed Serafima design and Kay Krochets cable version offer two very different approaches. The double-strand CraftingWithClaudie hat creates weight through the fabric itself, while the Yarnspirations version achieves contrast with fuzzy trim.
For a cleaner everyday interpretation, the Crochet with Clare, ABoC Studio, Mariie Crochet, Oombawka Design Crochet, VianneyCreates, and hook hues tutorials provide adaptable earflap foundations. They leave more room to experiment with restrained color blocking, borders, braids, or a small trapper-inspired front feature.
The baby projects deserve a separate sizing and finishing decision rather than simply shrinking an adult design. Use the creator’s intended size guidance, avoid unnecessary loose embellishments, and keep comfort and secure finishing central.
Conclusion
The strongest crochet trapper hat for fall 2026 depends on how literal you want the style to be. A fuzzy ushanka or fur-trimmed aviator creates the clearest traditional silhouette. Ribbing and cables offer a more texture-driven interpretation, while simple earflap bases give you greater freedom to create a streamlined hat that still provides the distinctive side coverage.
Before choosing, compare construction as carefully as appearance. Decide whether you want a worked-flat or shaped crown, a smooth or highly textured fabric, substantial or minimal earflaps, and ties, fuzzy trim, or a front visor.
Once you have chosen the overall shape, use the original tutorial for its exact construction, sizing, gauge, and finishing details rather than assuming those details transfer unchanged between projects.
Frequently Asked Questions
What makes a crochet trapper hat different from a regular earflap beanie?
Both can cover the ears, but trapper hats usually place more emphasis on the lower silhouette. A larger front flap, visor, fuzzy edging, substantial side panels, or aviator-style shaping can make the distinction clearer. A simple earflap beanie can still serve as a trapper-inspired base if its proportions support the look.
Can I turn a basic crochet earflap tutorial into a trapper-style hat?
Yes, as a design adaptation, but do not assume you can add any front panel or thick trim without affecting the result. First establish the base hat’s fit. Then consider whether the proportions can support a wider border, contrasting lower section, front flap, or other trapper-inspired detail.
What yarn works well when I want a structured crochet trapper hat?
Look at the fabric the yarn creates rather than relying only on fiber name or yarn-weight category. A fabric with enough body can define the crown and flaps, while a softer yarn produces a more relaxed silhouette. Swatching is especially useful when replacing the yarn used in a tutorial.
Can I add faux-fur yarn to any crochet trapper hat?
It can be added to many designs, but it is not automatically a direct substitution for ordinary edging. Fuzzy yarn can be thicker, harder to see while stitching, and visually dominant. Test a small section first and consider how added bulk will affect the forehead and ear areas.
Should a crochet trapper hat fit tightly around the ears?
It should sit securely enough for the intended style without depending on ties to correct an oversized crown, but comfort matters. Follow the source tutorial’s sizing and gauge guidance and check the fit on the intended wearer whenever possible.
Are braided ties necessary on a crochet trapper hat?
No. They create a recognizable winter-hat detail, but many trapper and aviator styles work without them. Leaving ties off can also make a design cleaner and reduce interference with coat collars. For young children, consider age, supervision, outerwear, and the appropriateness of long cords before adding them.