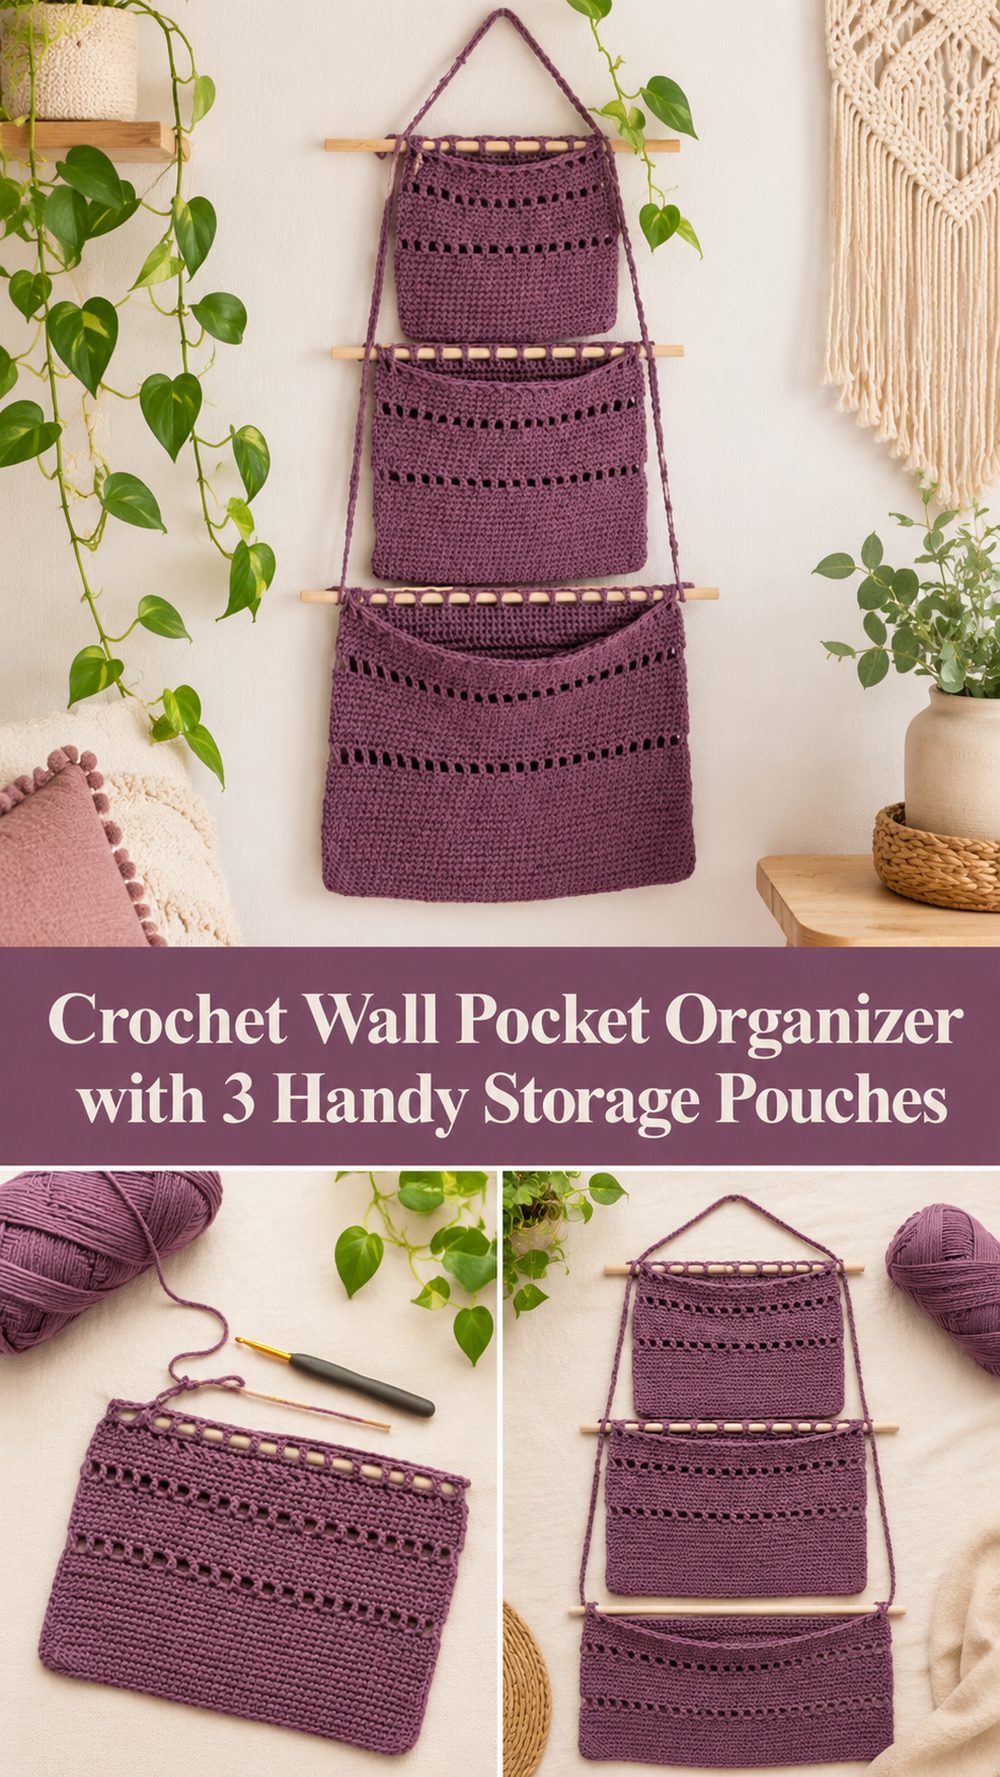
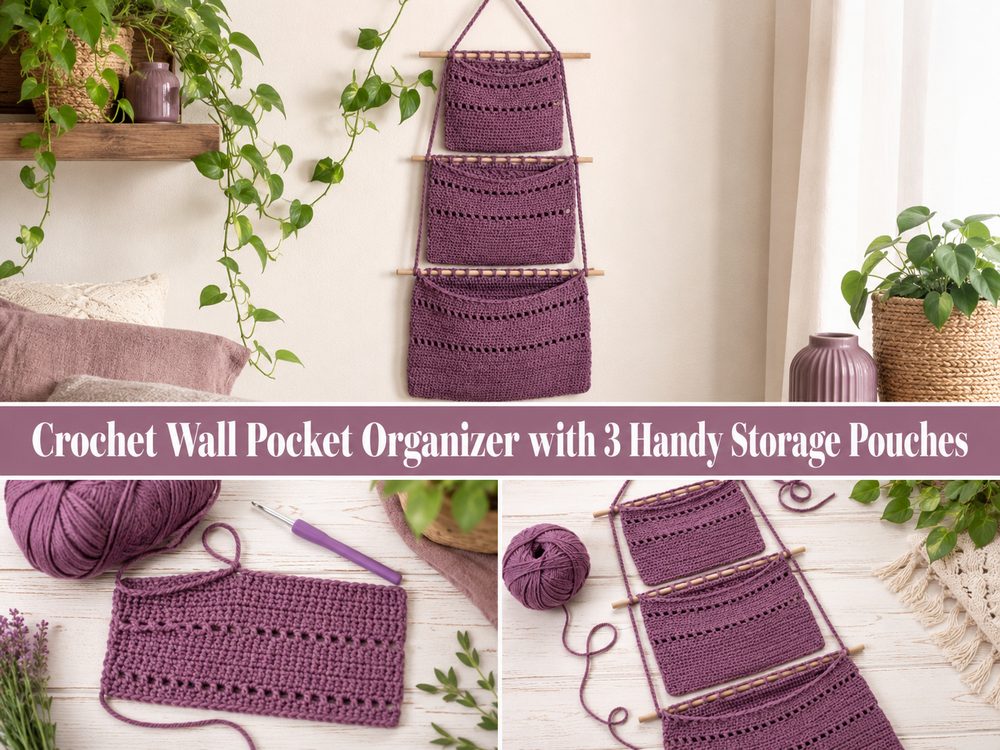
A crochet wall pocket is such a lovely way to add storage without making a room feel cluttered. It gives you that soft handmade touch while also being genuinely useful for everyday things like mail, baby essentials, small notebooks, hooks, scissors, or little craft tools. The version in this tutorial creates a hanging organizer with three pockets, so it feels more like a practical wall station than a simple decor piece. What makes it especially nice is that it still looks cozy and decorative even while doing real work. If you enjoy crochet projects that are neat, functional, and satisfying to finish, this one is a great choice. It is the kind of project that can brighten up an entryway, nursery, craft corner, or bedroom while helping you keep small things in one easy-to-reach place.
Why You’ll Love This Project:
This wall pocket project is fun because it blends storage and decor in such an easy, useful way. The three-pocket layout makes it practical for everyday organizing, and the finished piece has a warm handmade look that works beautifully in a nursery, hallway, craft space, or bedroom.
Materials Needed:
- Cotton yarn
- Crochet hook
- Scissors
- Yarn needle
- Stitch markers
- Wooden dowels or hanging rods
Use a yarn and hook size that matches your desired fit and texture. In the tutorial, the organizer is worked in cotton yarn and hung from wooden dowels, which helps it stay neat and practical on the wall.
Best Yarn for This Project:
A wall pocket works best in a yarn that has a little structure. Cotton is a really good choice because it helps the pockets hold their shape better and keeps the piece from stretching too much once you start filling it. A smooth worsted or aran-weight cotton works nicely if you want a clean, tidy finish. If you go too soft or stretchy, the pockets may sag more than you want. For something meant to hang and carry little items, a sturdier fiber usually gives the nicest result.
Skill Level:
This is a good project for confident beginners or easy-level crocheters.
The stitches are not overly complicated, but you do need to stay consistent with shaping, joining, and assembling the hanging sections. If you are comfortable with basic stitches and following repeated steps, this one should feel very doable.
Size and Fit Guide:
This style of wall pocket is very easy to adjust. You can make each pouch wider by starting with a longer foundation, or make it deeper by working more rounds before finishing. Since this organizer hangs vertically, it also helps to think about where it will go before you start. For a narrow wall space, keep the pockets more compact. For a craft room or nursery, you may want deeper pockets that can hold bulkier items. If you are making more than one pouch, try to keep them evenly sized so the finished wall hanging looks balanced.
Stitches Used:
- Chain
- Slip stitch
- Single crochet
- Double crochet
- Chain spaces
- Invisible join
The tutorial uses simple stitch combinations to build the pockets and then finish them neatly for hanging and assembly.
How to Make It:
Step 1: Start the First Pocket
This project begins by making an individual pocket rather than crocheting the whole wall hanging in one long piece. You start with a foundation chain, then work around it to create the base shape of the pouch. This gives the pocket a soft rounded bottom, which helps it open nicely and hold small items more comfortably.
As you work around the starting chain, keep your stitches even and take care not to twist the foundation. The shape at this stage matters because it sets up the whole pocket. If the beginning is neat and balanced, the rest of the pouch will sit much better.
Step 2: Build the Pocket Body
Once the base is established, keep working around to build upward. In the tutorial, the pocket grows into a simple pouch shape with a clean structure that feels practical rather than fussy. The body is roomy enough for storage, but it still keeps a neat wall-hanging look.
This part is nice and repetitive, which makes it relaxing to crochet. The key is keeping your tension steady so the pocket does not become uneven or too floppy. A wall pocket should have enough softness to look handmade, but enough firmness to hold its shape when hanging.
Step 3: Create Texture and Open Space
As the pocket develops, the stitch pattern shifts to include double crochet and chain spaces, which gives the organizer a lighter decorative look while still keeping it useful. This kind of stitch combination works well for a wall pocket because it keeps the project from feeling too heavy or stiff. It also adds a lovely handmade texture that makes the finished organizer feel more decorative on the wall.
If you like practical decor, this is a really nice balance. The pouch still functions as storage, but it also has enough stitch detail to look intentional and pretty in the room.
Step 4: Finish the Pocket Neatly
A clean finish makes a big difference in a home decor project, so the pocket is closed off with a tidy join. The tutorial includes an invisible join, which helps the rounds blend more smoothly and gives the top edge a polished look. This is especially helpful when your project will be hanging right at eye level, where little finishing details show more clearly.
Once one pocket is complete, you repeat the same process for the remaining pockets. Since this design uses three pouches, it is worth checking each one as you go to make sure they match in width and depth. Even if your tension shifts a little, you can compare them often and correct early if needed.
Step 5: Add the Hanging Support
After the pockets are made, each one is attached to a wooden dowel or rod. This gives the organizer structure and helps it hang flat against the wall. The dowels also create a very clean visual line at the top of each pocket, which makes the whole project look more finished and intentional.
When adding the dowels, take a little time to keep everything straight. If one side is pulled tighter than the other, the pocket may tilt once it is hanging. It helps to lay the piece flat while checking that both sides look even.
Step 6: Join the Three Pockets Together
The most distinctive part of this tutorial is that the organizer is made with three separate pockets joined into one vertical wall hanging. Once all three are ready, they are connected so they stack one above another. This creates a functional hanging organizer that gives you several storage spots without taking up table or shelf space.
As you join them, keep the spacing even so the whole piece looks balanced. This is also a good time to think about how full you expect the pockets to be. If you want them to hold heavier items, make sure your joins feel secure and your hanging strands are strong.
Step 7: Make the Hanging Length
To finish, the organizer needs a way to hang on the wall. The tutorial forms hanging lengths with chain stitches, running from the top support and down through the connected structure. This creates the final wall-hanging shape and gives you a loop or hanging section at the top.
Before fastening off, hold the organizer up and check the drop. You want it long enough to hang nicely, but not so loose that the pockets sag awkwardly. Once it looks right, weave in the ends carefully and give the whole piece a final shaping.
The finished wall pocket should look soft, tidy, and useful, with three stacked storage sections ready for small household items.
Helpful Tips:
- Use cotton yarn if you want the pockets to hold their shape better.
- Check that each pocket is the same size before joining them together.
- Use stitch markers at the start of rounds if that helps you stay even.
- Keep your tension steady so the pouches hang neatly.
- Test the hanging length before fastening off.
- Make sure the dowels sit straight for a cleaner final look.
Common Mistakes to Avoid:
- Starting with a twisted foundation chain
- Making one pocket noticeably larger than the others
- Using yarn that is too stretchy for a hanging storage piece
- Pulling one side tighter when attaching the dowels
- Leaving the hanging chains uneven
- Skipping the final shaping and wondering why it hangs crooked
Customization Ideas:
You can customize this wall pocket in lots of simple ways. Try soft neutral yarn for a calm home decor look, or go with cheerful colors for a nursery or craft room. You could make the pockets deeper for bulkier items, or keep them shallower for letters and small tools. A decorative edging can add a softer finish, and wooden beads or a different style of hanging rod can give it a more rustic or boho feel. You could also make just one pocket if you want a smaller wall organizer for a tight little space.
Style Ideas:
This project works beautifully in an entryway for mail and keys, beside a desk for pens and notes, in a nursery for baby essentials, or in a craft room for scissors, hooks, and measuring tape. It would also make a thoughtful handmade gift for someone who loves practical decor with a cozy touch.
Care Instructions:
Gentle hand washing is usually the safest choice for a crochet wall organizer, especially if it includes wooden dowels. Let it air dry fully before hanging it again. If the pockets lose shape, smooth them by hand and reshape them while damp. Avoid high heat and rough machine drying.
Time Needed:
This may take a few hours depending on your speed, yarn, size, and stitch pattern.
Conclusion:
A crochet wall pocket is one of those projects that feels charming and useful at the same time. It gives you a beautiful handmade storage piece while staying simple enough to enjoy from start to finish. You can adjust the size, colors, and depth to suit your own space, and the three-pocket layout makes it especially practical for everyday organizing. It is a lovely project to make when you want crochet decor that truly earns its place on the wall.
FAQs:
1. Is this beginner-friendly?
Yes, it is a good project for confident beginners who are comfortable with basic stitches and simple finishing.
2. What yarn is best for a crochet wall pocket?
Cotton yarn is a great choice because it is sturdy, neat-looking, and less stretchy than many other fibers.
3. Can I make only one pocket instead of three?
Yes, you can absolutely turn the idea into a single wall pocket if you want a smaller project.
4. How do I keep the pockets from sagging?
Use a structured yarn, keep your tension even, and avoid overfilling the pockets with heavy items.
5. Can I adjust the size?
Yes. You can change the width, depth, and overall hanging length to suit your space and storage needs.