Crochet bonnets have moved well beyond the traditional tied baby hat. By late summer 2026, the accessory was receiving renewed fashion attention, including crochet headwear appearing in cold-weather street style around Fashion Week. The current crochet landscape stretches from compact granny-square bonnets and ribbed scarf hybrids to pointed pixie hats, dramatic bows, ruffled frames, and neck-covering hoods.
That variety also means two bonnets that look similar in a photo can behave very differently once worn. This guide compares construction, coverage, yarn weight, openings, ties, texture, and sizing rather than recreating any creator’s pattern. Several ideas are adult-friendly fashion pieces, while others are specifically baby or child projects; those distinctions are clearly noted so you can choose an appropriate tutorial instead of assuming the sizing transfers automatically.
Quick List
- Crochet Granny-Square Tie Bonnet
- Crochet Ribbed Ushanka-Style Scarf Bonnet
- Crochet Slouchy Bonnet Beanie
- Crochet Long-Bow Hood Bonnet
- Crochet Double-Strand Ribbon Bonnet
- Crochet Textured Fae Bonnet Hood
- Crochet Chunky Pointed Pixie Bonnet
- Crochet Adjustable Rectangle Pixie Bonnet
- Crochet Long-Point Lost-Boy Bonnet Hat
- Crochet Ribbed Tie-Front Balaclava Bonnet
- Crochet Turtleneck Hood Bonnet
- Crochet Drawstring Winter Bonnet Hood
- Crochet Ruffle-Edge Fashion Bonnet
- Crochet Lace Child Bonnet
- Crochet Shell-Texture Baby Bonnet
- Crochet Cluster-Stitch Baby Bonnet
- Crochet Pixie-Puff Baby Bonnet
Choose the Bonnet Shape Before You Choose the Yarn
For fall wear, start with coverage rather than color. A fitted tie bonnet keeps the silhouette compact and leaves the neck open. Slouchy shapes create more room at the back of the head, while pixie bonnets deliberately add a pointed crown. Hood and balaclava hybrids extend farther around the neck, making them easier to pair with open-neck coats or sweaters when you want more coverage.
Hair volume matters too. A close ribbed bonnet may sit differently over thick curls than a roomy hood, and long ties can change where the lower edge rests once they are knotted. Before buying yarn, look at the tutorial’s finished shape from the front, side, and back. If the creator supplies measurements, compare those with the intended wearer rather than relying on an age label or a generic “one size” description.
Yarn Weight Changes More Than Warmth
Thicker yarn can make a bonnet look sculptural, especially on pixie points, wide ribbing, and hooded shapes. It can also increase bulk around the jaw, behind the neck, and under coat collars. Lighter yarn usually gives ties and ruffles more movement, while very open lace shifts the focus from insulation toward decorative texture.
Changing yarn weight is therefore not just a substitution decision. It can alter the size, drape, face opening, and way a pointed or slouchy crown hangs. When a tutorial relies on gauge or supplied measurements, treat those as part of the fit system. If you substitute yarn, make a fabric sample and assess both dimensions and feel. A yarn that looks attractive in the skein may be too rigid for a bow or too fluid for a pixie point you want to hold its shape.
Treat Ties, Bows, and Face Openings as Fit Features
Bonnet ties do more than finish the look. They can draw the lower edges closer together, shift the face opening, or pull a loose hood forward. A broad ribbon-like tie makes a different visual statement from a narrow cord, while long scarf panels add weight that can affect how the bonnet sits.
Check the opening before committing to final ties or decorative edging. The front should frame the face without twisting because the edging is tighter than the main fabric. Drawstring hoods need enough adjustment to be useful without excessive tightening around the face or neck. For baby and young-child bonnets, use particular care with long cords, loose embellishments, and unsupervised wear; follow age-appropriate clothing-safety guidance rather than assuming a decorative tutorial automatically addresses every safety consideration.
1. Crochet Granny Square Tie Bonnet
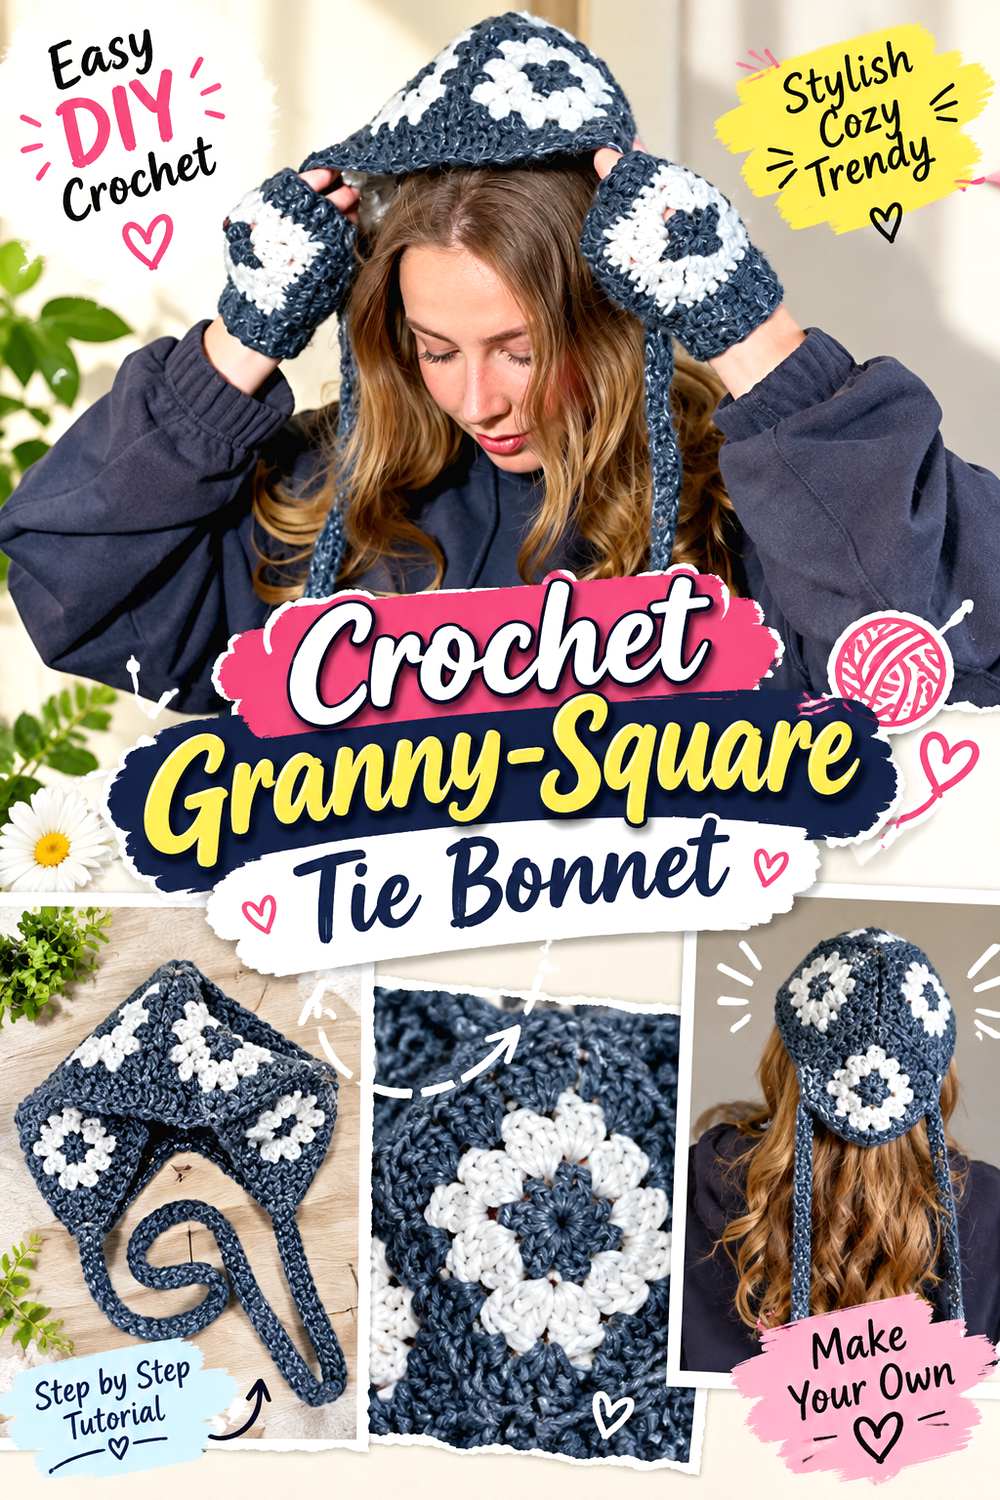
A granny-square bonnet makes the modular construction part of the finished design rather than hiding it. DIYGuru’s tutorial combines classic squares with ribbed sections and adjustable ties, producing a bonnet that feels more graphic and structured than a plain rounded cap. The visible joins also make this a useful choice when color placement is a major part of your fall wardrobe plan.
Compared with the smoother bonnets later in this list, this version asks you to think about motif consistency before assembly. It is especially suited to crocheters who like making small components first and then seeing them turn into a wearable shape.
Granny-Square Seams Become Part of the Fit
With modular headwear, a slightly different square does more than interrupt the color rhythm: it can change the bonnet’s overall width or make one section pull more strongly than another. Compare the blocked dimensions of every motif before final joining. If one square is noticeably smaller, solve that discrepancy before assembly instead of expecting the edging to disguise it.
Ribbing Can Calm a Busy Motif Layout
The ribbed areas give the eye a resting place between multicolor squares and the wearer’s face. That matters if you plan to use high-contrast motifs. Before settling on a palette, decide whether you want the ribbing to blend with the dominant square color or act as a clear frame. A quieter border can make complex granny-square colorwork easier to style with patterned scarves and coats.
Plan the Color Placement Before Joining
Granny squares create repeated blocks, so accidental clusters of the same dark or bright shade can look much more obvious after joining. Lay the motifs in their intended arrangement first and photograph the layout. Viewing that image at a smaller scale can reveal imbalance more quickly than studying each square separately.
Original Tutorial and Creator Credit
Creator: DIYGuru
2. Crochet Ribbed Ushanka Style Scarf Bonnet
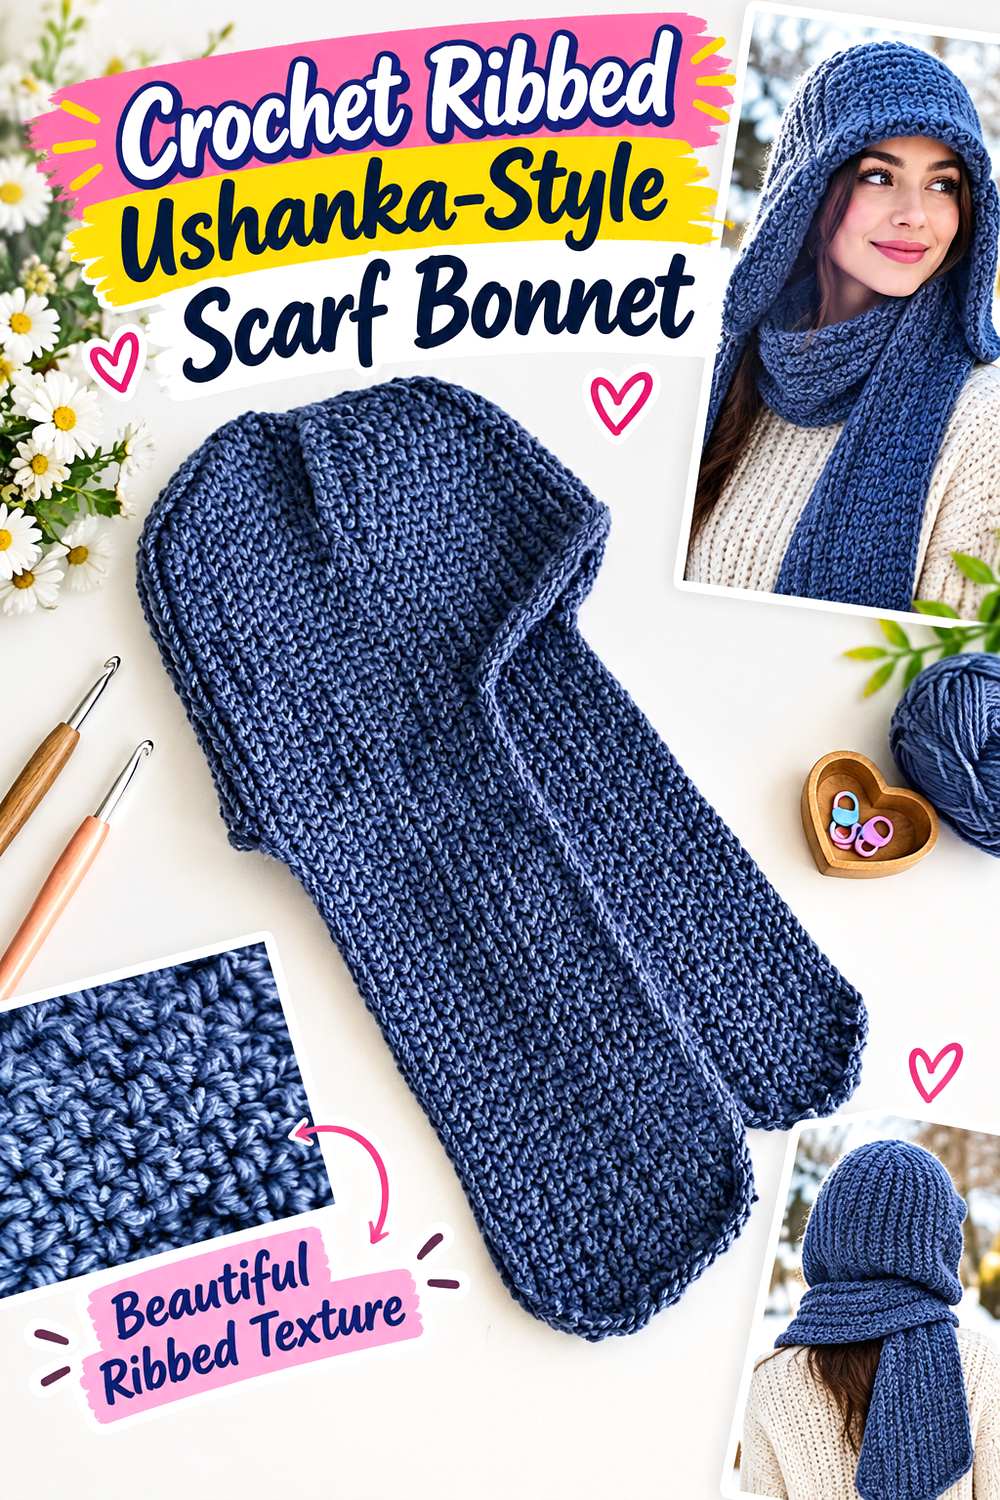
This ribbed bonnet sits between an earflap hat, a scarf, and the current bonnet silhouette. Serafima Crochet & Knitting works the piece sideways and uses crown shaping to create a closer anatomical fit, while elongated earflaps can extend down and wrap around the neck. The source also includes finished sizing information for the demonstrated version, which gives you a concrete checkpoint rather than leaving the fit entirely to guesswork.
Choose this direction if you want a bonnet to look streamlined on the crown but more substantial below the ears. It has far more neck presence than a small tied granny-square style.
Long Earflaps Turn the Bonnet Into a Scarf Hybrid
The extended lower sections change both styling and weight distribution. Worn loose, they create vertical lines beside the face; wrapped, they add another layer around the neck. Think about the coat you expect to wear with the bonnet. Thick lapels plus wrapped crochet panels can feel crowded, while a collarless jacket leaves more room for the scarf-like feature.
Sideways Ribbing Rewards Consistent Tension
Slip-stitch-style ribbing can produce a dense, flexible fabric, but uneven tension is easy to notice across long vertical ribs. Check the fabric periodically rather than waiting until the crown is complete. If one area is becoming markedly tighter, correcting tension early is less frustrating than trying to force symmetry during seaming.
Use the Supplied Measurements as a Starting Check
The video identifies the demonstrated size and discusses measurements. If your head measurement falls outside the example, do not assume extra rows alone will preserve every proportion. Crown depth, earflap placement, and circumference interact. Follow the creator’s sizing guidance where supplied and compare the partially formed bonnet to the intended wearer before completing the finishing stages.
Original Tutorial and Creator Credit
Creator: Serafima Crochet & Knitting
3. Crochet Slouchy Bonnet Beanie

A slouchy bonnet beanie is a good middle ground for someone who likes bonnet framing but does not want the close, historical-looking profile of a traditional tied cap. DIY FROM HOME CROCHET uses raised front-post texture in a design with extra space through the back, giving the finished hat a softer, more relaxed outline. The creator specifically notes that comfort with front-post double crochet is helpful, so this is not the strongest first choice if that stitch structure is completely new to you.
Its main distinction is volume: rather than tracing the head closely, the back becomes a visible part of the silhouette.
Extra Back Volume Changes the Styling
Slouch can look relaxed or oversized depending on how much hair sits underneath the bonnet. Before deciding that the sample’s silhouette is what you want, think about your own hair volume and where you prefer the fabric to collapse. A slightly roomy bonnet over thick hair may appear comparatively fitted, while the same shape over very short hair can look substantially looser.
Raised Posts Make Stitch Placement More Visible
Front-post texture creates stronger vertical and dimensional lines than a smooth fabric. That is attractive, but it also means misplaced posts can interrupt the rhythm. This is a project where stopping to identify the correct post is more valuable than working quickly. If you are still learning the technique, practice a small swatch until the raised columns remain easy to follow.
Let Drape Control the Slouch
A very stiff yarn may make the extra fabric project outward instead of falling toward the back. A softer yarn can encourage a more relaxed collapse, although any substitution needs to respect the tutorial’s fit requirements. Hold your sample vertically as well as flat; that simple check reveals how gravity will affect the finished bonnet more clearly.
Original Tutorial and Creator Credit
Creator: DIY FROM HOME CROCHET
4. Crochet Long Bow Hood Bonnet
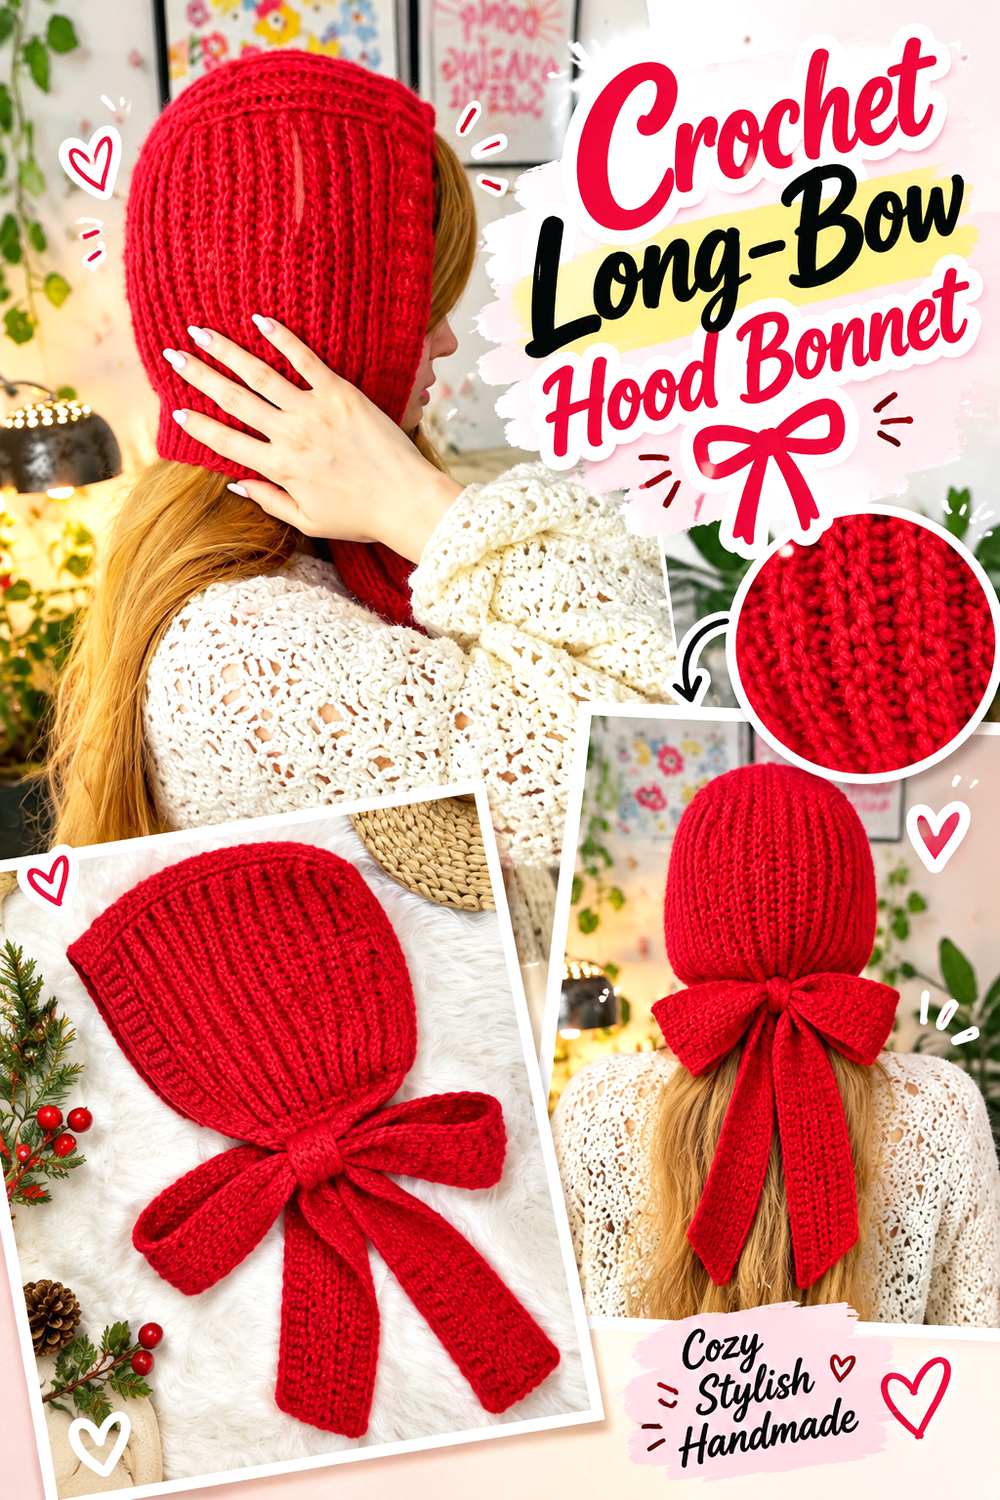
The defining feature here is not merely a pair of ties but the oversized bow they can form. WONDER NETTING’s bonnet uses long ties that make the closure a central visual feature, giving the finished piece a romantic fashion look rather than the discreet fastening of a traditional bonnet.
This style works especially well if you want your crochet accessory to remain noticeable after adding a coat or sweater. The bow keeps visual interest near the neckline, but that same scale means the ties need to cooperate with your outerwear instead of becoming trapped awkwardly beneath it.
Bow Length Is Both Decorative and Practical
Long ties offer several styling possibilities, but they also introduce more fabric around the neck and chest. Decide how you expect to wear the bonnet before choosing where the bow should sit. A front bow makes the detail obvious; looser ties create a less formal look. For young children, long tie styling requires additional safety consideration and should not be treated simply as decoration.
Softer Fabric Helps the Bow Fall Naturally
A bow made from rigid crochet can jut forward or resist tightening neatly. If the tutorial allows yarn choice, pay attention to how the swatch folds. You want enough body for the bonnet itself without creating ties that behave like stiff straps. The ideal balance depends on whether your priority is sculptural shape or fluid ribbon-like movement.
Check the Face Edge Before the Final Knot
Tightening a dramatic bow can subtly change the front opening. Try the bonnet with the ties held at your intended tension before considering the fit finished. If the edge starts pulling toward the cheeks or the crown shifts forward, the issue may be the way the ties are tensioned rather than the bonnet body itself.
Original Tutorial and Creator Credit
Creator: WONDER NETTING
5. Crochet Double Strand Ribbon Bonnet
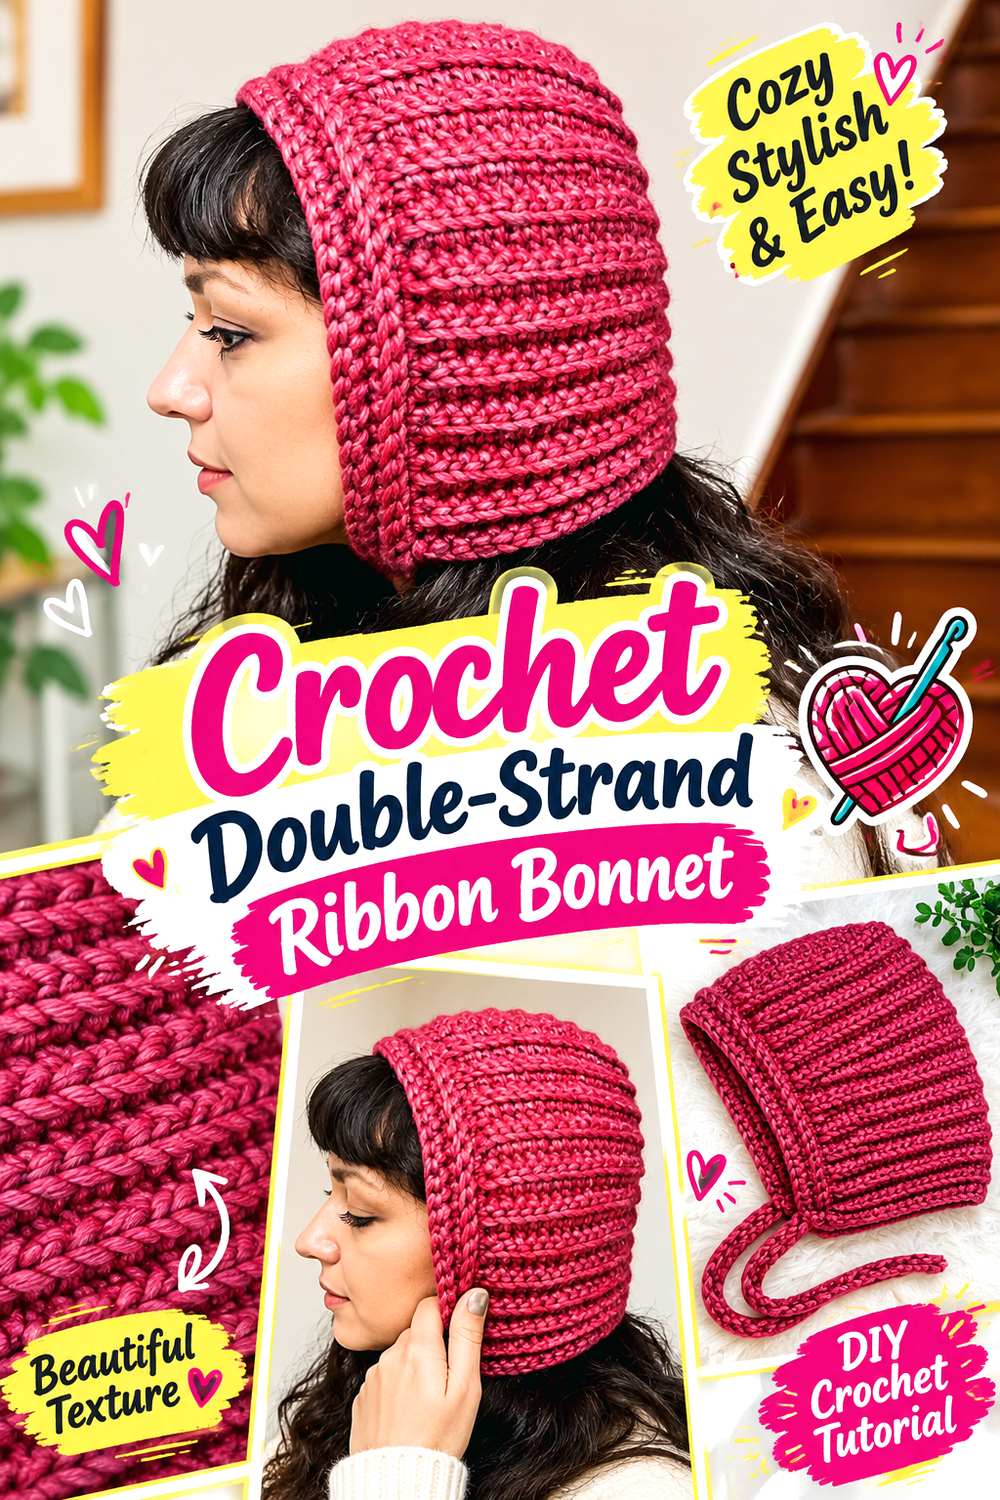
Material Grrrlz takes the simple bonnet idea in a denser winter direction. The tutorial works with yarn held double and finishes the piece with ribbon-like ties, creating a compact accessory with more visual substance than an airy lace or lightweight pixie design.
This is an appealing reference when you like clean bonnet lines but want the yarn itself to contribute texture. Holding strands together also opens up color possibilities: two matching strands create a more uniform field, while compatible but different shades can produce a subtle marled effect without changing the construction concept.
Held-Double Yarn Creates More Than Extra Warmth
Two strands can make the fabric feel thicker and visually fuller, but they also affect the size and flexibility of each stitch. If you substitute different yarns, avoid assuming that two strands automatically reproduce the creator’s fabric. Compare the resulting thickness, stretch, and gauge before making decisions based on the tutorial’s proportions.
Mixed Strands Can Add Quiet Color Depth
This format provides a way to introduce variation without committing to stripes or motifs. Two nearby shades can create gentle tonal movement; stronger contrast will make individual strands more obvious. Crochet a sample first if color blending is important, because twisted strands can look quite different once worked into fabric than they do when held side by side.
Watch the Face Border for Unwanted Tightness
A dense body can fit comfortably while a firmer finishing edge suddenly reduces the opening. Before fastening off, compare the front edge with the bonnet body and make sure the border is not pulling the sides inward. This checkpoint matters most when your edging tension naturally runs tighter than your main crochet.
Original Tutorial and Creator Credit
Creator: Material Grrrlz
6. Crochet Textured Fae Bonnet Hood
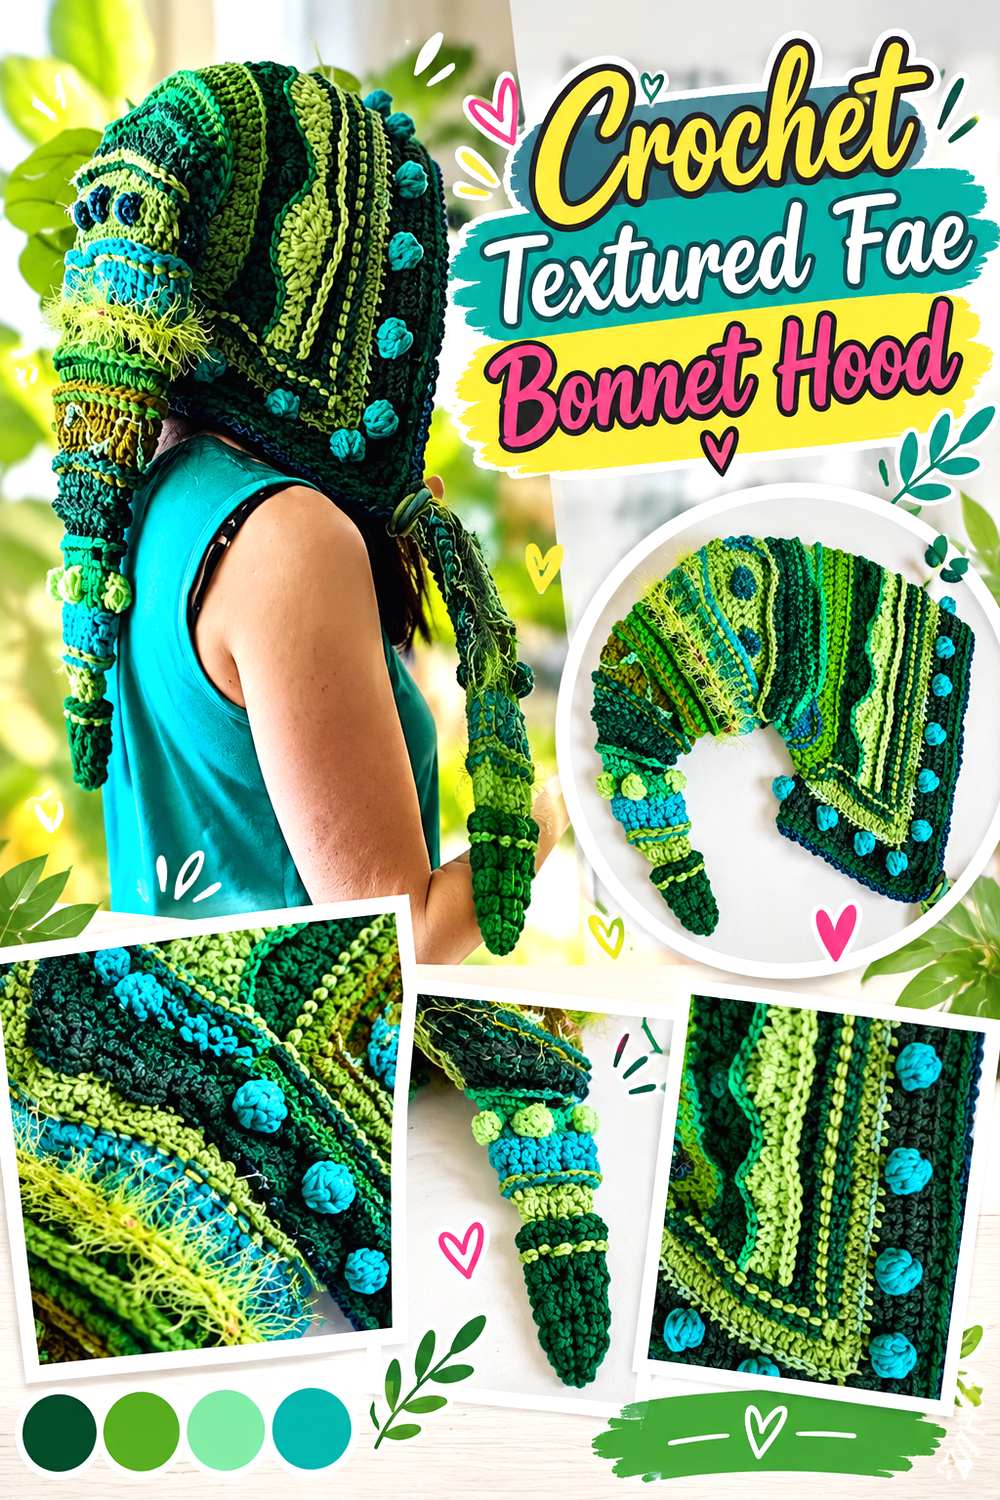
For a more woodland or fantasy-influenced fall accessory, Earth Tricks’ fae hood pushes the bonnet idea toward a statement hood. The design incorporates prominent texture and decorative surface work, so the interest comes from more than the basic head shape. It reads as intentionally whimsical rather than simply vintage.
Because the decoration is stronger, this option pairs best with a deliberate styling plan. If you already wear patterned knits, textured scarves, or heavily detailed coats, consider whether the bonnet should echo that richness or provide the single focal point near the face.
Surface Detail Needs Clear Stitch Definition
Raised and decorative elements disappear quickly in very fuzzy yarn. If the texture is what attracts you to this bonnet, compare how clearly your yarn shows stitch boundaries before committing to the full project. A smoother surface generally displays relief more clearly, while a haloed yarn can soften the details into a more blended, atmospheric texture.
Hood Depth Matters More Than a Tiny Fit Adjustment
A decorative hood has more room than a close-fitting cap, so assess where the back and crown sit rather than concentrating only on circumference. Too little depth can make a hood pull backward; too much can swallow the face opening. Use the creator’s construction guidance and check the developing shape from the side as well as the front.
Add Visual Extras Only After the Main Shape Works
Surface crochet, bobble-like texture, or other accents can draw attention away from fit issues while you are working. Treat the underlying hood as the priority. Once the main piece sits as intended, decorative choices become much easier because you know which areas remain visible and where extra texture will not crowd the face.
Original Tutorial and Creator Credit
Creator: Earth Tricks
7. Crochet Chunky Pointed Pixie Bonnet
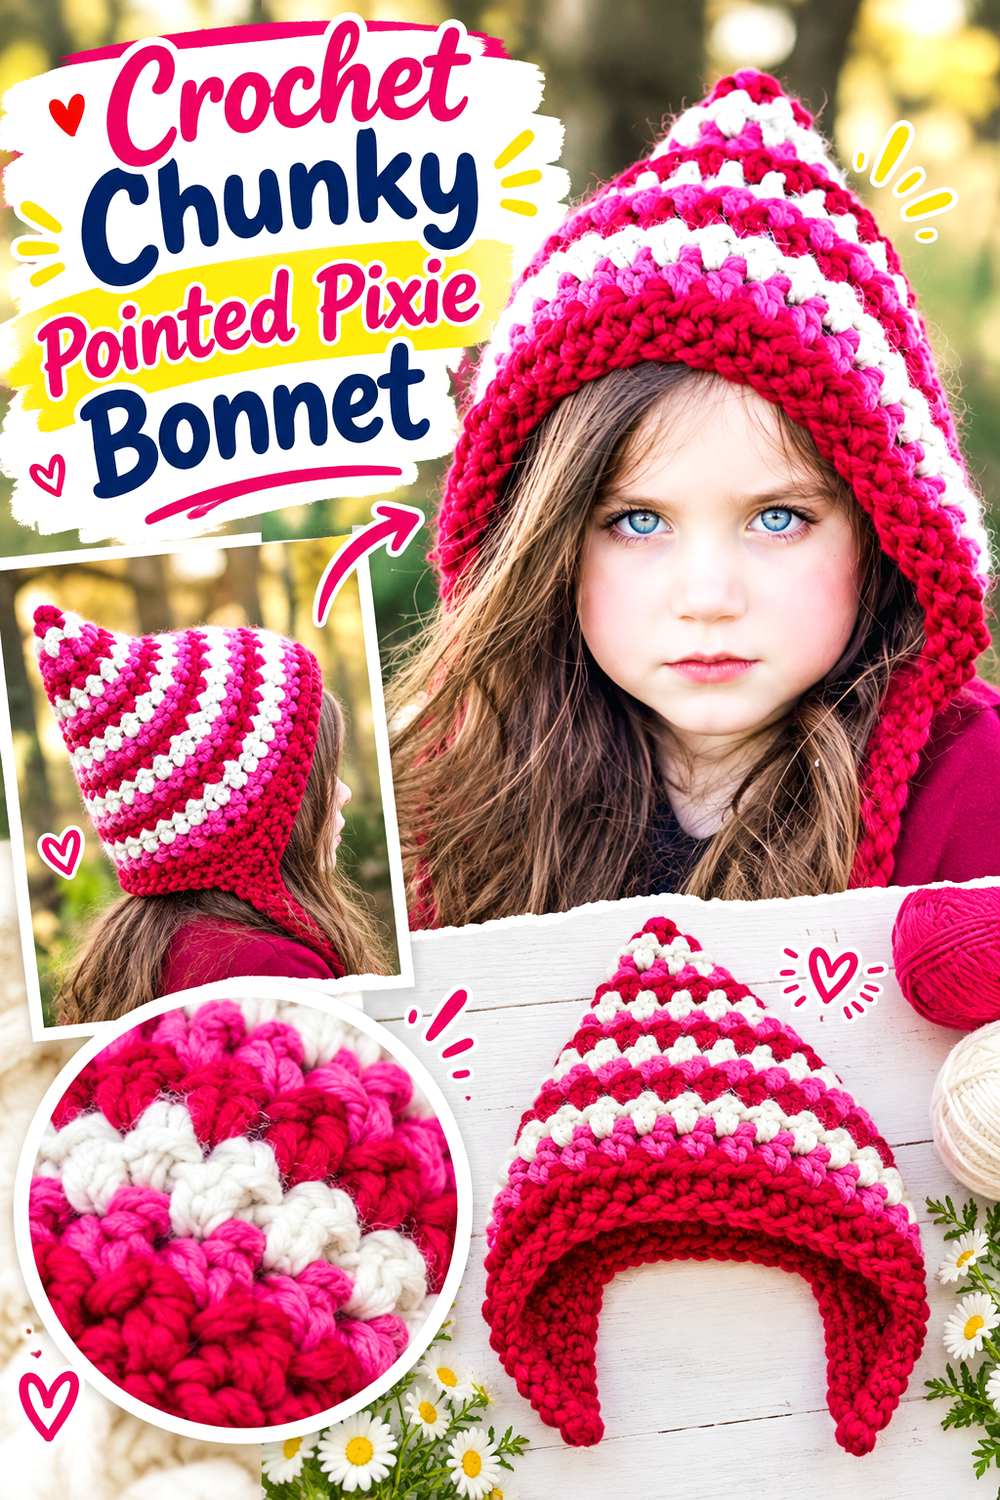
Simply Made by Erin Crochet’s pixie hat is a strong choice when you want the pointed silhouette to remain obvious instead of collapsing into soft slouch. The tutorial uses super-bulky yarn, giving the finished shape substantial stitch scale and an almost sculptural profile.
This is quite different from the thinner Lost-Boy-inspired option later in the article. The chunky version makes the yarn itself part of the aesthetic. It works well with simplified fall outfits where an oversized handmade texture can carry the look without needing complicated colorwork.
Super-Bulky Yarn Makes the Point More Architectural
Large stitches create a strong outline, but they also add thickness at seams and folded areas. Look at the back and crown as carefully as the front. A point that looks appealing in profile may feel heavier once the extra fabric sits against a coat hood or high collar.
Crown Depth Deserves an Early Fit Check
A pointed bonnet can have adequate circumference yet still feel too shallow if the crown-to-face distance is wrong. If the associated sizing information provides multiple options, choose based on actual measurements rather than simply adding room everywhere. Increasing every dimension can turn a neat pixie point into an oversized hood.
Keep Optional Decorations in Scale
A heart, flower, or other appliqué can make a chunky bonnet more playful, but large stitches already create significant visual weight. Before attaching anything, pin the embellishment temporarily and view the bonnet from a normal conversational distance. Often a smaller accent reads more clearly than a second oversized focal point.
Original Tutorial and Creator Credit
Creator: Simply Made by Erin Crochet
8. Crochet Adjustable Rectangle Pixie Bonnet
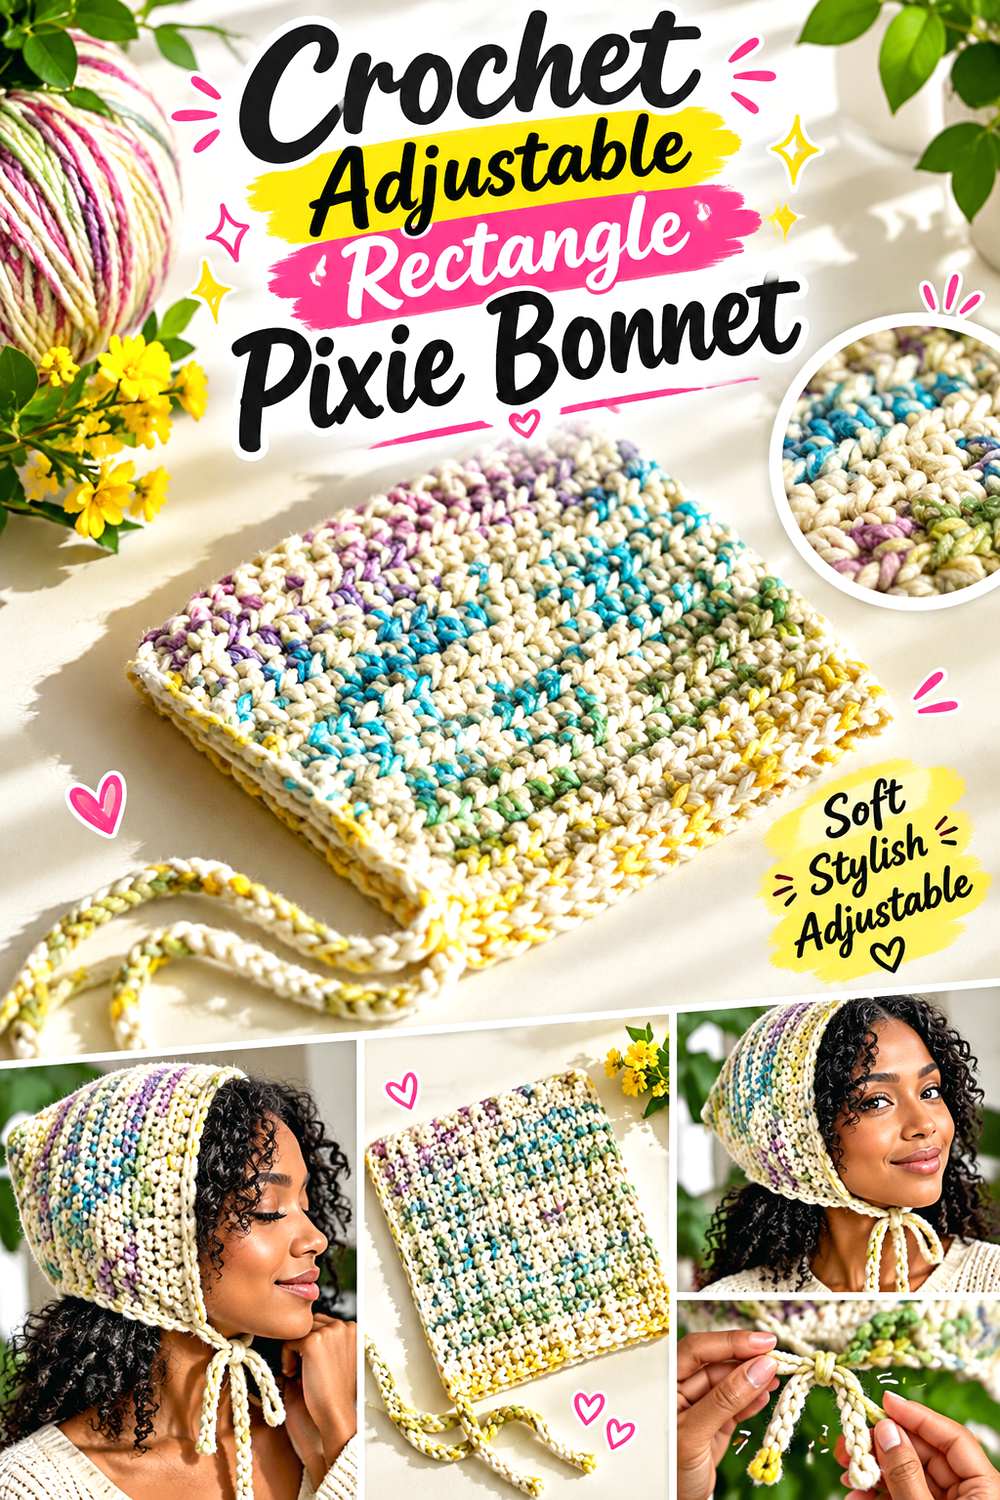
Sweet Softies approaches the pixie bonnet from a highly adaptable rectangle-based concept. The accompanying tutorial and pattern information explicitly discuss customizing the height, width, and straps for baby through adult sizes, making this one of the more flexible references in the collection.
The rectangle also makes the geometry easier to visualize before the bonnet becomes three-dimensional. If you are nervous about committing to elaborate crown shaping, this style gives you clearer opportunities to stop, measure, and compare the fabric against the intended wearer.
Rectangle Construction Makes Dimensions Easier to Audit
A flat piece gives you two straightforward measurements to monitor before shaping changes the silhouette. Use that advantage. Measure the actual fabric rather than counting on your stitch and row totals to match someone else’s result, especially if your yarn or tension differs from the sample.
Yarn Weight Can Change the Pixie Point Dramatically
The source discusses compatibility with multiple yarn weights when paired appropriately with the project’s sizing guidance. A chunkier fabric can emphasize the point, while a lighter fabric may allow it to bend or drape more readily. Decide which effect you want before substituting yarn solely because a particular color is appealing.
Measure the Wearer Instead of Copying Sample Proportions
“Any size” does not mean one set of dimensions fits everyone. The value of an adjustable design is that you can work from relevant measurements. Hair volume, desired coverage, and whether the bonnet will sit over another layer can all influence the finished feel, so use the creator’s sizing method rather than duplicating the sample blindly.
Original Tutorial and Creator Credit
Creator: Sweet Softies
9. Crochet Long Point Lost Boy Bonnet Hat
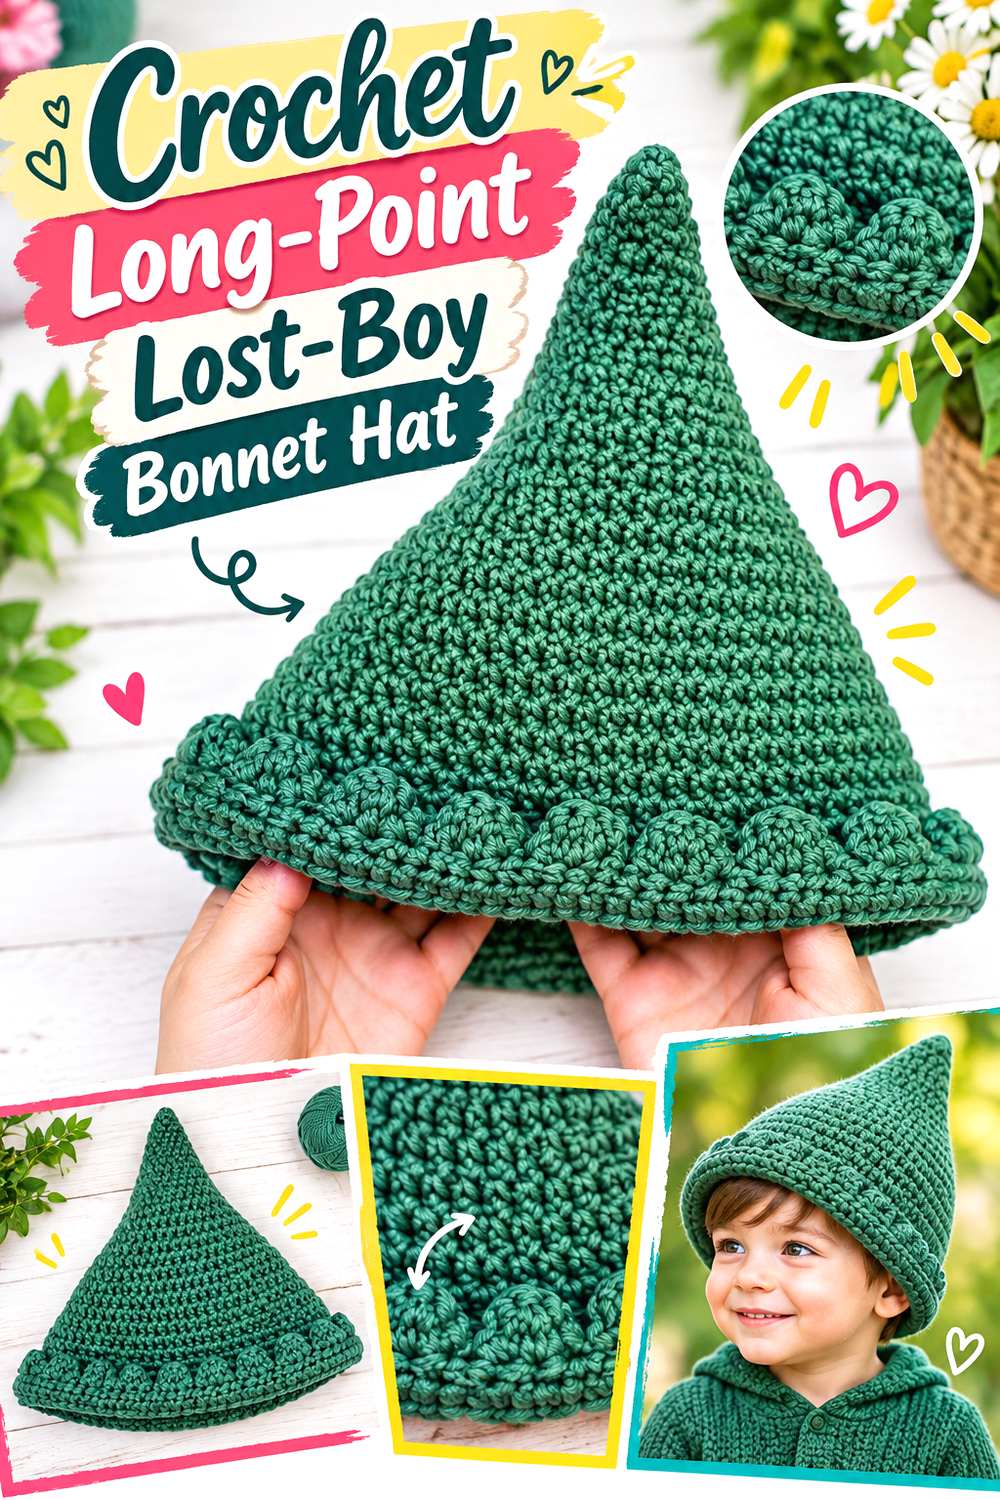
Tiffany Bliss’ pixie-hat tutorial leans harder into the elongated fairy-tale point. That makes it a good reference when the pointed crown is the reason you are choosing a bonnet in the first place rather than a minor shaping detail. The finished style lands between practical cold-weather headwear and a playful Lost-Boy or elf-inspired accessory.
Because the crown attracts so much attention, the rest of the bonnet can stay comparatively uncomplicated. That also makes color selection more important: an earthy neutral can push the design toward woodland styling, while a saturated shade can make the exaggerated shape feel more graphic.
The Crown Point Controls the Whole Silhouette
Before adapting a pointed bonnet, decide whether you want the tip to stand, fold, or hang. Those are not purely styling decisions; yarn weight and fabric stiffness influence the result. A substitution that changes drape can make the same basic shape look dramatically different even when the dimensions remain similar.
A Clean Face Edge Keeps the Shape Wearable
An exaggerated crown already supplies plenty of character. Keeping the front edge neat prevents the bonnet from becoming visually busy around the face. If you add contrasting trim, check it from the front rather than judging only on a flat work surface; the contrast can appear much stronger once it forms a frame.
Pair the Point With Simple Outerwear
For everyday fall use, this shape is easiest to integrate when nearby clothing has cleaner lines. A plain wool coat, oversized cardigan, or simple pullover lets the point look intentional. Pairing it with multiple other fantasy-inspired details can move the outfit toward costume styling, which may be exactly what you want—but it is worth deciding beforehand.
Original Tutorial and Creator Credit
Creator: Tiffany Bliss
10. Crochet Ribbed Tie Front Balaclava Bonnet
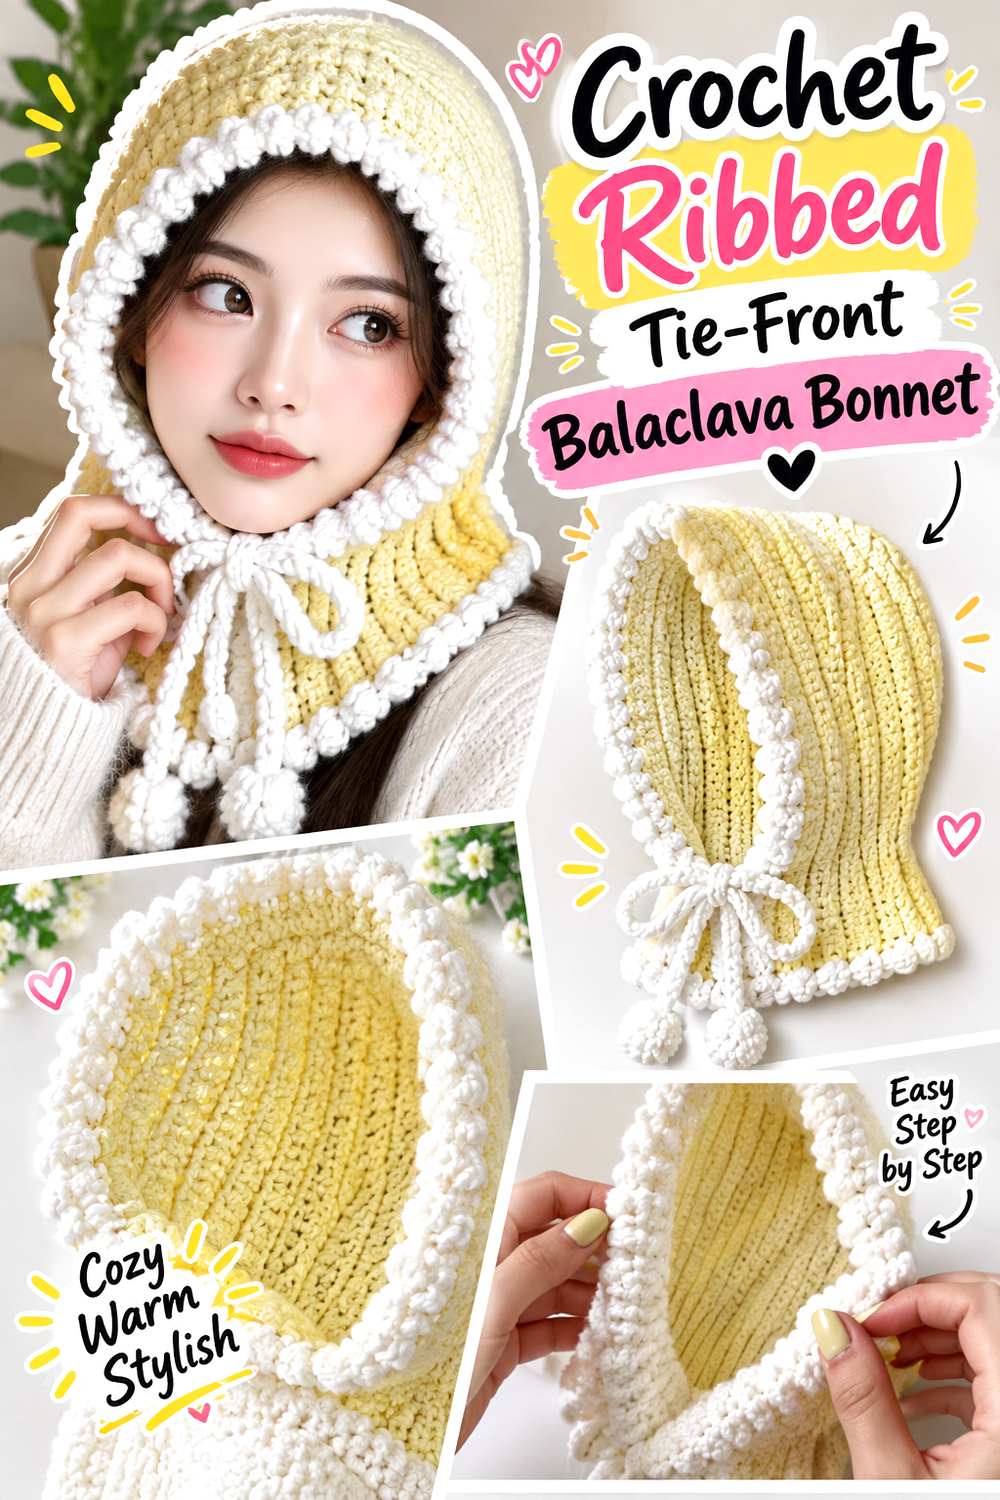
Kenikse Crochet’s tie balaclava sits right on the border between bonnet and hood. It has a more fitted face treatment than the looser fae or turtleneck hoods, with ribbing and a cord-like tie becoming visible parts of the design. The creator uses DK yarn in the demonstrated project and provides finished measurements in the video description.
This is a smart direction for someone who likes the tie-bonnet trend but wants more head coverage than the classic open-neck version. It can also sit more easily beneath some coats than a super-bulky hood.
Ribbing Gives the Face Opening a Defined Frame
A ribbed edge can add stretch while keeping the opening visually crisp. The key checkpoint is whether that ribbing sits flat when worn. If it flares outward or pulls inward, the difference may come from edging tension rather than the main bonnet dimensions.
Tie Placement Changes How Closely the Hood Sits
A tie-front design lets you influence the lower opening after the main fabric is complete. Test the closure at a comfortable tension rather than cinching it simply to match a photograph. The goal is to stabilize the shape without dragging the face band downward or making the neck area uncomfortable.
DK Yarn Reduces Some of the Coat-Collar Bulk
Compared with super-bulky pixie options, the demonstrated DK fabric creates a comparatively finer surface. That can be useful if the bonnet will sit beneath a hooded coat or high collar. If you move to a substantially thicker yarn, recheck both fit and layering space rather than expecting the same streamlined result.
Original Tutorial and Creator Credit
Creator: Kenikse Crochet
11. Crochet Turtleneck Hood Bonnet
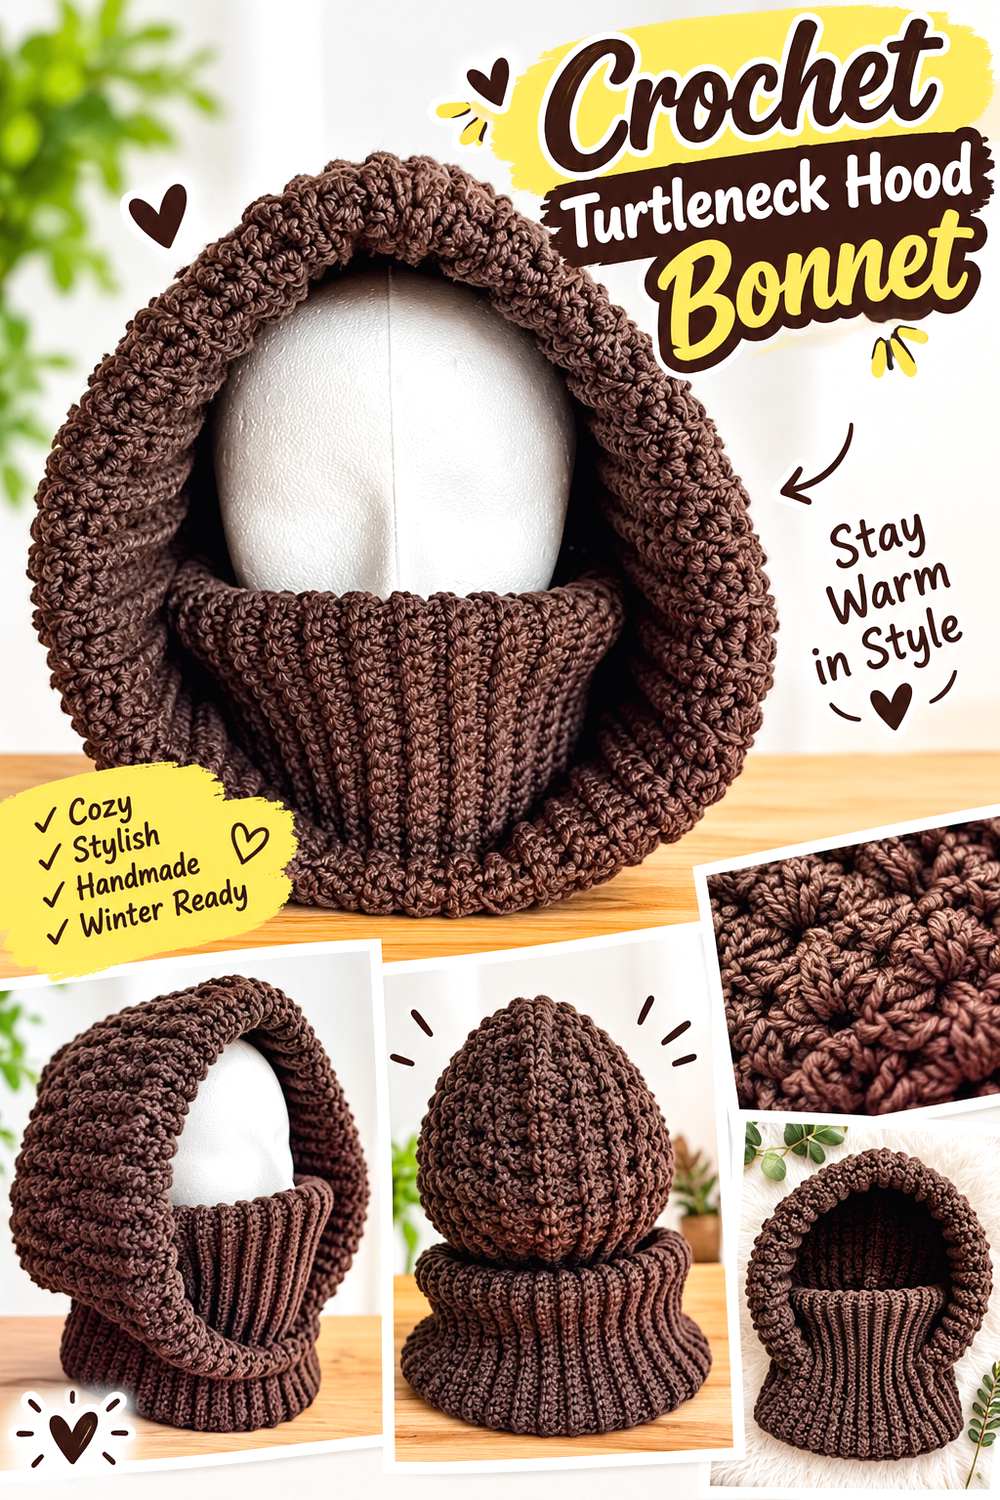
If you want the bonnet idea to function as serious neck coverage, the turtleneck hood from Diving Ducks Crochet takes the concept much farther than chin ties. The design combines a hood with an extended neck section and can also be considered alongside cowl and balaclava styling. The creator provides additional sizing resources alongside the tutorial.
Visually, this is one of the least traditional bonnets in the collection, but it fits the same 2026 preference for crochet framing the face. Choose it when function and layering matter more than a delicate ribbon closure.
Neck Coverage Is the Main Reason to Choose This Shape
A standard bonnet ends near the jaw or upper neck; this shape deliberately continues downward. That makes it useful with jackets that leave the neck exposed, but it also means you need to account for bulk inside a zipped coat. Test how the fabric folds at the base of the neck rather than judging comfort only while standing without outerwear.
The Turtleneck Transition Needs Comfortable Stretch
The hood and neck sections perform different jobs. The hood needs room around the head, while the lower portion must pass comfortably over or around the head according to the construction. If you alter yarn or tension, make sure the transition area still functions before finishing the entire piece.
Use This When You Want One Accessory to Do More
This bonnet-hood direction can replace the need for a separate scarf in some outfits because it visually connects head and neck coverage. That is an advantage for streamlined layering, but less so if you enjoy removing a scarf while leaving your hat on. Think about how you actually dress indoors and outdoors before choosing the most integrated option.
Original Tutorial and Creator Credit
Creator: Diving Ducks Crochet
12. Crochet Drawstring Winter Bonnet Hood
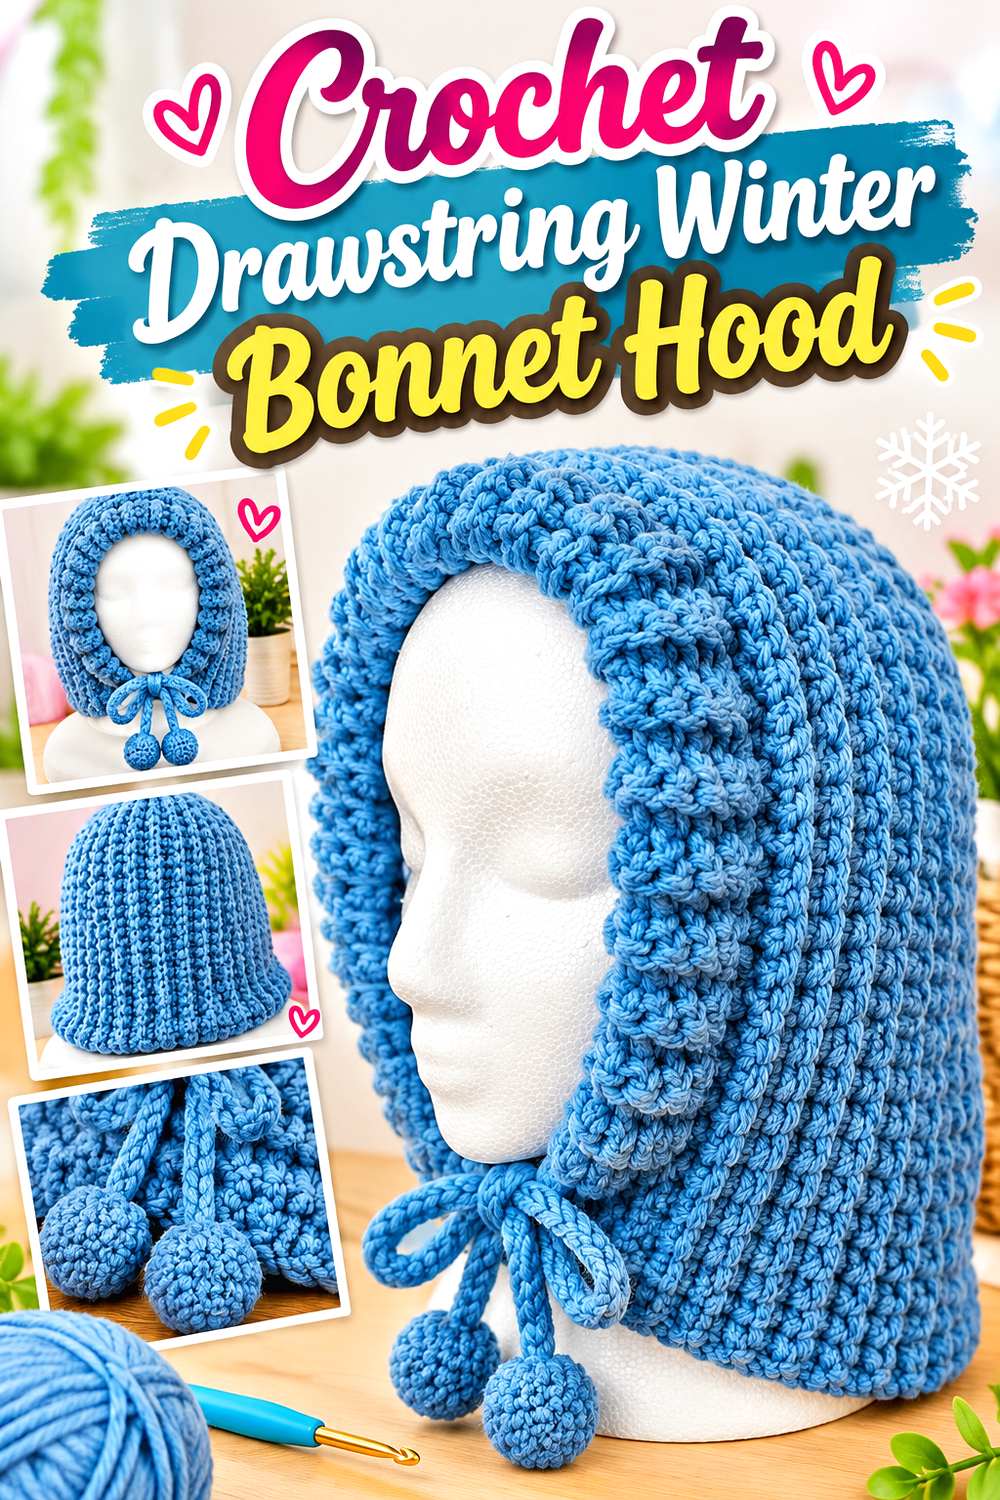
Cozy Loop Crochet’s drawstring balaclava adds adjustability directly around the hood opening. The video uses medium-weight yarn and demonstrates a separate drawstring feature, so the finished piece offers a different fit mechanism from fixed ties beneath the chin.
This direction makes sense if you want a hood that can sit relatively open at one moment and closer to the face at another. It looks sportier than the bow bonnet and less fairy-tale-inspired than the pointed pixie options, giving the collection a useful everyday winter alternative.
The Drawstring Lets You Fine-Tune the Opening
The main advantage is post-construction adjustment. Instead of relying on one fixed face opening, you can alter how closely the hood sits. Do not use that flexibility to compensate for a fundamentally incorrect bonnet size, though. The body still needs appropriate depth and circumference before the drawstring is added.
Medium-Weight Fabric Keeps the Closure Manageable
A very thick drawstring channel can become bulky around the cheeks or chin. The demonstrated medium-weight yarn keeps the adjustment feature from competing excessively with the rest of the hood. If substituting a much heavier yarn, consider how the gathered edge will feel as well as how warm the fabric becomes.
Cord Placement Deserves a Safety Check
Any cord close to the face or neck should be treated as a functional component rather than a casual decoration. Keep it comfortable, inspect it for secure finishing, and do not assume an adult fashion design is appropriate for a baby or young child. For children, use age-appropriate clothing guidance and choose safer alternatives where necessary.
Original Tutorial and Creator Credit
Creator: Cozy Loop Crochet
13. Crochet Ruffle Edge Fashion Bonnet
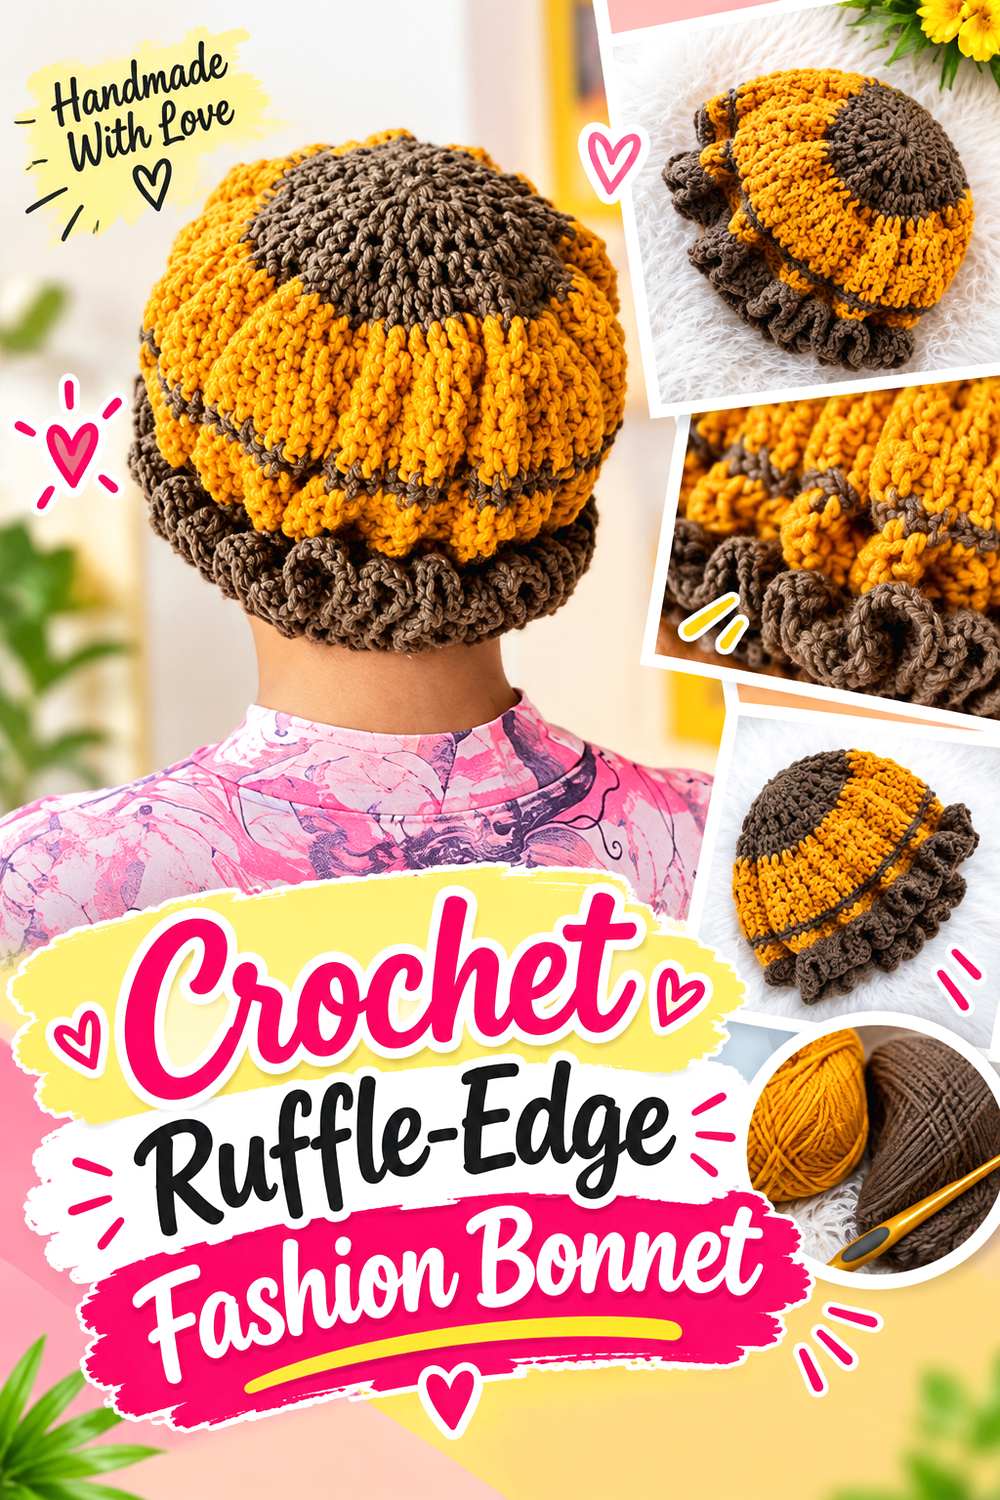
Princess handmade’s bonnet shifts attention away from heavy texture and toward the frame around the face. Its pronounced ruffle creates a romantic outline that looks intentionally decorative even when the bonnet body remains relatively simple.
This is a strong counterpoint to the ribbed and balaclava-inspired designs. Instead of using dense structure for drama, it uses extra fabric at the perimeter. That makes the project appealing for fall looks built around softer dresses, simple knits, or cottage-inspired layers, though the ruffle can also look more directional when paired with modern basics.
Ruffle Depth Can Change the Apparent Face Opening
A generous frill extends beyond the structural edge, so the bonnet can look smaller or more enclosing even when the actual fit has not changed. Check the unfinished body first, then judge how much edge volume you want. If adapting the look, avoid treating “more ruffle” as automatically better.
Let the Main Body Stay Visually Quiet
The strongest feature is already at the perimeter. A solid color or restrained texture gives that edge room to register. If you add complex striping, multiple appliqués, and a dramatic ruffle together, the bonnet may lose a clear focal point. Decide whether color or edging should lead the design.
Yarn Choice Controls Whether the Frill Floats or Stands
A soft yarn may let the ruffle fall closer to the cheeks; a firmer fabric can hold it farther away. Neither is inherently preferable. Think about the profile you want and test a small section of the edging before committing, particularly if you have substituted fiber or yarn weight.
Original Tutorial and Creator Credit
Creator: Princess handmade
14. Crochet Lace Child Bonnet
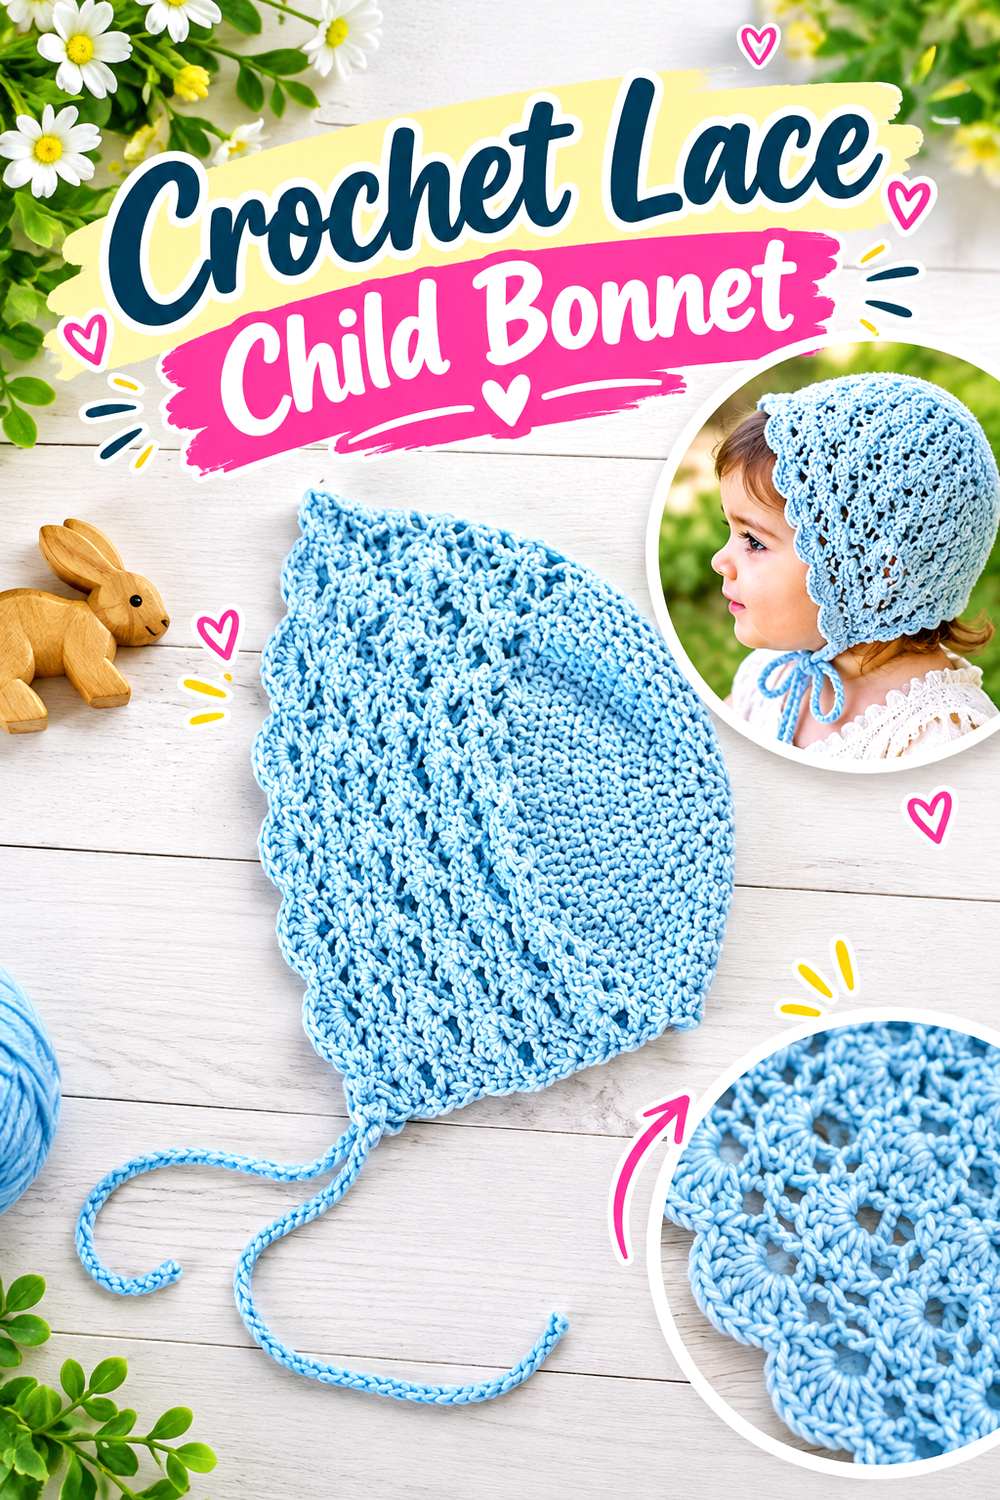
WoolyWondersCrochet’s lace bonnet represents the lighter, more traditional side of the category. The tutorial is specifically presented for baby and children’s sizing rather than as an adult fashion bonnet, and the open texture gives the finished piece a more delicate appearance than the dense fall hoods above.
This is worth including because lace changes the visual weight of a bonnet dramatically. It can work beautifully for special-occasion dressing or a handmade gift, but it should not be assumed to provide the same weather protection as dense ribbing merely because both items cover the head.
Open Lace Changes Both Appearance and Coverage
Negative space makes a bonnet look lighter and lets underlying hair or a contrasting layer show through. That is part of the appeal, but it also reduces wind-blocking compared with a compact fabric. Choose lace because you want its decorative effect, not because you expect it to behave like a tightly worked winter hood.
Stay Within the Sizing Information You Can Verify
The tutorial is designed around baby and child versions. If you want a similar adult look, seek compatible adult sizing rather than simply adding an arbitrary number of repeats. Head circumference is only one factor; crown depth and the position of the lower edge also need to scale appropriately.
Treat Child Ties as a Safety Detail
The familiar under-chin ribbon look can be charming, but cords and ties require sensible supervision and age-appropriate use. Keep finishing secure, avoid loose decorative parts, and consider the intended setting. A photography or special-event bonnet does not automatically have the same suitability as everyday unsupervised clothing.
Original Tutorial and Creator Credit
Creator: WoolyWondersCrochet
15. Crochet Shell Texture Baby Bonnet
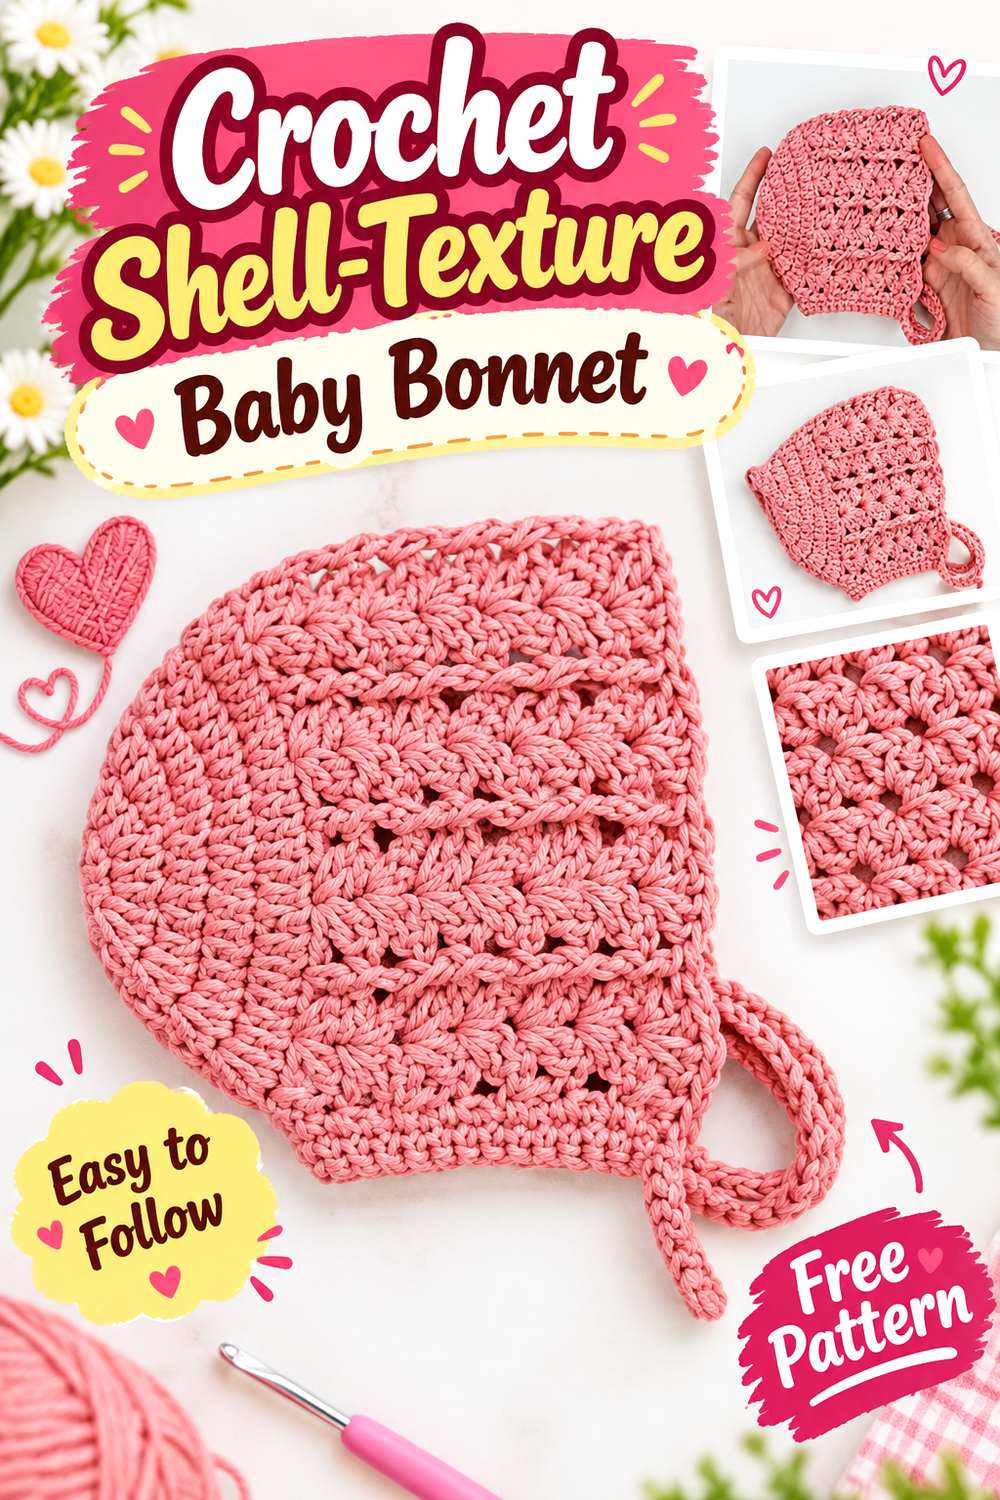
Croby Patterns’ tutorial focuses on a shell-textured baby bonnet. The free video demonstrates the 0–6 month version, while the creator points viewers to additional sizing through the related pattern resources. That makes this a case where the size shown on YouTube should be respected rather than quietly generalized to adults or older children.
The shell surface gives the small bonnet plenty of detail without needing appliqués or multiple motifs. It suits readers who want the stitch texture itself to provide the decorative finish.
Shell Texture Adds Detail Without Extra Pieces
A repeating shell surface creates shadow and curvature across the bonnet, so you can keep the color palette restrained and still get a visually rich result. This can be useful for gifts because there are fewer separate embellishments to manage. Make sure the chosen yarn shows the shell definition clearly rather than obscuring it with excessive fuzz.
The Video Size Is Specifically Baby-Focused
The creator identifies the tutorial size as 0–6 months and directs viewers elsewhere for additional sizing. Use that information instead of assuming the same instructions can simply be continued until the bonnet looks larger. If you need another size, follow the creator’s appropriate size resource or choose another tutorial designed for that age.
Check Fiber Care Before Making a Gift
Baby accessories are likely to need cleaning, so the fiber’s care instructions can be as important as its appearance. Read the yarn label and pass accurate care information to the recipient. Avoid claiming a bonnet is machine washable merely because the yarn feels sturdy; care depends on the actual fiber and product instructions.
Original Tutorial and Creator Credit
Creator: Croby Patterns
16. Crochet Cluster Stitch Baby Bonnet
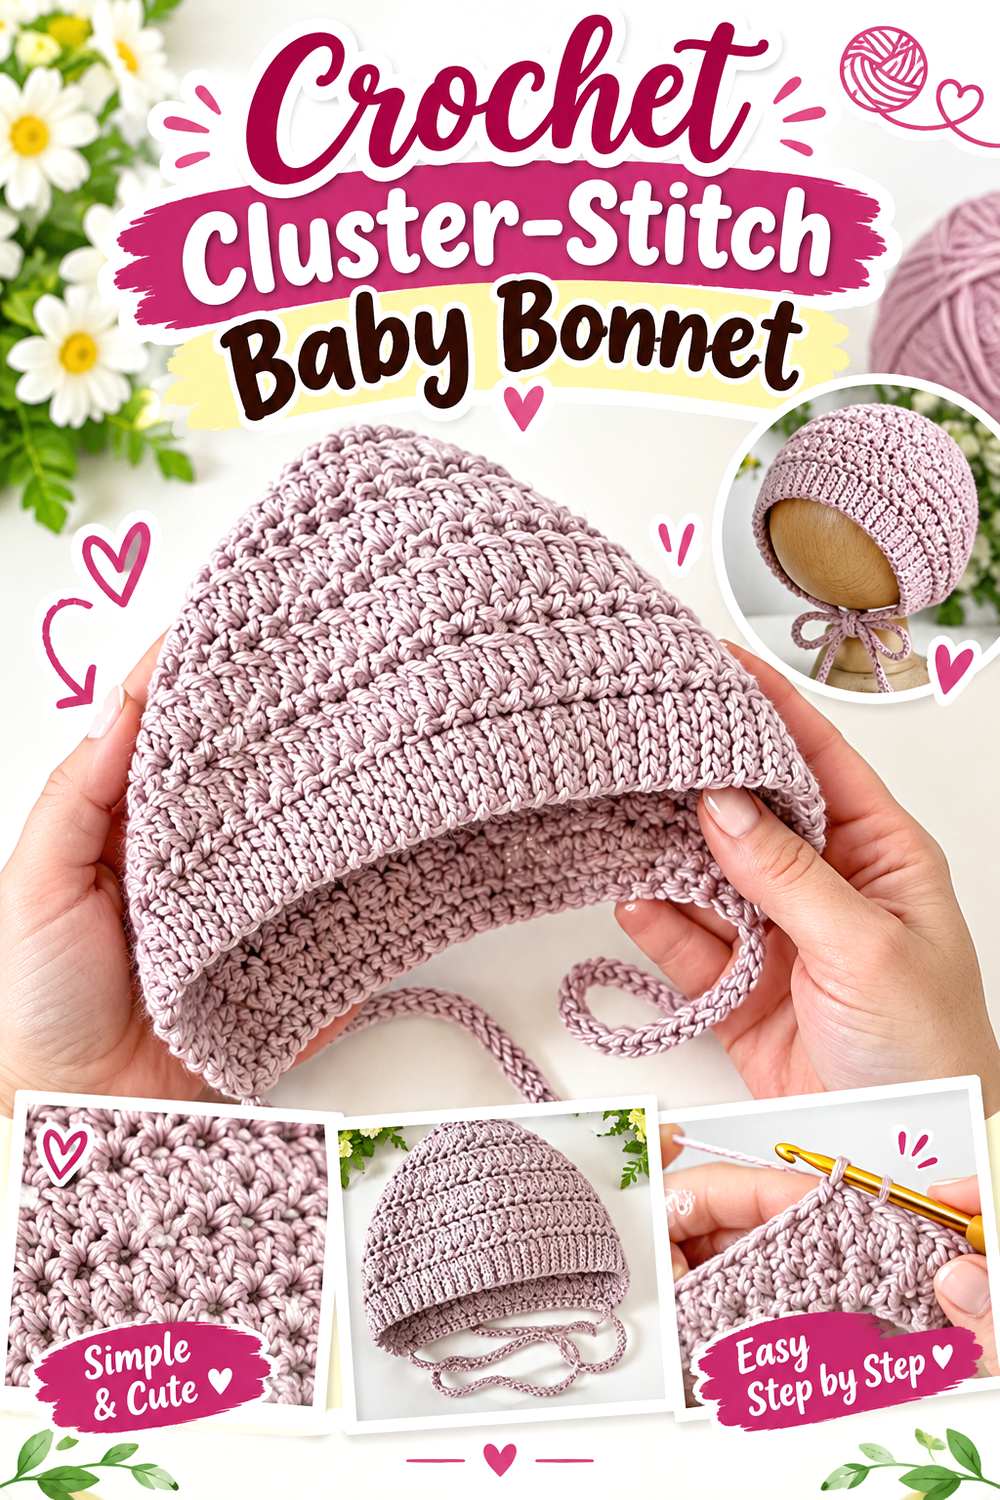
Daisy Farm Crafts offers another baby bonnet route, this time with cluster texture as the defining surface feature. The creator links the tutorial to a written pattern and size chart, which is useful when you want more sizing context than a finished photograph alone can provide.
Compared with the shell bonnet, the cluster version has a different rhythm and surface density. That distinction matters when you are choosing between designs for a gift: two bonnets can share a similar overall outline while the stitch texture gives each one a very different visual character.
Cluster Texture Creates Soft Surface Emphasis
Clusters concentrate several loops into visible groups, producing a textured fabric that catches light differently from flat stitches. If you are deciding between a variegated yarn and a solid, remember that strong color changes can compete with the clustered surface. A quieter color can make the stitch pattern easier to read.
Use the Linked Size Chart Rather Than Guesswork
When a designer supplies a dedicated size chart, use it. Baby head sizes change quickly, and age alone is not a precise measurement. If possible, confirm the intended wearer’s relevant measurement and compare it with the designer’s stated sizing information before starting the bonnet.
Keep the Face Edge Comfortable
Texture is attractive on the bonnet body, but the area touching the forehead and cheeks needs to feel comfortable. When choosing yarn, handle a worked swatch rather than judging softness from the skein. Some fibers feel different once clustered densely or after washing according to their care directions.
Original Tutorial and Creator Credit
Creator: Daisy Farm Crafts
17. Crochet Pixie Puff Baby Bonnet
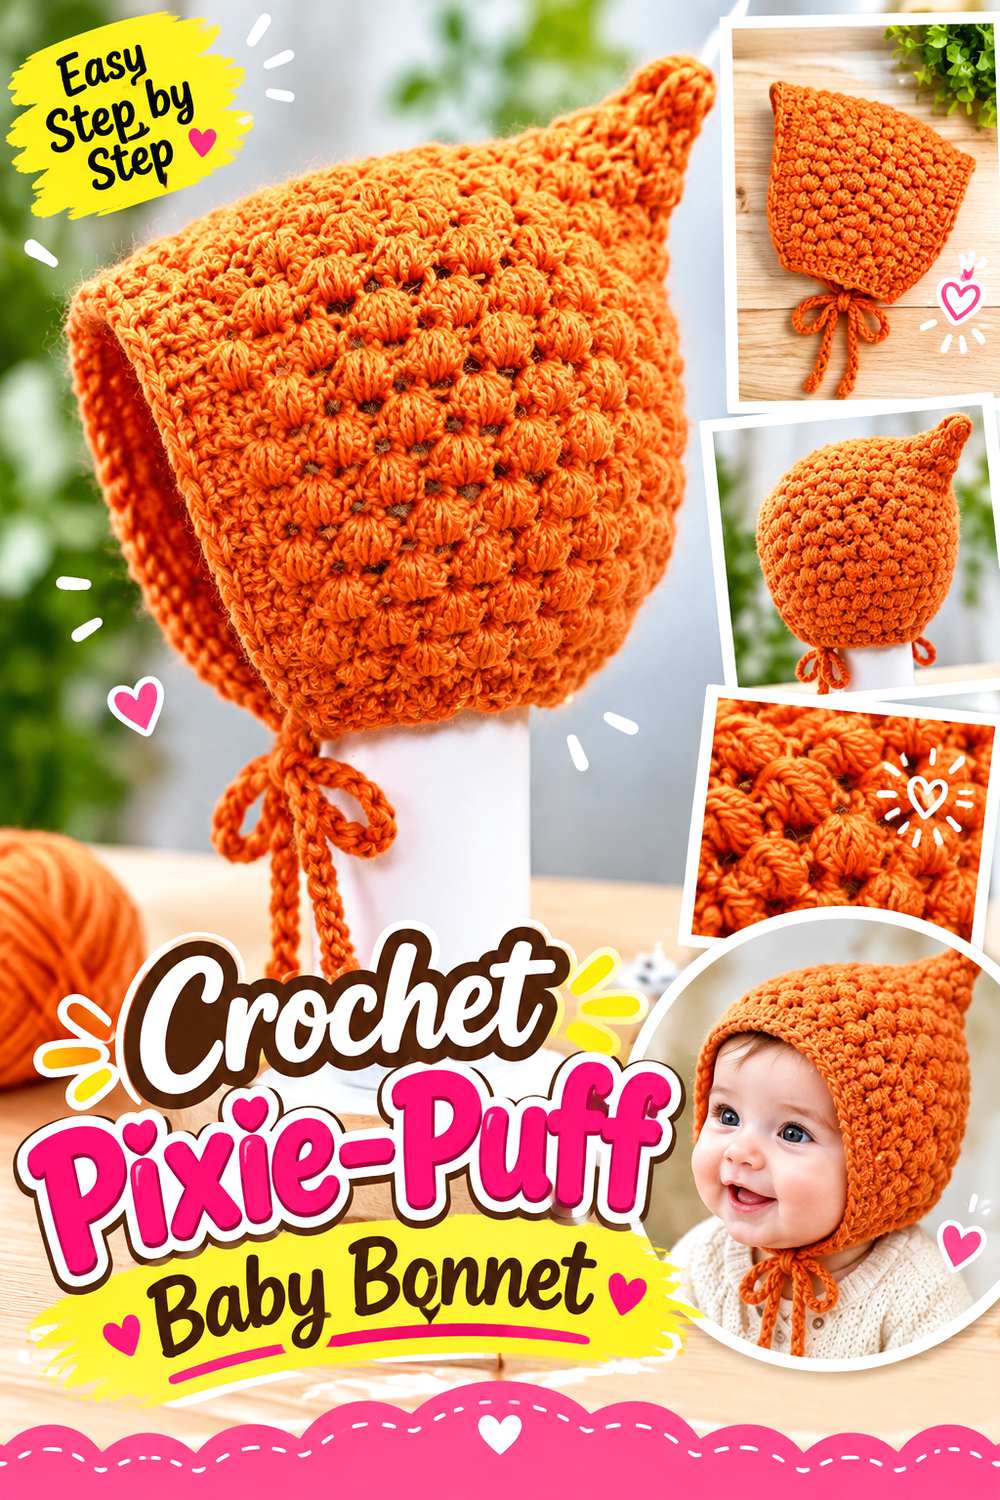
The Pixie Puff bonnet from Fuad Azmat / YARNutopia by Nadia brings the pointed silhouette into baby sizing. The source describes the featured version for babies around 3–6 months and notes that measurements are used when considering size changes. Its conical outline gives it a noticeably different profile from rounded lace, shell, and cluster bonnets.
This is a particularly playful choice for a photo outfit or woodland-inspired gift. The key is to keep the whimsical crown separate from the sizing decision: an exaggerated point can be decorative while the section that actually fits around the head still needs appropriate proportions.
A Conical Crown Needs a Different Fit Check
A round bonnet distributes depth more evenly, while a pixie point deliberately extends away from the head. Do not use the tip as evidence that the bonnet is large enough. Check the part that actually surrounds the crown and frames the face according to the tutorial’s measurement guidance.
Puff Detail Adds Volume on a Small Scale
Textured or puffed elements are visually prominent on baby accessories because the overall project is small. Keep that in mind if you change yarn thickness or add extra decoration. A detail that appears modest on an adult bonnet can dominate a much smaller baby version.
Size Adaptation Should Begin With Measurements
The creator discusses working from measurements when considering a different size. That is safer than deciding, for example, to add a few unspecified rows and hope every proportion scales with them. If your intended size is substantially different from the demonstrated 3–6 month sample, follow the creator’s measurement guidance carefully or select a tutorial written specifically for the required size.
Original Tutorial and Creator Credit
Creator: Fuad Azmat / YARNutopia by Nadia
Which Crochet Bonnet Style Makes Sense for You?
For a clearly adult fall-fashion look, the granny-square, slouchy, long-bow, double-strand, ribbed ushanka, and tie-balaclava options offer the easiest bridge between handmade texture and everyday outerwear. The turtleneck and drawstring hoods provide the most neck coverage, while the fae and long-point pixie designs make the strongest visual statement.
If flexibility is the priority, the Sweet Softies rectangle pixie stands out because its source explicitly addresses customization across sizes. Ruffles favor a softer romantic look, whereas ribbing and dense textures read more streamlined. The final four projects are baby or child oriented; they are better choices when that age group is genuinely the intended wearer rather than as shortcuts to an adult-sized bonnet.
Conclusion
The strongest Fall 2026 crochet bonnet choice depends less on one trending color and more on how you want the accessory to behave. Pick granny squares for modular color placement, ribbing for a close graphic frame, a slouchy back for relaxed volume, an oversized bow or ruffle for a romantic statement, or a hooded version when neck coverage matters. Pixie points bring a deliberately whimsical profile, while the baby and child designs need their own age-appropriate sizing and safety considerations.
Once you have chosen the silhouette, verify yarn, measurements, opening, and tie style before making substitutions. Use the original tutorials linked above for exact construction details rather than trying to transfer instructions from one bonnet shape to another.
Frequently Asked Questions
Are crochet bonnets actually in style for Fall 2026?
There is credible evidence of renewed fashion interest rather than the idea being limited to crochet blogs. In August 2026, Madame Figaro discussed crochet bonnets as a current fashion accessory and noted crochet headwear appearing in colder street-style settings around Fashion Week. For a handmade wardrobe, the most current-looking versions tend to treat the bonnet as intentional headwear—ribbed, graphic, hooded, oversized, or cleanly styled—rather than relying solely on vintage associations.
Which crochet bonnet shape is easiest to wear with a fall coat?
A relatively fitted tie bonnet or streamlined ribbed style usually adds less material around the collar than a large hood or turtleneck version. If your coat already has a high neck, thick lapels, or an attached hood, compare that space with the bonnet’s lower edge. Long scarf flaps and oversized bows create more overlap. A collarless or lower-neck coat gives chunkier hood-bonnet hybrids more room.
Can I enlarge a baby crochet bonnet tutorial to adult size?
Not automatically. Increasing circumference does not guarantee enough crown depth, correct face framing, or properly positioned ties. Some tutorials, such as Sweet Softies’ rectangle pixie design, explicitly provide a customizable sizing approach, while several baby tutorials in this list demonstrate specific infant sizes. When adult sizing is not supplied, choose a compatible adult pattern or use designer-provided measurement guidance rather than inventing extra repeats.
What yarn weight works best for a fall crochet bonnet?
There is no single ideal weight because the silhouette matters. Super-bulky yarn can emphasize a chunky pixie point, medium or DK yarn can reduce bulk around a coat collar, and lighter yarn can suit lace or softer ties. More important than the label is whether your fabric has the required dimensions, flexibility, stitch definition, and drape. When a tutorial gives gauge or sizing instructions, changing yarn means those fit checkpoints need to be reconsidered.
How can I stop crochet bonnet ties from distorting the face opening?
Test the bonnet with the ties held at the tension you expect to use before finishing everything permanently. If tying them causes the front edge to pull inward, first check whether the face border is too tight or whether the tie attachment is concentrating force at one point. Do not simply make the ties longer and expect the opening to correct itself; the issue may be edging tension or the bonnet body’s underlying fit.
Should I block a crochet bonnet before judging the final fit?
Blocking can help settle motifs, joins, lace, and some unevenness, but the appropriate method depends on the fiber and project. For a granny-square bonnet, comparing blocked motif dimensions before joining can prevent mismatched pieces from distorting the final shape. For other styles, follow the yarn’s care instructions and the creator’s finishing guidance. Blocking can refine fabric behavior, but it should not be used to force a substantially incorrect size into place.