A classic top-down raglan sweater is a great first garment because you work it in one piece, try it on as you go, and avoid seaming. You’ll start at the neckline, place four markers for the raglan lines, then add steady increases each round to shape the yoke. When the yoke reaches the right depth, you’ll separate the sleeves from the body, add a small underarm chain, and cruise down the torso in simple, even rounds. Ribbing at the hem and cuffs gives that polished, store-bought finish. Finally, you’ll pick up the neckline for a neat collar.
This pattern uses worsted-weight yarn and double crochet for a light, flexible fabric that works for most seasons. If you can chain, double crochet, and work front- and back-post stitches, you’re set. Keep a tape measure handy and check gauge so your fit lands where you want it. The instructions include four sizes and measurement targets so you can tailor the sweater to your body or the person you’re making it for. Choose a solid for a clean look or two colors and stripe the body and sleeves. Block lightly at the end to smooth stitches and relax the fabric. Ready? Lay out your tools, set the markers, and let the sweater grow from the neck down—simple, steady, and satisfying.
Full Pattern
Skill level: Advanced beginner
Sizes: S (M, L, XL)
Fits bust: 34–36 (38–40, 42–44, 46–48) in / 86–91 (97–102, 107–112, 117–122) cm with ~2–4 in (5–10 cm) ease
Yarn: Worsted (4). Approx 900 (1050, 1200, 1400) yds / 825 (960, 1100, 1280) m
Hooks: 5.5 mm (I) main; 4.5 mm (7) ribbing
Notions: 4 locking markers, waste yarn, scissors, yarn needle, tape measure
Gauge (after light blocking): 14 dc × 9 rows = 4 in / 10 cm with 5.5 mm
Abbreviations: ch (chain), sc (single crochet), dc (double crochet), sl st (slip stitch), fpdc (front-post dc), bpdc (back-post dc), st(s) (stitch-es), rep (repeat), pm (place marker), sk (skip)
Notes
- Worked top-down in the round. Raglan increases happen at 4 markers using (dc, ch 1, dc) into each ch-1 corner space.
- Try on as you go; stitch counts may vary slightly with personal tension. Aim for the Measurements Targets below.
Measurements Targets (guide)
- Yoke depth (neck to underarm): 7.25 (8, 8.75, 9.5) in / 18.5 (20.5, 22, 24) cm
- Sleeve sts at split (per sleeve): ~42 (46, 50, 54) dc
- Front/back sts at split (each): ~64 (70, 76, 82) dc
Neckline & Setup
Option A (easiest): Fdc 72 (76, 80, 84); join with sl st, taking care not to twist.
Option B: Ch 72 (76, 80, 84), join to ring; Rnd 1: dc in each ch around; join.
Rnd 2 (setup markers):
Dc evenly, pm at four equidistant points to divide as: Front 18 (19, 20, 21) | Sleeve 9 (10, 10, 11) | Back 18 (19, 20, 21) | Sleeve 9 (10, 10, 11). Convert each marker location into a ch-1 corner as follows: (dc to 1 st before marker, (dc, ch 1, dc) in next st; move marker to ch-1 space); dc to next marker and repeat around; join.
Yoke (raglan grows)
Rnd 3: Ch 2 (counts as dc), dc to first corner, (dc, ch 1, dc) in corner ch-1 space, rep at each corner; dc in all other sts; join.
Rnds 4–? Repeat Rnd 3 until your yoke hits the Yoke depth and is near the Measurements Targets above. Try on. Adjust a round or two if needed.
Separate Sleeves
With yoke complete and ending at the back, Body Join Rnd:
Dc to first corner, sk sleeve sts to next corner placing them on waste yarn, ch 6 (underarm), dc across Front to next corner, skip second sleeve to next corner, ch 6, dc across Back; join.
Body
Work dc in each st and in each ch of the underarm chains around; join each round.
Work even for 11 (12, 13, 14) in / 28 (30.5, 33, 35.5) cm from underarm or to desired length minus 2–3 in for ribbing.
Tidy edge: 1 round sc around.
Hem Ribbing (smaller hook):
Rnd 1: (fpdc, bpdc) around; join.
Rnds 2–8 (or desired): Repeat (fpdc, bpdc); join.
Fasten off body.
Sleeves (make 2)
Rejoin yarn at center of underarm.
Rnd 1: Pick up dc evenly around armhole and into the 6 underarm chains = sleeve stitch target or close. Join.
Taper (optional for classic fit): Every 7th round, dc2tog once at start and once at mid-round until you like the forearm fit.
Work even to wrist (approx 17–18 in / 43–46 cm total sleeve length from shoulder for long sleeves).
Cuff setup: 1 round sc.
Cuff Ribbing (smaller hook): (fpdc, bpdc) for 6–10 rounds. Fasten off.
Neckline
Join smaller hook at any neck st.
Rnd 1: sc evenly around; join.
Rnd 2–4: (fpdc, bpdc) around for a low crew; add more rounds for a taller collar. Fasten off.
Finishing
Weave in all ends neatly. Lightly block to measurements (steam or wet block per yarn). Enjoy.
Supplies Flat-Lay

Before you stitch a single chain, gather everything so your session runs smoothly. Pick a worsted-weight yarn that feels good on skin and a 5.5 mm hook for the main fabric, plus 4.5 mm for ribbing. Four locking markers mark the raglan lines. The measuring tape keeps you on fit, and a notebook tracks rounds and sizes. Sharp scissors, a yarn needle for weaving ends, and calm lighting round out the setup. Choosing colors now saves time later; a solid reads classic, stripes add play. Snap a reference photo of this flat-lay—you’ll thank yourself when you sit back down to continue.
Supplies You Needed
Supplies: Worsted yarn (800–1400 yds by size), 5.5 mm hook, 4.5 mm hook, 4 locking markers, scissors, yarn needle, measuring tape, notebook.
Neckline & Setup

Start with a comfortable neckline. Make a relaxed foundation chain (or foundation double crochets) and join carefully without twisting. Work one round of double crochet, then place four markers to define the raglan lines: front-right, sleeve-right, back, sleeve-left. These markers guide every increase and keep your yoke square and balanced. Check the opening against your neck; it should sit nicely without choking or gaping. If you need more ease, add a few chains now rather than later. Taking thirty seconds to confirm fit here saves rows of adjusting. Breathe, settle into your rhythm, and get ready for steady, satisfying growth.
Raglan Increase Rounds
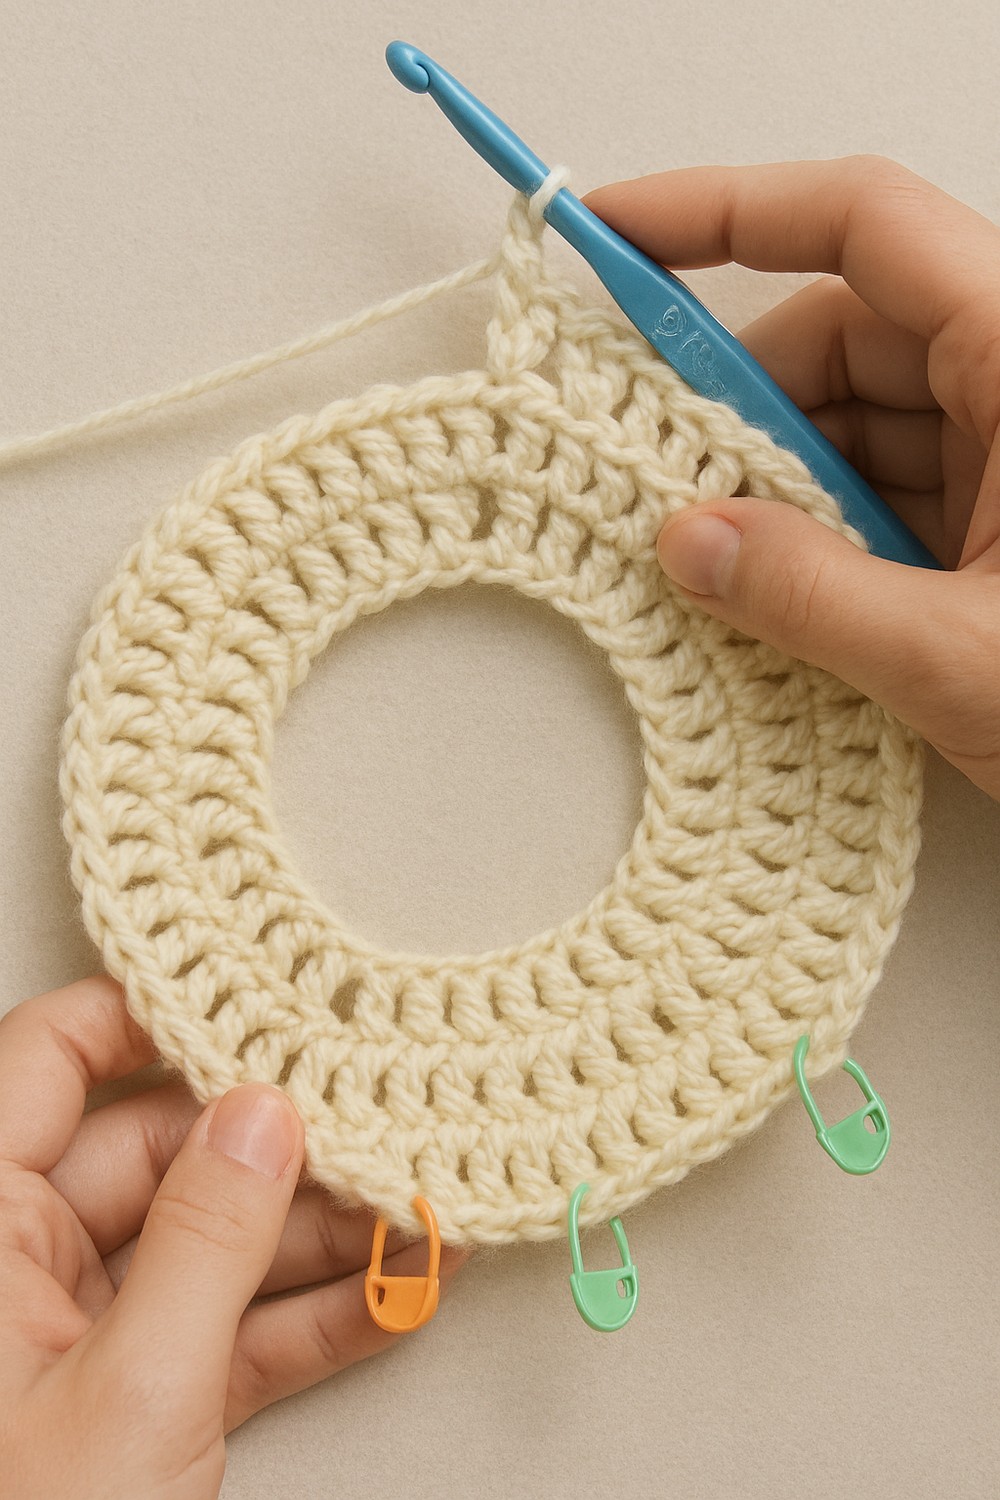
This is where the yoke takes shape. Work smooth rounds of double crochet. At each marker, create a simple raglan increase: (dc, ch 1, dc) into the stitch/space just before the marker and move the marker up into the ch-1 space. That tiny chain makes a neat ‘hinge’ so the yoke expands evenly. Try on every few rounds; the neckline should sit flat and the shoulder line should angle gracefully toward the underarm. If you want a roomier sleeve, sneak in an extra increase on the sleeve edges occasionally. Mark your rounds in the notebook and keep cruising—consistency is the secret.
Split for Sleeves
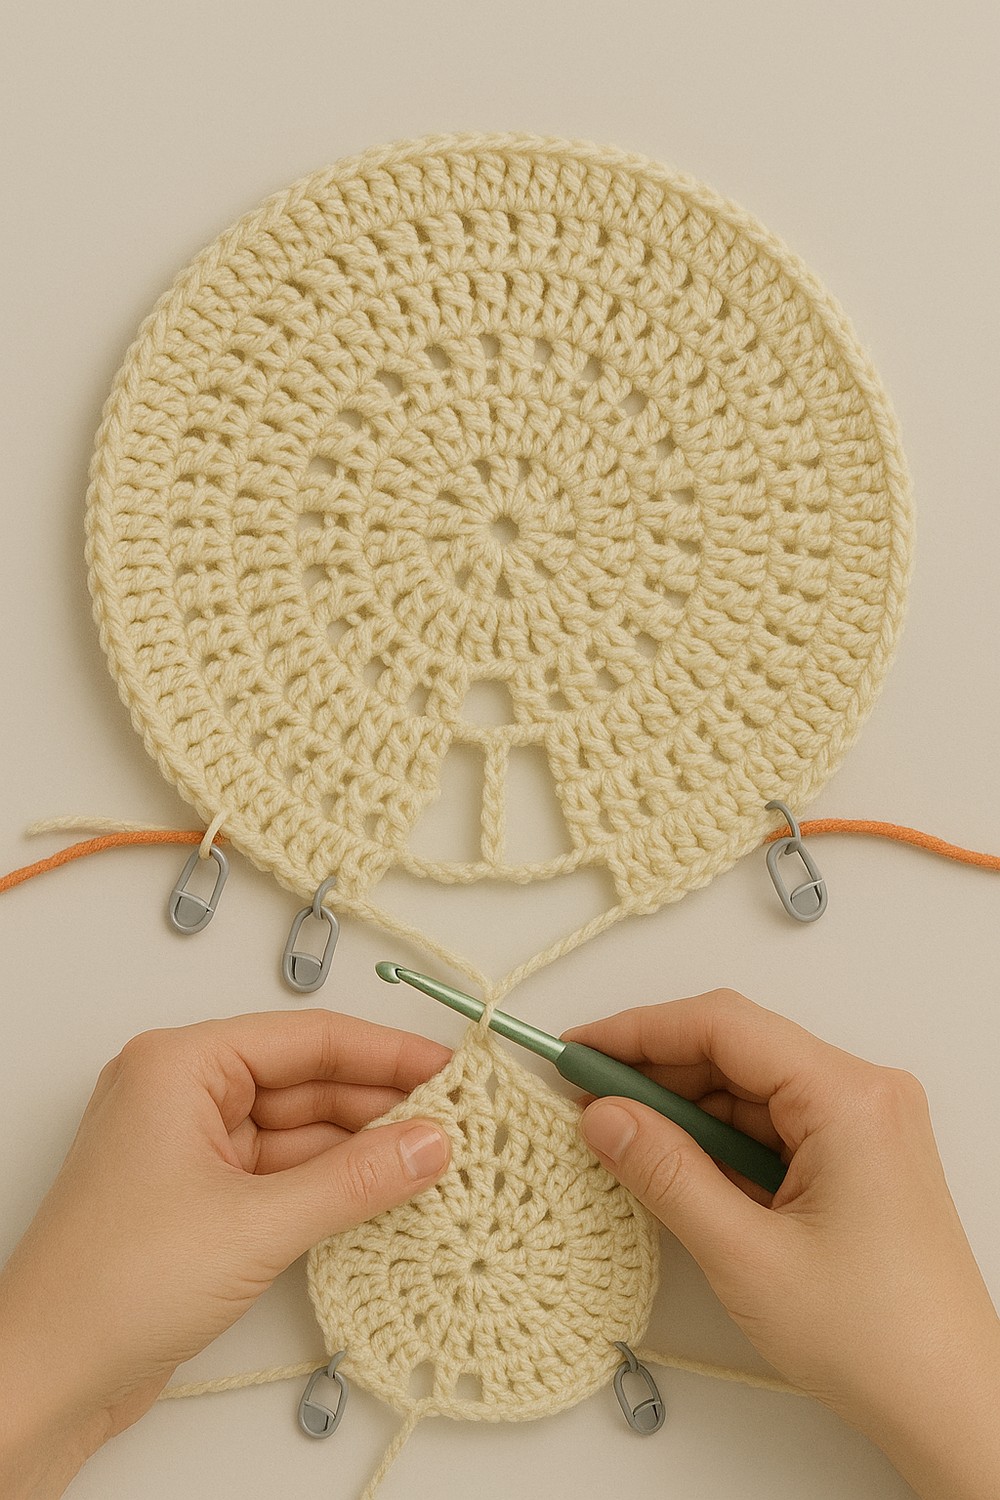
Once your yoke reaches the right depth, it’s time to separate. Slip the sleeve stitches onto waste yarn or spare cables so they can rest. Add a short chain under each arm to bridge the gap—this gives you comfortable mobility and a clean underarm. Then join the body in the round and continue without increases. Take a quick mirror check: the shoulder seam should sit slightly off the shoulder, and the fabric should skim the chest without pulling. If you need more ease, add a few stitches at the underarm chain; it’s a smart place to build subtle extra room.
Supplies: Same as Prompt 1 + scrap yarn or stitch holders.
Work The Body
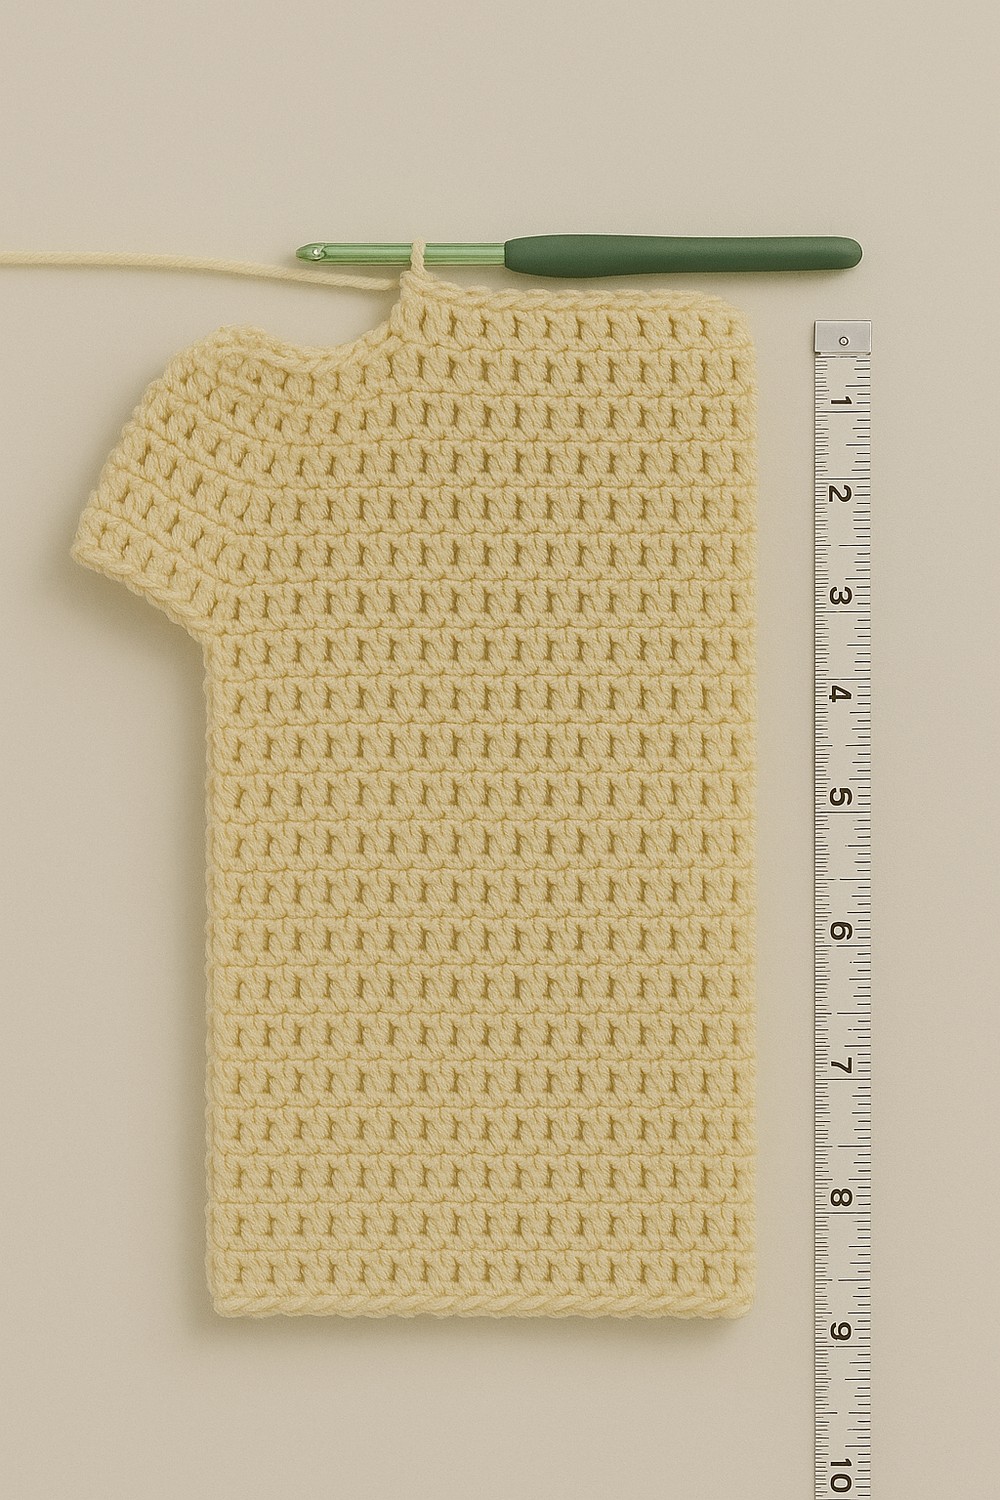
Now it’s smooth sailing. Work the body in double crochet rounds to your desired length. Keep the hook angle consistent so your stitches stack neatly. If you want gentle shaping, work one decrease round (every 6–8 rounds) along the sides; for a straight fit, just go even. Measure from underarm to hem and plan space for ribbing—about 2–3 inches. Color play lives here: add stripes, a color-block band, or keep it minimal. Periodically try on to confirm you like the drape over jeans or a skirt. When you hit the target length, pause before the hem to set up ribbing.
Hem Ribbing
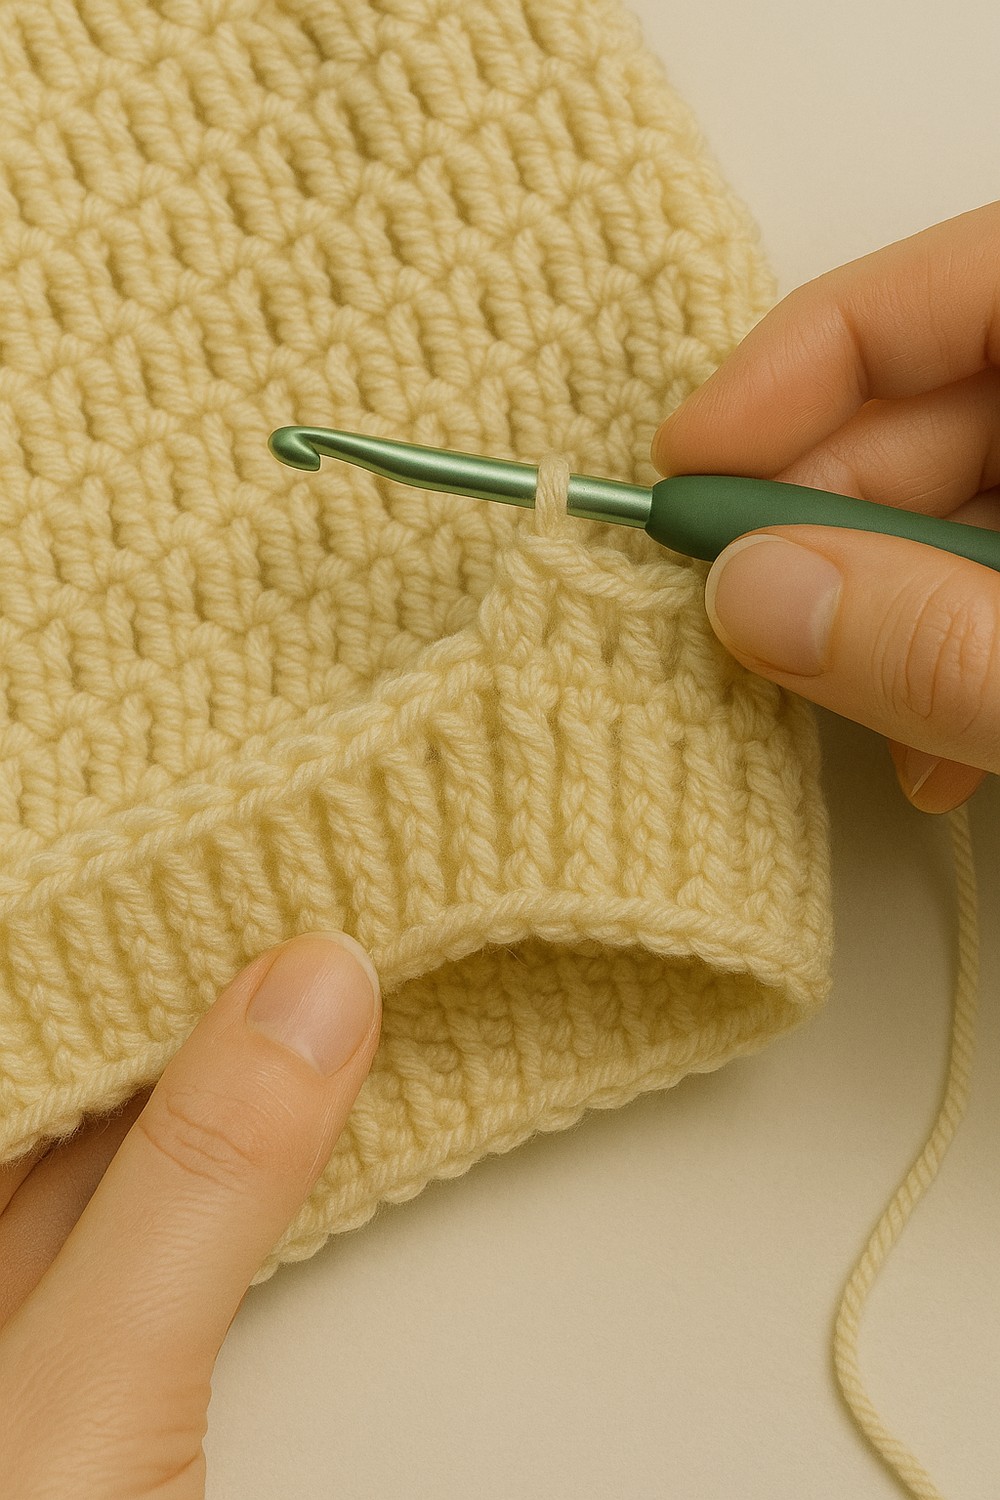
Switch to the smaller hook for structure. Work one round of single crochet to tidy the edge, then begin ribbing: [fpdc, bpdc] repeat around to form clean vertical columns. The front-post stitch pops forward; the back-post sinks back, creating true sweater rib. Keep your tension relaxed so the hem stretches and recovers, not cinches. Work 6–10 rounds depending on how chunky you want the finish. Steam lightly from a distance to settle the columns without flattening them. This neat rib anchors the silhouette and makes the sweater look finished even before you tackle sleeves or the neckline.
Sleeves, Cuffs & Finish

Return to each sleeve, pick up stitches evenly around the armhole, and work in rounds. For a classic fit, place a decrease every 6–8 rounds to taper toward the wrist; for a relaxed look, skip the decreases. Stop when you reach wrist length and switch to the smaller hook. Add cuff ribbing just like the hem—clean, stretchy, and comfortable. Weave in ends with a sharp yarn needle, then mist-steam or block flat to smooth the fabric and set the shape. Try it on, roll the cuffs if you like, and enjoy a handmade layer that looks great everywhere.
Crochet Sweater Quick and Easy

This handmade crochet sweater is the perfect example of simple elegance and cozy craftsmanship. Worked in a soft cream yarn, it features a clean round neckline, gently tapered sleeves, and neat ribbing at the cuffs and hem for a snug yet comfortable fit. The stitch pattern creates a beautifully textured fabric that feels both timeless and modern. Laid flat against a neutral background, the sweater’s balance of detail and minimalism highlights its versatility—ideal for layering, gifting, or wearing as a handmade favorite.
Final Thoughts
A top-down raglan rewards patience with clean lines and a custom fit. Keep notes, try on often, and let your fabric guide small choices—an extra round here, a gentle decrease there. If this is your first sweater, celebrate each stage: neckline, yoke, split, body, ribbing, sleeves. When you pull it on for the first time, you’ll feel why handmade clothes are special—soft, personal, and made to last. Take a photo, share your work, and start planning color number two.