Halloween crochet can go in very different directions. A tiny pumpkin keychain has almost nothing in common with a spiderweb sweater, while a structured treat bag needs different planning than a soft ghost plush or flat appliqué. That variety is exactly what makes a larger seasonal collection useful.
These 31 ideas cover wearable pieces, amigurumi, bags, granny squares, hanging decorations, home accents, and small accessories. Instead of treating them all as interchangeable “spooky projects,” the list focuses on differences in function, structure, display, fit, and adaptation so you can compare ideas before committing to a tutorial.
Each project also points to a different original YouTube creator for the complete construction details.
Quick List
- Crochet Bat Appliqué Accent
- Crochet No-Sew Pocket Ghost
- Crochet Ribbed Pumpkin Decor
- Crochet Skull Granny Square
- Crochet Pointed Witch Hat
- Crochet Stuffed Candy Corn
- Crochet Halloween Cauldron
- Crochet Ghost Granny Square
- Crochet Potion Coaster Cauldron Set
- Crochet Ghost Trick-or-Treat Bag
- Crochet Character Halloween Tote
- Crochet Hanging Spider Web
- Crochet Tarantula Decoration
- Crochet Pumpkin Keychain
- Crochet Flat Skull Motif
- Crochet Halloween Character Garland
- Crochet Squishy Ghost Plushie
- Crochet Black Cat Amigurumi
- Crochet Eyeball Coaster
- Crochet Cobweb Corner Storage Hammock
- Crochet Spiderweb Backless Sweater
- Crochet Mini Frankenstein Doll
- Crochet Mummy Amigurumi
- Crochet Spider Web Bandana
- Crochet Jack Skellington Amigurumi
- Crochet Spider Earrings
- Crochet Pumpkin Pillow
- Crochet Oogie Boogie Hat
- Crochet Reversible Vampire-and-Bat Doll
- Crochet Filet Halloween Treat Bag
- Crochet Witch Appliqué Granny Square
Choose Halloween Crochet by How You’ll Use It
Start with function rather than character. Flat motifs, granny squares, keychains, and earrings make sense when you want something compact or adaptable. Stuffed pumpkins, ghosts, cats, and character dolls have more visual presence on shelves and seasonal displays, but they also require more attention to shaping, stuffing, and finishing.
Bags and storage pieces need another type of planning. Open fabric can be attractive on a spiderweb decoration yet inconvenient when small objects must stay contained. Wearables introduce fit, drape, stretch, and comfort. A hat, bandana, and backless sweater can all use Halloween imagery while behaving very differently on the body.
Deciding where the finished project will live—or how it will be worn—usually narrows a long inspiration list much faster than choosing by color alone.
Match Yarn Behavior to the Finished Shape
The same yarn qualities do not suit every Halloween project equally. A plush or amigurumi generally benefits from fabric dense enough that stuffing does not dominate the surface. A structured bag may need fabric that resists excessive stretching, particularly around handles and openings. For a sweater or bandana, flexibility and drape become more important because the fabric has to move with the wearer.
Flat appliqués and granny squares are especially sensitive to stitch definition and blocked dimensions. If you plan to combine different motifs, measure them after blocking rather than assuming two squares with similar-looking borders will automatically match.
For seasonal decor that will be stored for most of the year, also consider how the fiber responds to folding, washing, dust, and reshaping before committing to a large set.
Plan Finishing, Display, and Safety Before the Last Stitch
Halloween details often create the character: eyes, dangling legs, facial embroidery, appliqués, handles, hanging cords, and dimensional embellishments. Those details also determine how practical the finished item is.
For display decor, decide whether it will sit, hang, lie flat, or be viewed from both sides. A garland needs balanced spacing; a pillow needs an even silhouette; a storage hammock needs secure attachment points appropriate for what you intend to store. On wearables, check embellishment placement against skin contact and movement.
Projects intended for small children or pets deserve extra care around detachable eyes, buttons, jewelry findings, stuffing access, cords, and other small components. A creator’s Halloween tutorial shows construction, but intended use should guide your own finishing decisions.
1. Crochet Bat Appliqué Accent
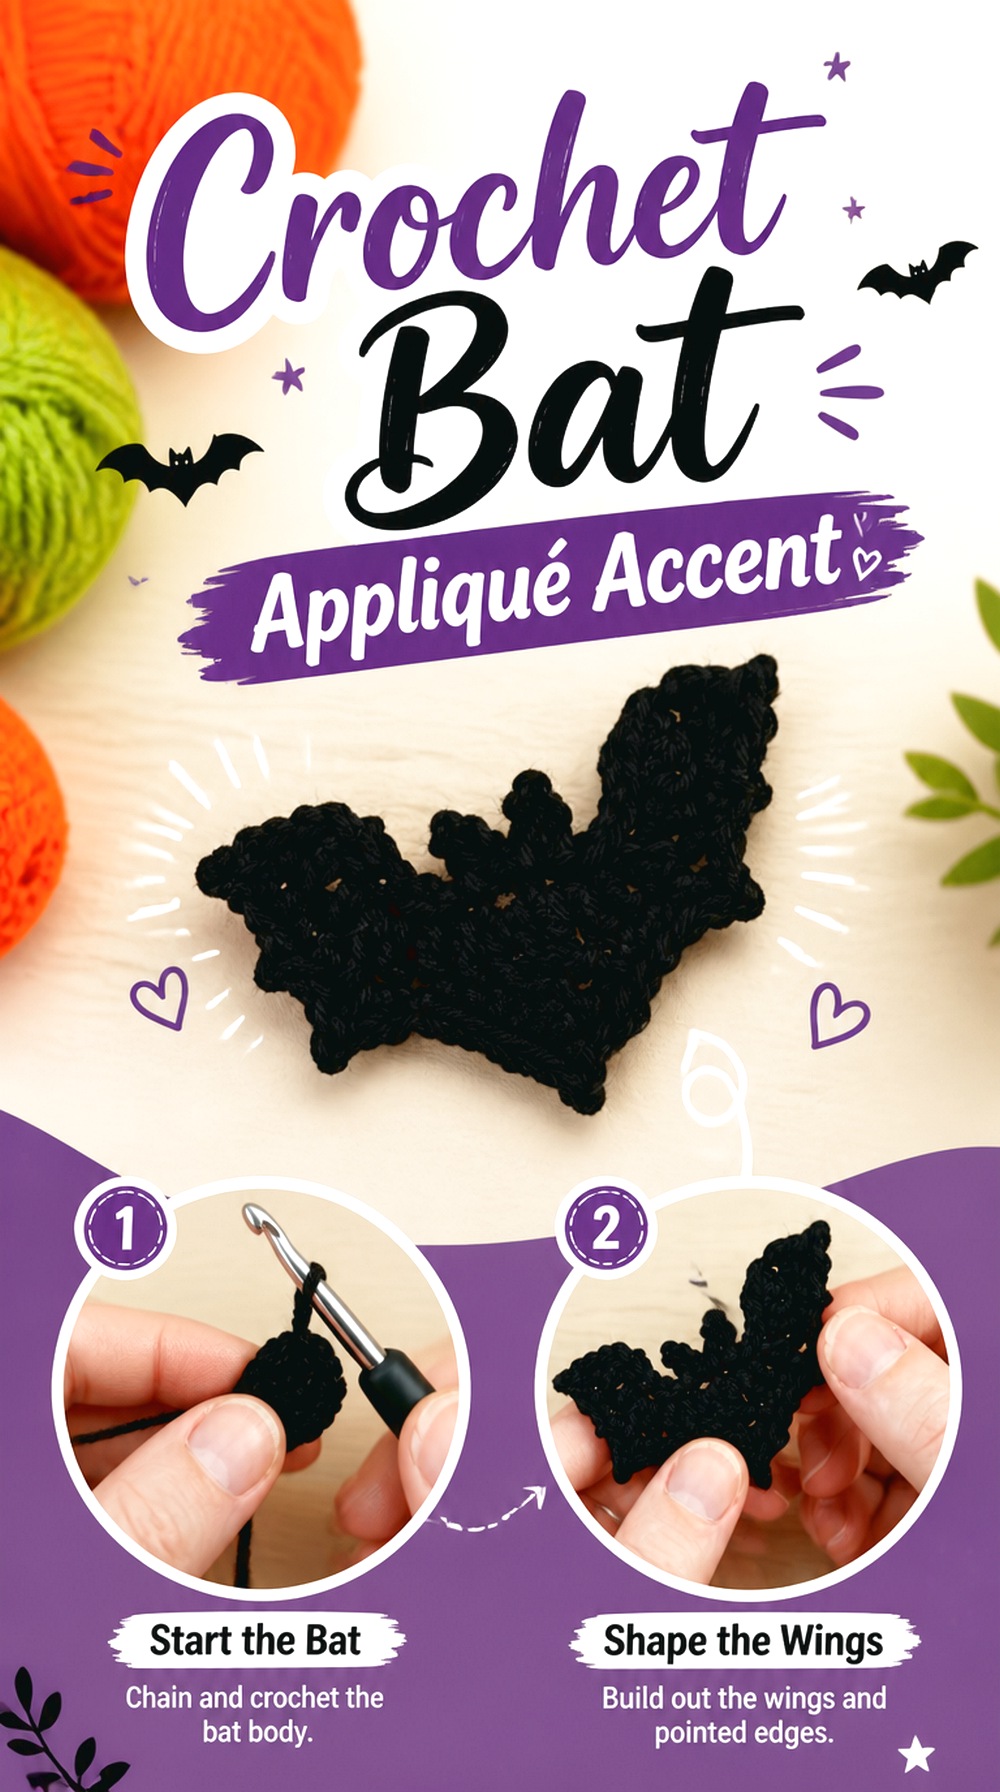
A flat crochet bat is one of the most adaptable projects in this collection because it does not dictate the final object. HappyBerry Crochet’s tutorial focuses on a recognizable bat appliqué, giving you a small motif that can become an accent on a bag, bunting strand, wall hanging, costume accessory, or larger Halloween composition.
The appeal is in the silhouette rather than bulk. That makes this option especially useful when you want Halloween imagery without creating another stuffed decoration. It also offers more flexibility than a fixed-size household item because you can decide where the bat belongs after making it.
Keep the Wing Shape Readable
A bat appliqué relies heavily on its outline. If the fabric curls or the wing points lose definition, the motif can become harder to identify from a distance. Before attaching it permanently, lay it on the intended background and view it from several feet away. Light blocking may help a flat motif settle, but follow the care limits of the fiber you actually use.
Contrast Matters More Than Traditional Black
Black is an obvious Halloween choice, but the motif only works visually when it separates from its background. A black bat can disappear on a dark tote or sweater. Before sewing it down, compare the motif against the finished fabric. Purple, gray, orange, cream, or another contrasting shade may produce a clearer silhouette without changing the underlying project.
Original Tutorial and Creator Credit
Creator: HappyBerry Crochet
2. Crochet No Sew Pocket Ghost
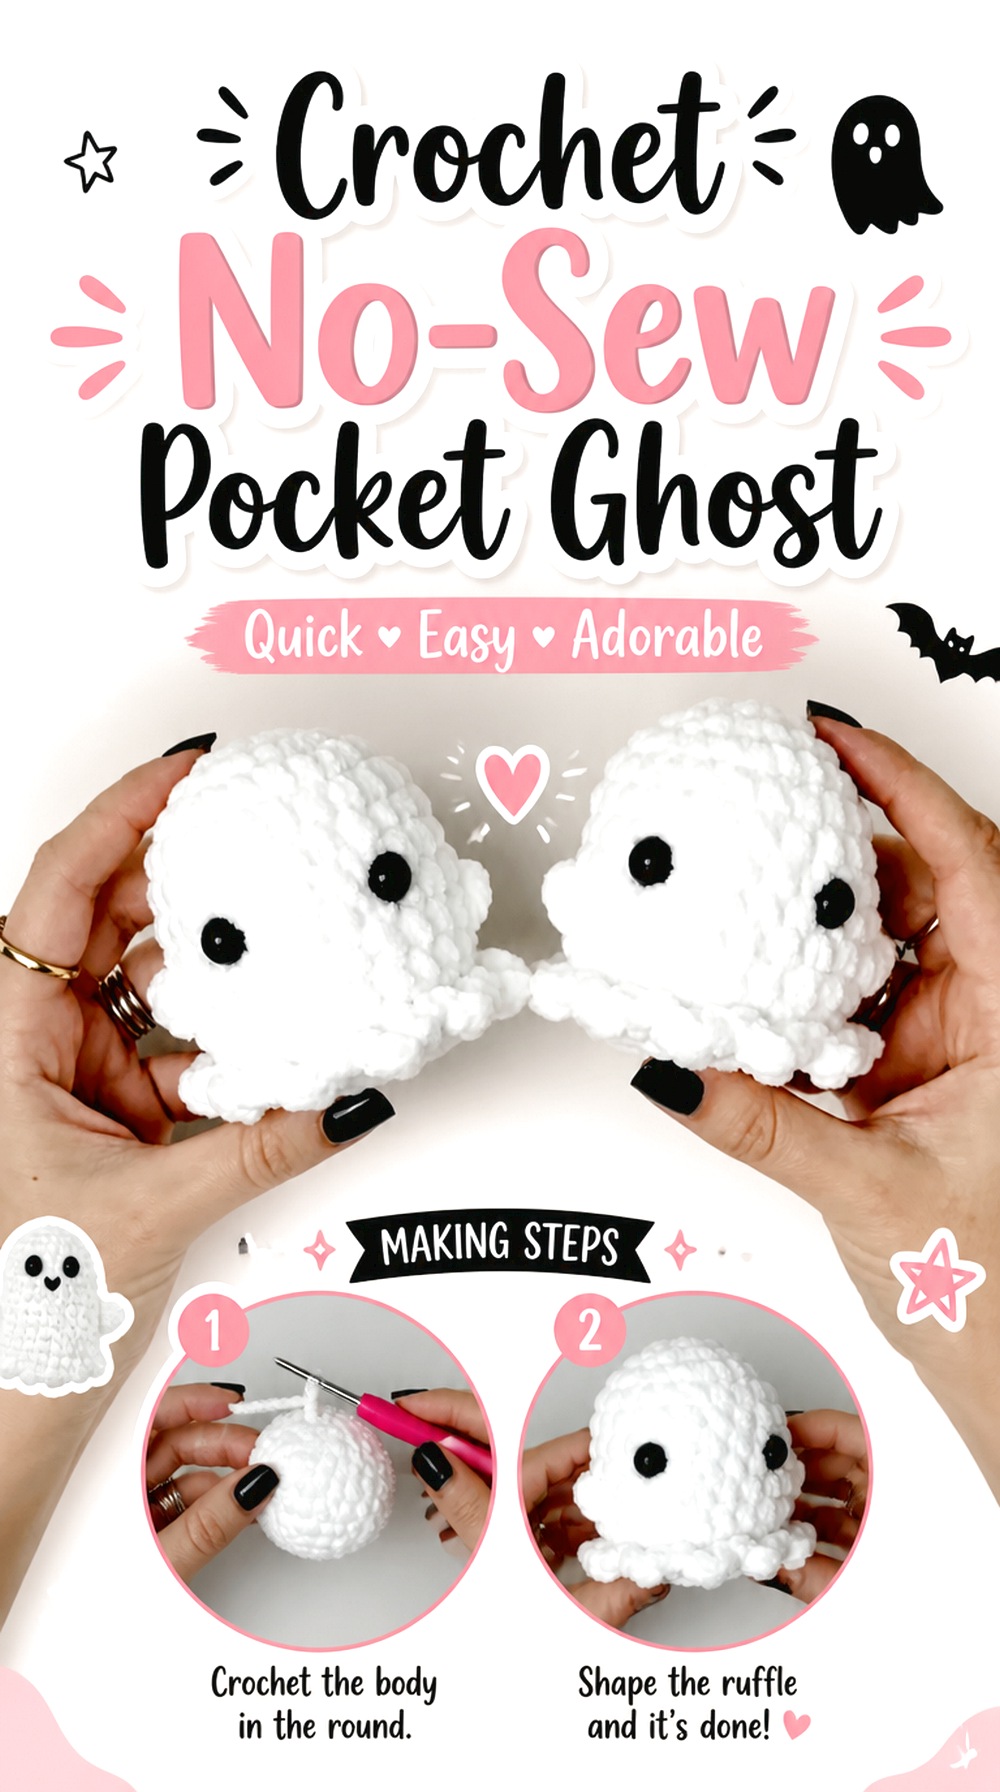
Rose and Lily Crochet’s compact ghost offers a different route from large plushies and assembled character dolls. The tutorial is specifically built around a no-sew ghost format, making the finished piece compact and visually simple rather than dependent on several separately attached body parts.
This is a good choice for a small Halloween desk decoration, gift addition, or grouped display where repeating the same character can create a stronger effect than making one large centerpiece. Its minimal silhouette also leaves plenty of room to experiment with expression and color while keeping the recognizable ghost shape intact.
Small Scale Makes Finishing More Visible
On a compact character, minor changes in facial placement can noticeably alter the expression. Check the front of the ghost before committing to permanent facial details, particularly if you are making several. Setting multiple unfinished ghosts side by side can help you keep intentional similarities—or deliberately give each one a different personality.
Check Embellishments Against the Recipient
A small plush can also contain small components. If the ghost is intended for a young child or a pet-accessible environment, do not assume a decorative eye or other attachment is appropriate simply because it appears in a craft project. Consider embroidered alternatives and secure finishing based on the actual recipient and intended use.
Original Tutorial and Creator Credit
Creator: Rose and Lily Crochet
3. Crochet Ribbed Pumpkin Decor
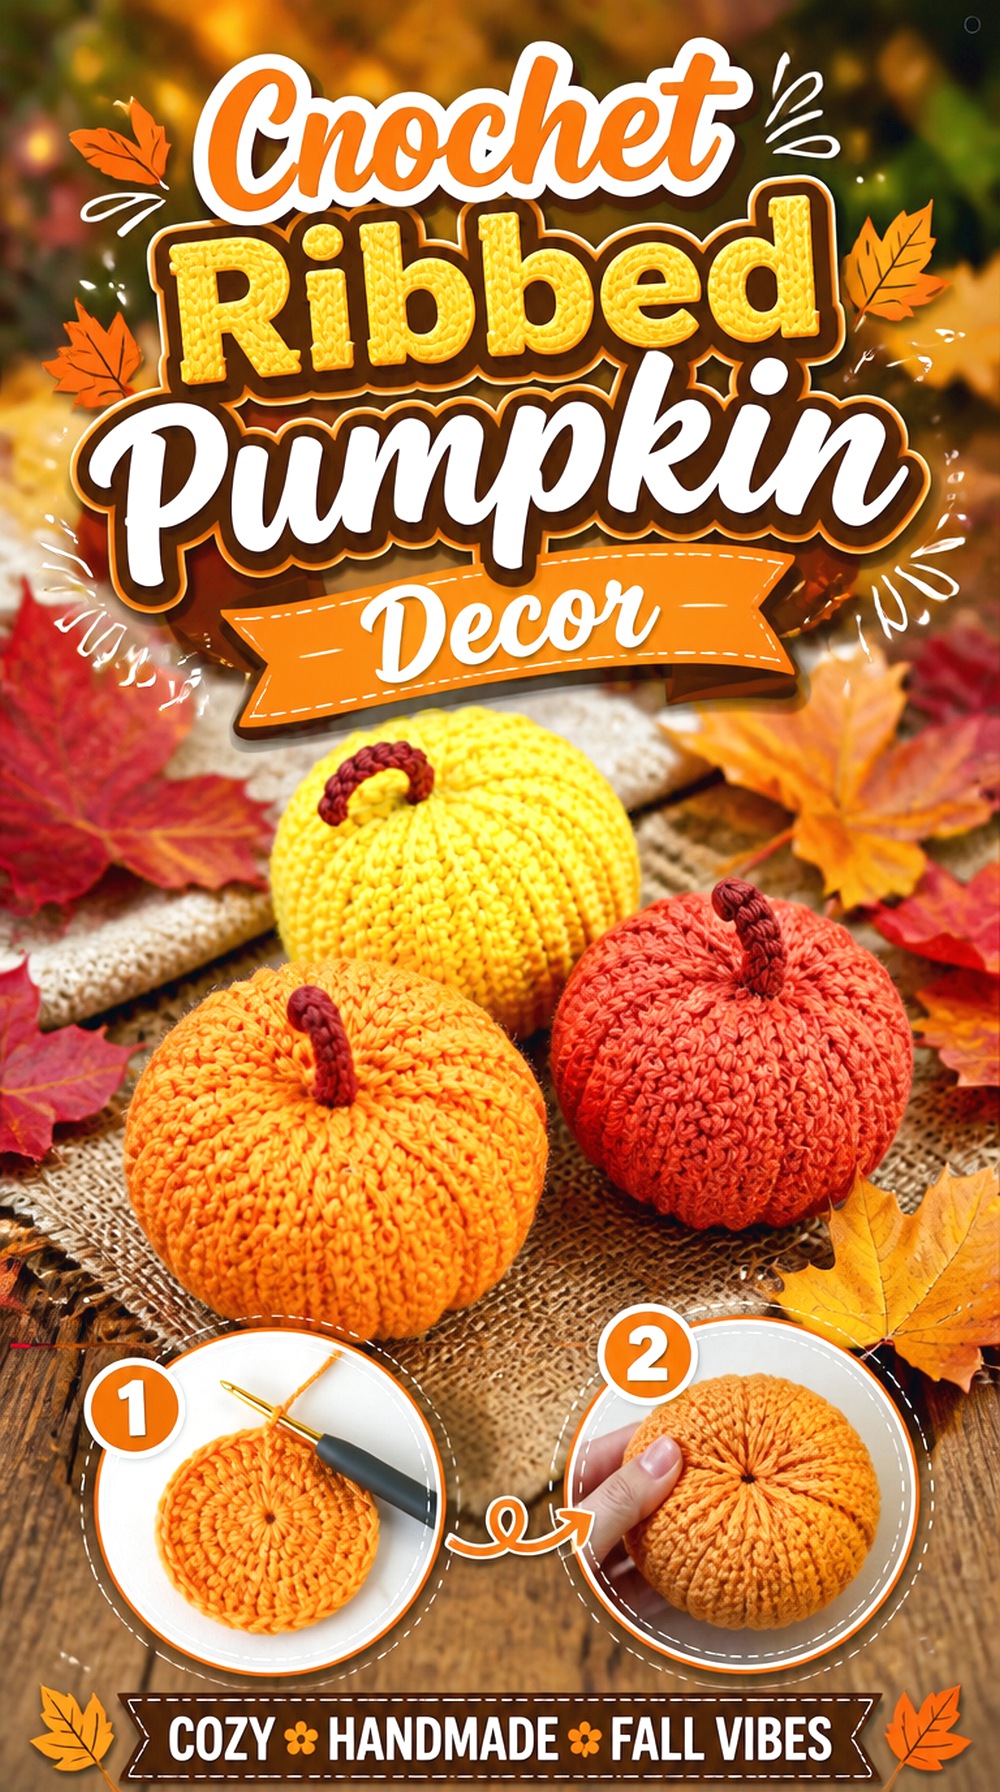
A crocheted pumpkin earns its place in a Halloween collection because it can stay out through the broader fall season. Crochet with Tuula Maaria’s tutorial creates a dimensional pumpkin rather than a flat motif, with the ribbed form providing most of the visual interest.
Compared with character amigurumi, the project has fewer facial or costume details competing for attention. That makes it easier to style in multiples on a mantel, shelf, entry table, or centerpiece. It is also a useful option for anyone who prefers autumn decor that hints at Halloween without committing to skulls, spiders, or monsters.
Stuffing Controls More Than Firmness
How a soft pumpkin is filled affects its overall silhouette. Too little filling can leave the sides looking collapsed, while excessive stuffing can flatten the ribbed character that makes the shape interesting. Judge the pumpkin from the top and side as you fill it rather than using firmness alone as the checkpoint.
Build a Group Through Scale, Not Just Color
If you want several pumpkins, variation can come from proportion and texture rather than making identical shapes in different oranges. A mixed grouping generally looks more intentional when the pieces do not form a rigid row. Before producing a whole set, finish one pumpkin and assess its scale against the shelf, bowl, or table where you expect to use it.
Original Tutorial and Creator Credit
Creator: Crochet with Tuula Maaria
4. Crochet Skull Granny Square
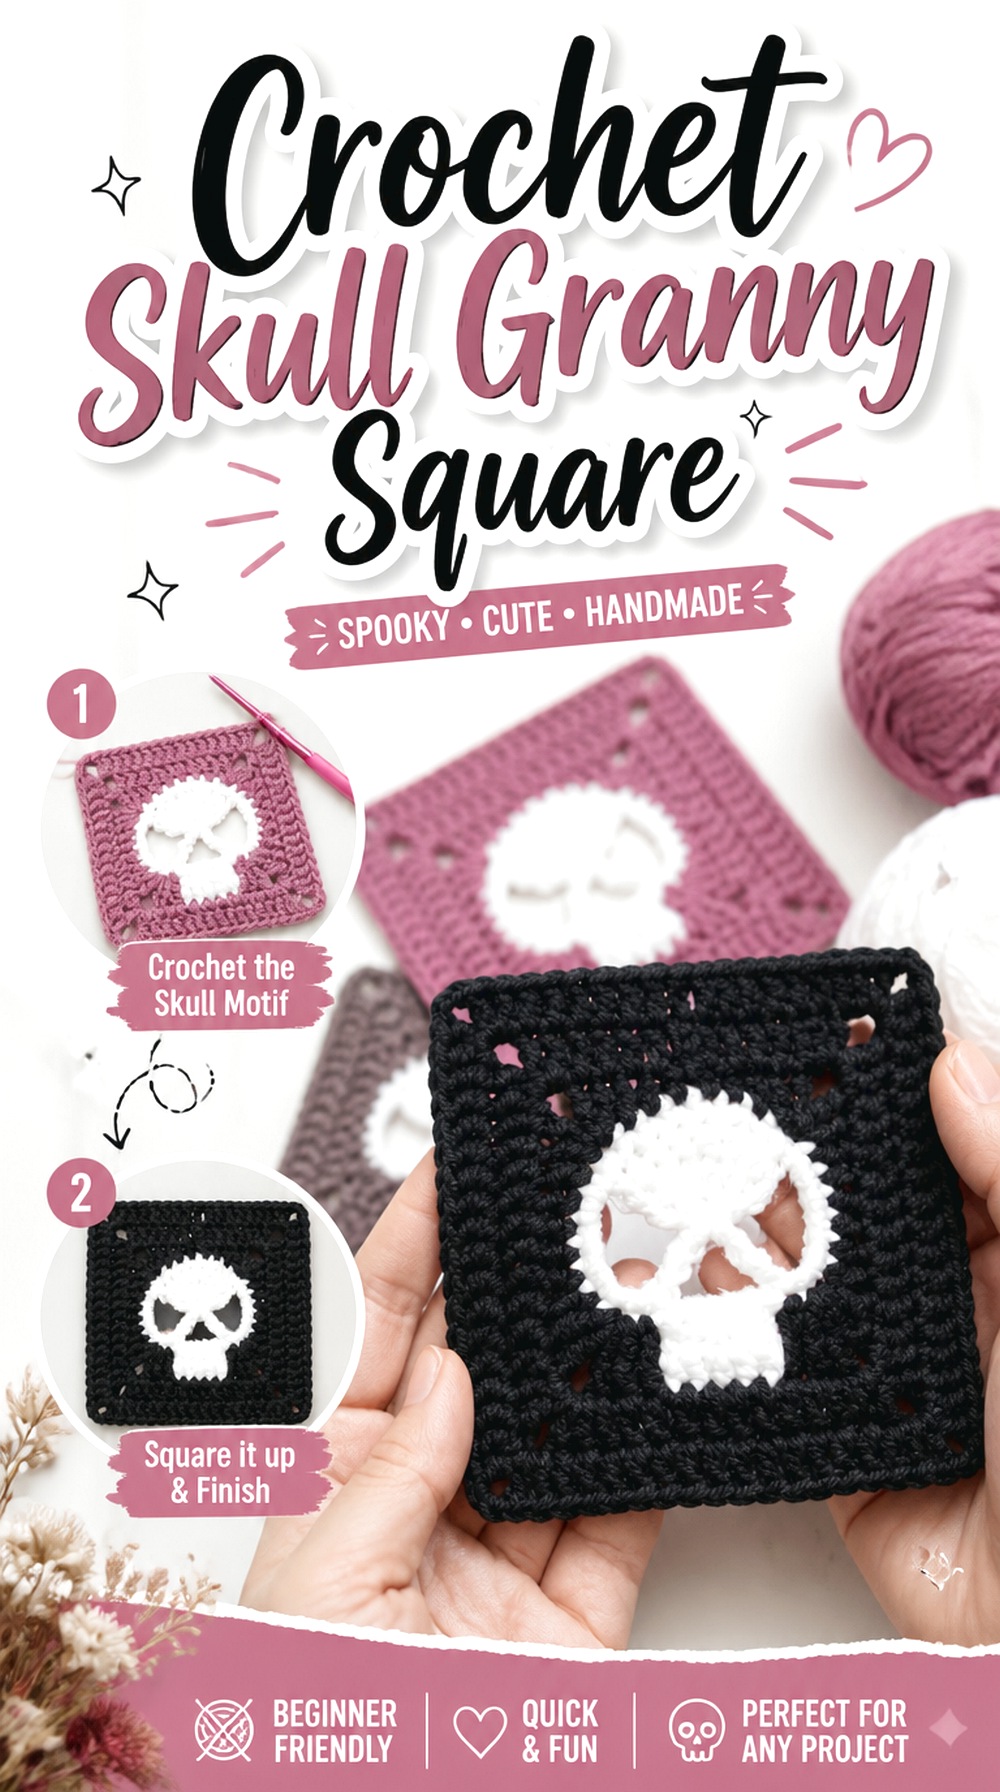
Creggy’s Crochet turns a skull into the focal point of a granny-square format, which opens up far more possibilities than a standalone skull decoration. One square can work as a patch or framed motif, while repeated squares can become part of a bag, cushion, blanket, or wearable.
The key difference from a conventional granny square is visual density. The skull has to remain readable inside a bounded square, so both the center motif and surrounding background contribute to the design. This is worth choosing when you want Halloween imagery integrated into modular crochet rather than attached afterward.
Measure Before Mixing Square Designs
A skull square from one design and a plain square from another may not finish at identical dimensions. If you intend to combine motifs, block samples first and compare actual width, height, and edge behavior. Correcting a noticeable mismatch before joining is usually easier than forcing unequal squares into a larger panel.
Think About Skull Direction in the Layout
Orientation matters once a recognizable face replaces an abstract motif. A square can look correct individually and still appear upside down after joining if the layout is not mapped in advance. Lay the completed motifs on a flat surface before assembly, especially for bags and garments where panels may rotate during construction.
Original Tutorial and Creator Credit
Creator: Creggy’s Crochet
5. Crochet Pointed Witch Hat
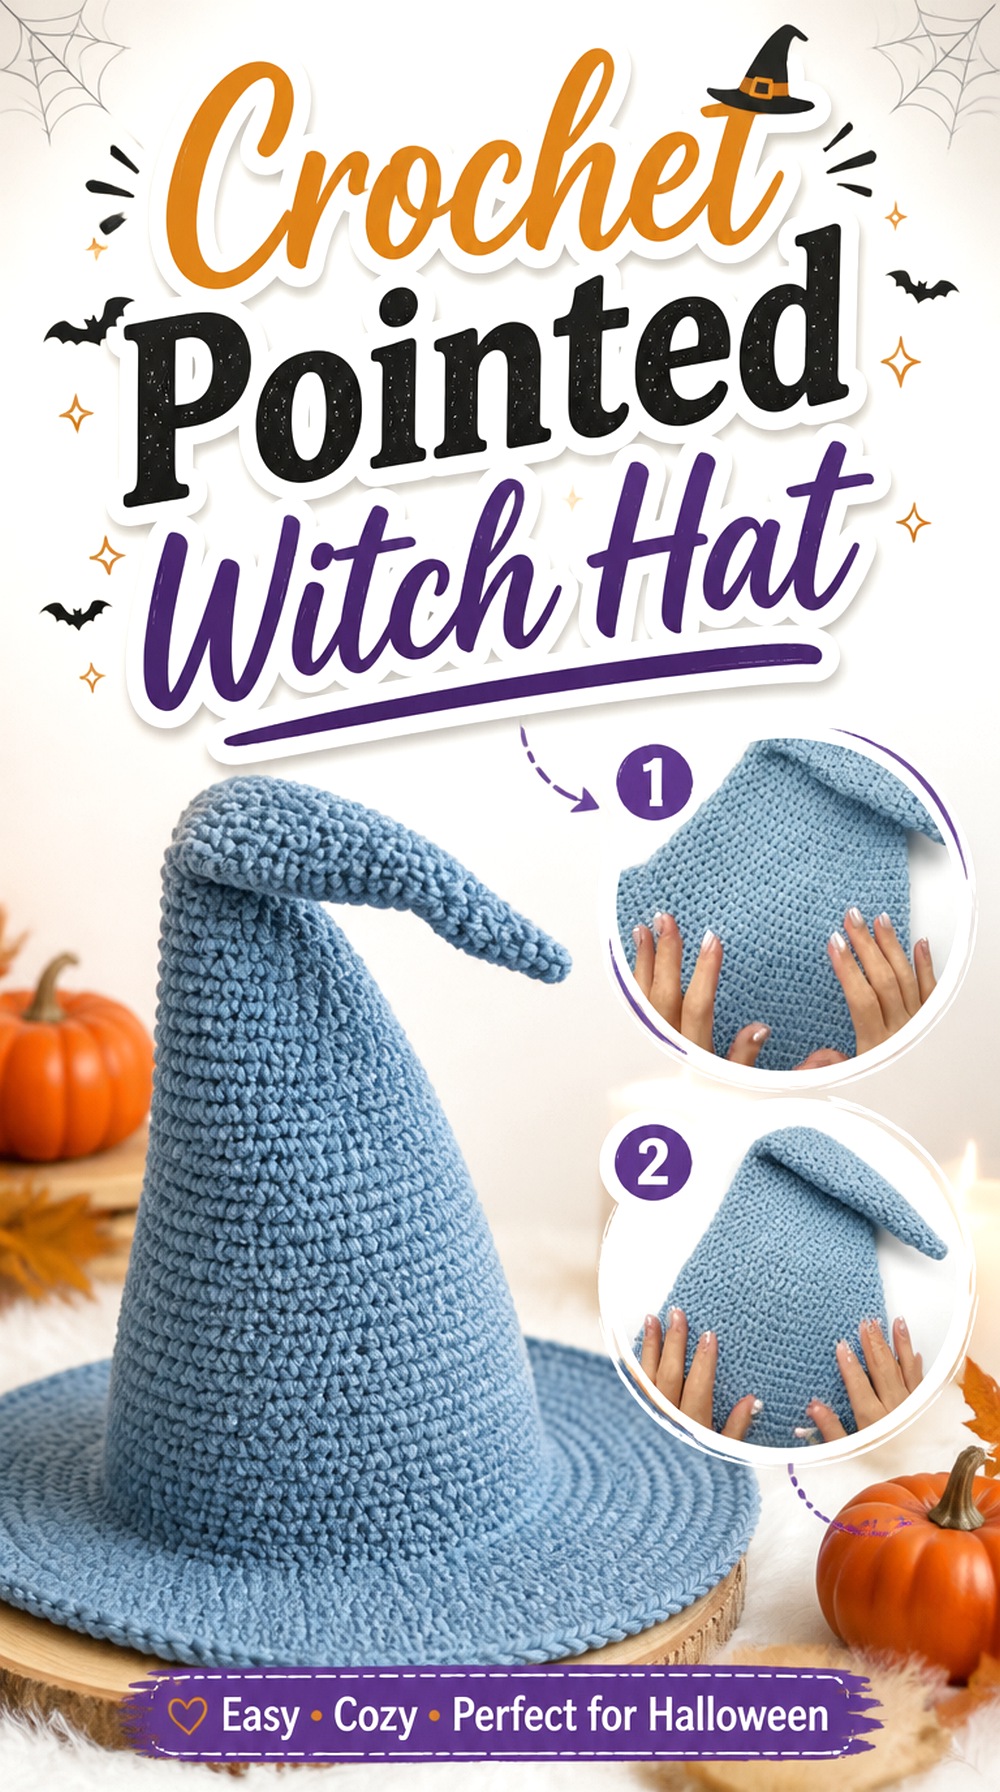
A full crochet witch hat immediately moves the project from seasonal decor into costume and wearable territory. ElyseCrochets’ tutorial focuses on a pointed wizard-style Halloween hat, giving you a much larger statement piece than the small witch motifs later in this list.
Wearability makes proportion especially important. The brim, crown, and point all influence the silhouette, while the opening has to work with the wearer’s head and hairstyle. This project suits someone looking for a centerpiece costume accessory rather than a subtle Halloween accent.
Fit the Opening Before Focusing on the Point
The dramatic top gets the attention, but the lower opening determines whether the hat is actually comfortable to wear. Check fit at the stage the creator recommends rather than assuming the final fabric will behave like a rigid costume hat. Crochet can stretch, and different fibers may change how securely the hat sits.
Decide How Structured You Want the Silhouette
A softly collapsing witch hat creates a different effect from a sharply upright one. Yarn behavior, fabric density, and any creator-recommended finishing all influence that result. Decide which silhouette you want before substituting materials; a softer yarn chosen for comfort may not reproduce the same visual structure as a firmer fabric.
Original Tutorial and Creator Credit
Creator: ElyseCrochets 💌
6. Crochet Stuffed Candy Corn
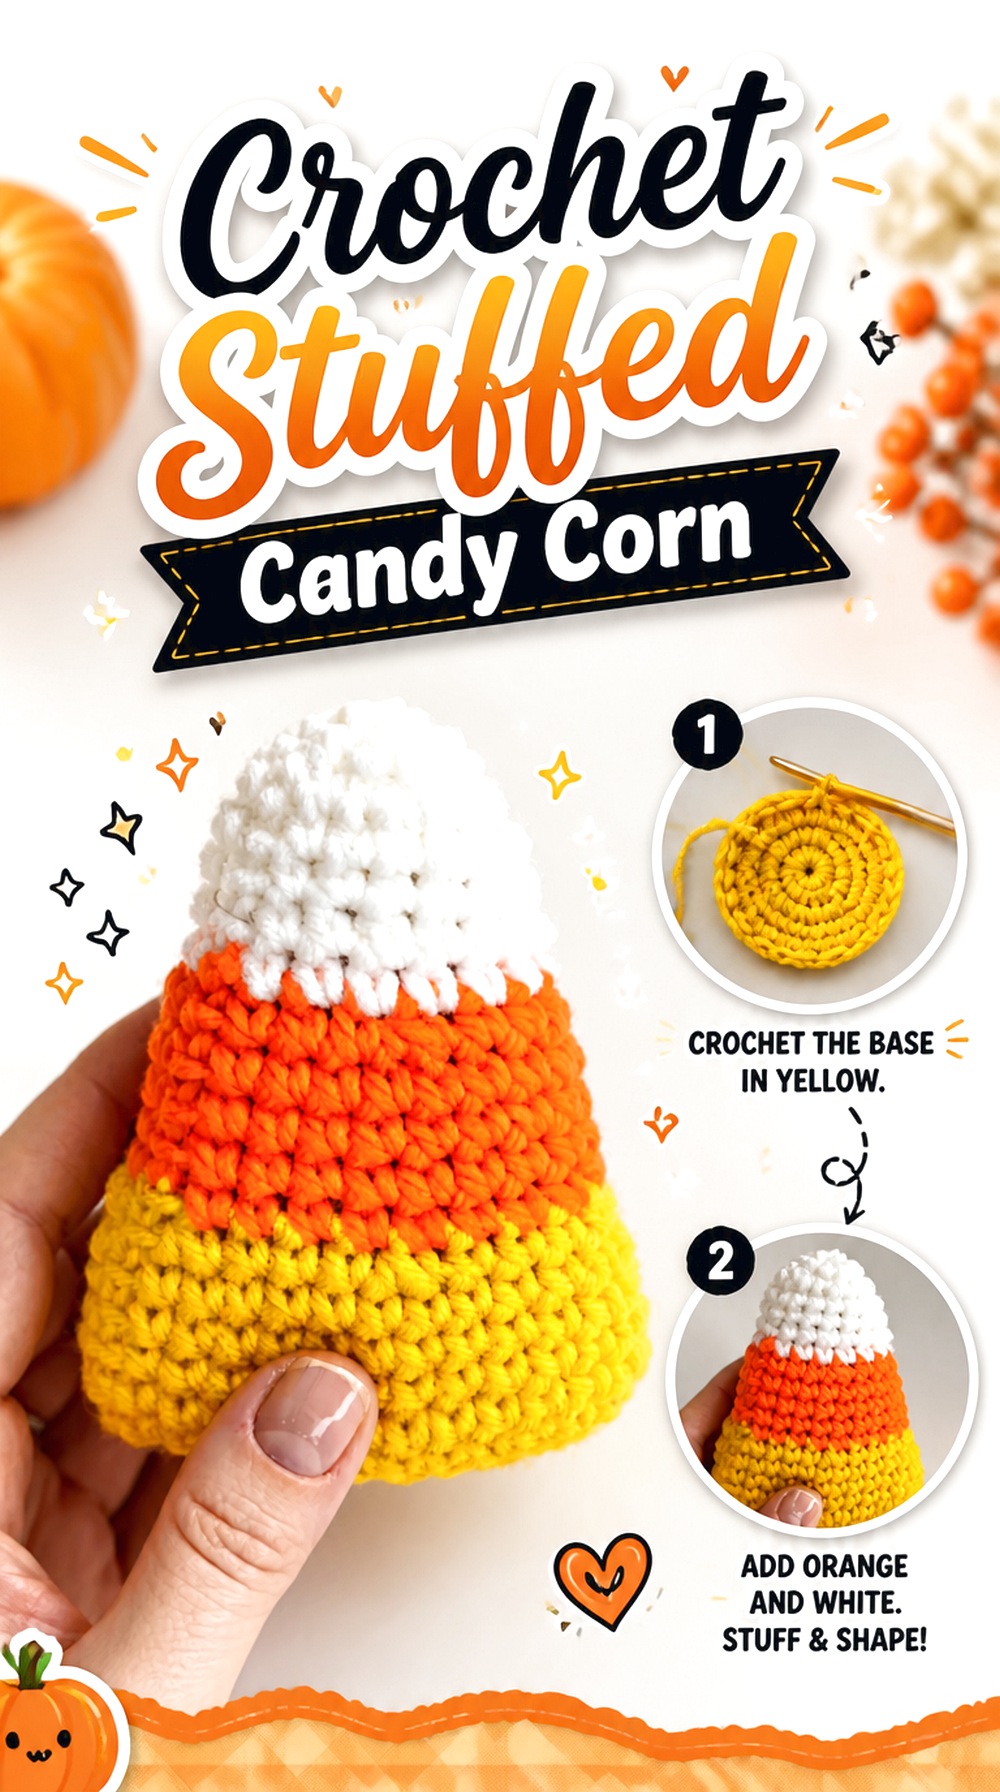
DIY FROM HOME CROCHET’s candy corn turns a familiar Halloween sweet into a dimensional decoration. The color blocking does most of the recognition work, so the project stays visually clean and does not need the complex features of a character doll.
This is a practical choice when you want a small shelf or tabletop object that can be repeated as a set. It can also break up a display dominated by pumpkins and ghosts because the triangular profile adds a different shape. Since the finished object is stuffed, however, yarn and filling choices will influence how cleanly that taper holds.
Preserve the Taper While Stuffing
Candy corn depends on a broad base narrowing toward the top. As the piece fills, check whether the stuffing is pushing the sides outward enough to blur that shape. Add filling gradually and rotate the piece as you work so you can judge the silhouette from every side rather than only from the front.
Keep the Color Breaks Deliberate
A simple three-part color scheme looks strongest when the transitions read clearly. If you substitute yarns, compare their thickness and texture before beginning. A noticeable change in yarn bulk between color sections can alter the profile as well as the surface, even when the colors themselves look correct.
Original Tutorial and Creator Credit
Creator: DIY FROM HOME CROCHET
7. Crochet Halloween Cauldron
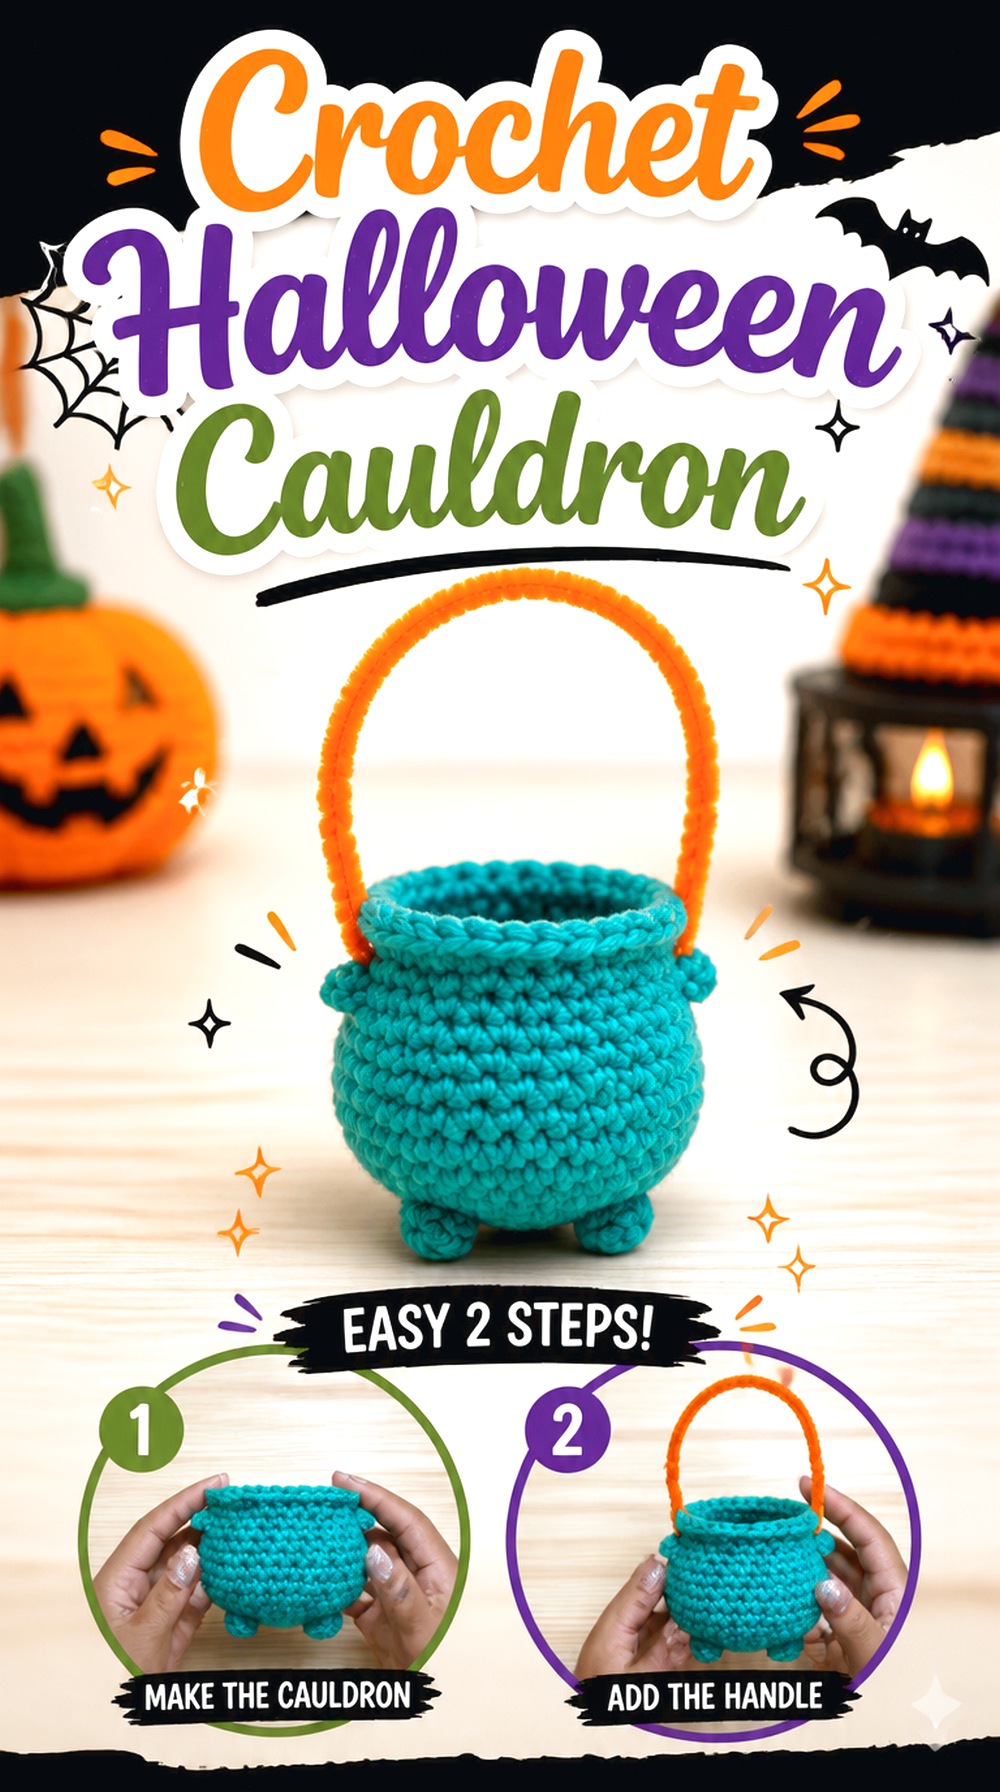
The Stitches n Scraps cauldron is a useful Halloween project because the shape can function as decor rather than simply depicting another character. A rounded vessel with a contrasting rim gives it a strong silhouette, and the theme works naturally beside potion bottles, witches, ghosts, or candy displays.
Before making one, decide whether yours is purely decorative or whether you hope to place lightweight objects inside. That distinction matters because a soft stuffed form and a functional open container have different structural needs. Follow the source tutorial for its intended construction rather than assuming any crocheted cauldron is designed to carry contents.
Judge the Base on the Surface Where It Will Sit
A cauldron that looks balanced in your hand can behave differently on a shelf. Before finishing, place the work on a flat surface and check whether the base sits evenly and whether the body leans. Uneven filling or tension can become more visible in a round vessel than in an irregular plush character.
Let the Rim Define the Vessel
The opening helps distinguish a cauldron from a simple black ball. Keep an eye on how the rim sits and whether it maintains a clear visual boundary around the top. If you alter materials, compare the resulting stiffness with the creator’s finished example before making several for a coordinated display.
Original Tutorial and Creator Credit
Creator: Stitches n Scraps
8. Crochet Ghost Granny Square
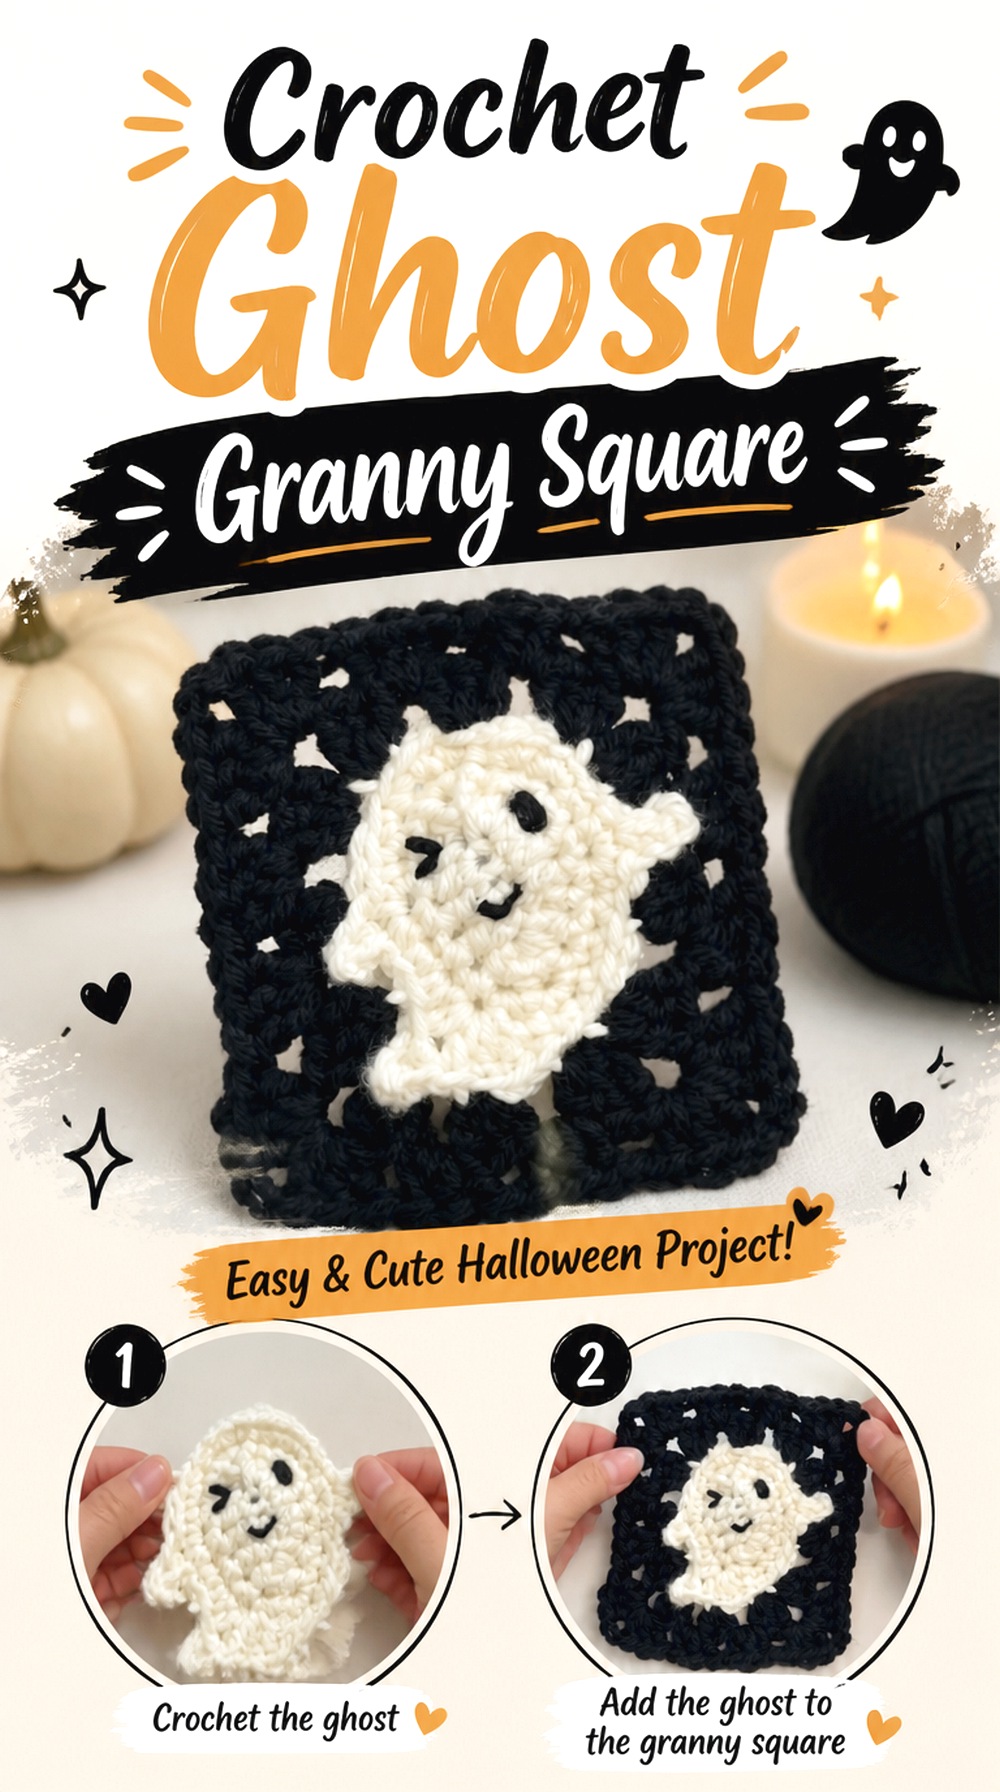
The Knotting Perch’s ghost square offers a friendlier alternative to the skull motif earlier in the list. Because the character sits within a modular square, you can use one ghost as an accent or repeat the design across a larger project without committing to a three-dimensional plush.
This format is especially useful for a Halloween pillow front, tote panel, or mixed-motif blanket. The ghost’s pale shape also creates a different contrast problem from a dark skull: the background has to be strong enough for the figure to remain visible, particularly if you depart from classic black or orange.
Test the Ghost Against the Background Yarn
A pale motif does not automatically have high contrast. Cream against beige, for example, can make the shape disappear even though both colors look attractive separately. Photograph a completed sample from a short distance before planning a large repeat. A phone image can make weak figure-background contrast easier to notice.
Keep Repeated Faces Facing the Same Way
When several character squares are used together, tiny orientation differences become much more obvious. Arrange the blocked squares before joining and mark the intended top edge if necessary. That simple planning step is particularly helpful when assembling two-sided objects such as bags or cushions.
Original Tutorial and Creator Credit
Creator: The Knotting Perch
9. Crochet Potion Coaster Cauldron Set
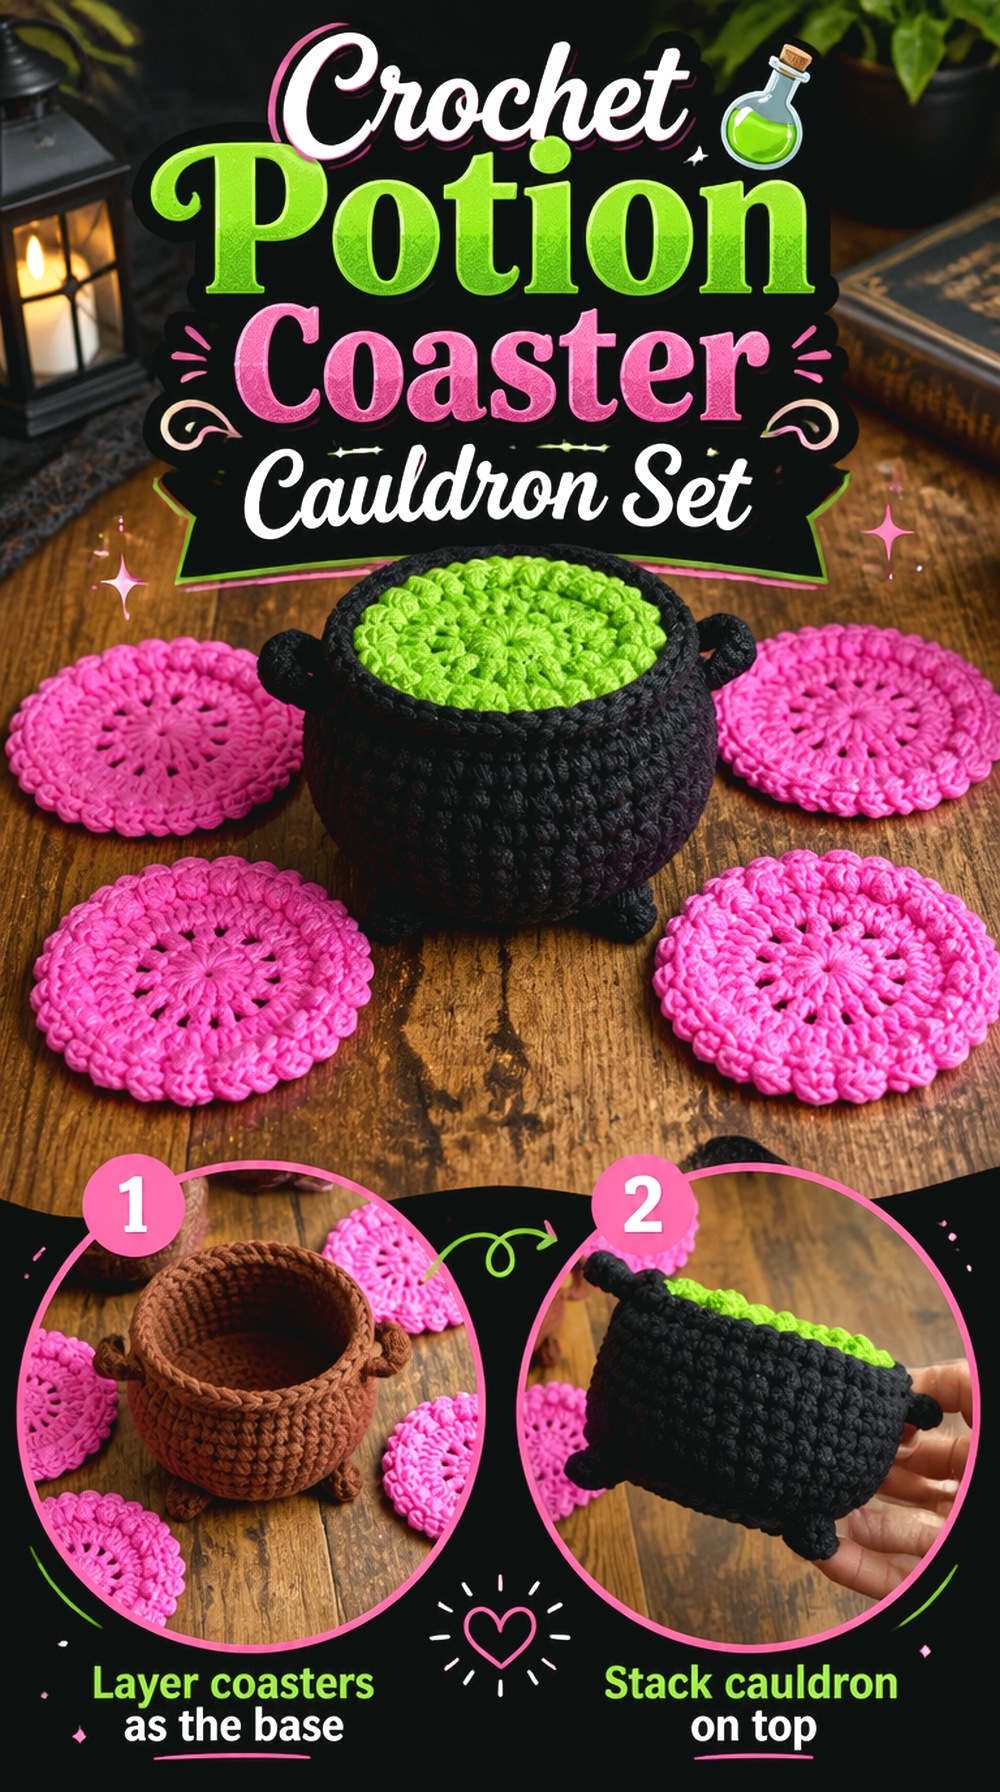
Make It Yourself By Papari combines potion-themed coasters with a cauldron holder, making this project more functional than a standalone stuffed cauldron. The set also creates its own display when the coasters are stored, so the storage solution becomes part of the Halloween design.
That makes it a smart option for a coffee table, party setup, or seasonal drink station where flat decor alone would not add much function. The main planning issue is compatibility: all of the coasters need to fit comfortably inside the holder without becoming so loose that the set loses its tidy appearance.
Check the Full Stack, Not One Coaster
A holder can fit a single coaster perfectly and still feel crowded once the whole set is inside. If you substitute materials or change tension, periodically compare the developing holder with the actual stack rather than relying on one sample. Crochet thickness accumulates when several pieces sit together.
Flatness Matters on the Table
A decorative coaster still needs to sit reasonably flat if you intend to use it under a cup. If the edges ripple or curl, address the tension or finishing issue before making the rest of the set. Do not rely on a heavy mug to force a noticeably distorted coaster into shape.
Original Tutorial and Creator Credit
Creator: Make It Yourself By Papari
10. Crochet Ghost Trick or Treat Bag
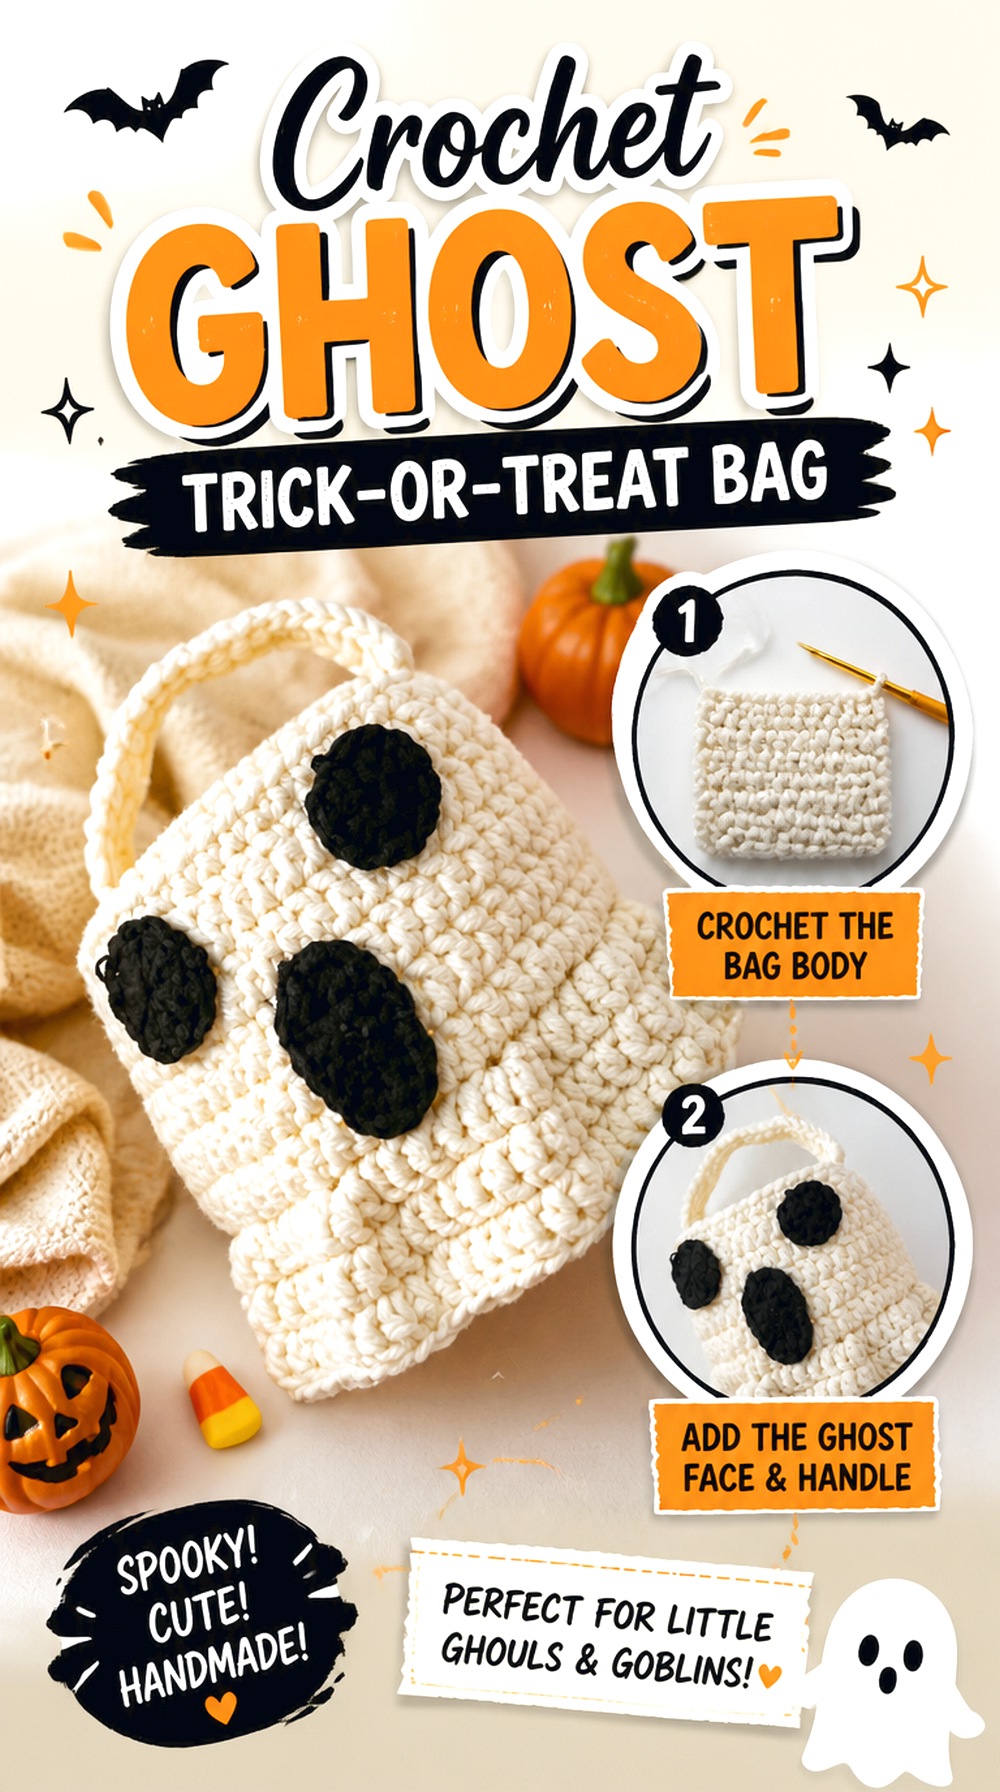
Sirin’s Crochet turns the ghost theme into something designed to be carried rather than displayed. The project works as a Halloween candy bag, so opening size, handles, and fabric behavior matter alongside the recognizable ghost appearance.
This option differs from the filet bag later in the article because the bag itself reads as a ghost character instead of using a flat image inside a conventional panel. That gives it stronger costume appeal, particularly for trick-or-treating. Before choosing it, think about who will carry the bag and whether the finished handle placement and overall scale suit that person.
Handles Need to Work Under Load
A bag can hang neatly when empty and change shape once candy or other contents are added. Examine how the tutorial constructs and anchors the carrying area. If you make substitutions, avoid assuming that a stretchier fiber or looser fabric will behave the same way when weight is placed inside.
Keep the Face Clear When the Bag Expands
Character bags can distort as they fill. Facial features that look perfectly positioned on a flat or empty body may spread differently once the bag is carrying contents. Before permanently finishing decorative details, gently open the bag and assess the front in a more realistic filled shape.
Consider Visibility With Costume Clothing
If the bag will be used during trick-or-treating, think beyond the project in isolation. A white ghost may stand out against dark clothing but blend into a pale costume. Reflective or visibility needs should be handled separately rather than assuming crochet colors alone provide safety after dark.
Original Tutorial and Creator Credit
Creator: Sirin’s Crochet
11. Crochet Character Halloween Tote
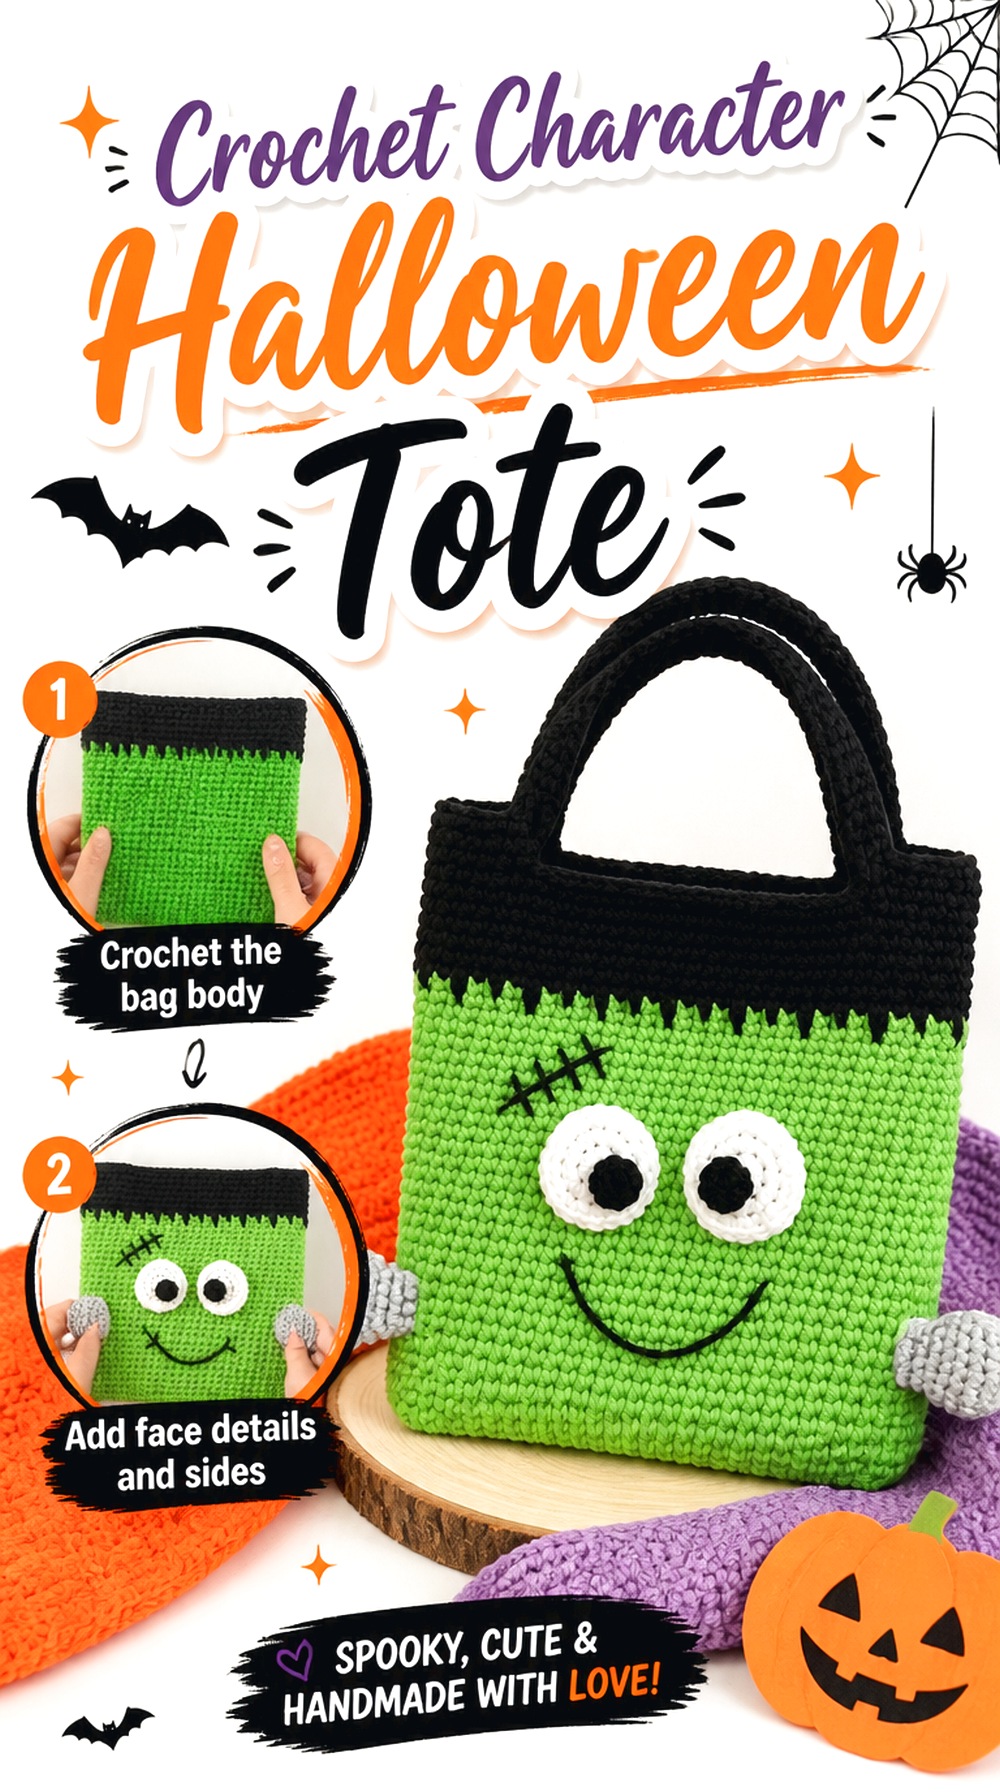
RepeatCrafterMe’s tutorial presents Halloween totes based on recognizable seasonal characters, giving you a conventional bag shape with a decorative identity. This is an appealing middle ground between a novelty-shaped candy carrier and an everyday rectangular tote.
Because the basic silhouette stays familiar, the character treatment can do most of the seasonal work. The source includes multiple Halloween character possibilities, so the project also suits households where several bags are needed but no one wants an identical design. Keep the construction consistent and vary the faces rather than changing every structural element at once.
A Rectangular Body Makes Capacity Easier to Judge
Compared with highly sculpted bags, a straightforward tote lets you evaluate the opening and internal space more intuitively. Still, do not infer a carrying capacity from appearance alone. If you plan to use the tote for trick-or-treating, check the creator’s finished construction and reinforce only in ways compatible with the design.
Plan Facial Details After the Main Bag Takes Shape
Decorative placement is easier to judge on the actual finished panel than from an isolated sketch. Centering is not always the most visually pleasing choice once handles and the top opening are present. Temporarily position features and view the entire tote rather than judging each detail independently.
Original Tutorial and Creator Credit
Creator: RepeatCrafterMe
12. Crochet Hanging Spider Web
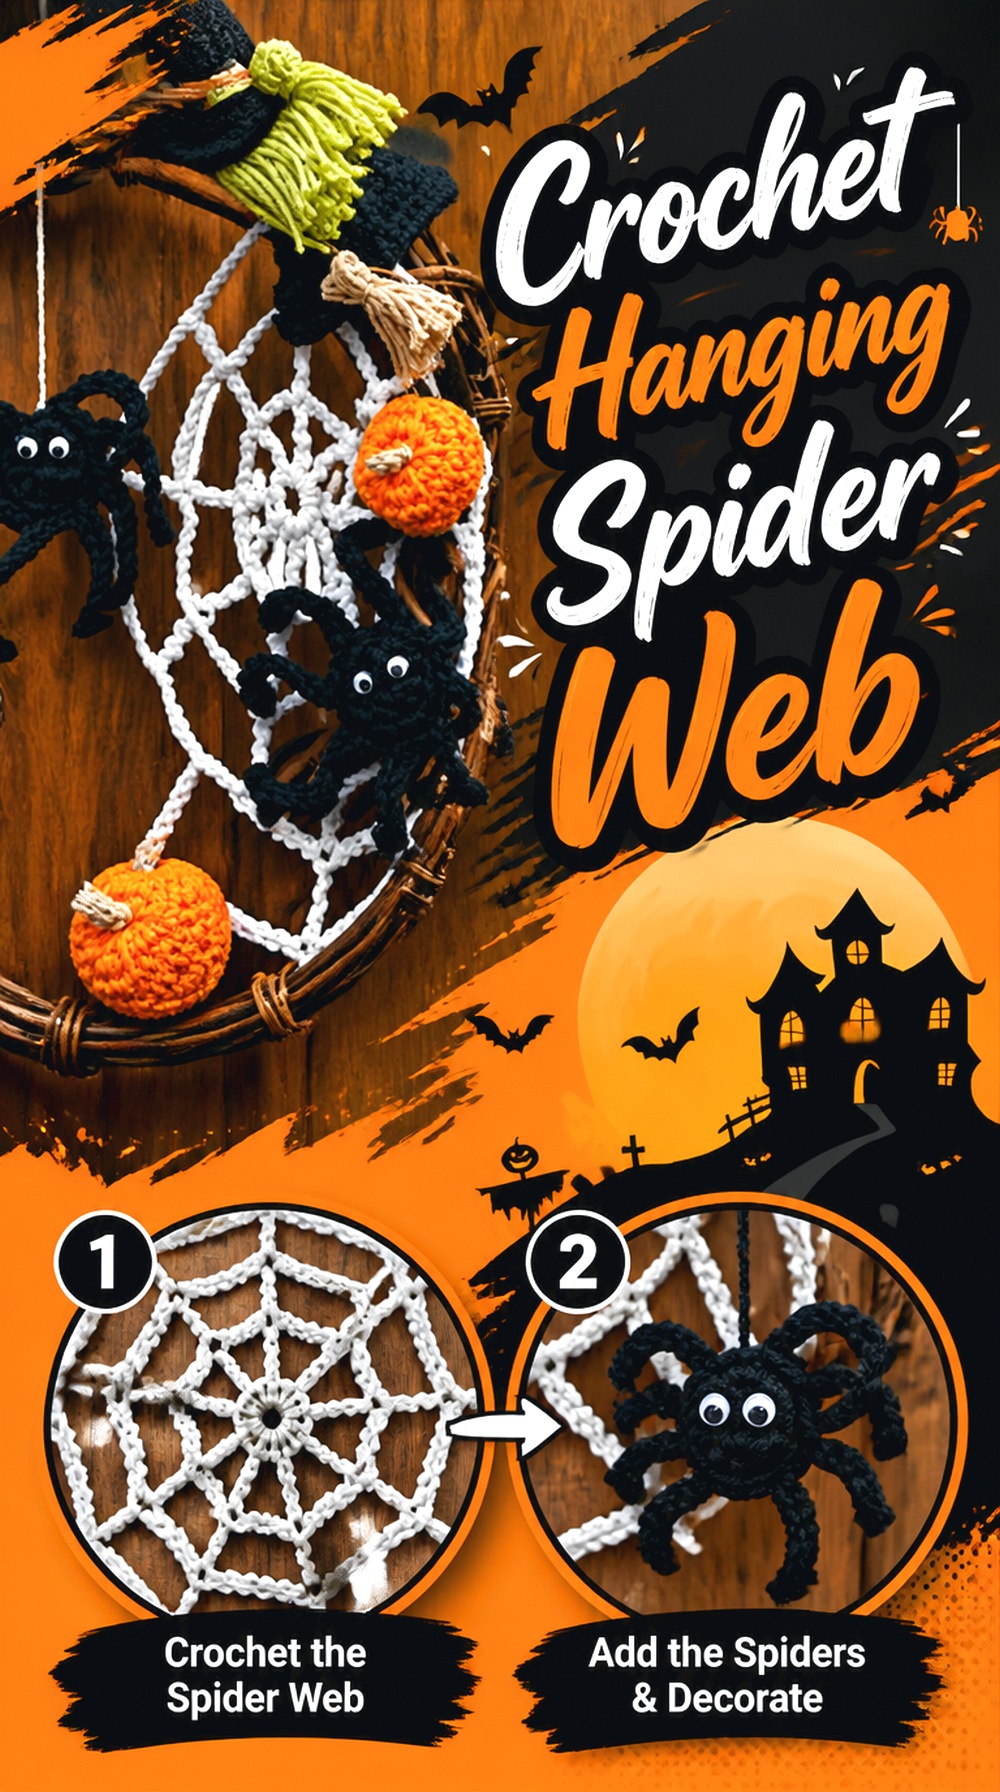
The Crochet Crowd’s spider web is flat, graphic decor rather than another stuffed Halloween figure. That makes it useful for doors, walls, windows, party backdrops, or layered displays where you want a larger visual element without much bulk.
Open spaces are the defining feature, so the project depends more on geometry and tension than on dense fabric. A web can also be easier to store than many three-dimensional decorations because it can lie relatively flat once the season is over. Before making one, decide how you intend to mount it; the surrounding surface changes how clearly the web can be seen.
Stretch Changes the Geometry
A spider web often looks different once tension is applied at its outer points. Test the finished piece in its intended hanging position before deciding that a section is uneven. At the same time, avoid pulling so aggressively that the center or outer loops distort beyond the shape shown in the tutorial.
Background Is Part of the Design
An open black web against a dark wall can disappear, while a lighter wall can turn every opening into part of the pattern. Evaluate the installation spot before choosing yarn color. For a window, also check how the web looks in both daylight and indoor evening light.
Original Tutorial and Creator Credit
Creator: The Crochet Crowd
13. Crochet Tarantula Decoration
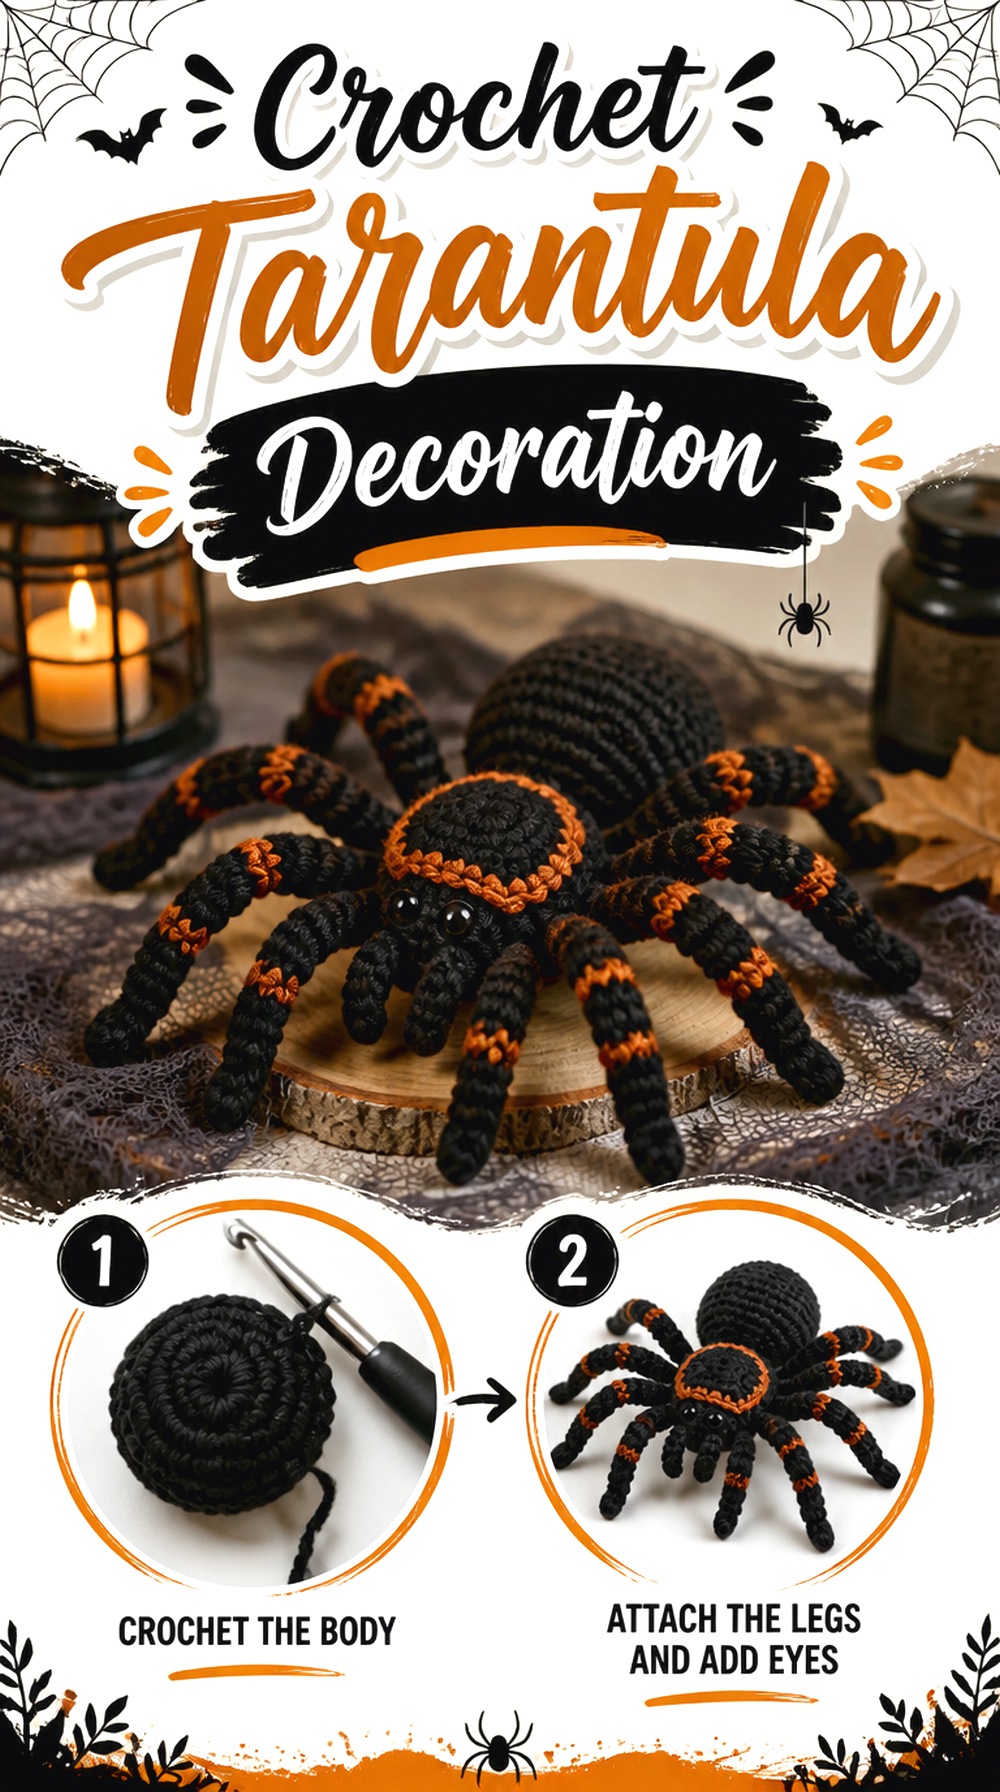
Crafty Crochet Castle’s tarantula introduces a much more dimensional spider than the flat web and tiny spider earrings elsewhere in this collection. The finished project works as a shelf prop, table decoration, or playful addition to a larger Halloween scene.
The long legs are the defining feature, so this is a project where proportion and posing matter as much as the central body. It can look convincingly creepy or intentionally cute depending on facial treatment and leg position. Because optional structural materials may be involved, decide whether your spider is purely decorative before adapting its construction.
Leg Position Determines the Footprint
A tarantula can occupy much more horizontal space than its body suggests. Before making multiples or committing to a display location, position the finished legs in the pose you want and measure the real footprint. This is particularly useful for narrow mantels, shelves, and tiered displays.
Treat Internal Support as a Use Decision
If a version uses wire or pipe-cleaner-style support, that changes how and where the spider should be used. Exposed or protruding internal material is undesirable around rough handling. For decorative placement, check every leg end and attachment point before putting the piece into storage or display.
Original Tutorial and Creator Credit
Creator: Crafty Crochet Castle
14. Crochet Pumpkin Keychain
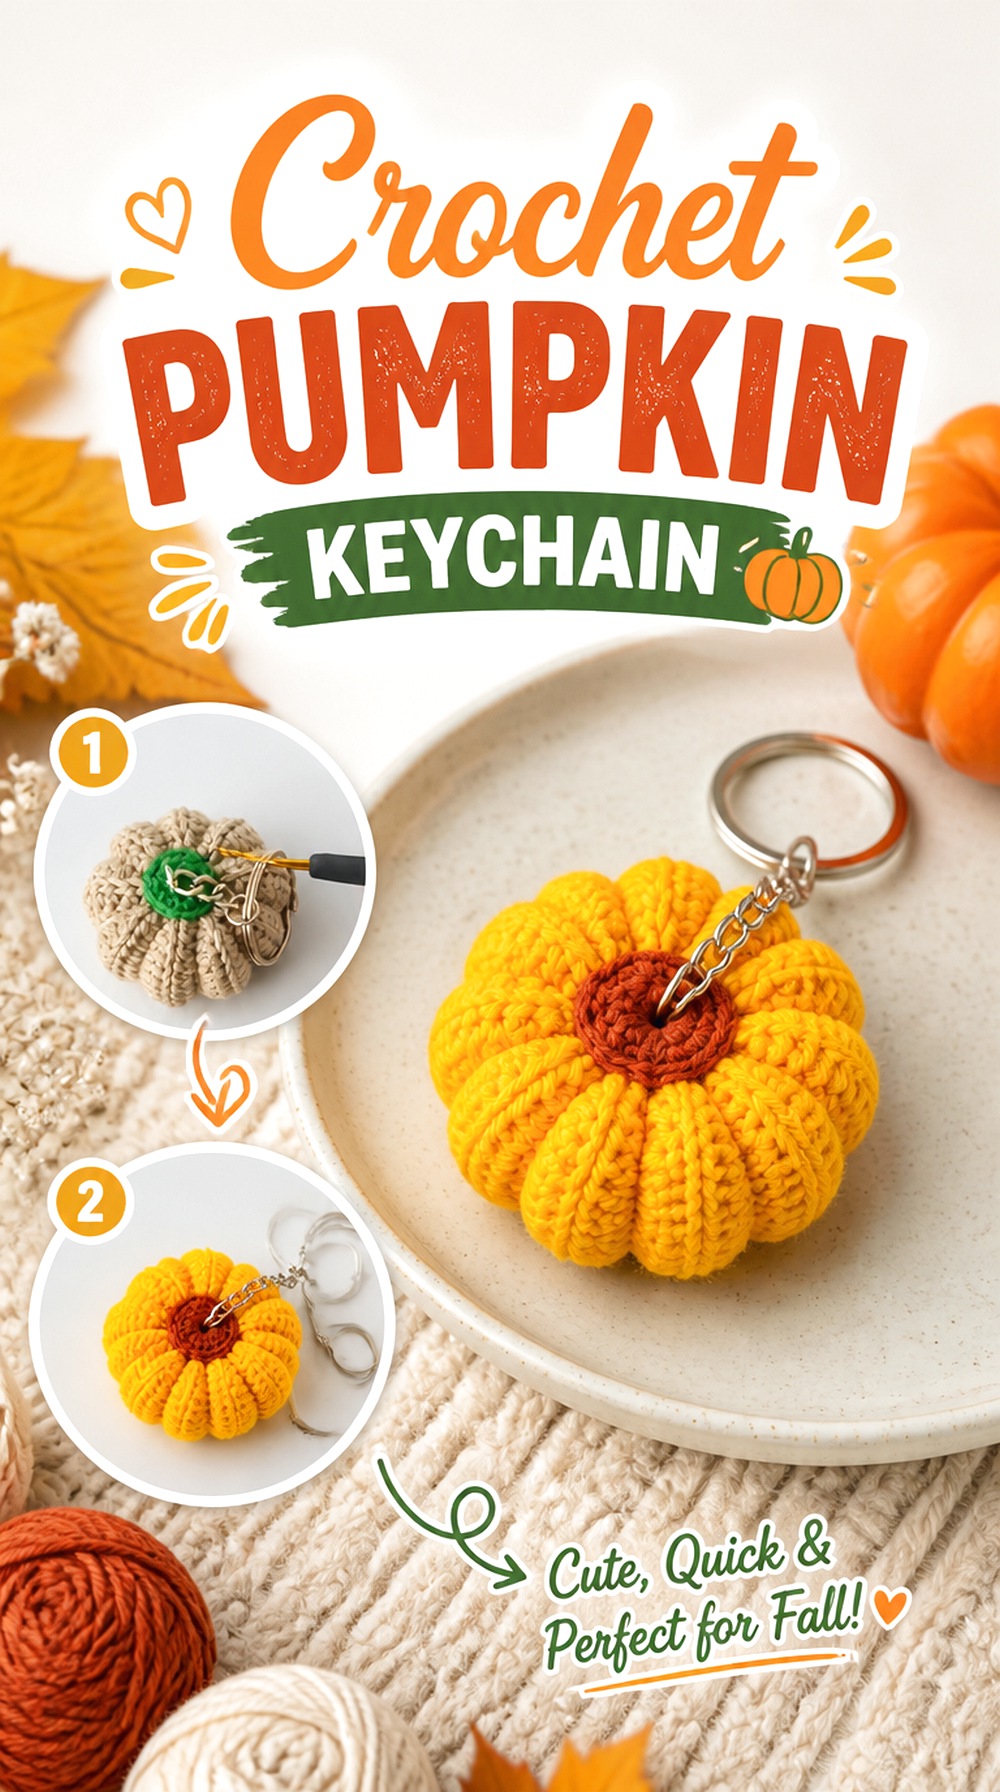
Tuba Crochet’s pumpkin keychain compresses seasonal crochet into a genuinely small accessory. Unlike tabletop pumpkins, this version is designed to hang from something else, so weight, attachment, and scale matter more than display stability.
A pumpkin charm works well on a project bag, zipper pull, seasonal gift, or key ring, and it can use Halloween colors without looking costume-specific. This is also a useful idea when you want repeatable handmade favors rather than one large project. The hardware, however, becomes part of the finished object and deserves as much attention as the crochet itself.
Inspect the Attachment Point First
A charm repeatedly swings and twists during use. Make sure the area connecting the pumpkin to its ring or clasp is secure and not relying on a single loose strand. If the item is purely decorative, the demands are lower, but a frequently handled keychain needs a more deliberate attachment.
Avoid Overloading a Tiny Shape
Extra leaves, faces, bows, or beads can quickly overwhelm a small pumpkin. Additions that look balanced on a shelf-sized decoration may appear crowded at keychain scale. Finish the basic pumpkin first, attach the hardware, and then decide whether another embellishment actually improves the silhouette.
Original Tutorial and Creator Credit
Creator: Tuba Crochet
15. Crochet Flat Skull Motif
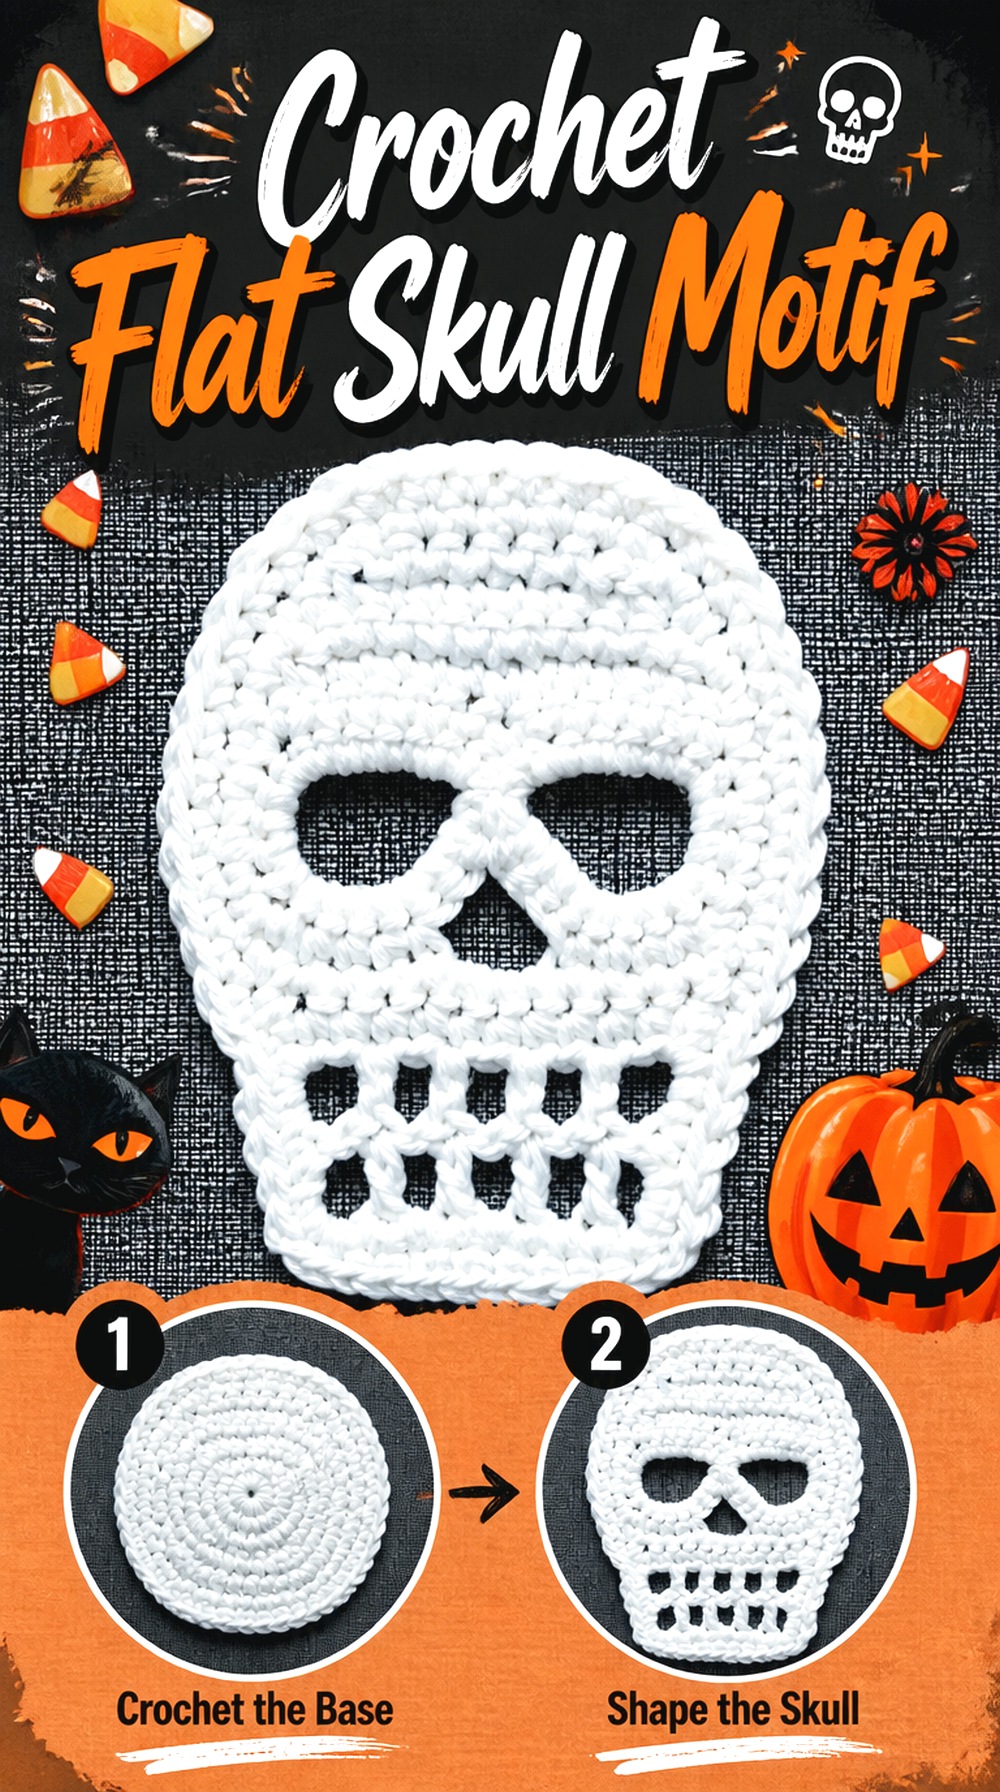
HandmadebyRaine’s skull is a standalone flat motif, which distinguishes it from the skull already enclosed inside a granny square. Without a square border controlling the final shape, the outline of the skull itself becomes the focus.
That gives you freedom to use it on bunting, a patch-style decoration, a larger wall composition, or as an appliqué on another crochet project. It also means you are not locked into a modular grid. Choose this version when you want the skull to sit independently rather than repeat as part of a square-based fabric.
Decide Whether the Skull Needs to Stay Flat
A skull used on a wall can be blocked and displayed differently from one stitched onto a flexible bag or garment. Before finishing, decide whether the motif must move with another fabric or keep a crisp decorative outline. That choice affects how much shaping and blocking are practical.
Test Placement Before Sewing the Entire Edge
A flat skull is visually directional, and the surrounding negative space contributes to the face. Pin or loosely baste the motif in place first if it will be attached to another item. Step back and check the angle, especially on a bag or wearable where the underlying fabric may curve.
Original Tutorial and Creator Credit
Creator: HandmadebyRaine
16. Crochet Halloween Character Garland
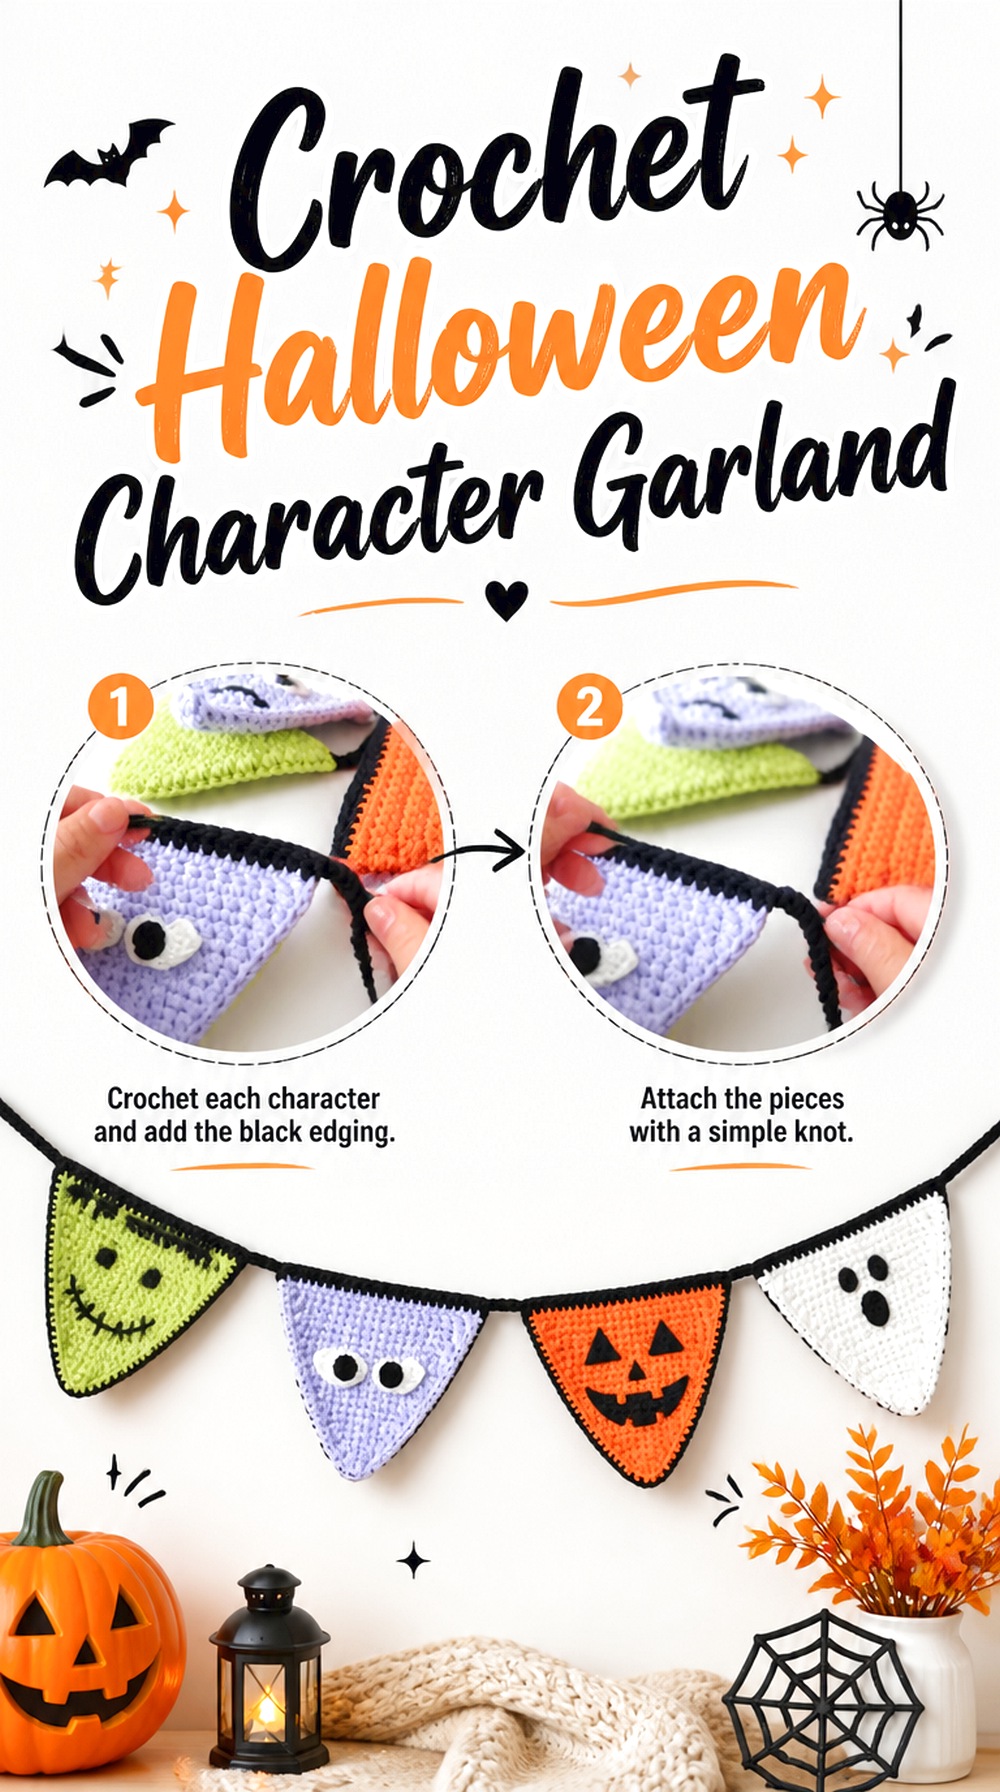
Despite the “wreath” wording in the video title, Ahuyama Crochet’s tutorial description presents a garland or bunting-style decoration featuring Halloween characters including pumpkin, Frankenstein, and vampire options. That gives this idea a completely different display rhythm from a single wall motif.
A garland is particularly good for mantels, doorways, shelves, or windows because the repeated pieces create a horizontal line of color. It can also grow gradually: you can make enough motifs for a small area first, then decide whether a longer strand is worth the additional work.
Arrange the Characters Before Joining Them
The order can change how balanced the finished garland looks. Place all completed motifs on the floor or table and experiment with spacing before permanently connecting them. If some figures are visually heavier or darker than others, alternating them may produce a more even result than grouping identical characters together.
Hanging Points Need to Share the Load
A decorative strand can sag differently once every motif is attached. Test it across roughly the same span you plan to use in the room. If the ends pull inward or the characters rotate, adjust spacing or connection points before adding more motifs.
Storage Favors Detachable or Flexible Displays
A garland is easier to store than many large seasonal objects, but dangling pieces can still tangle. Before October ends, note how the motifs naturally stack or roll so you can choose a storage method that does not crush dimensional details.
Original Tutorial and Creator Credit
Creator: Ahuyama Crochet
17. Crochet Squishy Ghost Plushie
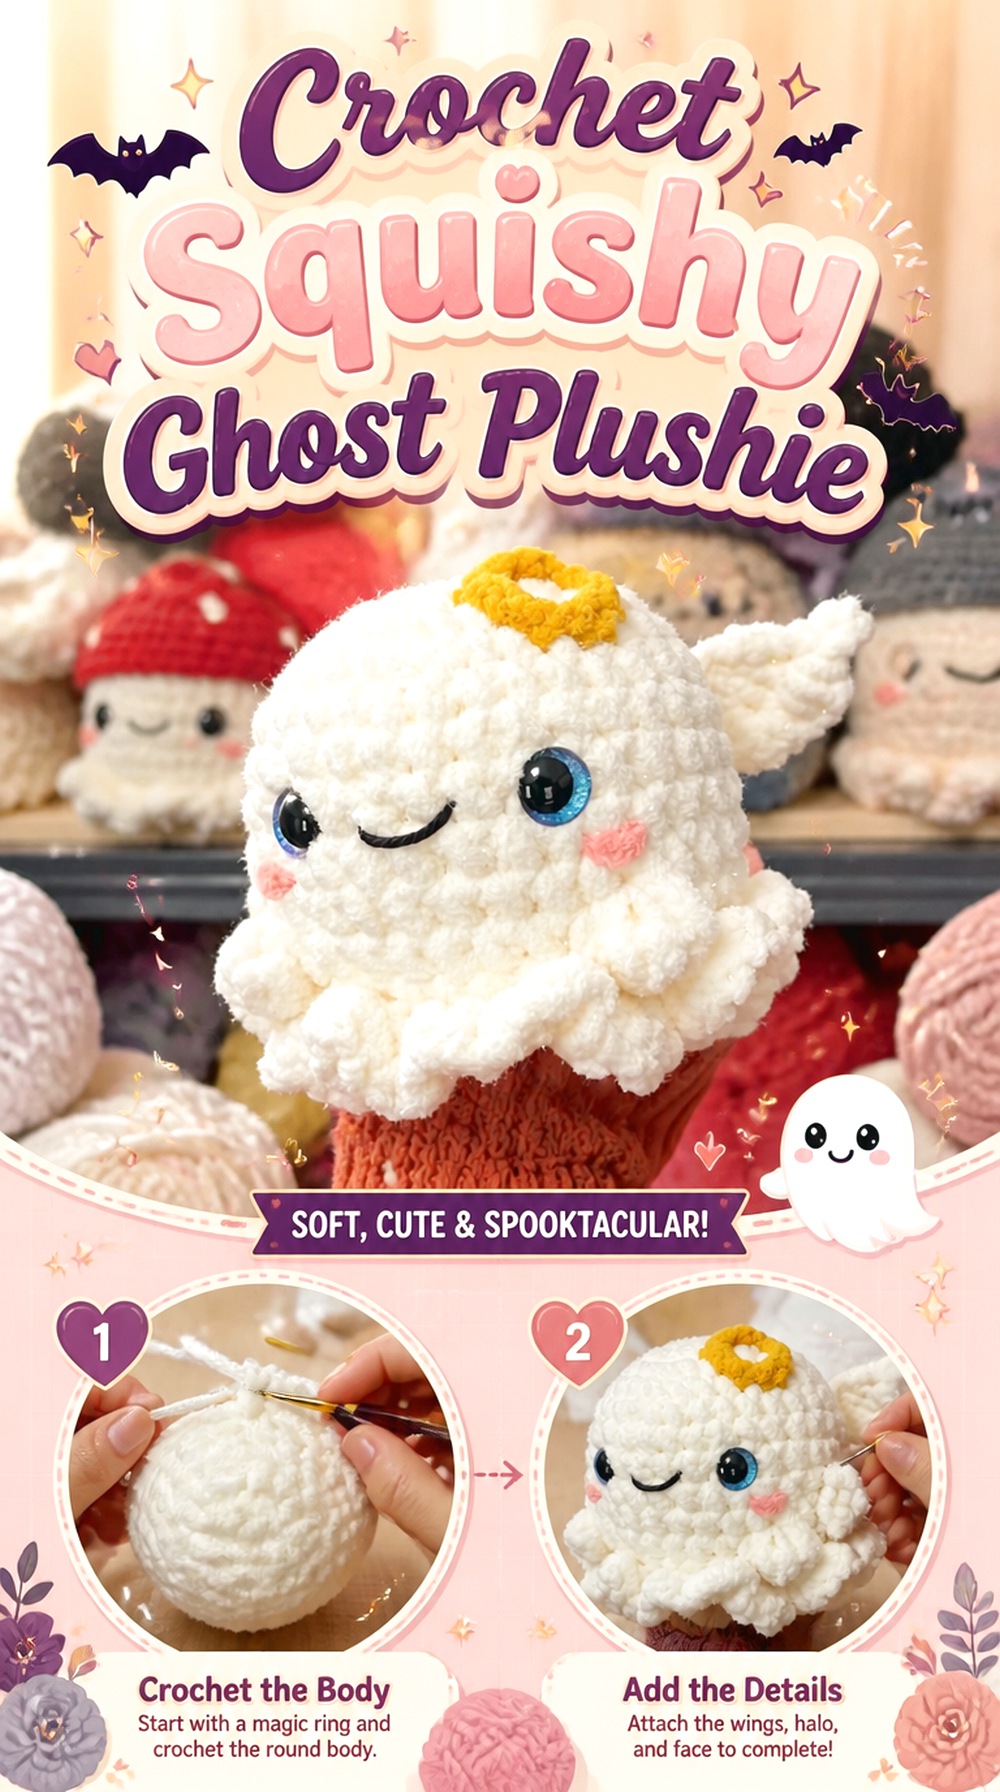
Annie Carraway Art’s ghost plushie is for readers who want a more substantial soft character than the small no-sew ghost earlier in the list. A plush format gives the body more presence, making it better suited to a bed, chair, shelf, or larger Halloween arrangement.
Because the silhouette remains simple, texture and stuffing become especially noticeable. A larger ghost can also support a more expressive face without tiny features dominating the object. Choose this approach when you want the ghost itself to act as a decorative centerpiece rather than a pocket-size accent.
Aim for an Even Outer Surface
Broad areas of pale yarn tend to show irregular filling more readily than a heavily detailed character. Add stuffing in smaller amounts and move it into the edges before closing. Rotate the plush as you work so one side does not become noticeably fuller than the other.
Check the Bottom Before Final Closure
A display plush should sit or rest in the orientation you expect. Before finishing the final opening, place it on the intended surface and assess whether the base or lower body supports the pose shown by the design.
Original Tutorial and Creator Credit
Creator: Annie Carraway Art
18. Crochet Black Cat Amigurumi
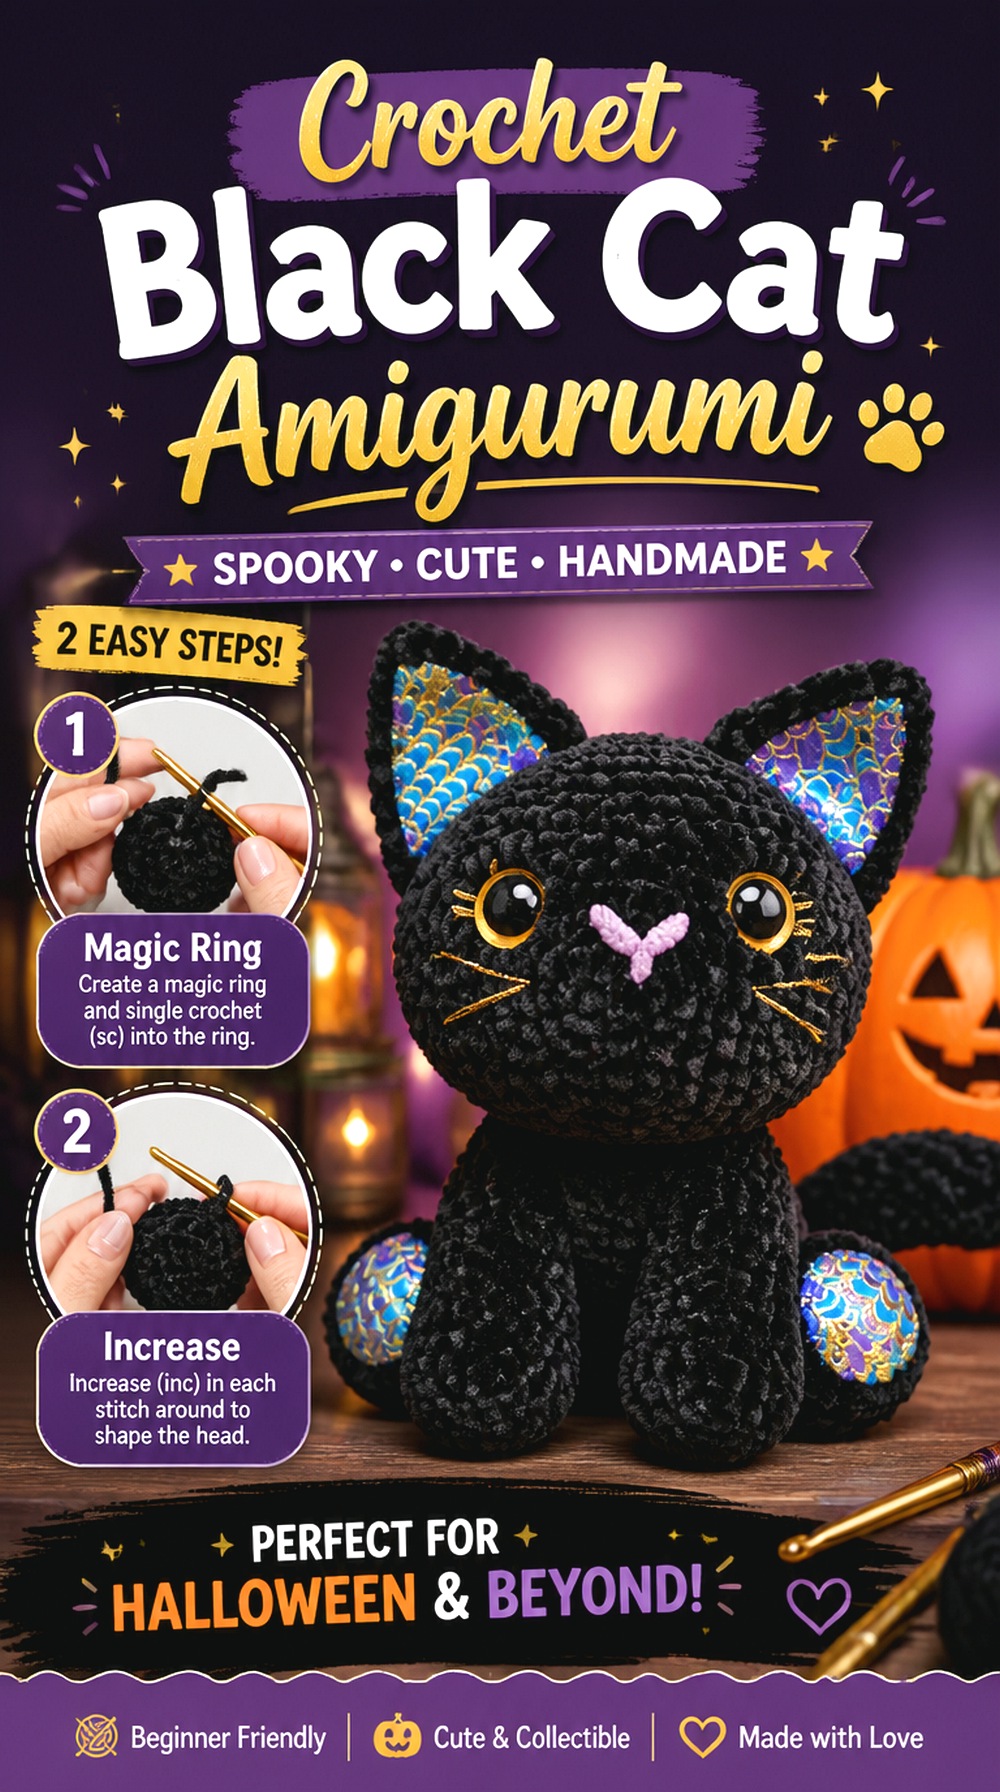
AmareeLis offers a black cat amigurumi that works for Halloween without being limited to one night of the year. The animal form creates a softer theme than skulls and monsters, while black yarn and feline features still fit naturally into spooky-season styling.
Cats introduce more placement decisions than a simple pumpkin because ears, face, body, and limbs all need to read as one coherent figure. Dark yarn can also hide stitch detail under poor lighting, which makes the making process and final photography slightly different from working with pale ghost yarn.
Use Strong Lighting While Working With Dark Yarn
Black yarn can make stitch openings and attachment points harder to see. Good task lighting is useful not only for comfort but also for keeping placement consistent. If you substitute a very fuzzy black yarn, consider whether the added texture will obscure the shaping that gives the cat its expression.
Pin Features Before Permanent Assembly
The distance between ears and facial features strongly affects a small animal’s expression. If the construction includes separate components, position everything provisionally first. View the cat from the front, side, and slightly above before completing permanent attachments.
Original Tutorial and Creator Credit
Creator: AmareeLis
19. Crochet Eyeball Coaster
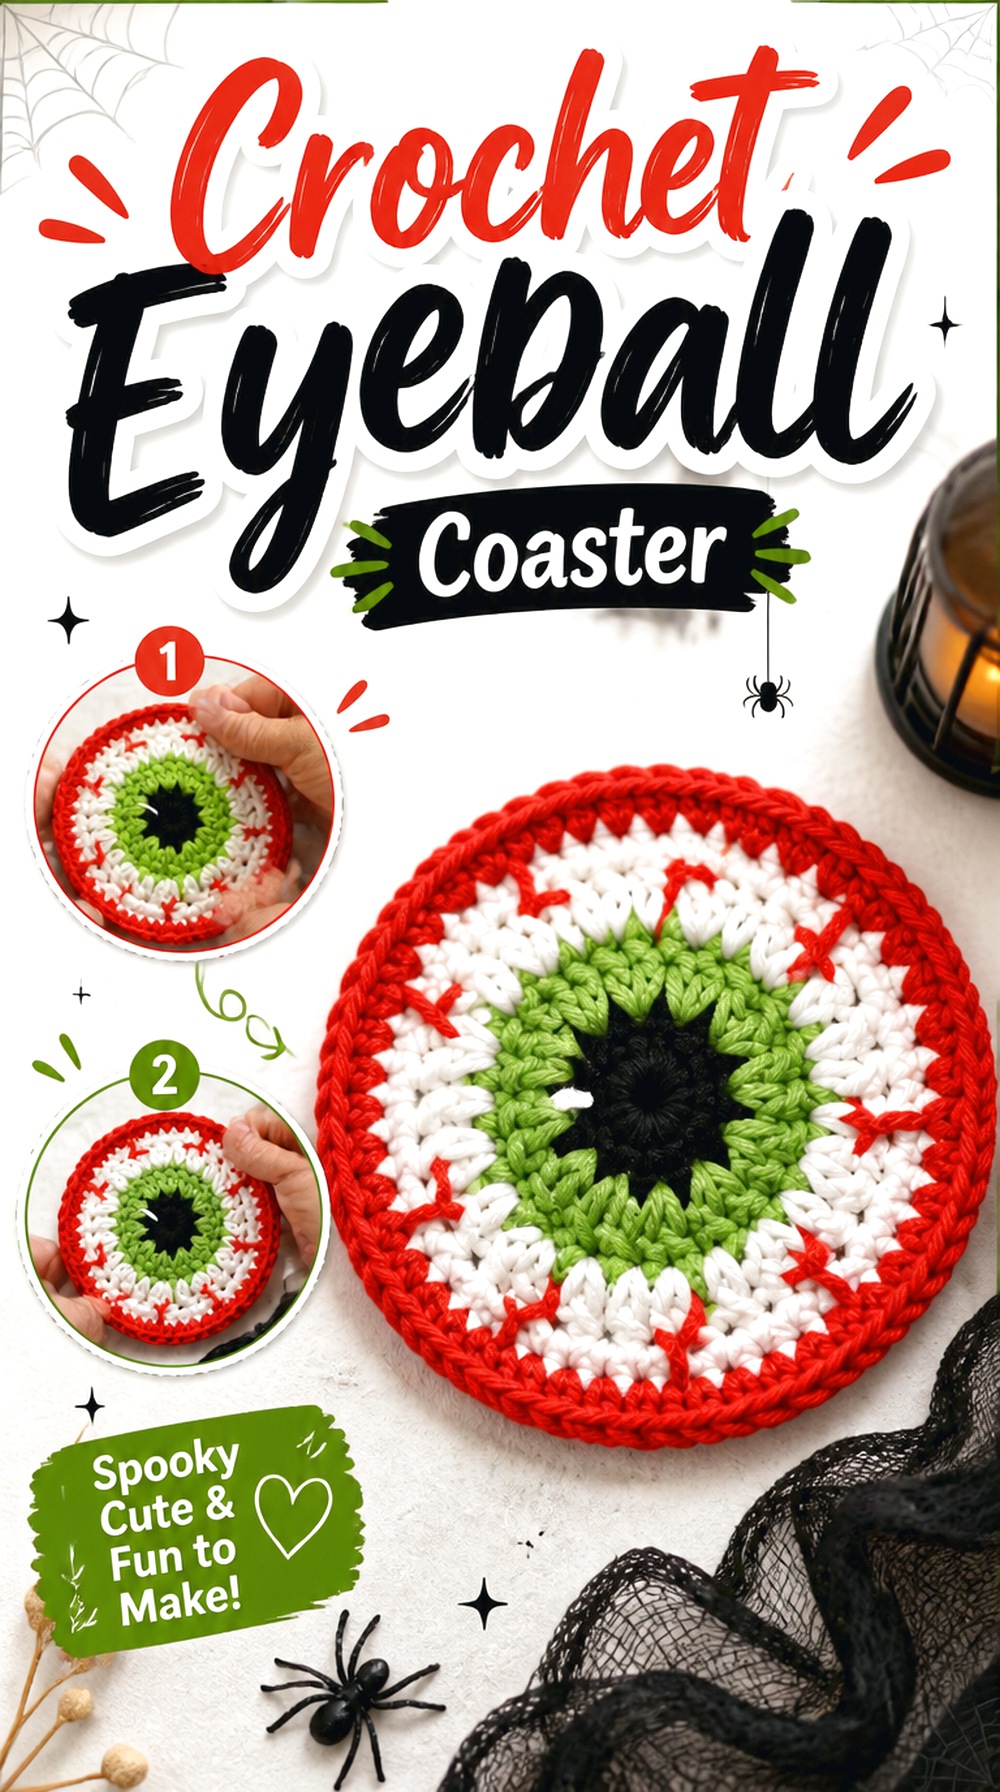
Martenitsa Spirit’s eyeball coaster turns a creepy image into a flat functional accent. Unlike the potion coaster set, this project makes the coaster itself the focal Halloween graphic rather than creating a coordinated storage system.
Circular color changes naturally suit an iris-and-pupil design, so the idea can be recognizable without extra sewn-on pieces. It works particularly well for a party table where a conventional coaster would disappear into the setup. Because it is intended to sit under a drink, however, flatness and surface stability matter more than dimensional realism.
Keep the Center From Buckling
A circular coaster needs to expand evenly. If the center domes or the edge develops a pronounced ruffle, the finished piece may not support a cup predictably. Compare the fabric with the creator’s result as you work and correct tension issues before adding more rounds of visual detail.
Choose Detail That Survives Real Use
A coaster with raised or loosely attached embellishments may look dramatic but be less practical under drinkware. If you adapt the design, keep the contact area in mind. Decorative versions can be more dimensional; functional versions benefit from a relatively even upper surface.
Original Tutorial and Creator Credit
Creator: Martenitsa Spirit
20. Crochet Cobweb Corner Storage Hammock
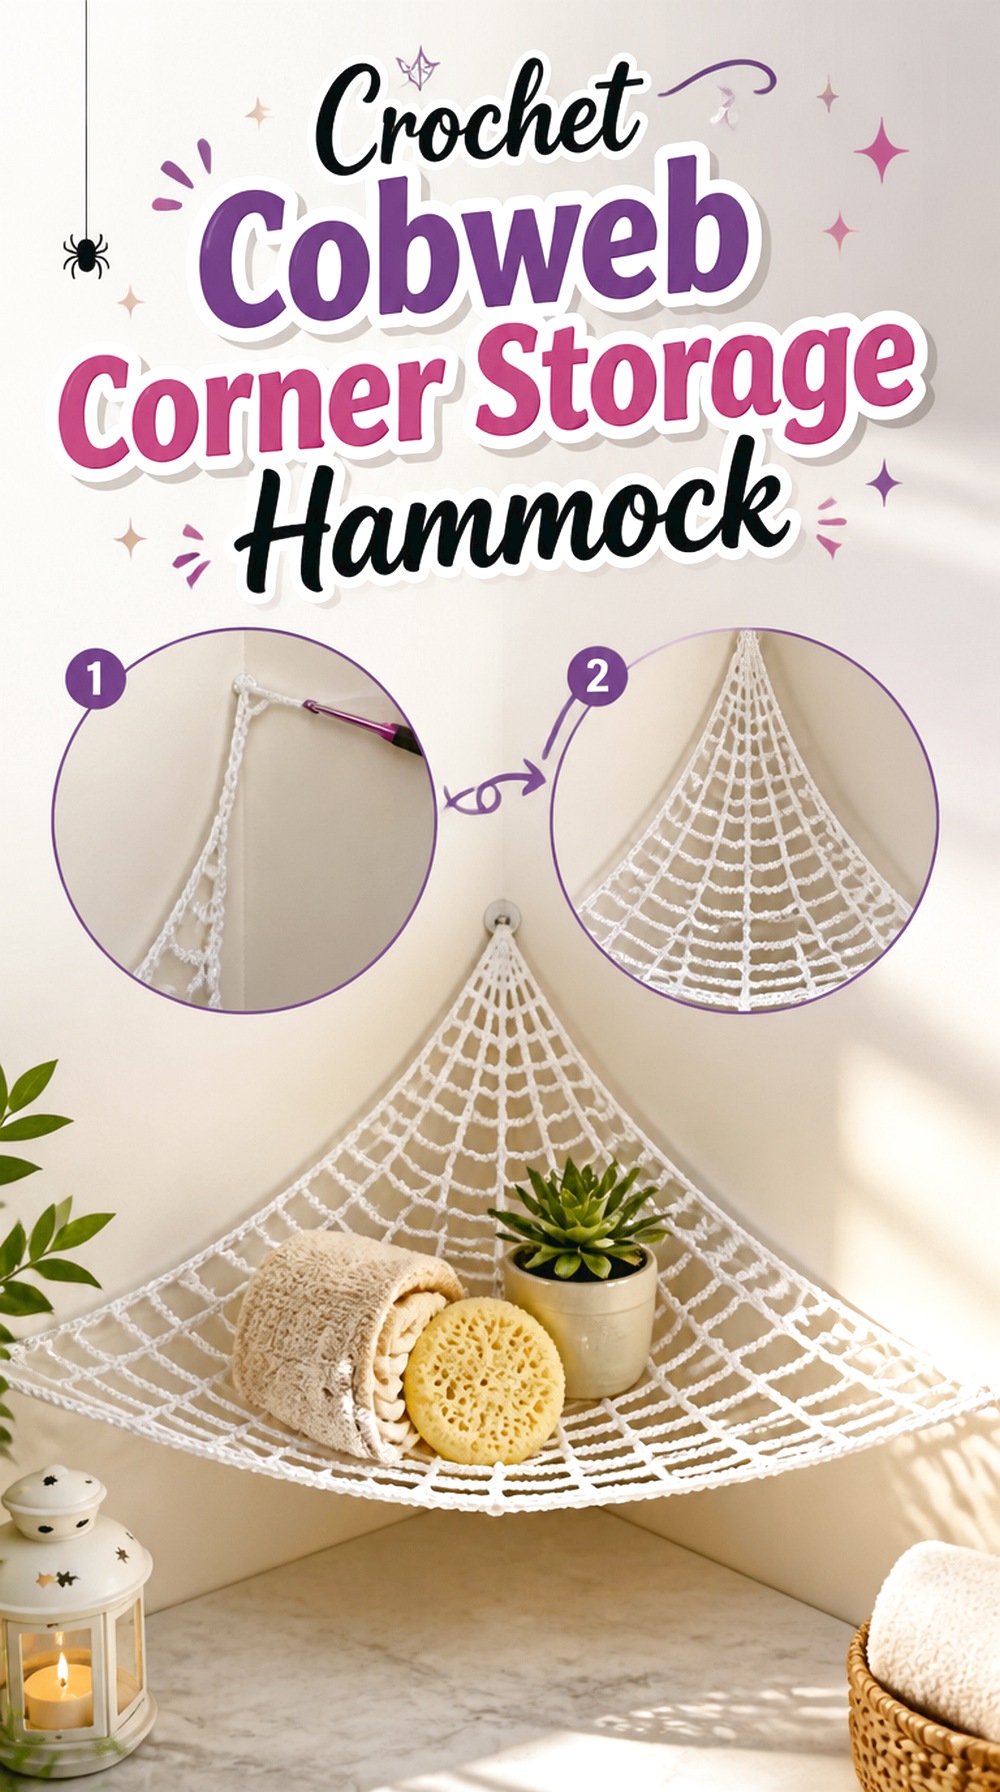
VivCrochets combines spiderweb styling with actual corner storage, making this one of the most functional ideas in the roundup. Rather than hanging flat against a wall, the cobweb stretches across a corner to create a hammock-like space.
That means it has to be planned around a real location. Wall angle, mounting points, stretch, and what you intend to place inside all matter. It can be especially effective for displaying lightweight plush collections or seasonal items, but decorative crochet should not be assigned an unsupported load capacity. Use the tutorial’s construction as the reference and choose installation hardware appropriate to your wall and intended use.
Measure the Corner, Not Just the Crochet
A hammock that looks generously sized laid flat may hang much differently once anchored. Measure the available corner and consider furniture, doors, windows, and head clearance. The most useful checkpoint is the actual installed span, not a flat fabric measurement in isolation.
Stretch Will Affect the Stored Shape
Adding objects changes the web from a decorative triangle into a loaded surface. If your yarn substitution has noticeably more stretch than the example, the hammock may hang lower. Test with lightweight objects gradually instead of immediately filling it.
Mounting Is Separate From the Crochet Pattern
Wall anchors and hooks must suit the wall material and expected load; the crochet tutorial cannot determine that for every home. Keep mounting decisions separate from the yarn construction, and avoid placing a storage hammock where a failure could cause injury or damage.
Original Tutorial and Creator Credit
Creator: VivCrochets
21. Crochet Spiderweb Backless Sweater
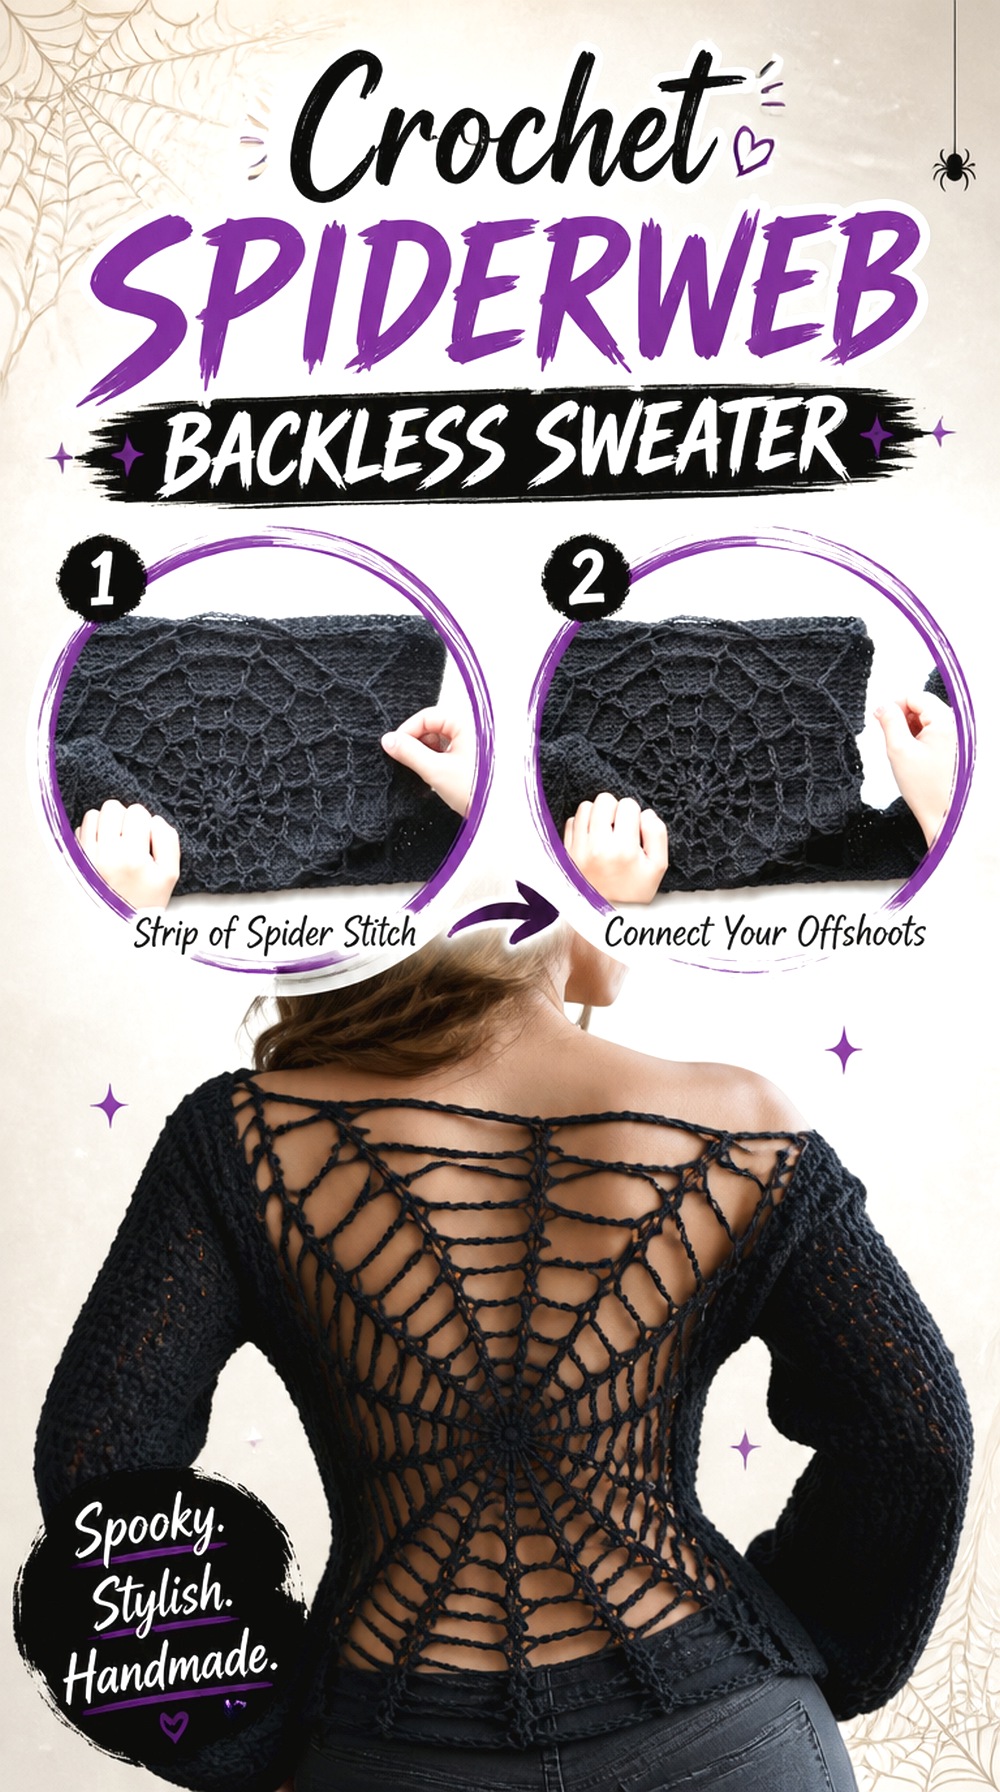
Yaejiyea’s backless sweater is the most substantial wearable in this collection. Instead of using a spiderweb as a separate appliqué, the web becomes a major part of the garment’s back, giving Halloween imagery a structural role.
That makes fit more important than it is on a scarf or hat. Front coverage, shoulder position, back opening, sleeve behavior, and the web section all influence how the finished sweater sits. This project is best approached as a garment first and Halloween graphic second: a beautiful web will not compensate for shoulders or sleeves that do not suit the wearer.
Check Shoulder Placement Before Extending the Garment
The open back draws the eye, but the shoulder area carries much of the garment. Compare the developing fit with a garment you already like or use the sizing logic provided by the creator. Do not wait until the sleeves and finishing are complete to discover that the upper body sits too wide or narrow.
An Open Web Behaves Differently From Solid Fabric
The spiderweb section has more negative space than the surrounding sweater, so it can stretch and drape differently. When substituting yarn, consider whether the new fiber is heavier or more elastic than the creator’s material. A small change may be more visible in the open back than in a dense panel.
Plan What Will Be Worn Underneath
A backless sweater can look very different over a camisole, dress, bralette, or contrasting shirt. Decide on the intended layer while assessing length and fit rather than treating styling as an afterthought.
Original Tutorial and Creator Credit
Creator: yaejiyea
22. Crochet Mini Frankenstein Doll
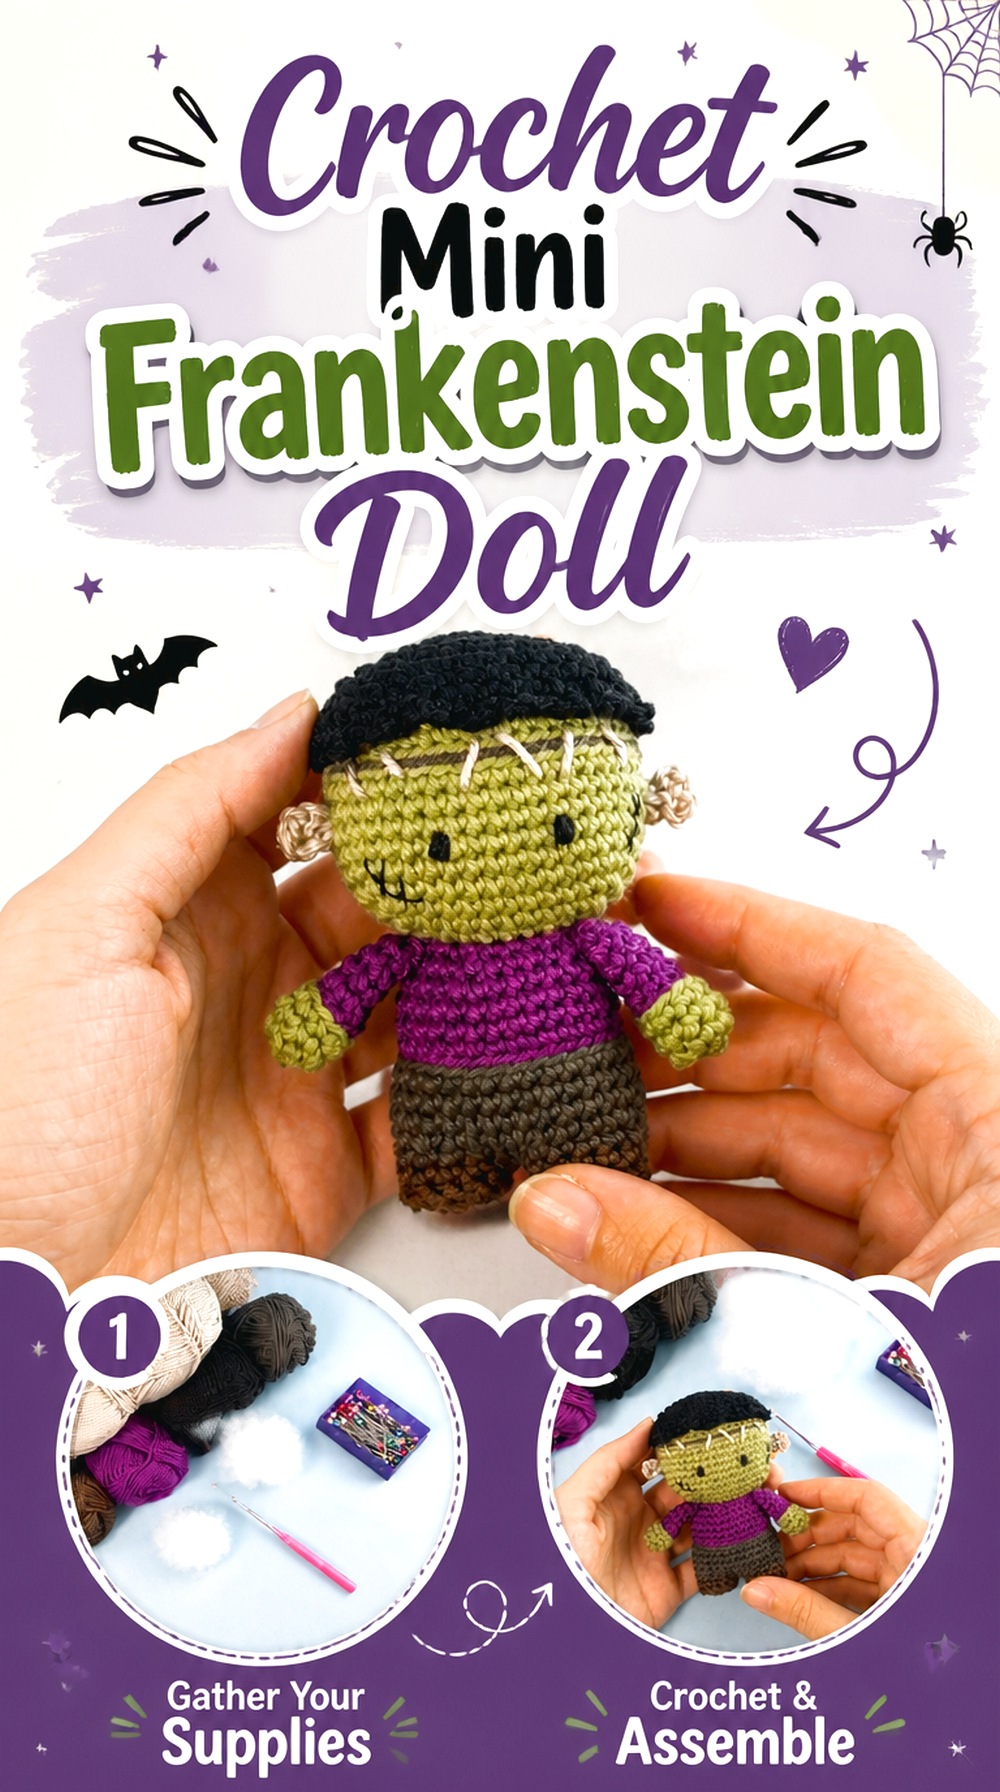
Little Crochet Farm’s Frankenstein tutorial creates a complete small amigurumi character, adding a classic monster to a list otherwise heavy on ghosts and pumpkins. The humanoid proportions and recognizable head details give it a different assembly challenge from round plushies.
This project works well as a shelf figure or part of a themed monster collection. Because several small features contribute to the character, neat placement matters. The original video is a complete tutorial and includes the character’s body, hair, assembly, and finishing rather than functioning as a short preview.
Symmetry Helps the Face Read Clearly
Frankenstein-inspired details can be exaggerated, but the main facial landmarks still need intentional placement. Before securing features, view the head straight on. Small offsets that seem insignificant when you are holding the piece close can become more noticeable after the hair and other details are added.
Build the Character Before Adding Display Props
It is tempting to plan a miniature Halloween scene immediately, but finish the doll first. Its actual scale and seated or standing posture determine what size cauldron, pumpkin, or background decoration will look convincing beside it.
Original Tutorial and Creator Credit
Creator: Little Crochet Farm
23. Crochet Mummy Amigurumi
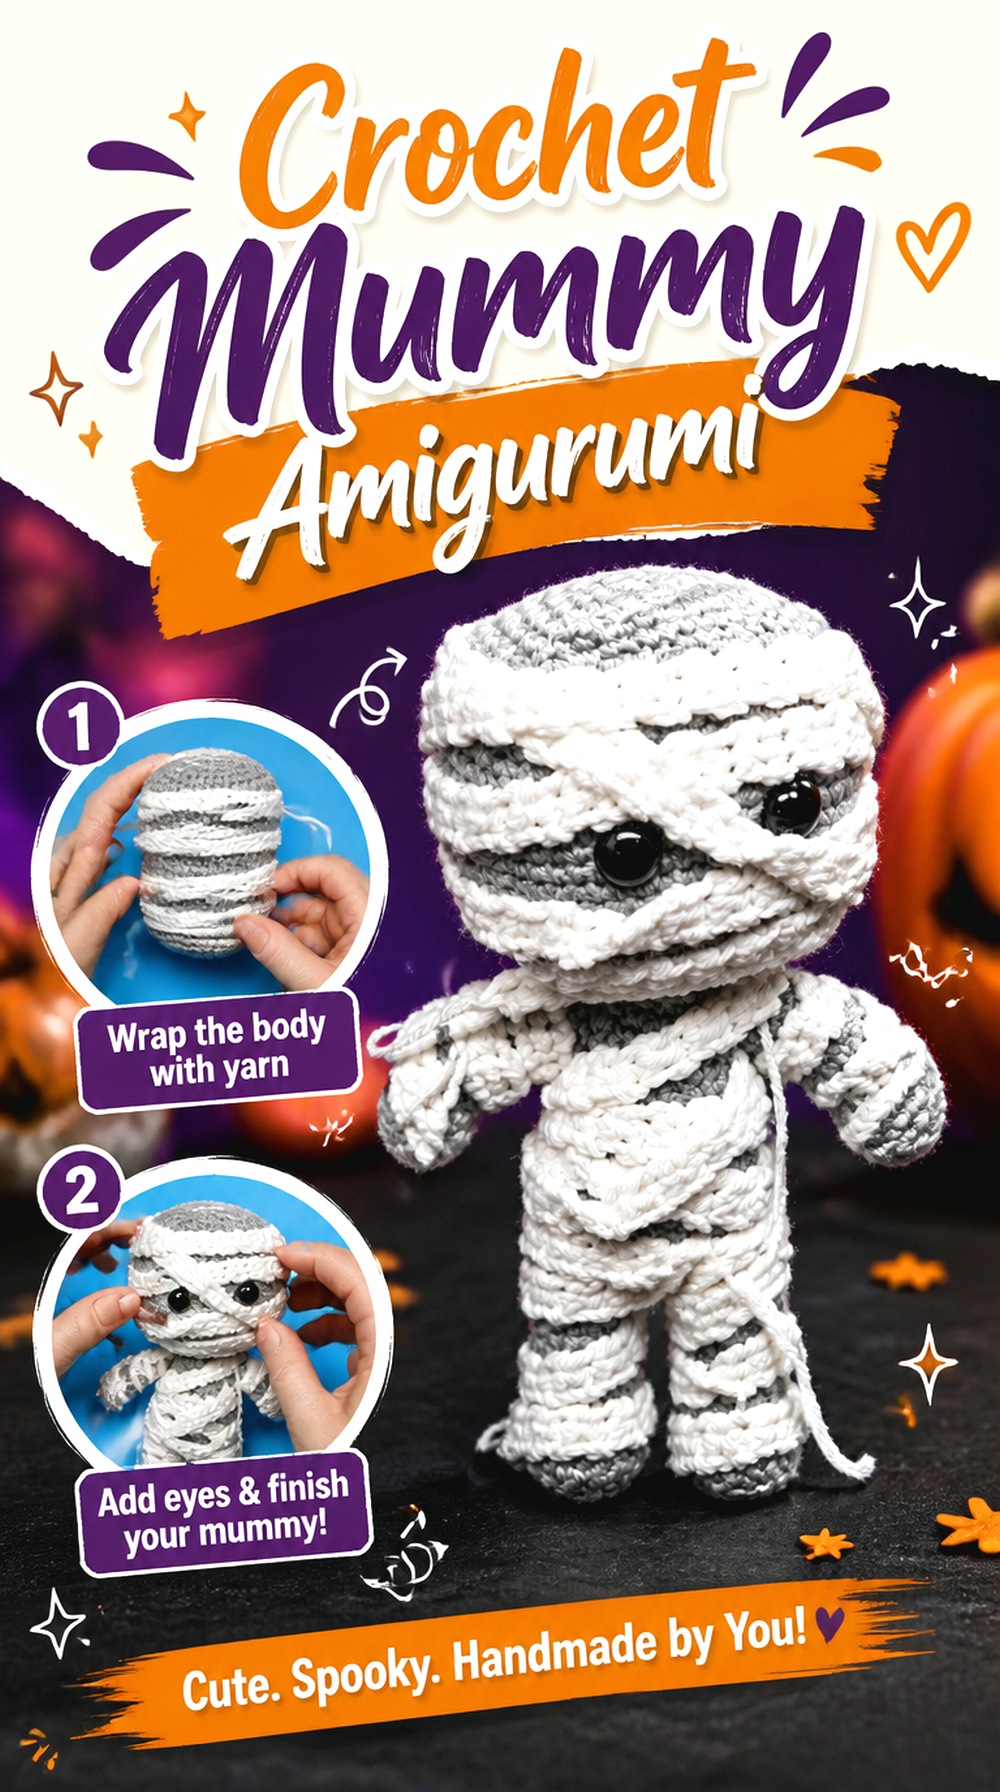
Skein Spider’s mummy brings a texture-driven monster to the collection. Instead of relying mainly on color changes, the wrapped-bandage appearance gives the character its identity, producing a deliberately layered surface.
That distinguishes the mummy from smoother amigurumi such as the black cat or Frankenstein doll. It is a strong choice for a coordinated monster shelf because a mostly pale character also breaks up a row of dark Halloween colors. The source video is a full character tutorial with separate sections for the body components, bandages, and assembly.
Bandage Texture Should Look Intentional
Irregularity suits a mummy, but random bulk can hide the overall body shape. Periodically view the figure from a distance as the wrapped effect develops. You want enough layering to communicate “mummy” without losing the underlying silhouette completely.
Keep Dangling Details Appropriate to the Use
Loose-looking bandage ends can add character to display decor, but long unsecured pieces are less practical on an item that will be handled frequently. Decide whether the mummy is a shelf figure, gift, or toy-like object before modifying the creator’s finishing.
Original Tutorial and Creator Credit
Creator: Skein Spider
24. Crochet Spider Web Bandana
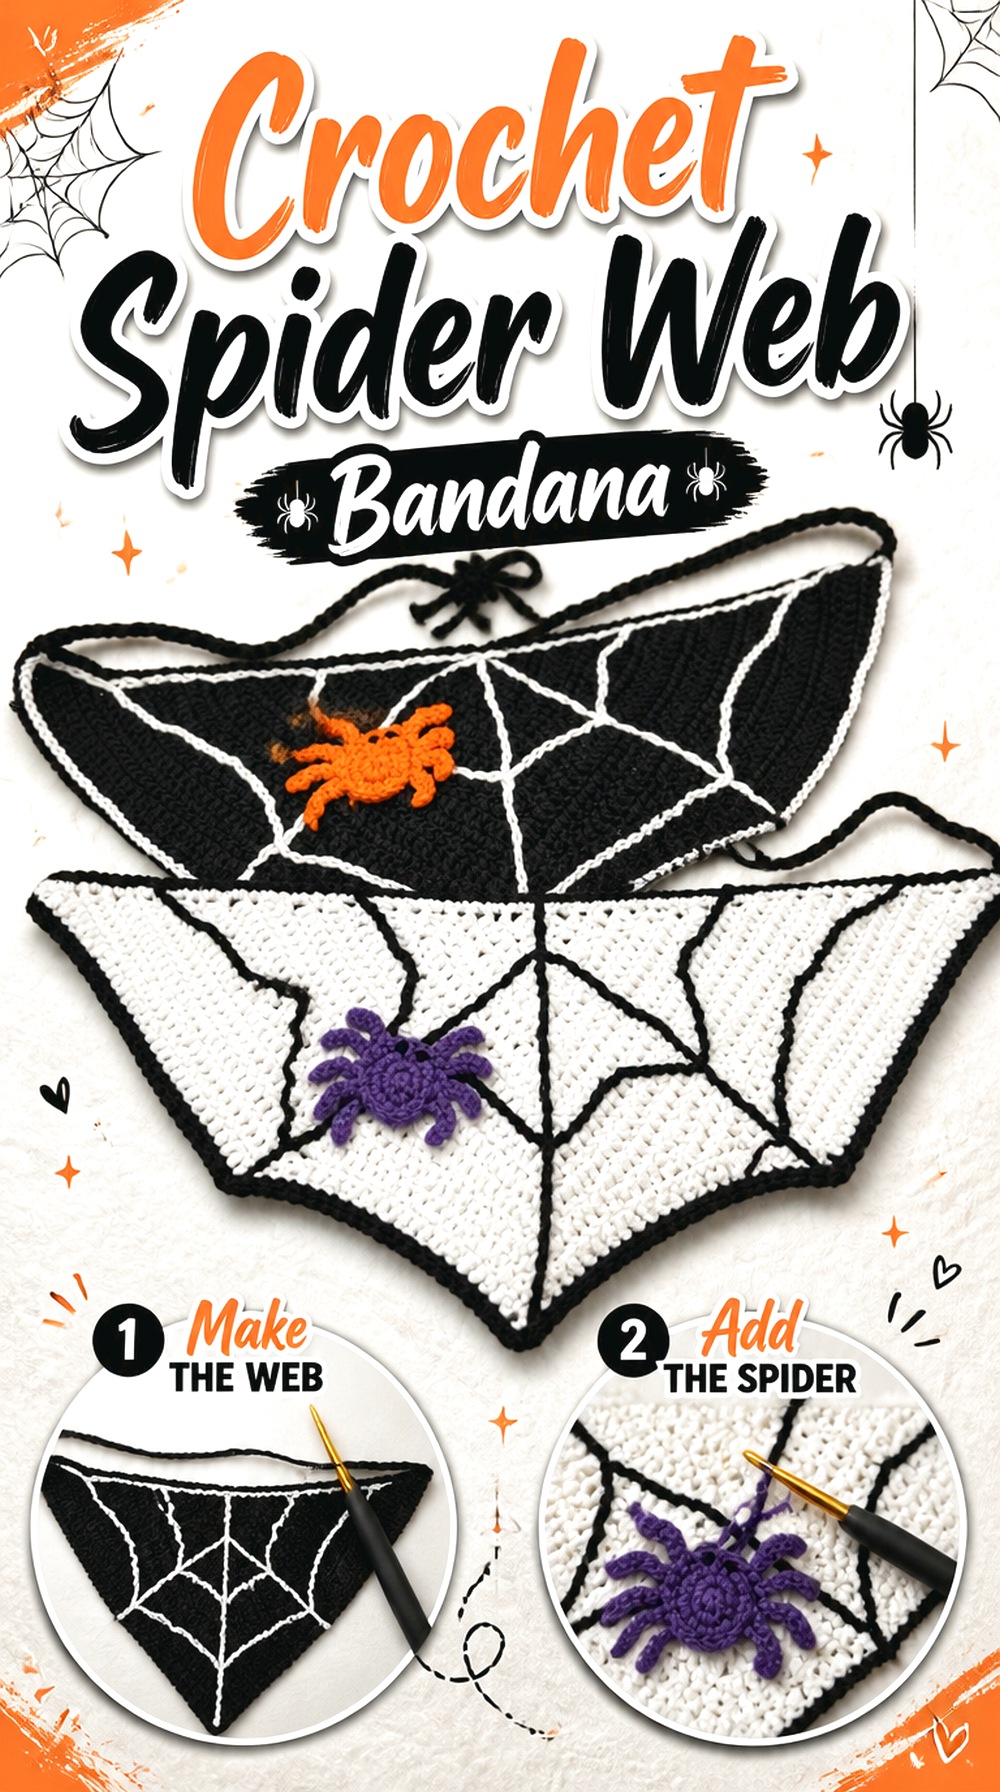
Ravella Design turns the web motif into a triangular hair accessory. This is much lighter and less fitted than the backless sweater, so it offers Halloween styling without committing to an entire garment.
The triangular outline naturally supports radiating web lines, and the finished bandana can be styled as part of a costume or with everyday clothes during October. Because it sits around the head, ties and edge comfort matter as much as the central motif. Consider your preferred wearing position before deciding whether to alter the size or yarn.
Judge Coverage in the Position You’ll Wear It
A triangular piece that looks large on a table may cover much less once curved over the head. Try the developing piece in the intended position when the tutorial allows. Hair volume and styling can change the amount of coverage you prefer.
Tie Length and Stretch Affect Security
Longer ties are not automatically better. Excessively stretchy ties may loosen, while short ones restrict styling options. If you change fiber or yarn weight, assess how the ties behave under gentle tension rather than copying their appearance alone.
Original Tutorial and Creator Credit
Creator: Ravella Design
25. Crochet Jack Skellington Amigurumi
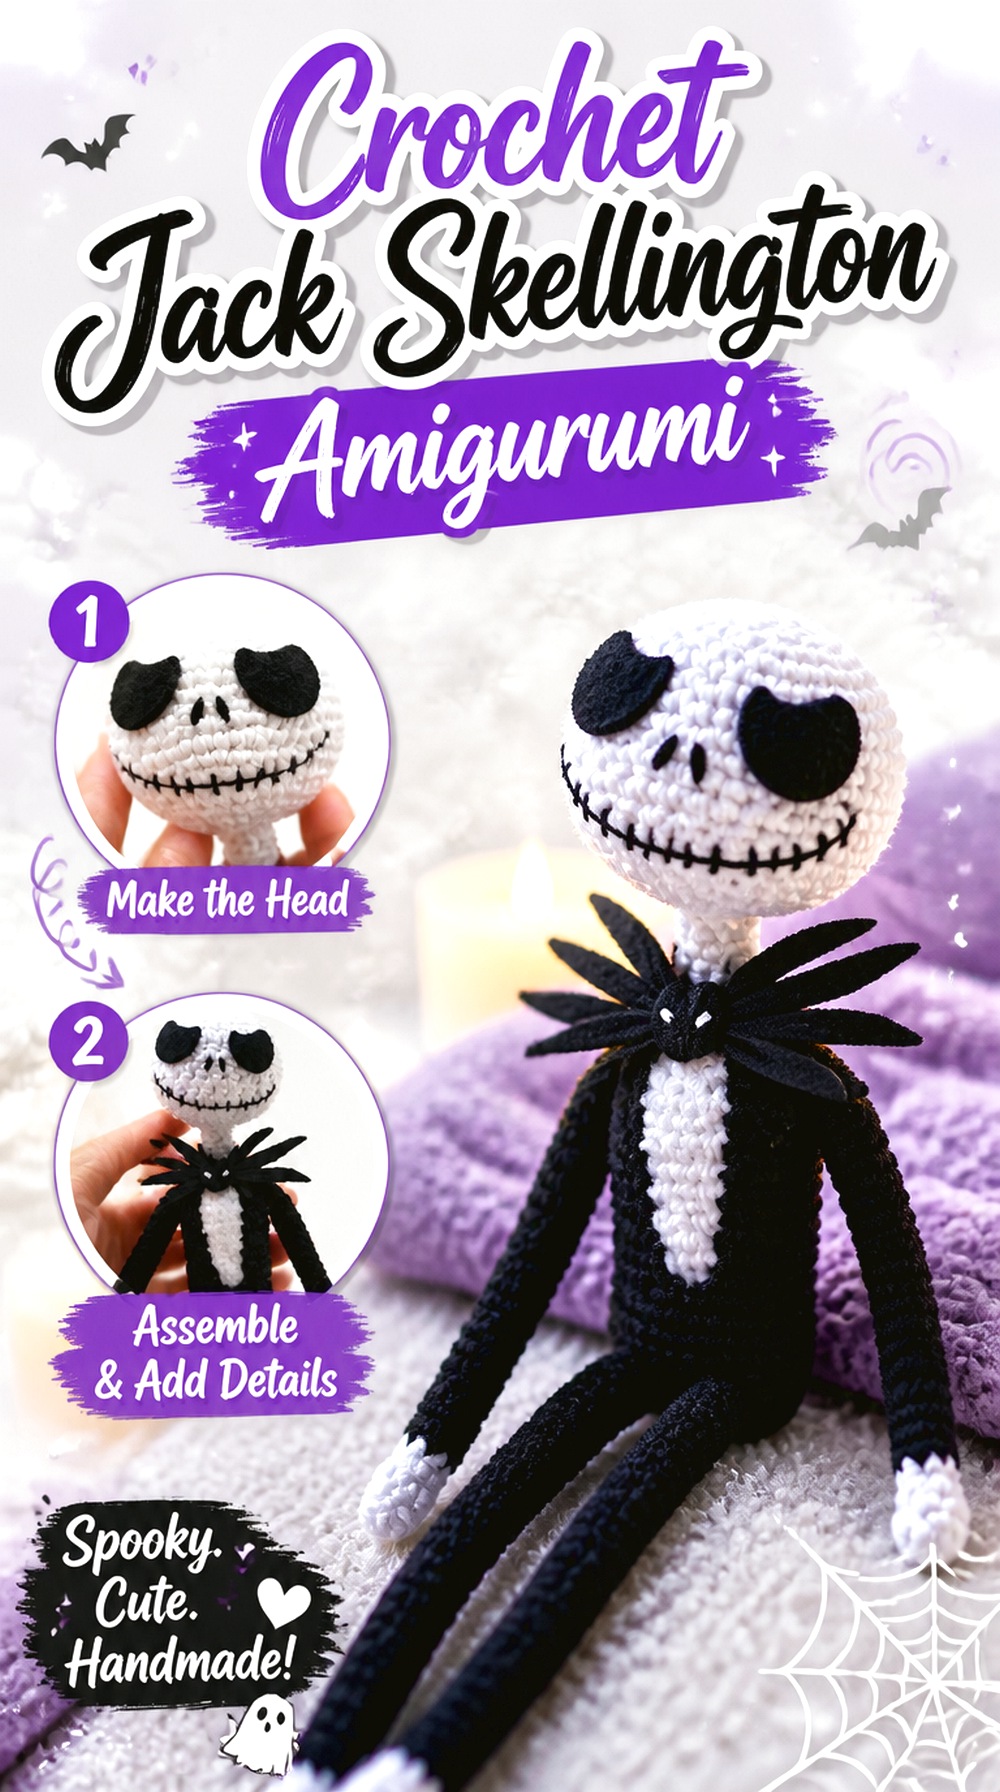
Azu Xolotl’s Jack Skellington tutorial is an option for crocheters who want a recognizable movie-inspired Halloween character rather than a generic monster. The long, stylized character proportions create a very different visual challenge from compact amigurumi.
Because the identity depends on shape and facial treatment, proportion is especially important. This is best treated as a display or fan project where the character itself is the focus. If you intend to sell finished pieces or use copyrighted character imagery commercially, do not assume a public crochet tutorial grants those rights; check the relevant creator terms and intellectual-property requirements separately.
Preserve the Deliberately Elongated Proportions
A stylized figure can look “wrong” if you unconsciously shorten narrow limbs or overstuff slender sections. Compare the developing silhouette with the finished result shown by the tutorial rather than judging it by normal doll proportions.
A High-Contrast Face Needs Careful Placement
Dark facial features on a light head attract immediate attention. Before securing them, check the expression from normal viewing distance rather than only close to your hands. Small positional changes can significantly alter a character with a minimal face.
Original Tutorial and Creator Credit
Creator: Azu Xolotl
26. Crochet Spider Earrings
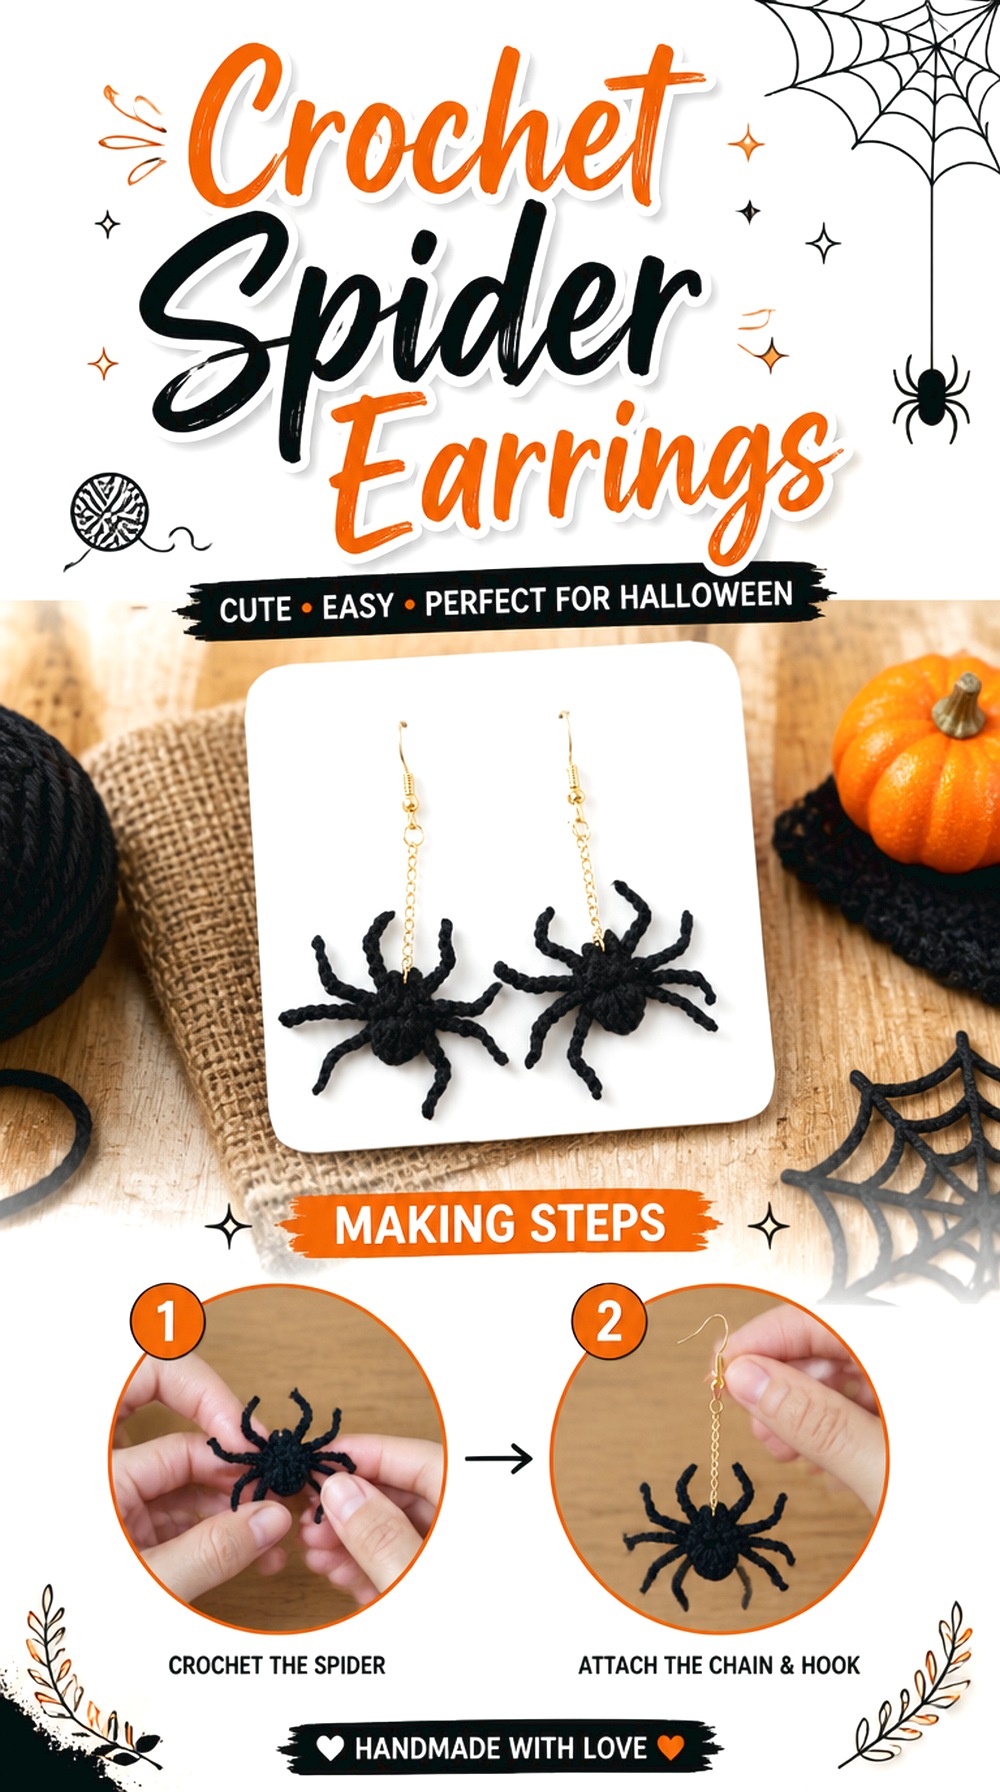
CriativaTube’s spider earrings take Halloween crochet into jewelry scale. That makes them fundamentally different from the large tarantula decoration: here, the spider has to remain recognizable without becoming so bulky that it overwhelms the wearer.
The tutorial also incorporates jewelry findings, so crochet is only one part of the finished object. This can be a fun option for party accessories, costume details, or small seasonal gifts. Before making several pairs, complete one earring first and assess its actual weight, movement, and scale against the ear.
Make the Pair Visually Consistent
Two handmade motifs do not need machine-perfect symmetry, but large differences in leg spread or body size become obvious when the earrings hang side by side. Compare the first and second spider frequently instead of waiting until both are attached to their findings.
Hardware Quality Is Part of the Project
An attractive crochet motif cannot compensate for rough, damaged, or unsuitable jewelry findings. Inspect hooks, rings, chains, and closures before assembly. Anyone with metal sensitivities should choose findings appropriate to their own needs rather than relying on appearance alone.
Original Tutorial and Creator Credit
Creator: CriativaTube
27. Crochet Pumpkin Pillow
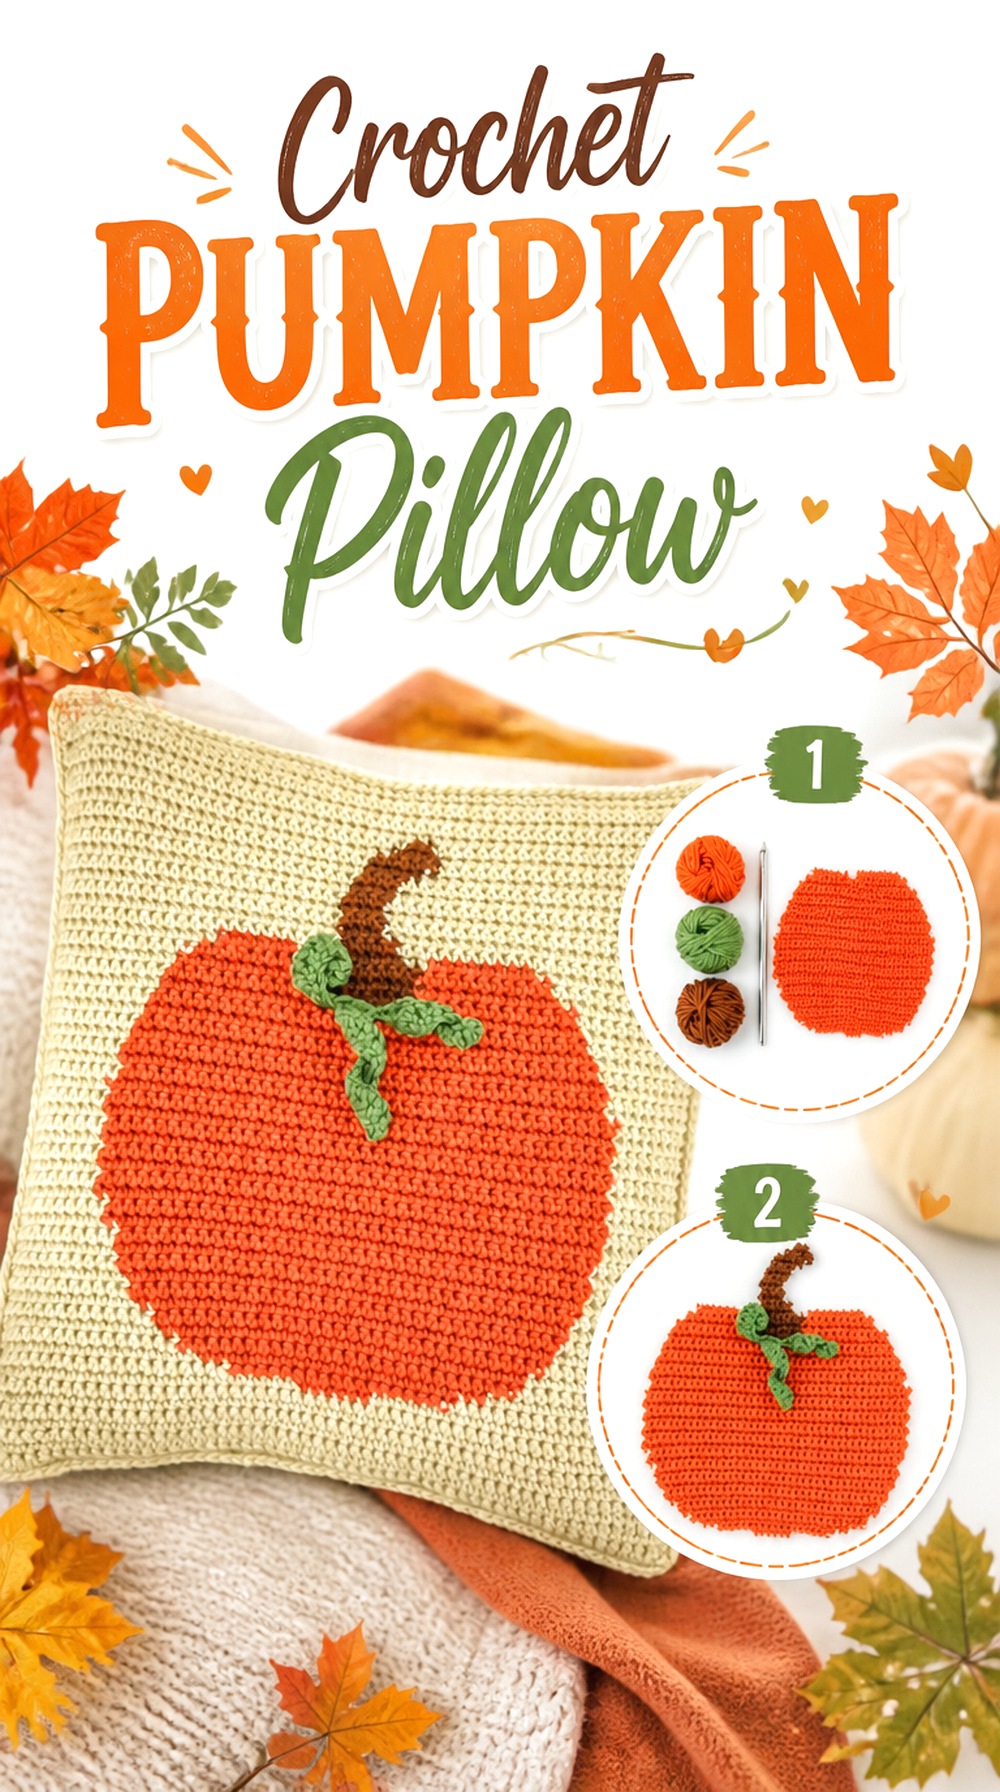
Jo to the World Creations scales the pumpkin theme up into a cushion, making this a much more substantial home-decor project than the small stuffed pumpkin earlier in the list. The shape reads as seasonal decor even without a jack-o’-lantern face, so it can stay in the room beyond Halloween.
A pillow also introduces comfort, insert or stuffing distribution, and furniture scale. Before choosing yarn solely for its autumn color, think about how the surface will feel if the cushion is actually used rather than only displayed.
Check the Shape From Across the Room
A pillow is viewed at a much larger scale than a keychain or coaster. Step back during assembly and evaluate whether the pumpkin outline remains clear. Slight irregularities that are invisible in your lap can become obvious once the cushion is sitting upright on a sofa.
Decorative Texture Can Affect Comfort
Strong ridges and raised details create the pumpkin look, but consider where the pillow will be placed. A highly dimensional surface may be better as a decorative accent than as a cushion someone regularly rests against.
Original Tutorial and Creator Credit
Creator: Jo to the World Creations
28. Crochet Oogie Boogie Hat
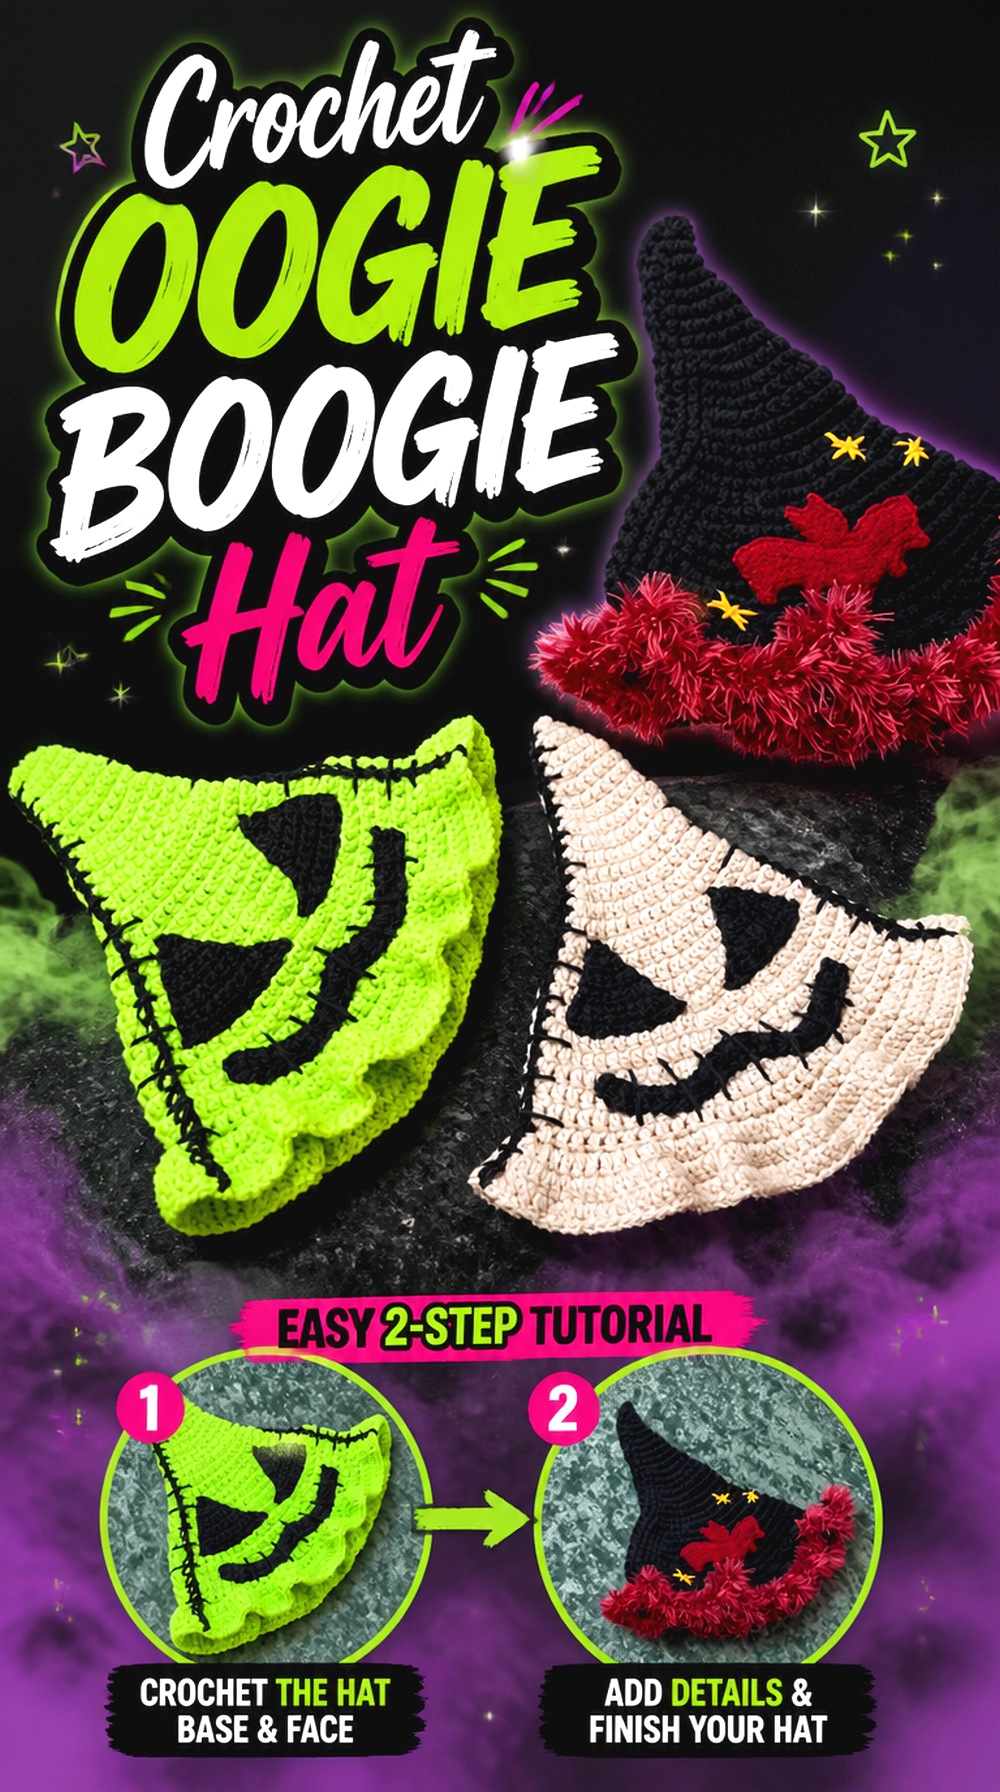
Stitchinwithliz’s Oogie Boogie-inspired hat combines a recognizable character with a functional wearable. Unlike the tall witch hat, it uses a conventional hat base as the foundation for character styling, which can make it easier to pair with a costume or casual Halloween outfit.
The source notes that changing yarn weight or hook size can alter the finished size, making fit an important checkpoint rather than an assumption. Character appliqués and facial details then need to remain visually balanced once the hat is curved around the head.
Confirm Hat Fit Before Adding the Face
Complete the main fit checks before investing time in decorative placement. A face positioned beautifully on an oversized or undersized hat does not solve the underlying problem. Try the hat in its intended wearing position, then determine where the front actually falls.
Curved Fabric Changes Appliqué Placement
Character features laid on a flat hat can shift visually once the fabric wraps around a head. Pin appliqués temporarily, put the hat on, and view it in a mirror from the front and side before sewing everything permanently.
Original Tutorial and Creator Credit
Creator: Stitchinwithliz
29. Crochet Reversible Vampire and Bat Doll
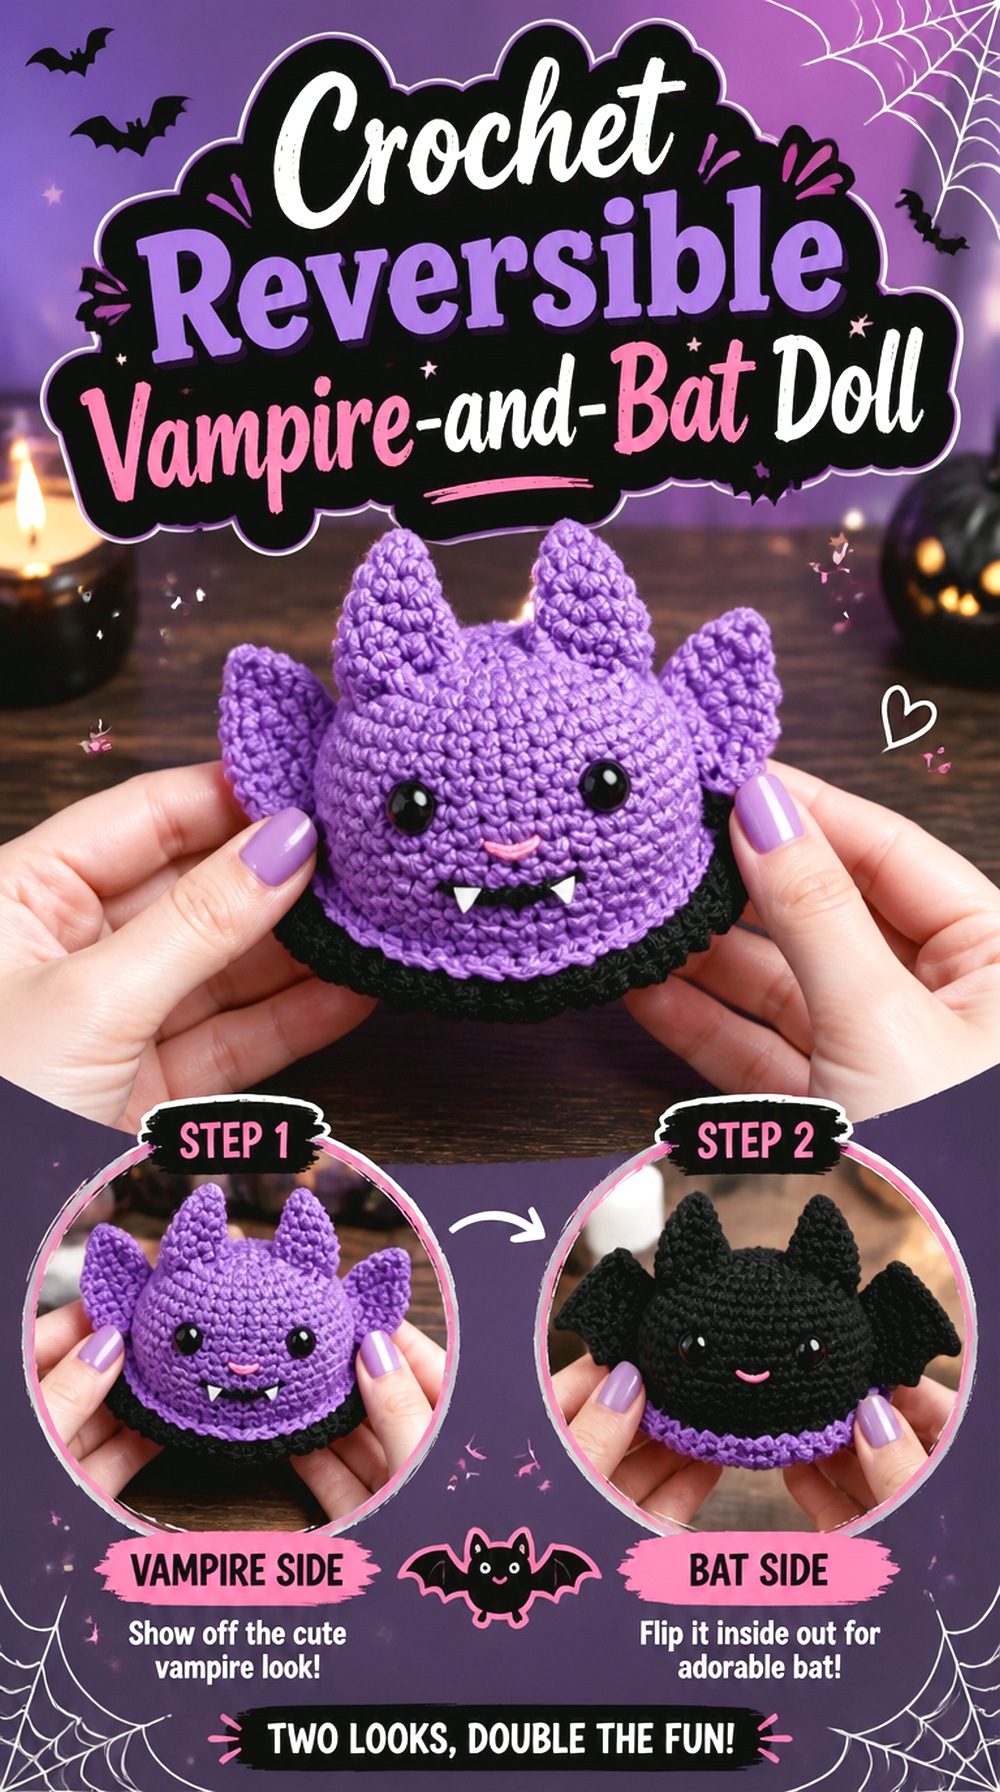
Heart and Craft Crochet’s reversible project stands out because one object transforms between two Halloween identities. Rather than displaying a separate vampire and bat, the construction is designed so the doll can flip from one character to the other.
That makes it one of the more interactive projects in the roundup and a strong conversation piece for a shelf or Halloween display. It also means finishing deserves extra attention: both sides matter, and details that would normally be hidden inside a conventional doll may affect how smoothly the transformation works.
Judge Both Characters Before Finalizing Details
Do not evaluate the project from only its vampire-facing position. Flip it repeatedly while working and compare the balance of both forms. A feature that looks well placed in one configuration can become bulky or distracting when the doll is reversed.
Keep the Reversible Movement Unobstructed
Extra embellishments may be tempting, but they can interfere with the design’s primary feature. Before adding anything beyond the tutorial, check whether it catches, bunches, or prevents the fabric from turning cleanly.
This Works Best Where People Can Handle It
A reversible doll communicates its design most clearly when viewers can see both forms. On a high shelf, the transformation may be lost. A lower seasonal display or tabletop placement makes the dual-character construction easier to appreciate.
Original Tutorial and Creator Credit
Creator: Heart and Craft Crochet
30. Crochet Filet Halloween Treat Bag
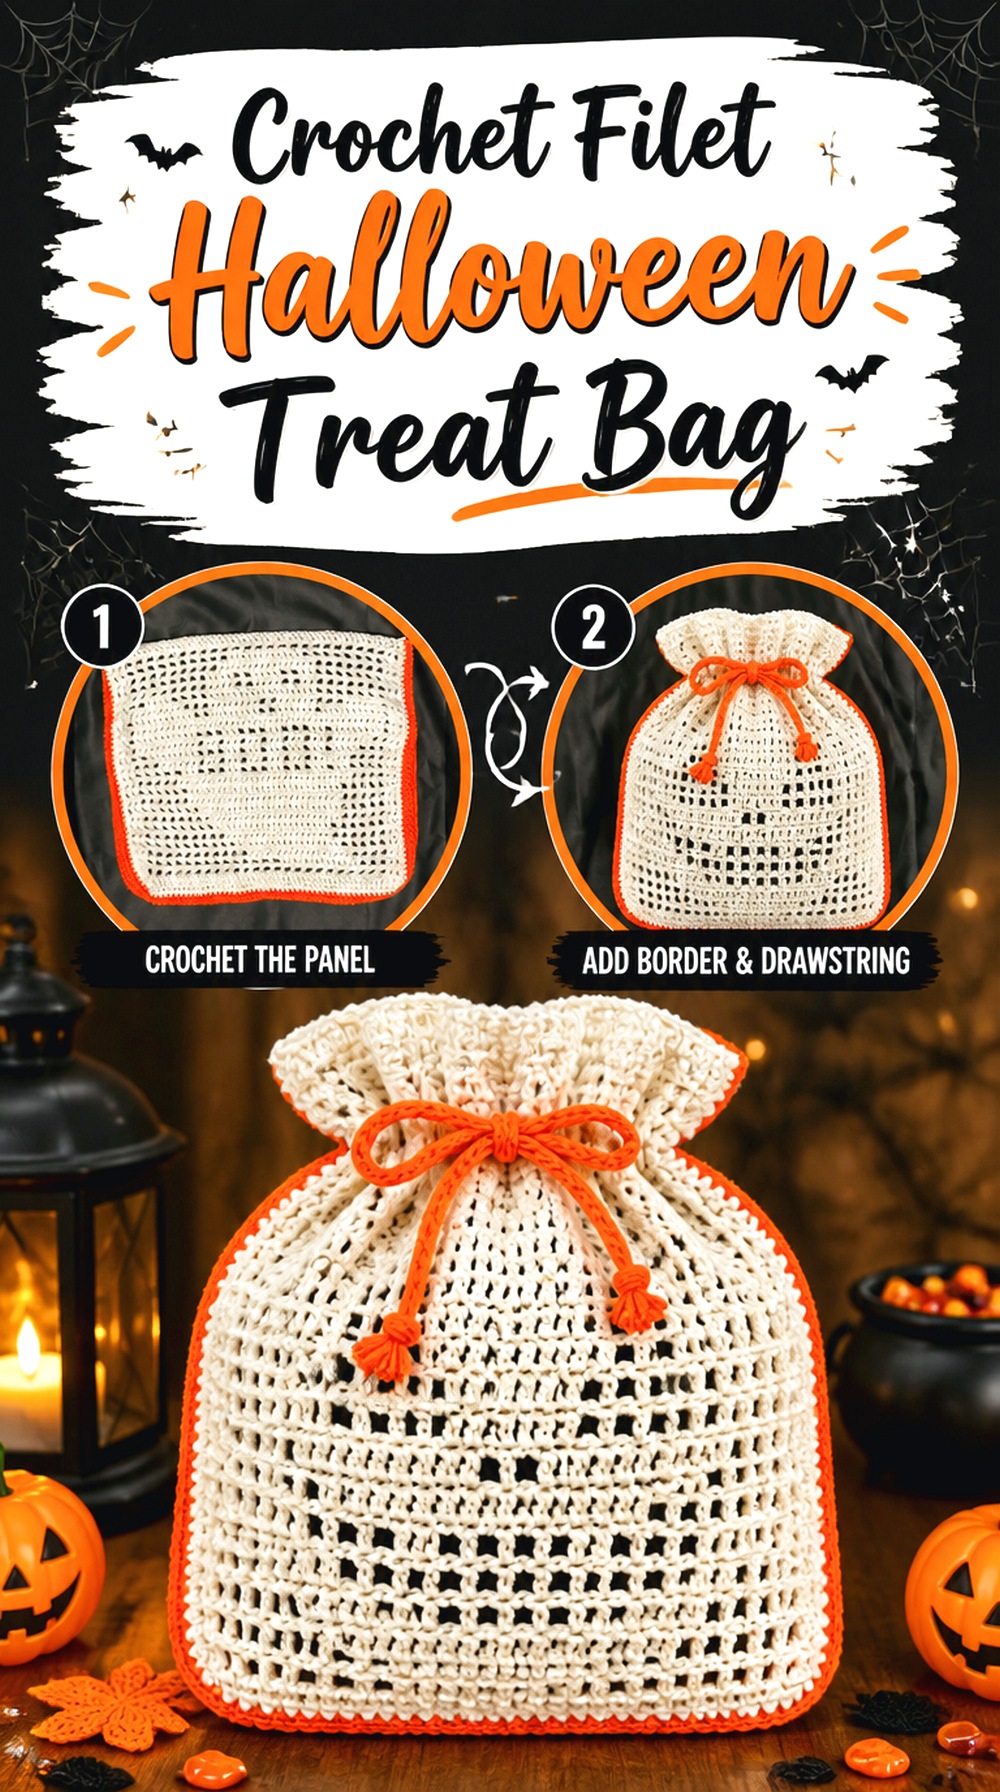
Crochet with Lisa’s treat bag uses filet crochet to build Halloween imagery through the relationship between open and solid areas of the fabric. The source includes multiple motif choices, including Halloween imagery such as a jack-o’-lantern, black cat, ghost, and moon-and-stars option.
That makes the finished bag flatter and more graphic than the ghost-shaped carrier earlier in the article. It is a particularly interesting choice if you enjoy picture-based fabric but do not want to attach separate appliqués after making the main bag.
Filet Images Need a Clear Viewing Background
Because open spaces form part of the graphic, the contents behind the panel can affect readability. Before deciding on a color, hold a swatch against several backgrounds. A motif that looks crisp on an empty bag can become less obvious when patterned contents show through.
Consider Whether Small Contents Need a Lining
Open filet areas are part of the design, but they also change containment. If you intend to carry small objects rather than larger wrapped treats, determine whether a lining is appropriate. A lining will also change the visual contrast behind the motif, so choose it as part of the design rather than as an afterthought.
Handle Stretch Still Matters
Even when the decorative technique gets most of the attention, the tote still has to be carried. Check how the creator constructs the handles and opening, and be cautious about yarn substitutions that are substantially stretchier.
Original Tutorial and Creator Credit
Creator: Crochet with Lisa
31. Crochet Witch Appliqué Granny Square
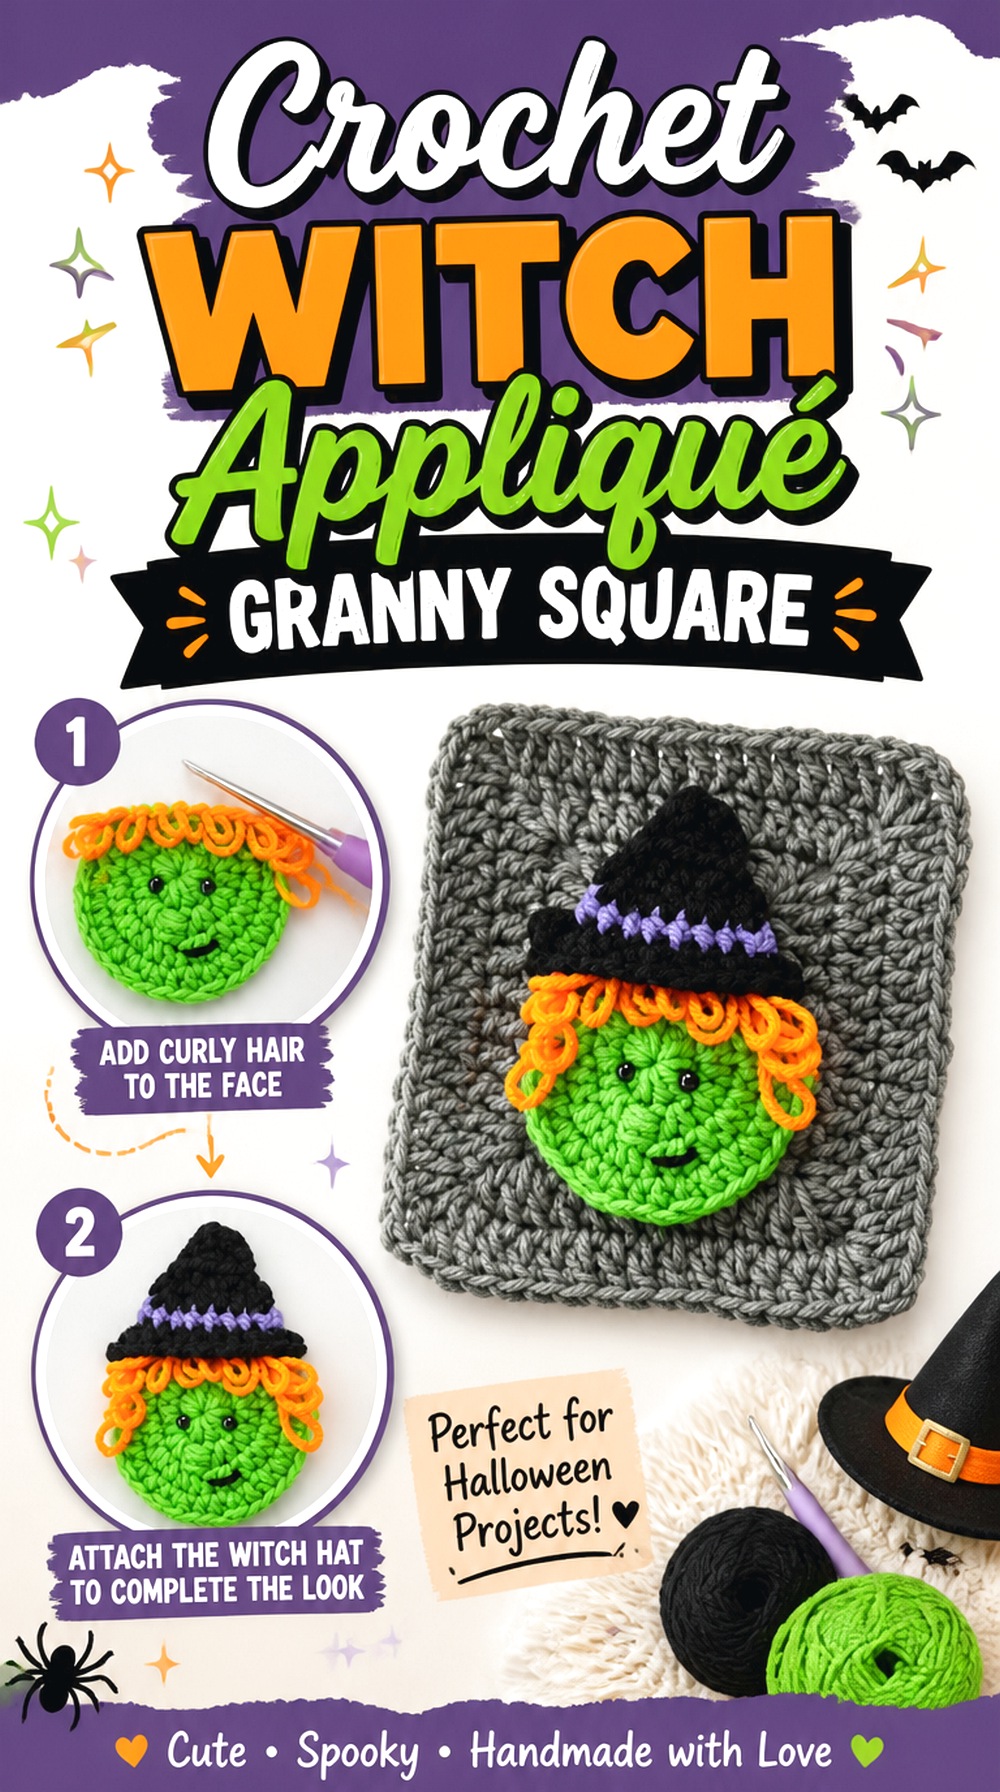
Maria’s Blue Crayon combines a witch appliqué with a granny-square framework, giving the roundup a motif that can become one unit in a larger Halloween textile. It differs from the skull and ghost squares because the character effect is built through an appliqué-focused treatment rather than relying on exactly the same visual construction.
One square could become a small accent, but the format makes the most sense when you are thinking about a bag, cushion, blanket, or other modular piece. The biggest planning issue is not the witch alone—it is whether the finished square will integrate cleanly with the other motifs you choose.
Match Blocked Dimensions Before Joining
If you combine this witch design with skulls, ghosts, or plain filler squares, compare their blocked measurements first. Even small differences can accumulate across a multi-square panel. A border adjustment may sometimes help compatibility, but do not assume one creator’s square is interchangeable with another without checking.
Leave Enough Space Around the Witch
A detailed motif can feel crowded when seams or borders sit too close to the figure. Lay out the finished square with neighboring motifs before joining and make sure the witch remains readable once the seam area is visually occupied.
Original Tutorial and Creator Credit
Creator: Maria’s Blue Crayon
Which Halloween Crochet Idea Should You Choose?
For something small and repeatable, start with the bat appliqué, pumpkin keychain, candy corn, eyeball coaster, or spider earrings. If you want a seasonal centerpiece, the pumpkin pillow, Halloween cauldron, character garland, or larger ghost plushie has more visual impact.
For functional projects, compare the ghost bag, character tote, filet treat bag, and cobweb storage hammock according to what you actually need to carry or store. The witch hat, spiderweb bandana, Oogie Boogie hat, and spiderweb sweater make more sense when wearing Halloween crochet is the goal.
For a longer modular project, the skull, ghost, and witch granny squares give you room to build a coordinated textile rather than one standalone object.
Conclusion
The most useful Halloween crochet project is the one whose construction suits its final job. Choose a compact motif when you want flexible decorating options, amigurumi when a dimensional character matters, a structured bag when function comes first, or a wearable when fit and drape are part of the appeal.
The 31 ideas here range from understated fall pumpkins to spiderweb clothing and recognizable Halloween characters, so you do not have to build an entire seasonal collection around one style. Once you choose a project, use the credited original tutorial for the creator’s exact stitches, shaping, assembly, and finishing details.
Frequently Asked Questions
What are the most practical Halloween crochet projects to make?
Bags, coasters, pillows, keychains, storage pieces, and wearables continue to have a function beyond being displayed. That does not automatically make them better than amigurumi or garlands; it simply gives them a different purpose. Decide whether you want the project to be carried, worn, used around the home, or brought out purely as seasonal decor before comparing tutorials.
Which Halloween crochet ideas are easiest to adapt into a larger project?
Flat appliqués and granny squares usually give you the most layout flexibility because they can become components of bags, cushions, blankets, garments, and wall pieces. The important checkpoint is compatibility. When mixing motif designs from different tutorials, compare blocked dimensions, edge counts, density, and orientation before joining rather than assuming every “granny square” will fit another perfectly.
Should Halloween amigurumi use safety eyes?
That depends on the project’s intended recipient and the specific components. Safety eyes are common in amigurumi, but their name should not be treated as a universal guarantee of suitability for every child or pet context. For items intended for very young children or situations involving rough unsupervised handling, consider secure embroidered features and follow relevant product-safety guidance for the intended use.
What yarn is best for Halloween crochet decor?
There is no single best fiber for all 31 types of projects. Firmer, well-defined fabric can help bags, baskets, motifs, and shaped decor retain their appearance, while wearables may benefit from more drape and softness. Amigurumi generally needs sufficiently dense fabric to contain stuffing cleanly. Always check the tutorial’s materials before substituting because changing yarn thickness or fiber behavior can affect scale and structure.
Can I combine different Halloween granny-square tutorials in one blanket or bag?
Yes, but treat compatibility as something to verify rather than assume. Make and block sample squares, then compare their finished dimensions. Also inspect edge behavior, motif direction, and fabric thickness. If one skull or witch square is significantly denser than the surrounding pieces, the assembled panel can pull unevenly even when the overall width looks similar.
How should Halloween crochet decorations be stored after the season?
Clean them according to the yarn’s care requirements before storage and make sure they are completely dry. Avoid crushing structured hats, stuffed figures, or dimensional details under heavier decorations. Flat motifs and garlands can usually be layered or loosely rolled, while plush pieces benefit from enough room to retain their shape. Remove detachable hardware when that makes storage safer and prevents snagging.
Can I sell finished Halloween crochet items made from these tutorials?
Do not assume that access to a public tutorial automatically grants permission for every commercial use. Check each creator’s stated terms regarding finished-item sales and attribution. Projects based on recognizable copyrighted or trademarked characters can raise separate intellectual-property considerations beyond the crochet pattern itself, so commercial sellers should verify those rights independently rather than relying only on the tutorial description.