Crochet can change wired headphones in several very different ways. You can work yarn directly around an earphone cable, make a removable cord keeper, store earbuds in a small pouch, cover round or oval ear pads, or add decorative pieces to a full headset. The useful choice depends less on color and more on which part of the headphones you want to change.
This collection separates those functions so you can compare them before starting. Some tutorials were made specifically for wired earphones or office headsets, while a few cup-cover tutorials demonstrate wireless models whose shapes may also suit certain wired headphones. For those adaptations, check the cable jack, controls, hinges, vents, and cup dimensions before assuming the cover will fit.
Quick List
- Crochet Full-Length Anti-Tangle Earphone Wire Wrap
- Crochet Fine-Cotton Earphone Cable Sleeve
- Crochet Textured Earphone Cord Cover
- Crochet Flower Cable Keeper for Wired Headphones
- Crochet Tunisian Earphone Storage Pouch
- Crochet Round Ear-Pad Covers for Wired Headphones
- Crochet Oval Ear-Cup Covers for Wired Headphones
- Crochet Plantronics Blackwire Headset Covers
- Crochet Multi-Brand Work Headset Covers
- Crochet Lightweight Cotton Headphone Covers
- Crochet Minimal Everyday Headphone Covers
- Crochet Fitted Beats-Style Headphone Covers
- Crochet Cat-Ear Headphone Band Cover
- Crochet Meadow Appliqué Headphone Covers
Decide Which Part of the Wired Headphones You Want to Crochet
A cord wrap, cable keeper, storage pouch, and ear-cup cover solve different problems. Crochet worked directly around a wire stays with the headphones and can make the cable easier to distinguish from other cords, but it also adds thickness along the cable. A removable keeper bundles the cord without permanently covering it, while a pouch keeps the whole earphone set contained when it is not in use.
Headset covers are a separate fit problem. Round ear pads, elongated oval cups, small office-headset earpieces, and adjustable consumer headphones do not use interchangeable shapes. Before choosing one of those projects, look at the actual area the crochet must grip and identify any cable entry, microphone arm, hinge, adjustment track, control, or opening that needs to remain exposed.
Fit and Yarn Matter More Than a Universal Headphone Size
There is no single useful “headphone cover size.” Even two similarly sized headphones can differ at the edge where a crochet cover needs to hold. Round pads usually need different shaping from oval cups, while small work-headset earpieces may have microphone hardware or rotating joints immediately beside the pad.
Yarn also changes the result. Finer yarn can keep a cable treatment or ear-pad cover relatively low profile, while a thicker fabric may add more noticeable bulk. Cotton appears in several of the sourced tutorials, but that does not mean one fiber is universally right for every headset. Compare the tutorial’s demonstrated headphone shape with your own device, then consider whether you want a firm, defined surface or a softer treatment with more give.
Keep Plugs, Controls, and Moving Hardware Accessible
A decorative cover should not make the headphones harder to operate. On wired earbuds, keep the plug, strain relief, Y-splitter, inline microphone or remote, and earpiece connections accessible rather than burying them under crochet. Avoid forcing the cable into a sharp bend just to keep stitches or a cord keeper in place.
For full headsets, check the cable entry before fitting an ear-cup cover. Leave hinges, sliders, boom microphones, buttons, and other moving parts free to operate. If a cover changes how an ear pad sits against your head, test comfort and listening performance rather than assuming the extra layer has no effect. Removable accessories also have an advantage when cleaning is important because they can be cared for separately from the electronics.
1. Crochet Full Length Anti Tangle Earphone Wire Wrap
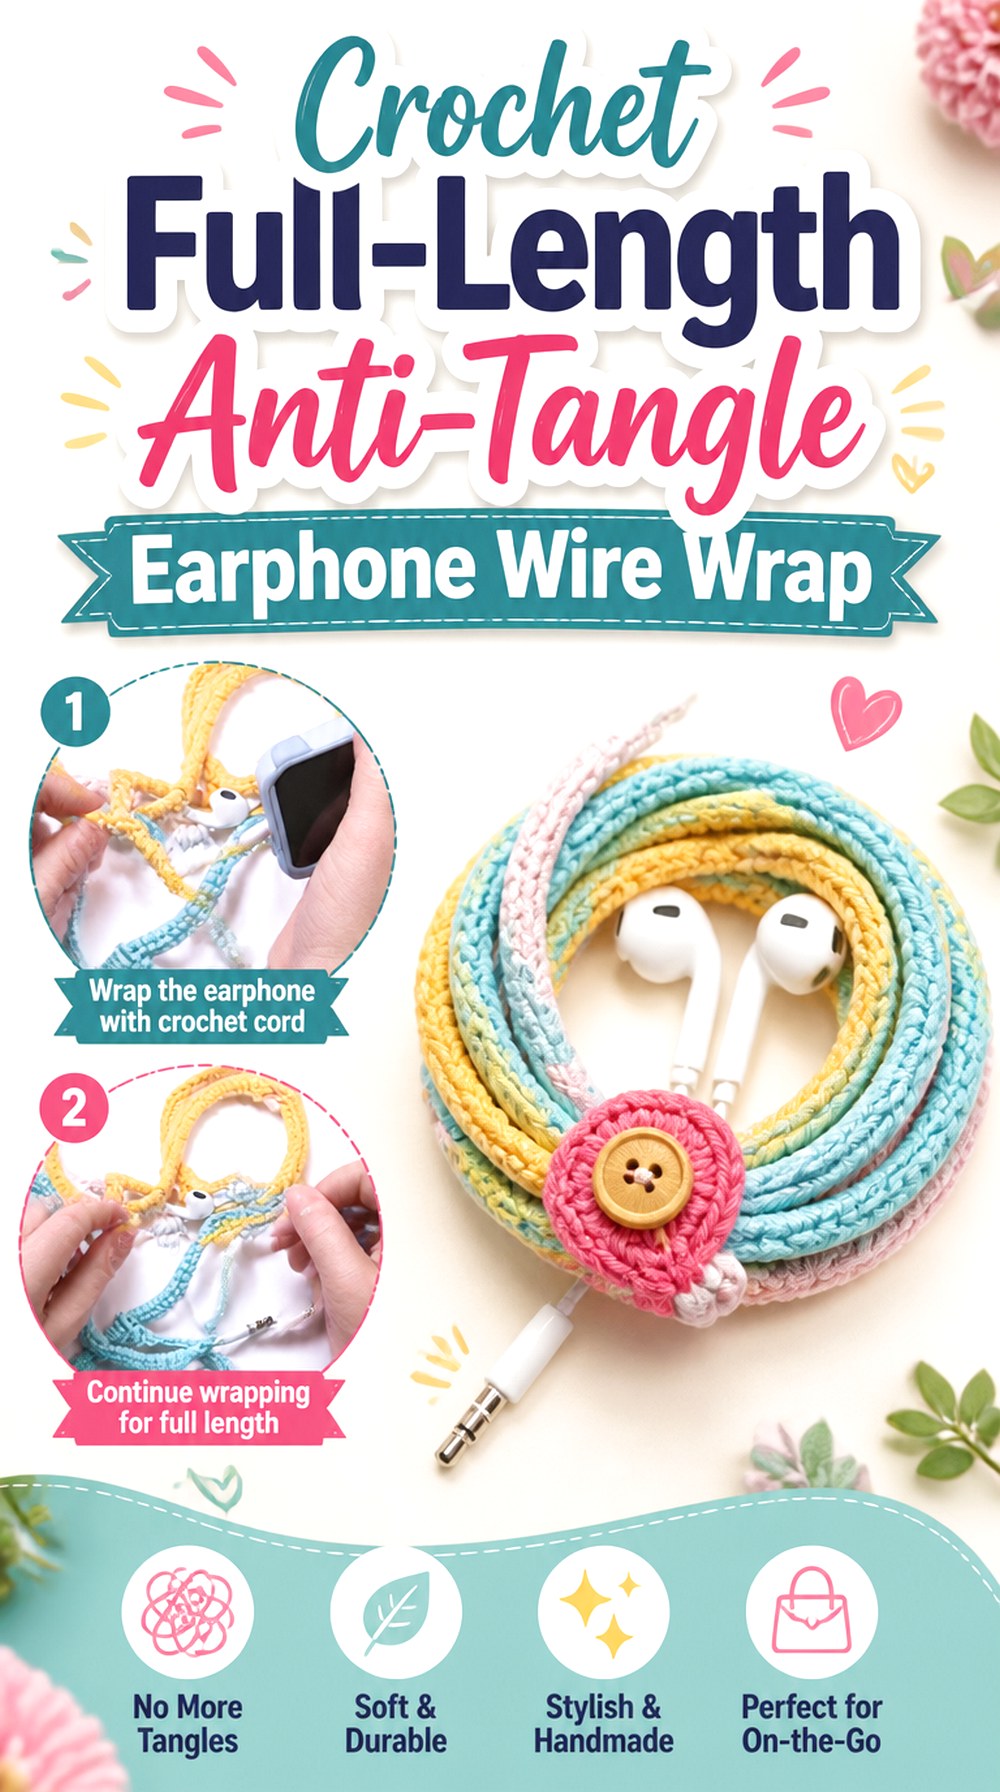
This idea turns the earphone cable itself into the crochet surface. The Crochet Crowd demonstrates crochet worked around the wire, creating a continuous yarn-covered cable intended to help with tangling. Visually, it is much closer to a permanent cable makeover than a separate case or organizer.
It suits readers who want the crochet to stay with their wired earphones rather than carrying another accessory. The important planning question is where the covering should stop. The plug, Y-splitter, inline controls, strain-relief sections, and connections close to the earbuds may all need more freedom than the long straight portions of cable.
A Continuous Wire Wrap Needs Natural Flex
A cable still needs to bend during ordinary use and storage. Avoid treating maximum stitch tightness as the goal; a covering that forces the wire into a rigid curve defeats the purpose of having a flexible earphone cable. As you assess the result, allow the covered cord to lie naturally rather than pulling the crochet straight and judging fit only under tension.
Stop Before Functional Cable Components
Map the cable before beginning. If your earphones include an inline microphone, remote, splitter, or unusually long strain-relief section, plan separate stopping points around those components. Keeping them uncovered makes controls easier to find and prevents decorative crochet from interfering with the places where the cable changes thickness.
Original Tutorial and Creator Credit
Creator: The Crochet Crowd
2. Crochet Fine Cotton Earphone Cable Sleeve
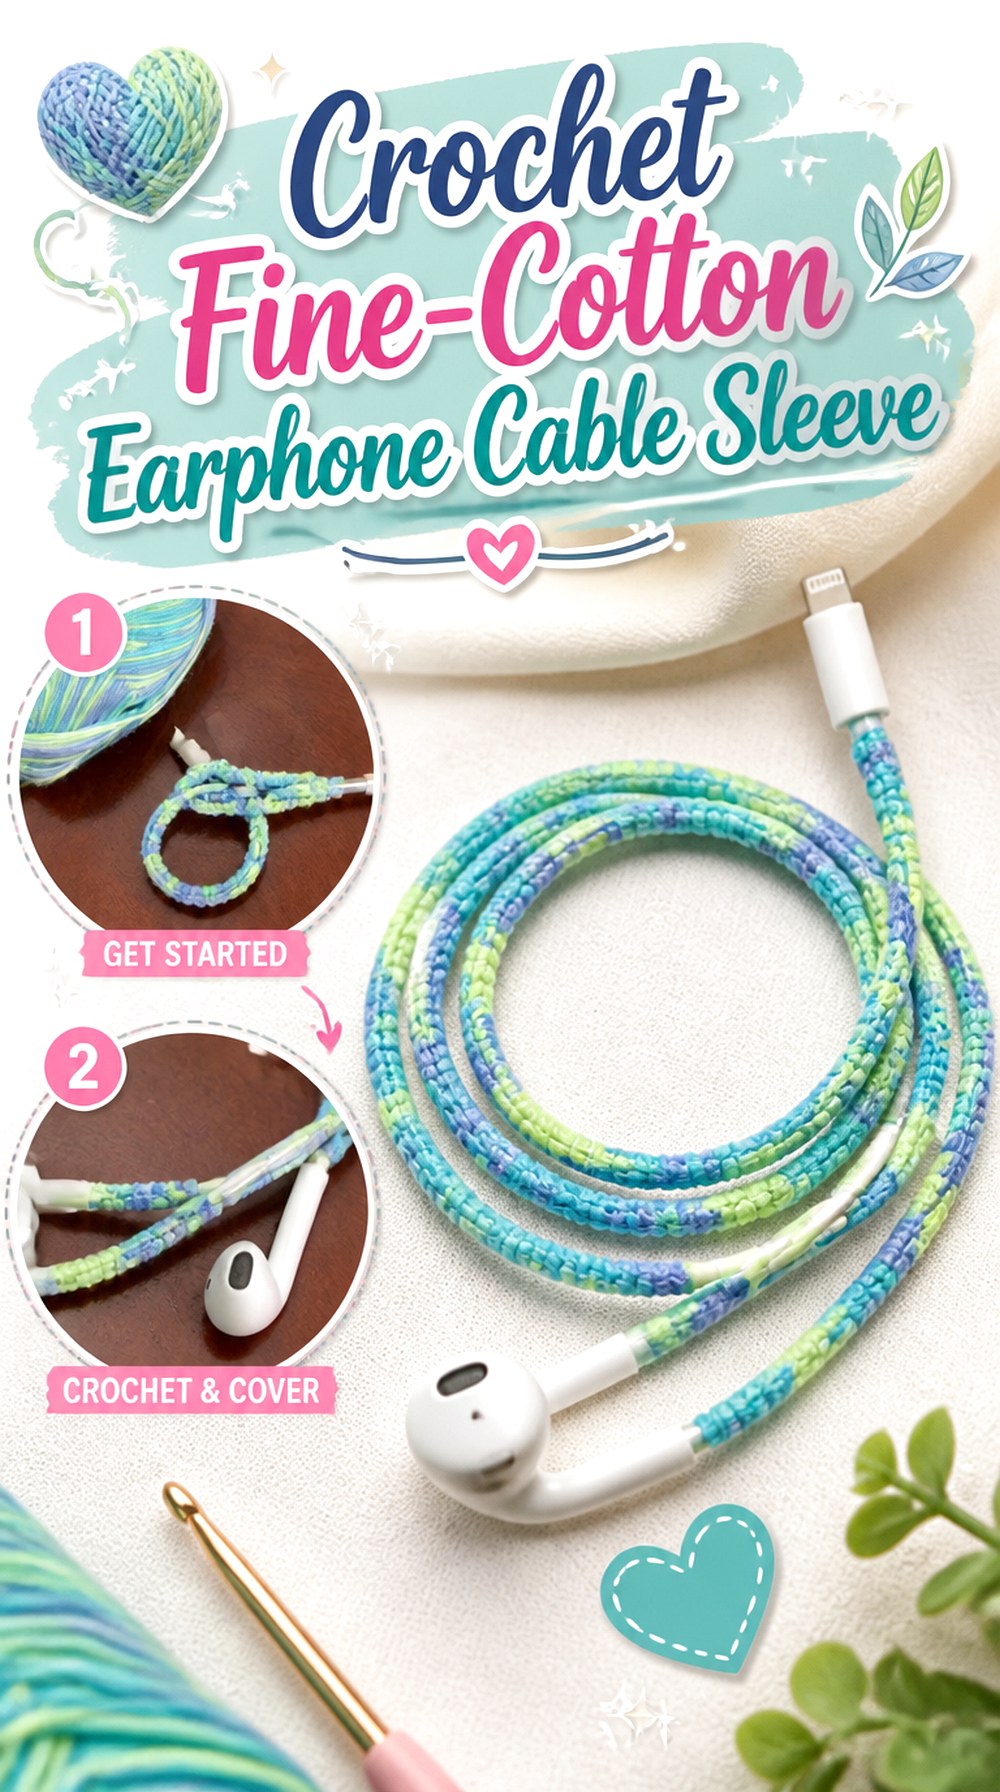
Crochet Kalakar’s tutorial offers another direct-on-the-wire approach, but its listed materials include cotton yarn and a small hook, making it a useful reference when you prefer a finer-looking treatment rather than a visually bulky cord cover.
This concept works well when the cable itself is meant to remain the focus instead of becoming a large decorative accessory. Because earphones split into left and right branches, consistency matters: visibly different tension or yarn build-up on each side can make the finished pair look unbalanced even when both sides remain functional.
Fine Yarn Can Keep the Cable Profile Controlled
A finer yarn gives you more opportunity to cover a narrow cable without making every section look oversized. That is especially relevant above the Y-splitter, where two thinner branches run toward the earbuds. Before committing to the whole cord, compare a short covered section with the uncovered cable and decide whether the added diameter still feels comfortable to handle.
Balance Both Earbud Branches Visually
Once the cable divides, treat the two sides as a pair. If you change color, texture, or coverage length, decide whether those changes should mirror each other. Symmetry is not required, but making the choice deliberately creates a cleaner result than discovering at the end that one branch has much denser or longer crochet than the other.
Original Tutorial and Creator Credit
Creator: Crochet Kalakar
3. Crochet Textured Earphone Cord Cover
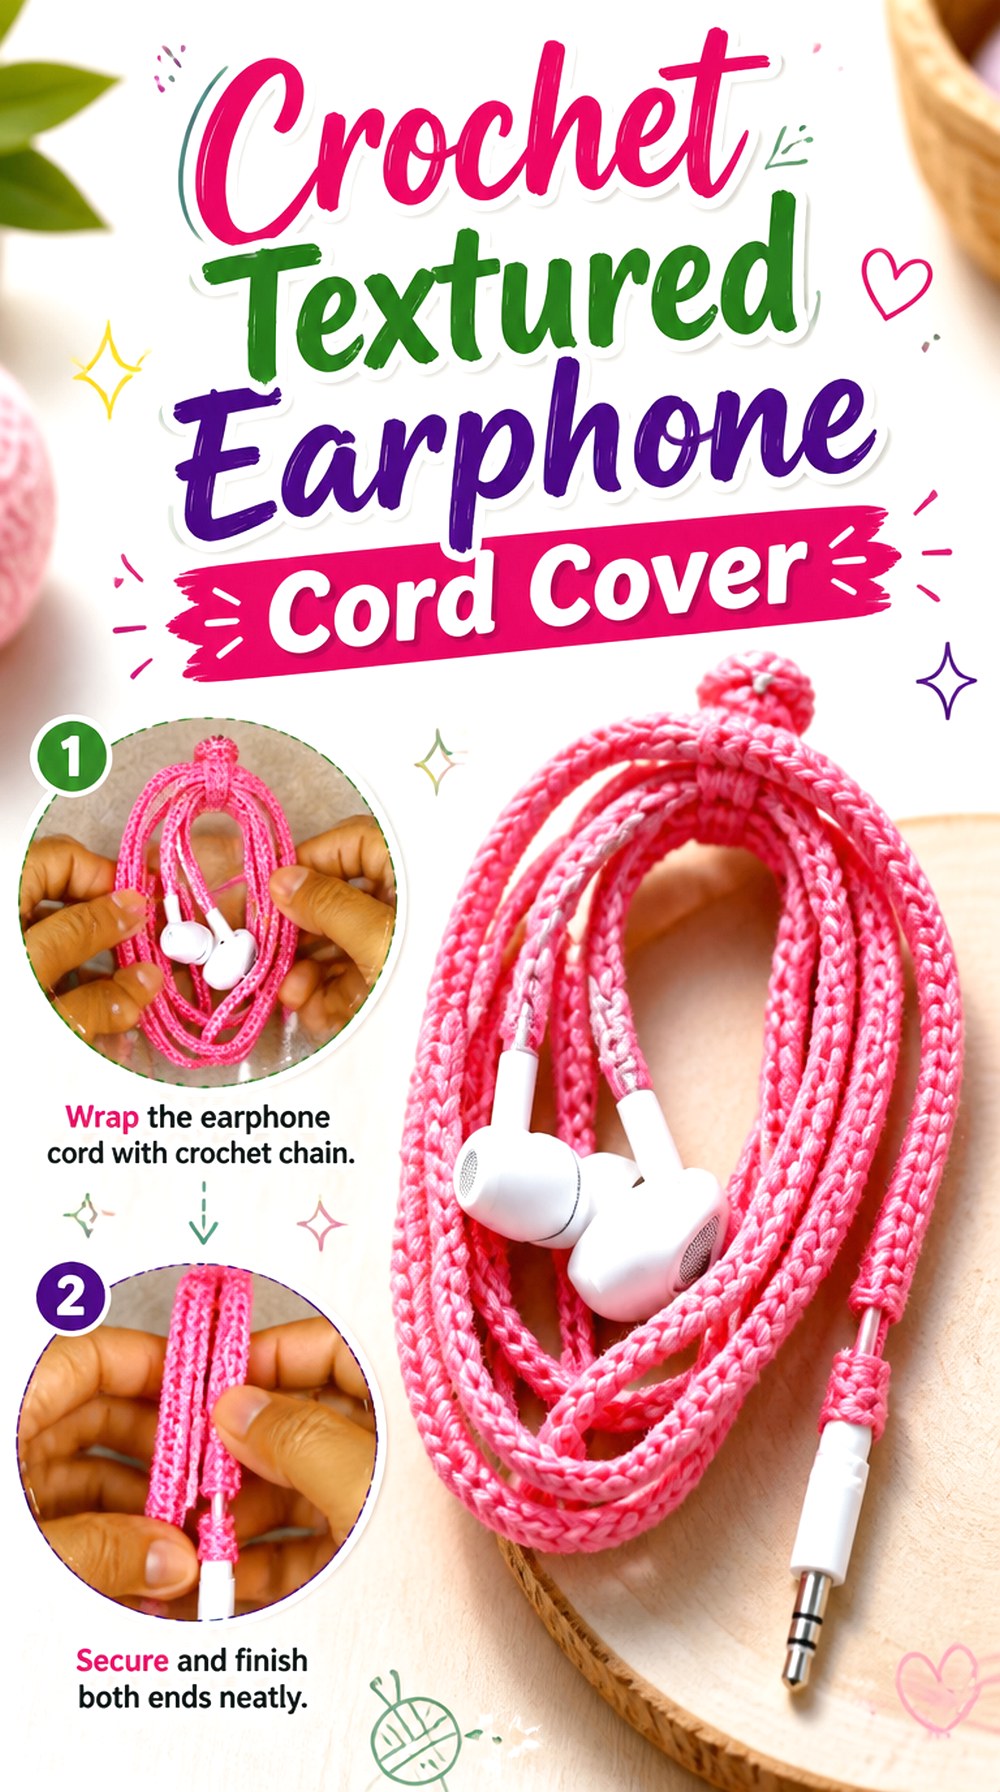
Crochet Bucket’s earphone cord tutorial gives the same general cable-covering category a more decorative direction. Its published stitch abbreviations include several stitch types rather than presenting the project as a single uniform surface, making it a useful source when texture is part of the appeal.
Compared with the first two ideas, this option makes more sense when you want the covered cord to read as visible crochet rather than simply as a neat yarn skin. The trade-off is that pronounced texture can catch more easily on bag contents or other cords, so the finished surface should still suit how you normally carry your headphones.
Texture Is Most Useful When It Stays Manageable
Decorative height along a cord can create visual interest, but more projection is not automatically better. If your headphones spend most of their time in a crowded bag or pocket, pay attention to loops or raised sections that could snag. A smoother lower section near the plug can also be practical where the cable is handled frequently.
Give the Splitter Room to Move
The point where one cable becomes two is already a structural transition. Avoid crowding it with extra bulk simply to continue a decorative repeat without interruption. Leaving enough room around the splitter lets the two earbud branches fall naturally and makes it easier to inspect the cable if wear develops later.
Original Tutorial and Creator Credit
Creator: Crochet Bucket
4. Crochet Flower Cable Keeper for Wired Headphones
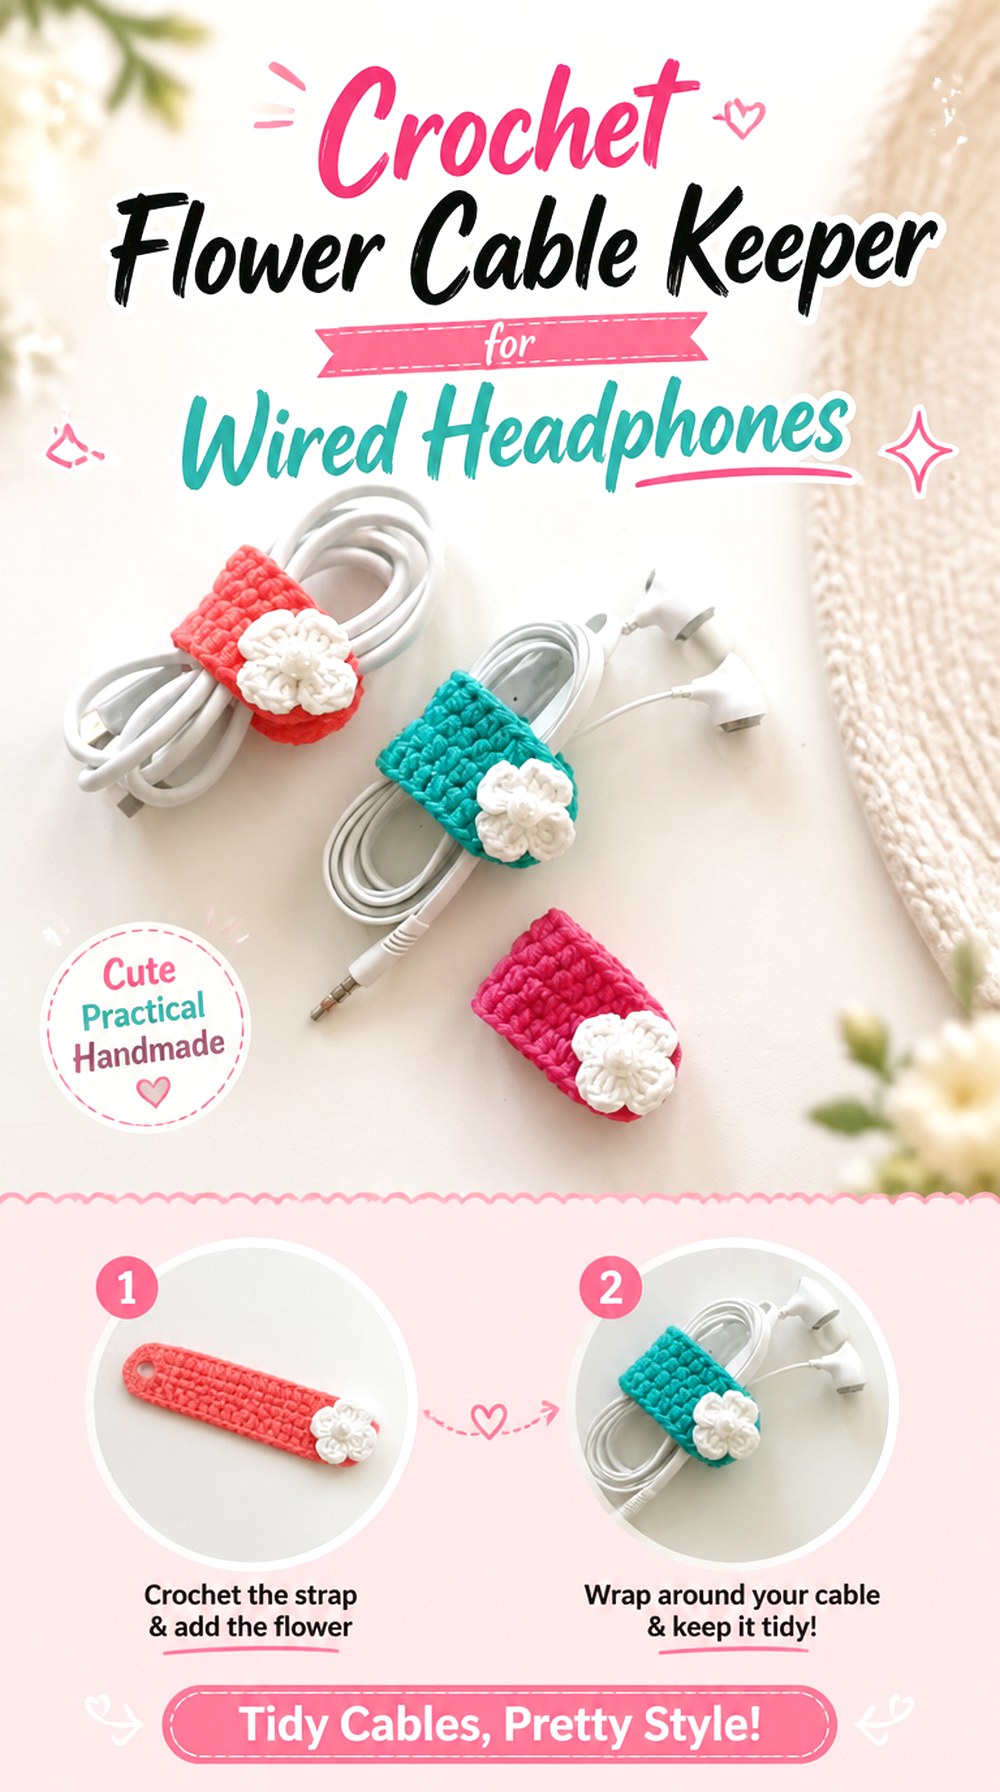
Instead of crocheting onto the cable, this project creates a separate organizer. Calm stitches presents a crochet cable keeper with a decorative flower, designed for cords such as headphones and charging cables.
That removable format is the main advantage. You can use the wired headphones normally without extra yarn running along the cable, then coil the cord and secure it when storing. It is also easier to replace or wash a separate keeper than a covering attached directly to a wire. The flower gives the organizer a recognizable decorative face, but practical fit still depends on how much cord you bundle.
Removable Organization Preserves the Bare Cable
Choose this type if you like crochet storage but do not want to permanently alter the feel of the headphone wire. The keeper only needs to work during storage. That makes it particularly useful for headphones with several controls, splitters, or connectors that would make a continuous crochet sleeve inconvenient.
Coil the Cord Without Pulling It Tight
A keeper should contain the cable, not force it into the smallest possible bundle. Make relaxed loops and let the organizer close around them without sharply folding the plug end or strain-relief areas. If the keeper only closes when the cable is compressed hard, adjust the bundle rather than pulling more strongly on the cord.
Original Tutorial and Creator Credit
Creator: Calm stitches
5. Crochet Tunisian Earphone Storage Pouch
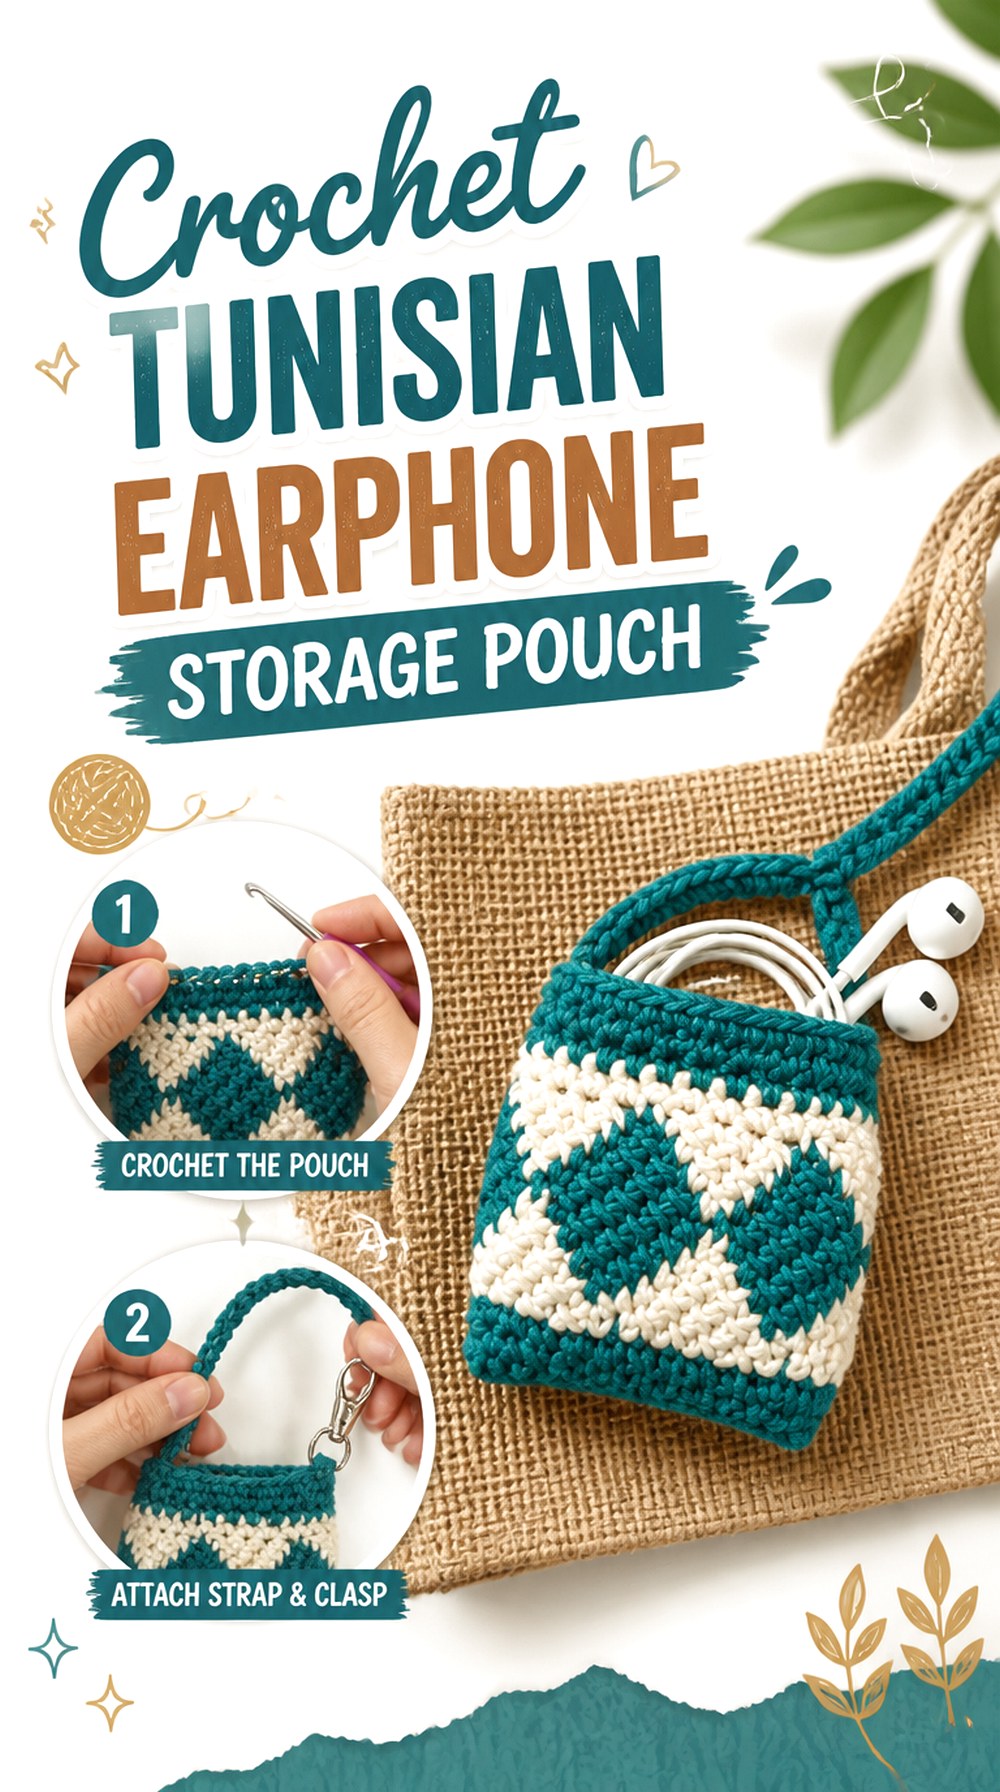
A pouch changes the goal from decorating the cable to protecting organization during storage. TSUMUGI かぎ針編み🧶 demonstrates an earphone pouch using an Afghan/Tunisian crochet approach, giving this collection a more structured storage option rather than another wire treatment.
This format can keep the earbuds, cable, and plug together as one item when they are not being worn. It also keeps the cable from mixing freely with keys, pens, or other small objects in a bag. Because wired earphones vary in cable length and plug shape, check the finished pouch against the way you naturally coil your own pair instead of packing the cable more tightly just to make it fit.
Pouch Capacity Should Follow Your Normal Coil
Before choosing a pouch size, loosely coil the wired headphones the way you normally store them and look at the resulting bundle. That gives you a more useful reference than measuring only the earbuds. A pouch that fits the earpieces but requires the cable to be sharply folded will not solve the storage problem well.
An Attachment Point Changes Where the Pouch Lives
A small pouch can be more useful when it has a clear place to stay rather than floating loose in a larger bag. If you adapt the idea with a loop or attachment feature, consider whether it will hang inside or outside your bag and whether the wired headphone plug remains contained rather than dangling freely.
Original Tutorial and Creator Credit
Creator: TSUMUGI かぎ針編み🧶
6. Crochet Round Ear Pad Covers for Wired Headphones
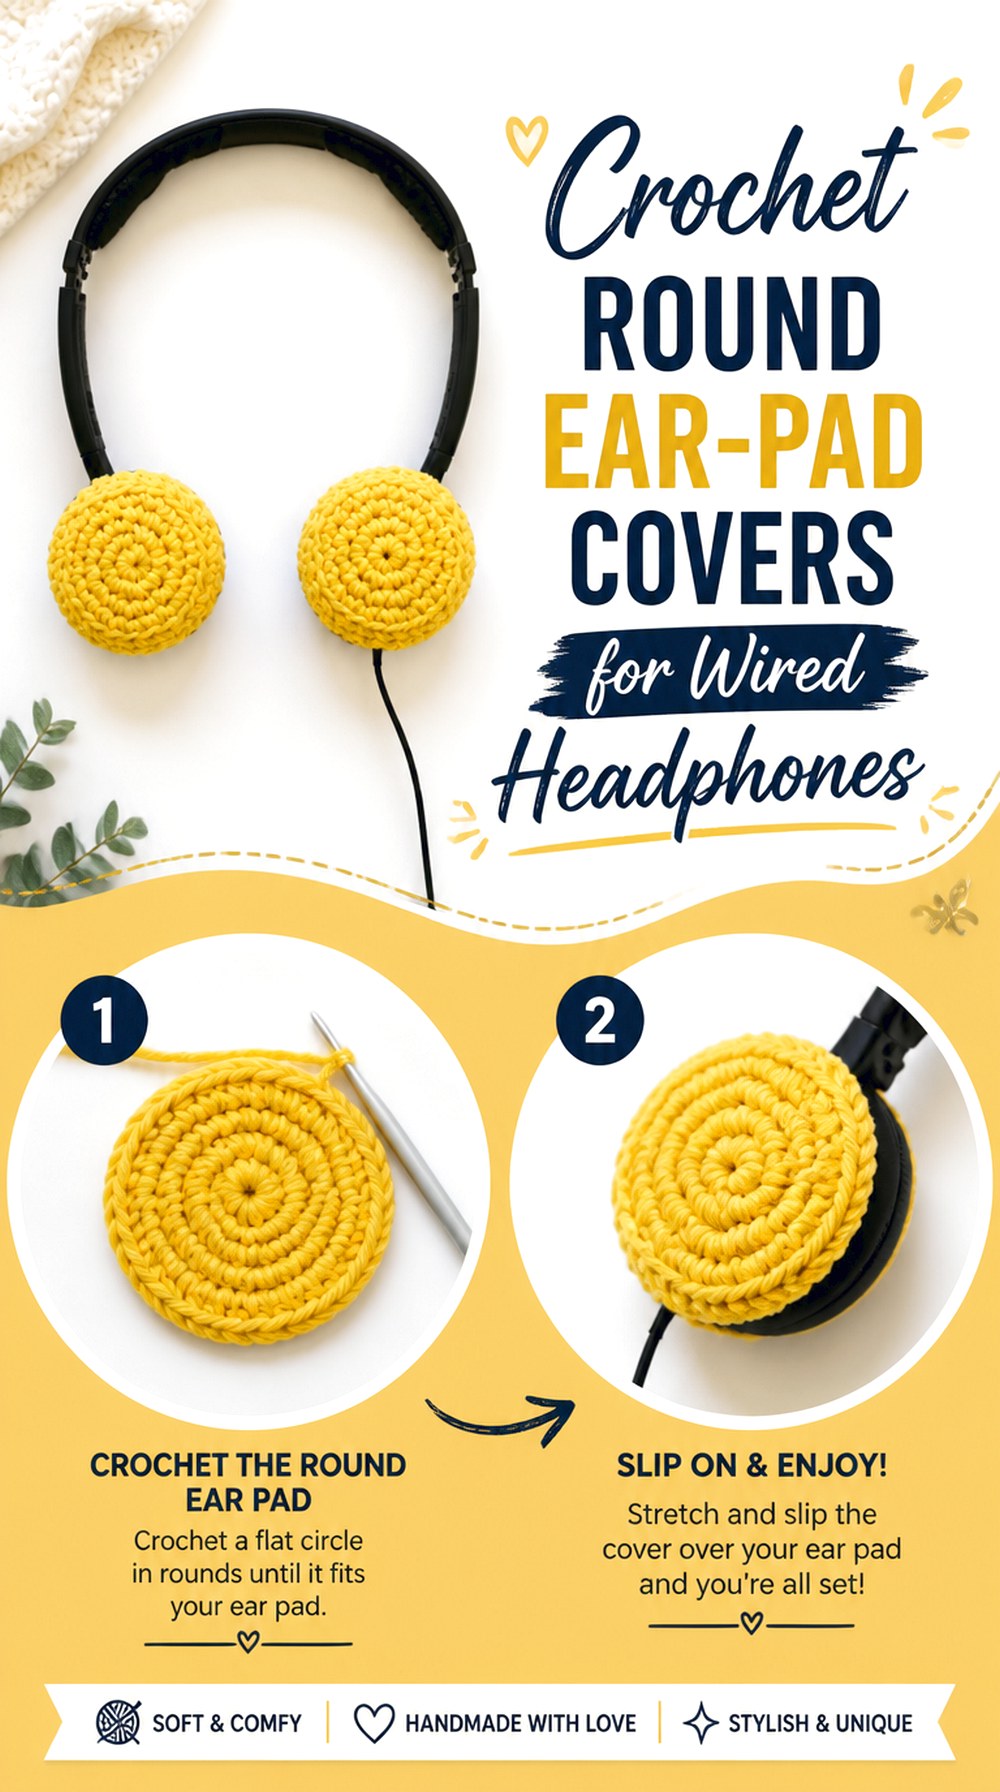
byGoldenberry demonstrates circular headphone covers designed to curve around round ear pads. That makes this a strong shape-specific option for wired headphones whose cushions are genuinely close to circular rather than elongated or rectangular.
The cover sits on the listening hardware itself, so fit matters more than it does for a loose pouch or cord keeper. A circle that looks correct when laid flat can still be too loose at the edge or too tight over a padded cup. Compare the demonstrated shape with your own headphones before using diameter alone as your guide, and check where the cable connects to the cup.
Round Cups Need More Than a Flat Circle
The useful feature is not simply a circular center; the outer edge also has to turn around the ear pad and stay there. When evaluating fit, look at both the face of the cushion and its depth. A cover that spans the front but barely reaches the side may slip, while one pulled too far around can compress the pad.
The Retaining Edge Should Grip, Not Crush
The tutorial discusses ways to secure the cover at the outer edge, including adjustment at the final section. The practical checkpoint is simple: the crochet should stay in position during normal handling without visibly distorting the ear cushion. If the pad shape changes substantially, reconsider the edge tension rather than assuming tighter is always more secure.
Test the Ear-Pad Seal After Adding Fabric
Anything added over or around an ear pad can change how that pad contacts your head. After fitting the covers, listen and check comfort before treating the modification as permanent. If the headphones feel different, sit farther from the ear, or no longer seal as expected, adjust or remove the cover rather than assuming the change is harmless.
Original Tutorial and Creator Credit
Creator: byGoldenberry
7. Crochet Oval Ear Cup Covers for Wired Headphones
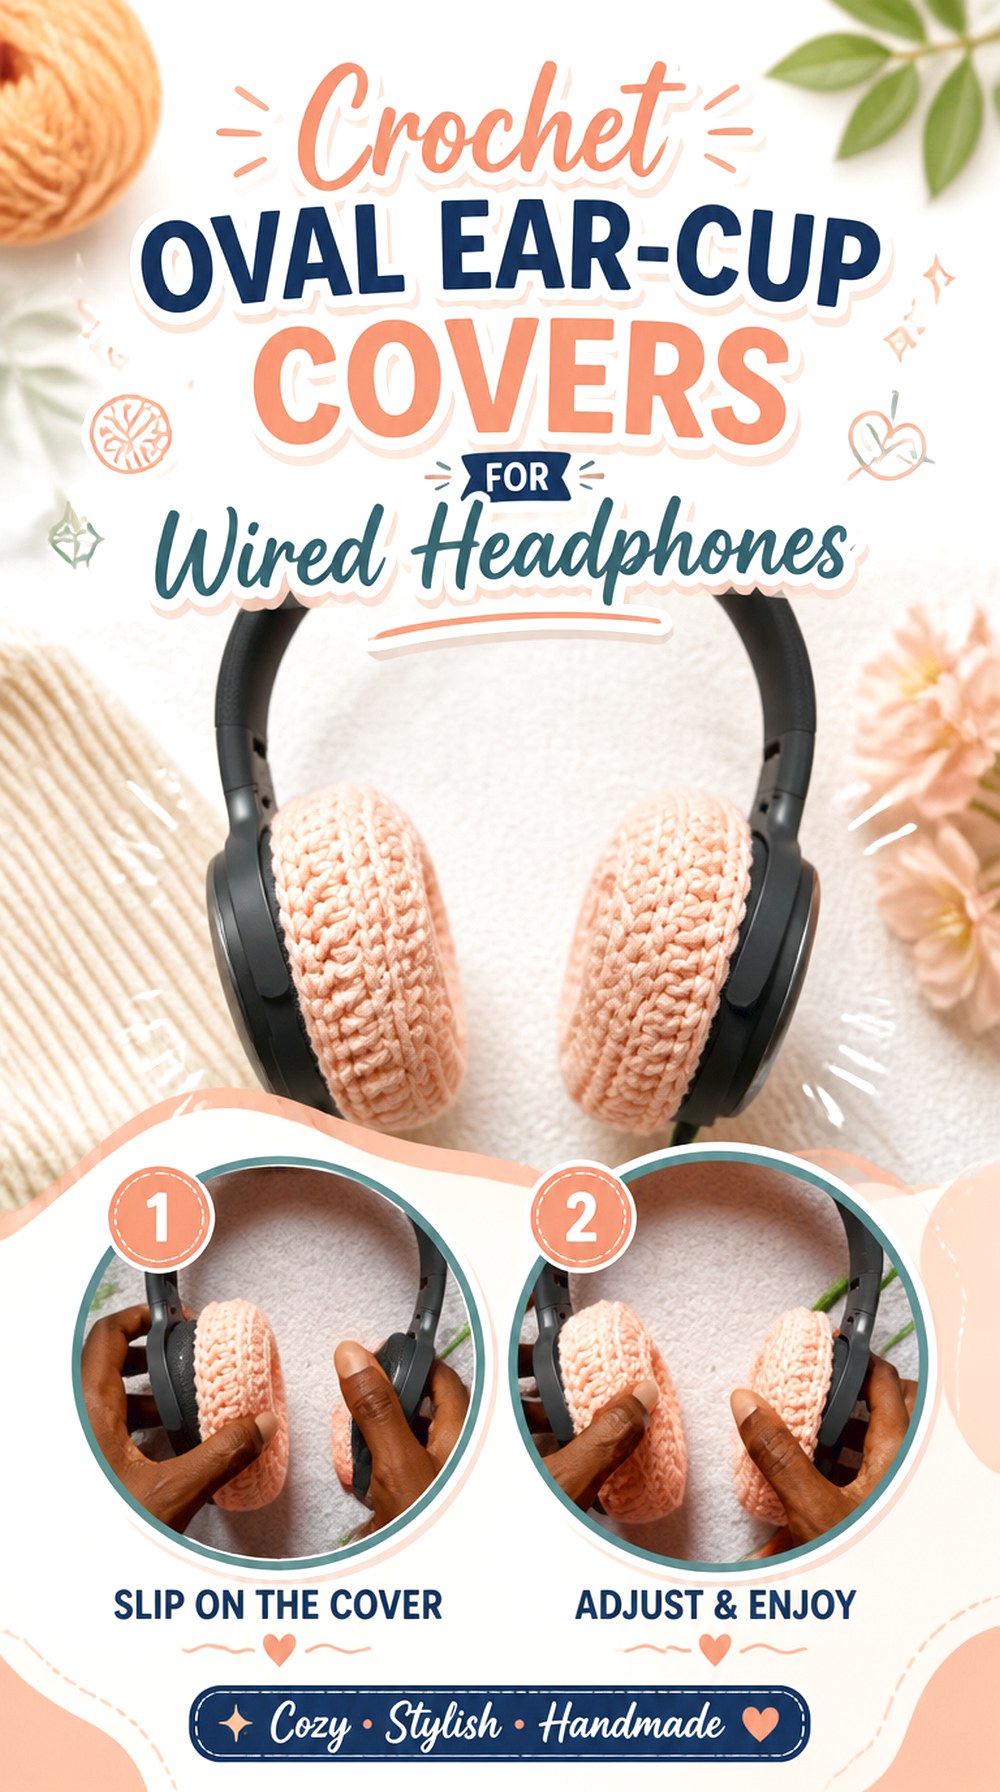
theshadepcks focuses specifically on oval-shaped headphone covers rather than treating every cup as a circle. The demonstrated headphones are not a wired model, so this tutorial is best viewed as a shape reference for wired headphones with similarly elongated cups, not as proof of universal compatibility.
That distinction matters because enlarging a circular cover does not automatically create a good oval fit. Length, width, edge depth, and the position of the cable connection all affect whether an adaptation makes sense. Compare your actual cup outline before committing to the construction.
Oval Geometry Needs Its Own Fit Check
An oval has two different principal dimensions, so measuring only across the widest point can hide an obvious mismatch. Compare both the long and short axes of your ear cup with the demonstrated shape. Also look at how rounded or squared the ends are, because two “oval” headphones can still have noticeably different outlines.
Compare Cup Depth Before Extending the Edge
A cover has to reach around the side far enough to hold without swallowing the entire cup. If your wired headphones have deeper cushions or a thicker plastic housing than the example, do not assume simply adding more fabric will solve the problem. Additional depth can also bring the crochet closer to ports and controls.
Protect the Wired Connection Area
A wireless demonstration may not reserve space for the exact jack or fixed cable entry found on your headphones. Identify that point before fitting the cover. The yarn should not press sideways against a plug, trap a detachable connector, or make it necessary to bend the cord sharply as it leaves the ear cup.
Original Tutorial and Creator Credit
Creator: theshadepcks
8. Crochet Plantronics Blackwire Headset Covers
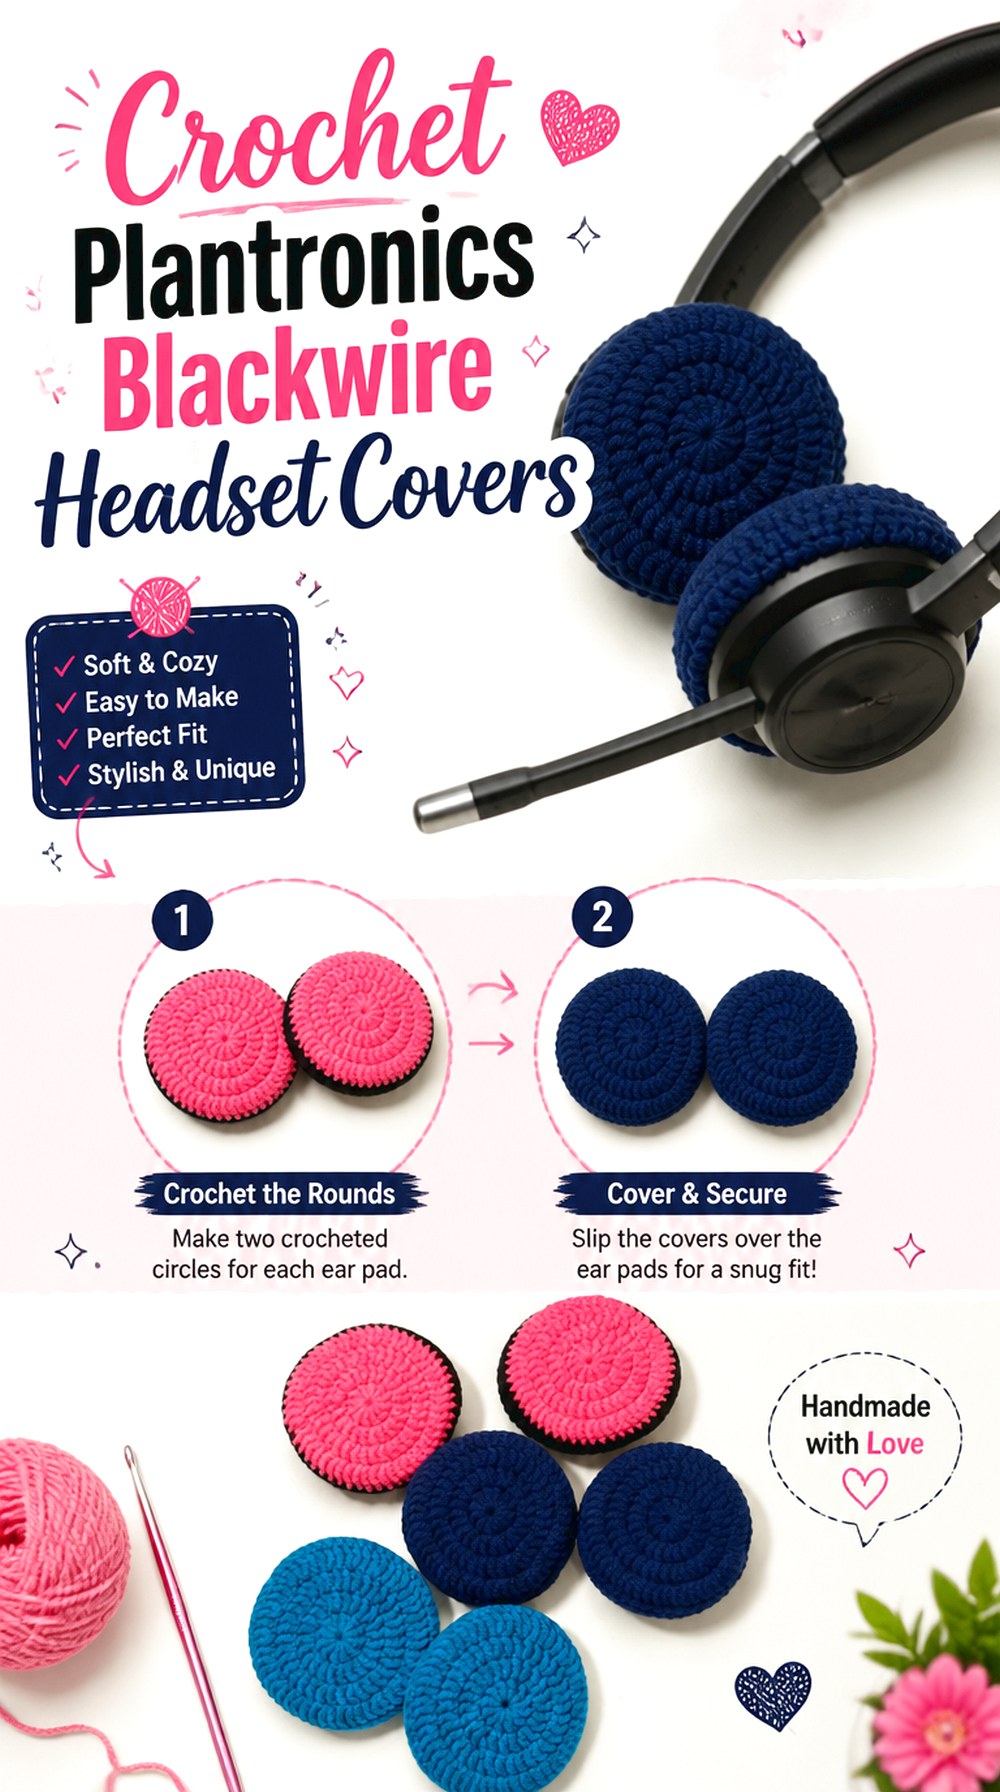
Crafter Mai’s tutorial is particularly relevant to this topic because it is designed around a Plantronics Blackwire headset rather than a large consumer headphone cup. The project uses small covers retained with elastic bands, which suits the lighter earpiece format of an office-style wired headset.
This is a useful choice for people whose “wired headphones” are actually call-center, office, or computer headsets with a boom microphone. The hardware around those earpieces is usually more crowded, so a small, controlled cover makes more sense than adapting a thick over-ear design.
Small Office Earpieces Need Less Added Bulk
A compact headset depends on light ear pieces and a narrow headband. A thick decorative layer can feel disproportionate even if it technically fits. When selecting yarn or adapting the cover, consider the scale of the headset as a whole and keep the finished edge away from areas that rotate or fold.
Elastic Retention Creates a Different Fit
The tutorial uses elastic bands as part of the cover setup. That allows the crochet to be held around a small earpiece without relying entirely on a tightly crocheted edge. Check that the elastic sits on a stable part of the housing and does not cross a control, grille, cable entry, or moving joint.
Leave the Boom Microphone Path Open
Office headsets often position a microphone arm close to one earpiece. Move the microphone through its normal range after installing any cover. If crochet catches the arm or bunches underneath its pivot, the cover needs to be repositioned or resized rather than forcing the hardware to move against the yarn.
Original Tutorial and Creator Credit
Creator: Crafter Mai
9. Crochet Multi Brand Work Headset Covers
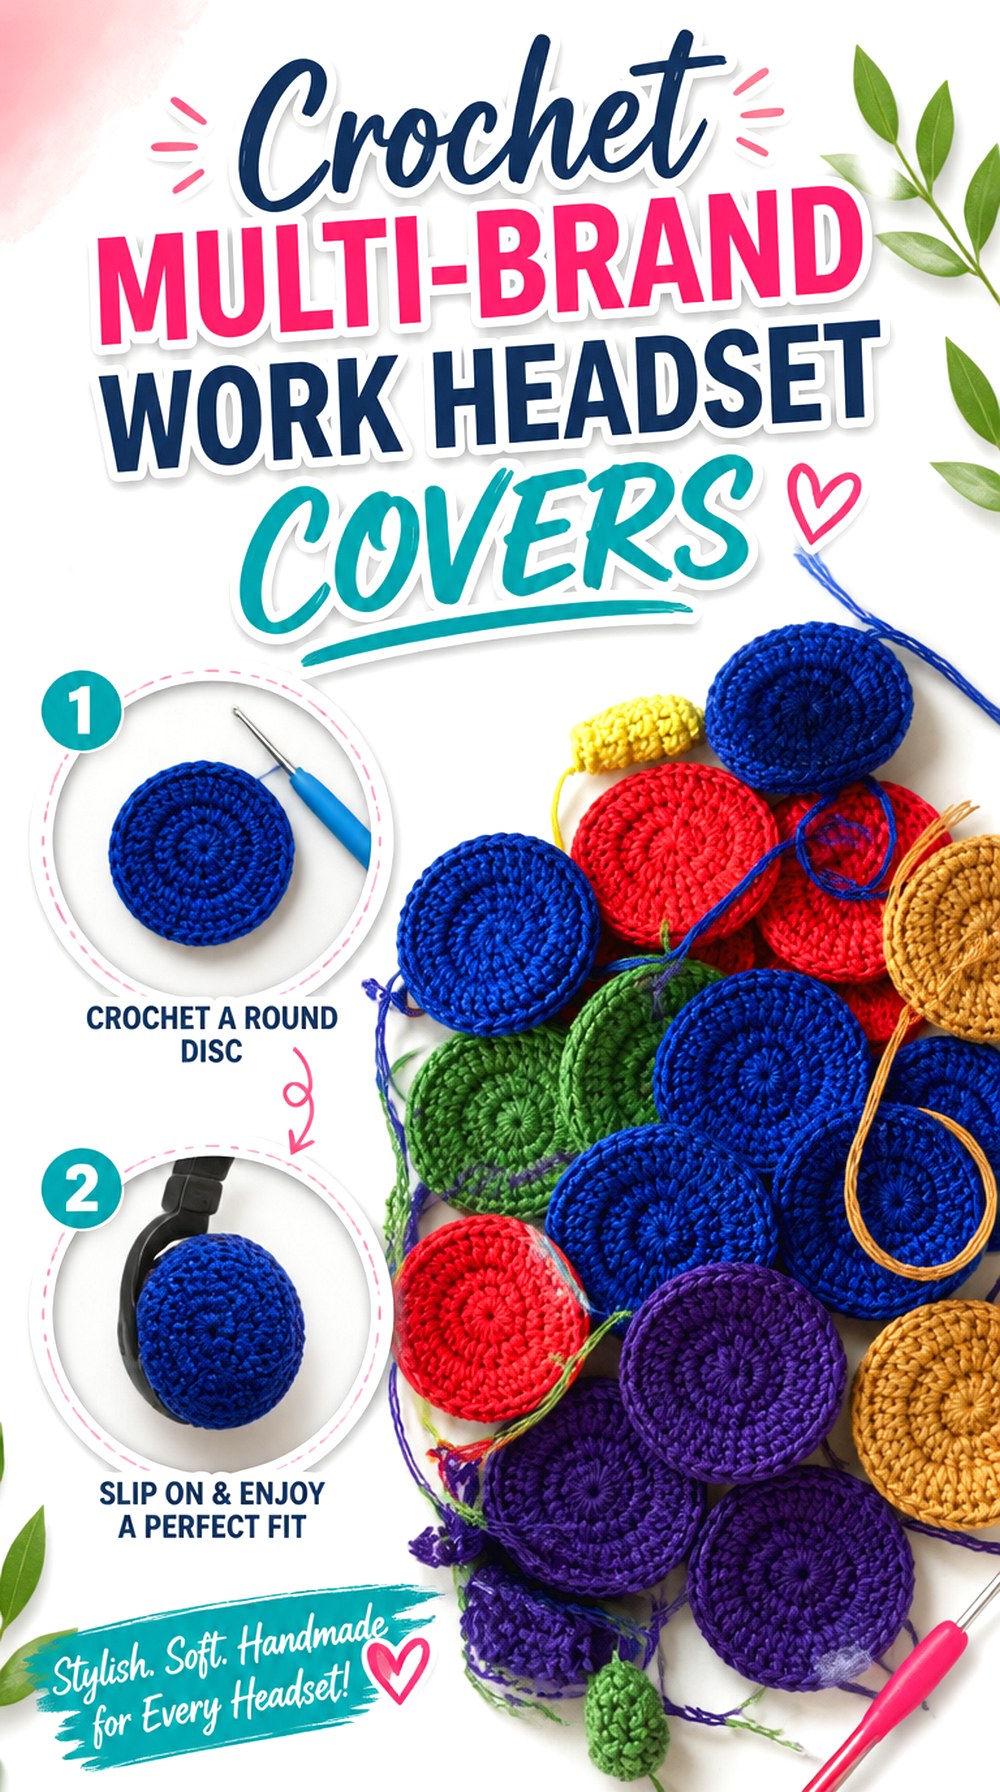
AbbysCROCHET presents headset covers in the context of Jabra, Logitech, and Plantronics equipment, making this a useful route when your priority is adapting crochet to common work-headset formats instead of one exact consumer headphone silhouette.
A multi-brand tutorial is still not a guarantee that every model within those brands shares the same geometry. Headset generations can differ in cushion diameter, microphone placement, cable routing, and controls. Treat the source as a construction reference, then compare your own hardware closely before deciding where the retaining edge should sit.
Brand Compatibility Still Starts With Your Model
The name printed on the headset is only a starting point. Look at the earpiece outline, cushion depth, attachment points, and microphone pivot on your exact unit. If those features differ from the example, adjust the concept around the hardware rather than assuming a brand-level match makes the cover interchangeable.
Left and Right Earpieces May Need Different Clearance
One side of a work headset may carry the microphone arm, cable entry, or buttons while the other side is simpler. Before making a perfectly mirrored pair, inspect both sides. The crochet can still coordinate visually while leaving different openings or edge positions where the headset hardware requires them.
Choose This Route When Compatibility Is the Main Question
This project stands apart from decorative full-size covers because its value is practical adaptability across work-headset shapes. It is a good place to start when you want a restrained cover that works around existing call controls and microphone hardware rather than turning the entire headset into a character accessory.
Original Tutorial and Creator Credit
Creator: AbbysCROCHET
10. Crochet Lightweight Cotton Headphone Covers
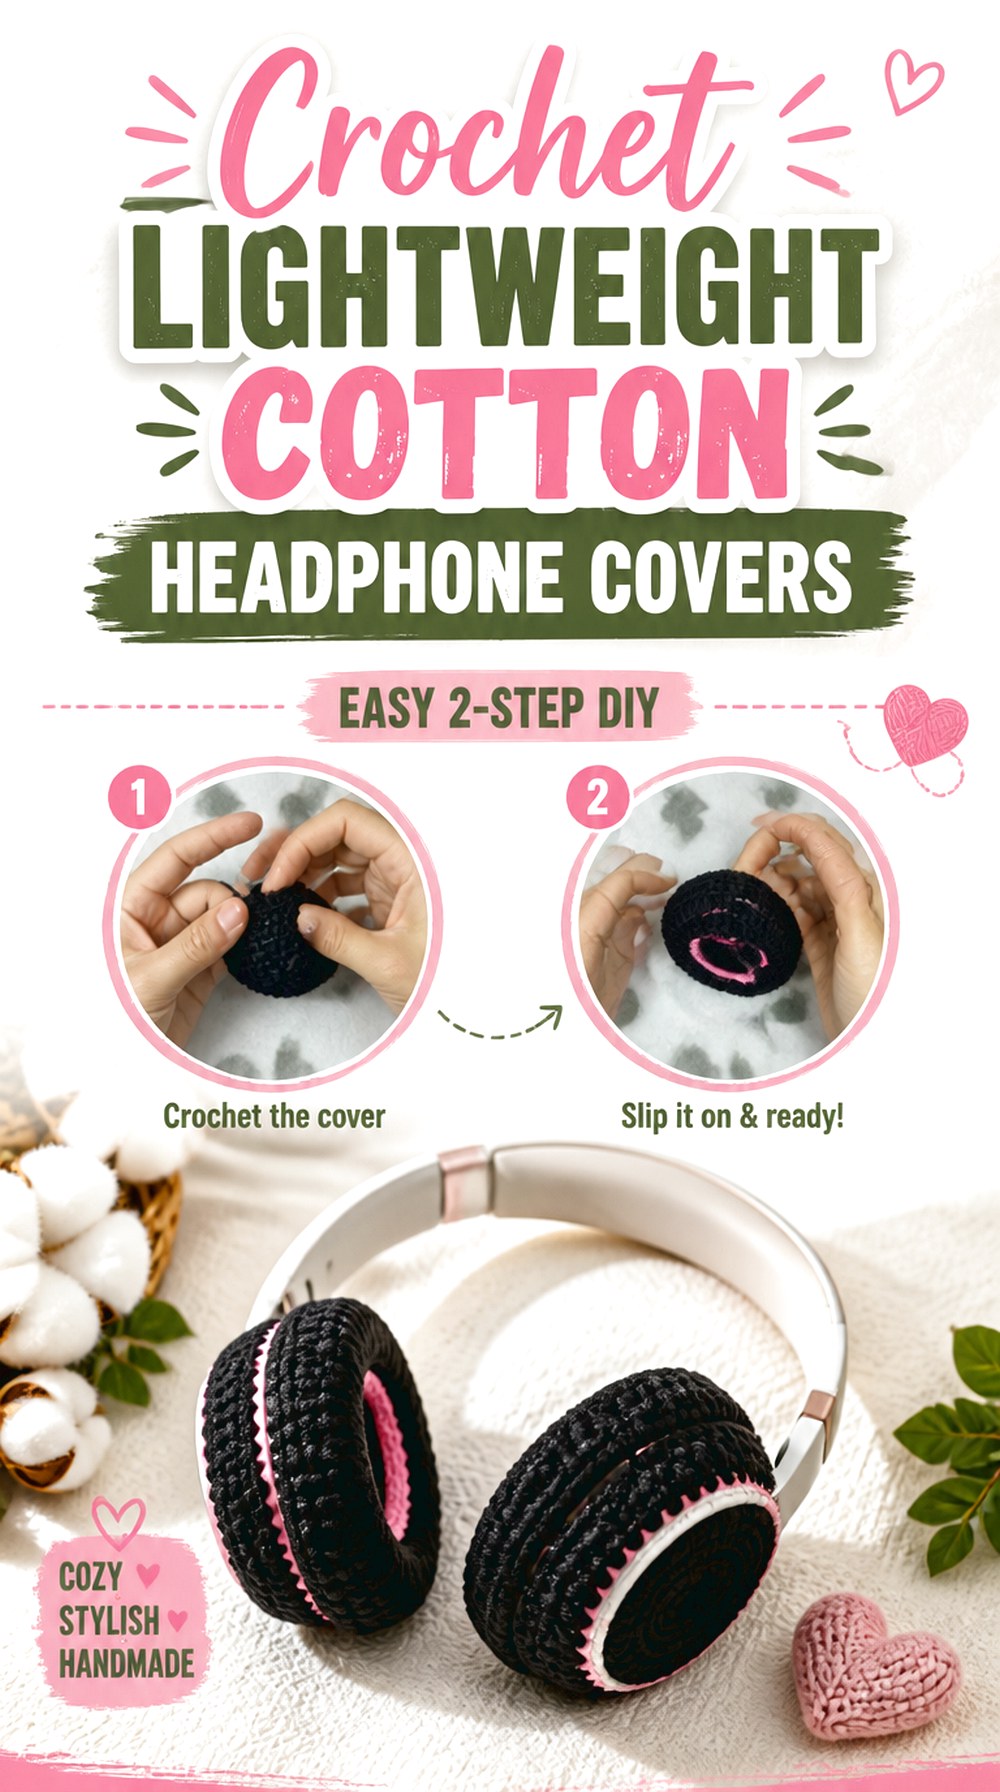
Cassiekoy Crochet demonstrates headphone covers made with fine cotton yarn and a small hook, giving this idea a lighter visual scale than chunky decorative cup covers. The creator presents the covers as a comfort-oriented addition worn over the headphones.
This option suits readers who like visible stitch detail but do not want large appliqués or dimensional ears. For wired headphones, the first adaptation check is still mechanical: confirm that the edge of the cover can sit securely without crossing the cable entry. The second is personal comfort, since even relatively fine crochet changes the surface touching or surrounding the ear pad.
Fine Cotton Keeps the Visual Weight Down
Small-scale stitches can make the cover look integrated with the headphone cup rather than like a separate bulky object. That is useful on compact headphones where thick yarn would dominate the proportions. Compare the covered and uncovered cup side by side before making a pair so you can judge whether the added texture suits the headset.
Comfort Depends on Where the Edge Sits
A smooth center does not help if the retaining edge lands where it presses against your head. Put the headphones on after fitting the first cover and notice the rim, seams, and any gathered sections. If one area feels raised, shifting the cover slightly may be more effective than changing the whole project.
Coordinate With the Headband Without Covering It
Because this design focuses on the ear pieces, the headband can remain visually simple. If you later add a band wrap, keep it separate from the cup covers so the headphones can still extend, fold, or swivel as designed. Matching color is optional; preserving movement is the more important constraint.
Original Tutorial and Creator Credit
Creator: Cassiekoy Crochet
11. Crochet Minimal Everyday Headphone Covers
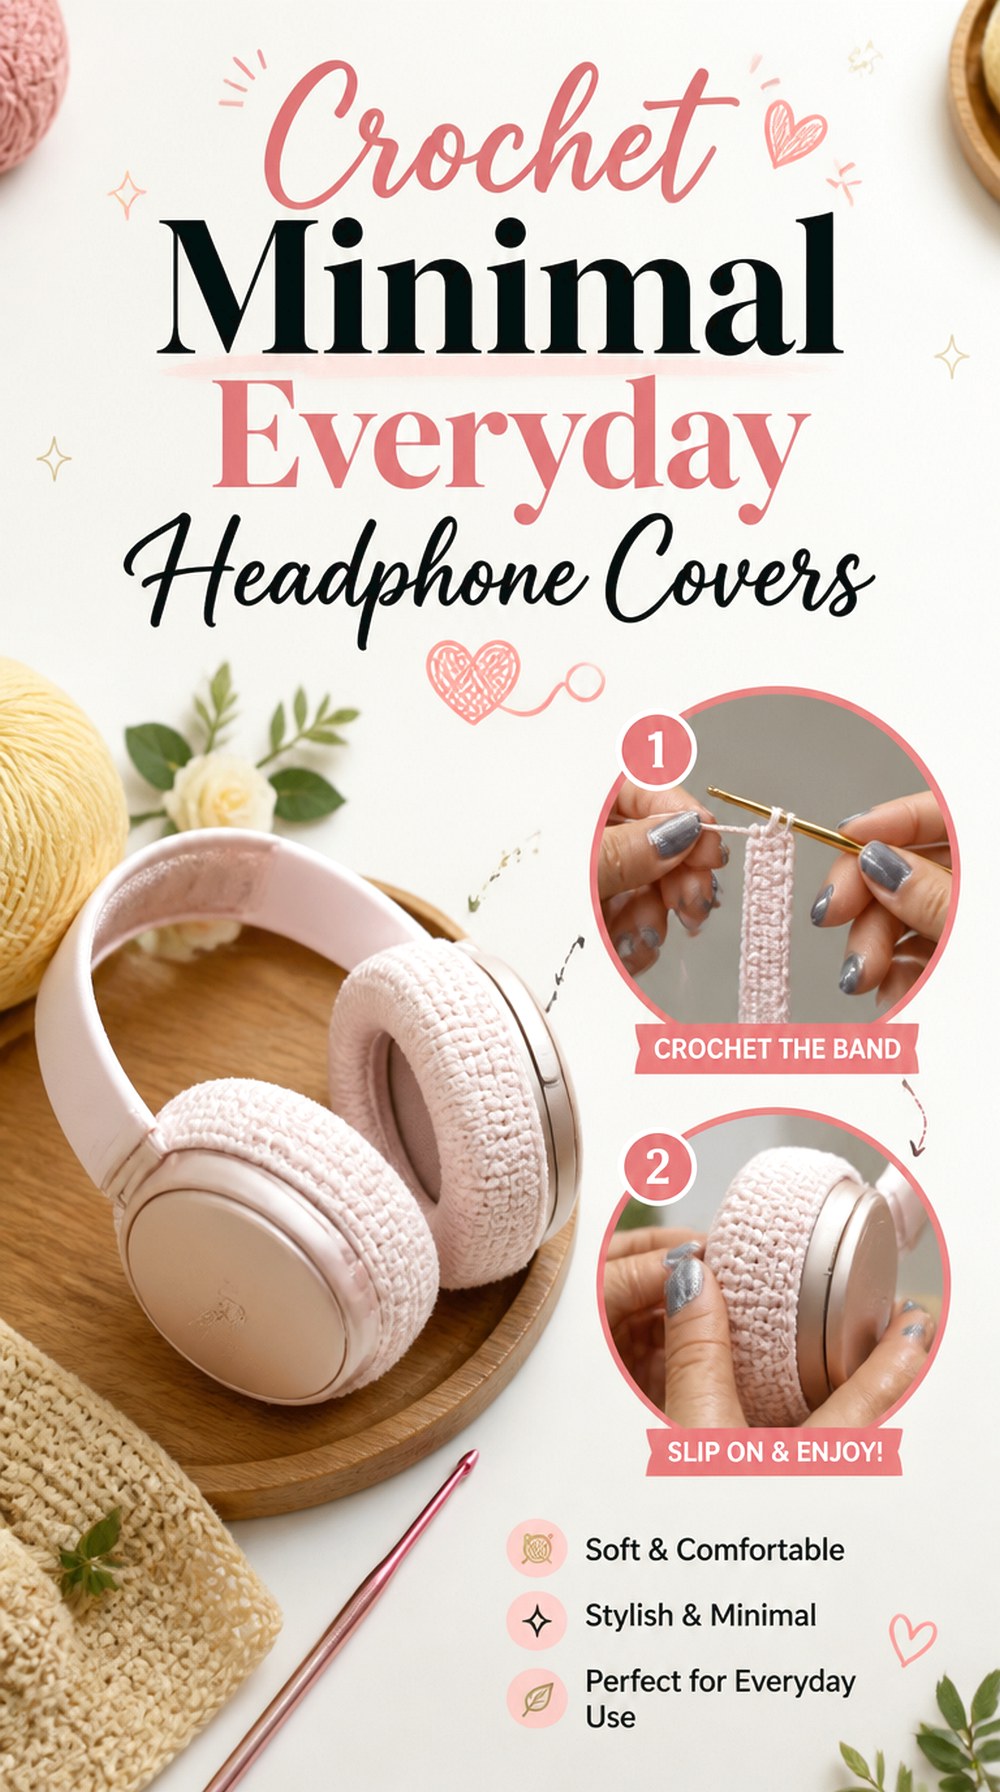
caroleena’s closet offers a straightforward headphone-cover tutorial that works well as inspiration for a more minimal finished look. Rather than relying on a specific character motif or elaborate surface decoration, the concept keeps attention on covering the headphone cups themselves.
That makes this idea useful when you want crochet texture without making the headphones visually complex. It also leaves more freedom to adapt the color or edge treatment to the device you already own. For a wired pair, inspect the cable connection and adjustment hardware first because those details determine where a simple cover must stop.
Use the Headphones as the Primary Fit Reference
A generic cover tutorial is most useful when you compare it continuously with your real device instead of assuming the demonstration dimensions apply. Look at cup width, height, depth, and edge shape. Even small differences can matter if the retaining portion has to sit between an ear pad and plastic housing.
Minimal Styling Makes Hardware Easier to Inspect
A restrained cover has a practical advantage: fewer dimensional decorations compete with hinges, controls, and cable exits. If the headphones need regular adjustment, keep the surface nearest those parts relatively clean. You can still create visual interest through yarn color or stitch texture without attaching something exactly where the hardware moves.
Keep Adjustment Marks and Hinges Visible
If your headphones use a sliding headband or folding cup, operate those features after fitting the first cover. A cover that slowly creeps into the hinge path can create more inconvenience than a slightly smaller one. Functional clearance should be judged while the headphones move, not only while they sit flat on a table.
Original Tutorial and Creator Credit
Creator: caroleena’s closet
12. Crochet Fitted Beats Style Headphone Covers
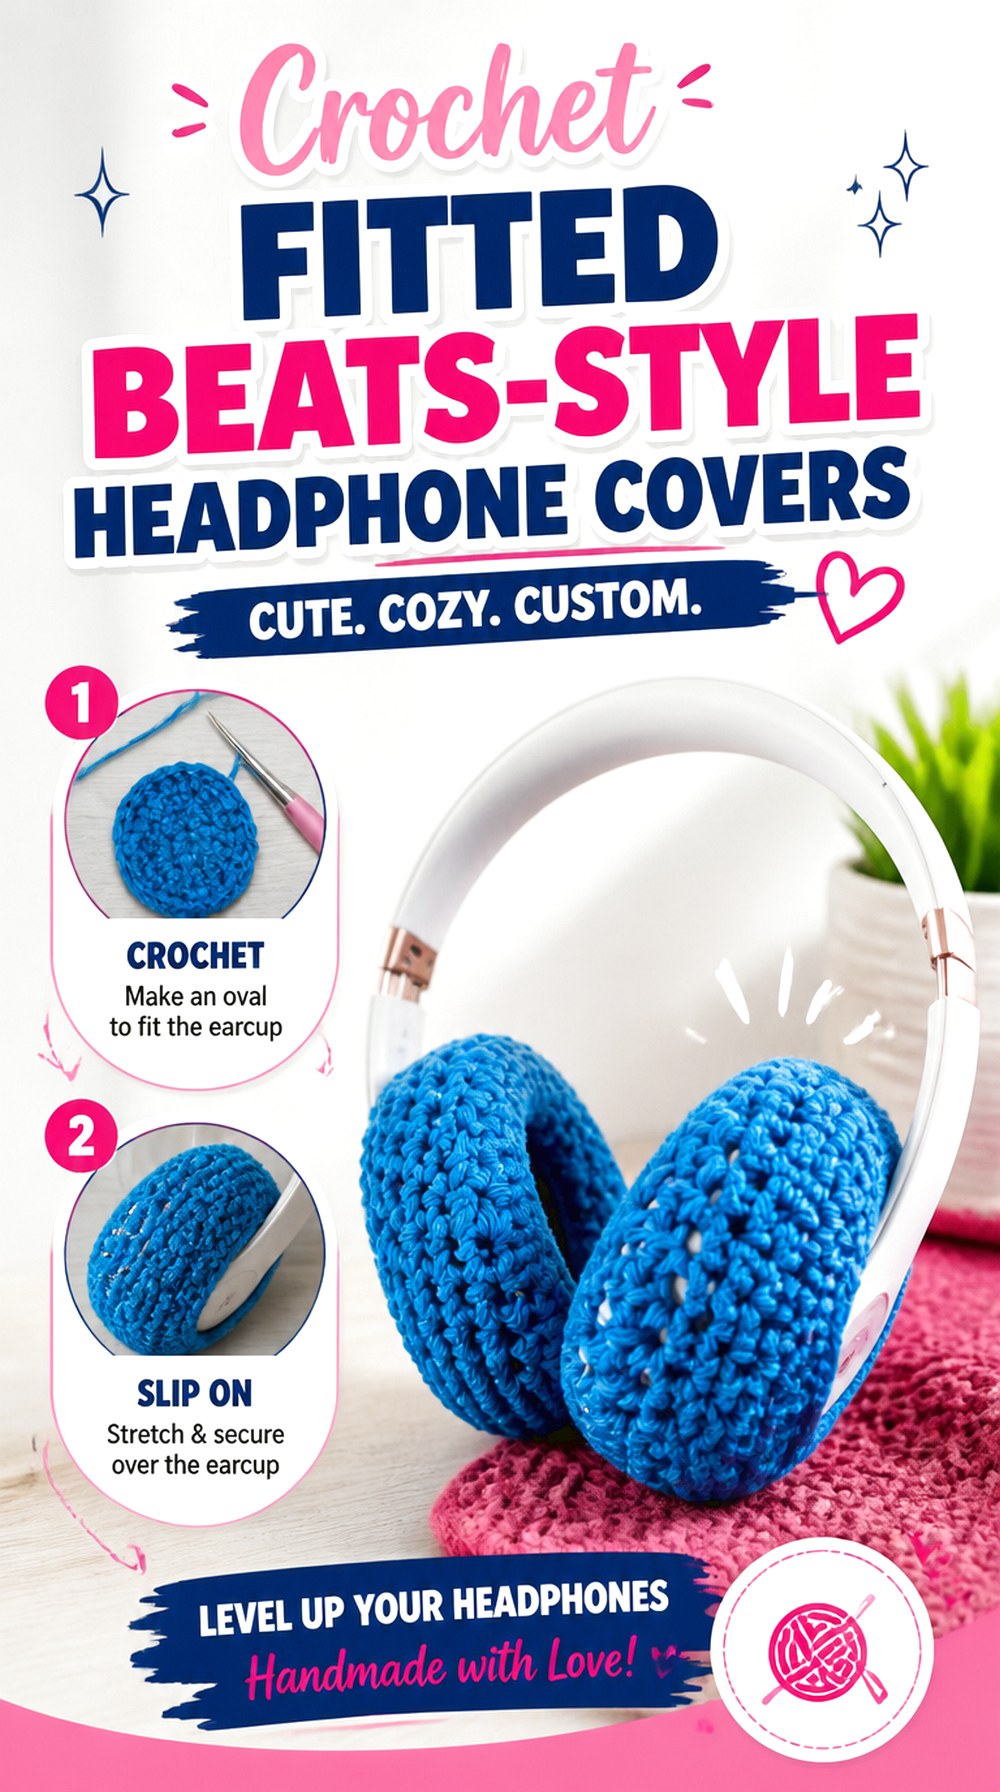
9amStudio demonstrates snug crochet covers for Beats Solo headphones using cotton yarn. Although this is not presented specifically as a wired-headphone tutorial, the fitted cup concept can be useful for a wired or wire-capable headphone with a genuinely similar outer shape—provided the cable connection and controls remain accessible.
This project differs from the looser round ear-pad style because the visual goal is a close outer fit around a compact headphone cup. That makes inaccurate adaptation more obvious. If your device has a jack, fixed cable, button cluster, or noticeably different cup depth, those differences should guide the adaptation rather than the brand-inspired appearance.
A Snug Cover Must Still Clear the Cable Jack
Close-fitting crochet leaves less margin around hardware. Plug the wired cable in before finalizing the edge position so you can see how much space the connector and strain relief actually need. A cover that fits perfectly with the cable removed but presses against the plug during use is not a successful wired adaptation.
Compact Cups Make Edge Bulk More Noticeable
On a small on-ear shape, even a modest gathered edge can occupy a large portion of the side wall. Check the profile from the side, not just from the front. If the cover looks balanced face-on but bunches around the perimeter, revisit fit rather than hiding the excess behind the ear pad.
Cotton Makes Stitch Definition Easy to Evaluate
The demonstrated project uses cotton, which makes the fitted surface a useful reference for seeing individual stitches clearly. If you substitute another yarn, compare how much it stretches and rebounds around the cup. A material that behaves differently may need a different fit even when the same headphone shape is used.
Original Tutorial and Creator Credit
Creator: 9amStudio
13. Crochet Cat Ear Headphone Band Cover
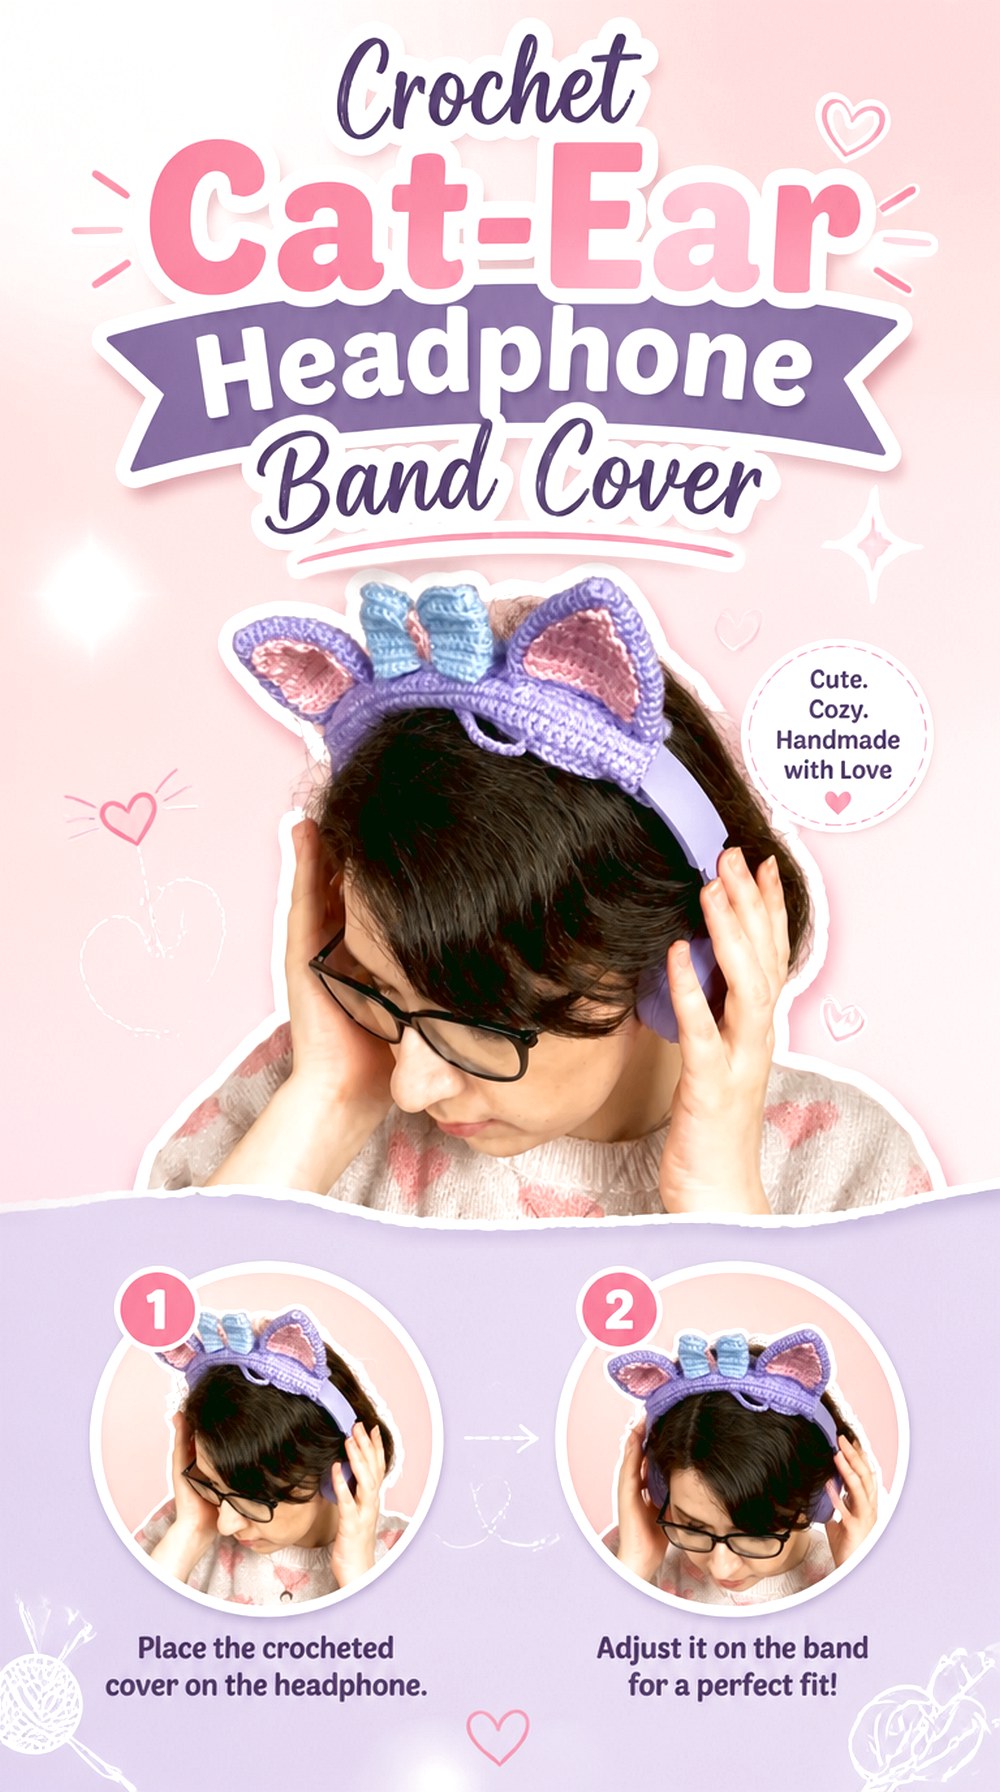
My Rainbow Crochet turns the headband area into the main decorative feature with cat ears, a bow, and removable fastening elements. That creates a very different finished object from simple ear-pad covers: the headphones become a character accessory, while the large decorative details sit primarily above the cups.
The source demonstrates an AirPods Max-style setup, so wired users should treat it as decorative construction inspiration rather than direct device compatibility. A wired headset with a similar band still needs enough clearance for adjustment, folding, cup rotation, and the cable connection.
Position Cat Ears Where the Band Can Still Flex
Decorative ears look best when their placement appears intentional, but the strongest visual position may not be the best mechanical position. Extend and flex the headband before deciding where attachments should sit. Keep bulky joins away from areas that telescope, bend sharply, or rest directly against your head.
Removable Fasteners Simplify Maintenance
The tutorial includes removable fastening elements, which is particularly useful around electronics. A detachable decorative cover can be washed, reshaped, or replaced without wetting the headphones. It also lets you check the band underneath for wear instead of permanently hiding the surface.
Keep the Bow Away From Cup Movement
A bow adds a second focal point, but it should not hang into the path of a swiveling ear cup or adjustment joint. Move the headphones through their normal storage and wearing positions after attaching the decoration. If the bow folds into a hinge, shifting it slightly higher can preserve the look without compromising movement.
Original Tutorial and Creator Credit
Creator: My Rainbow Crochet
14. Crochet Meadow Appliqué Headphone Covers
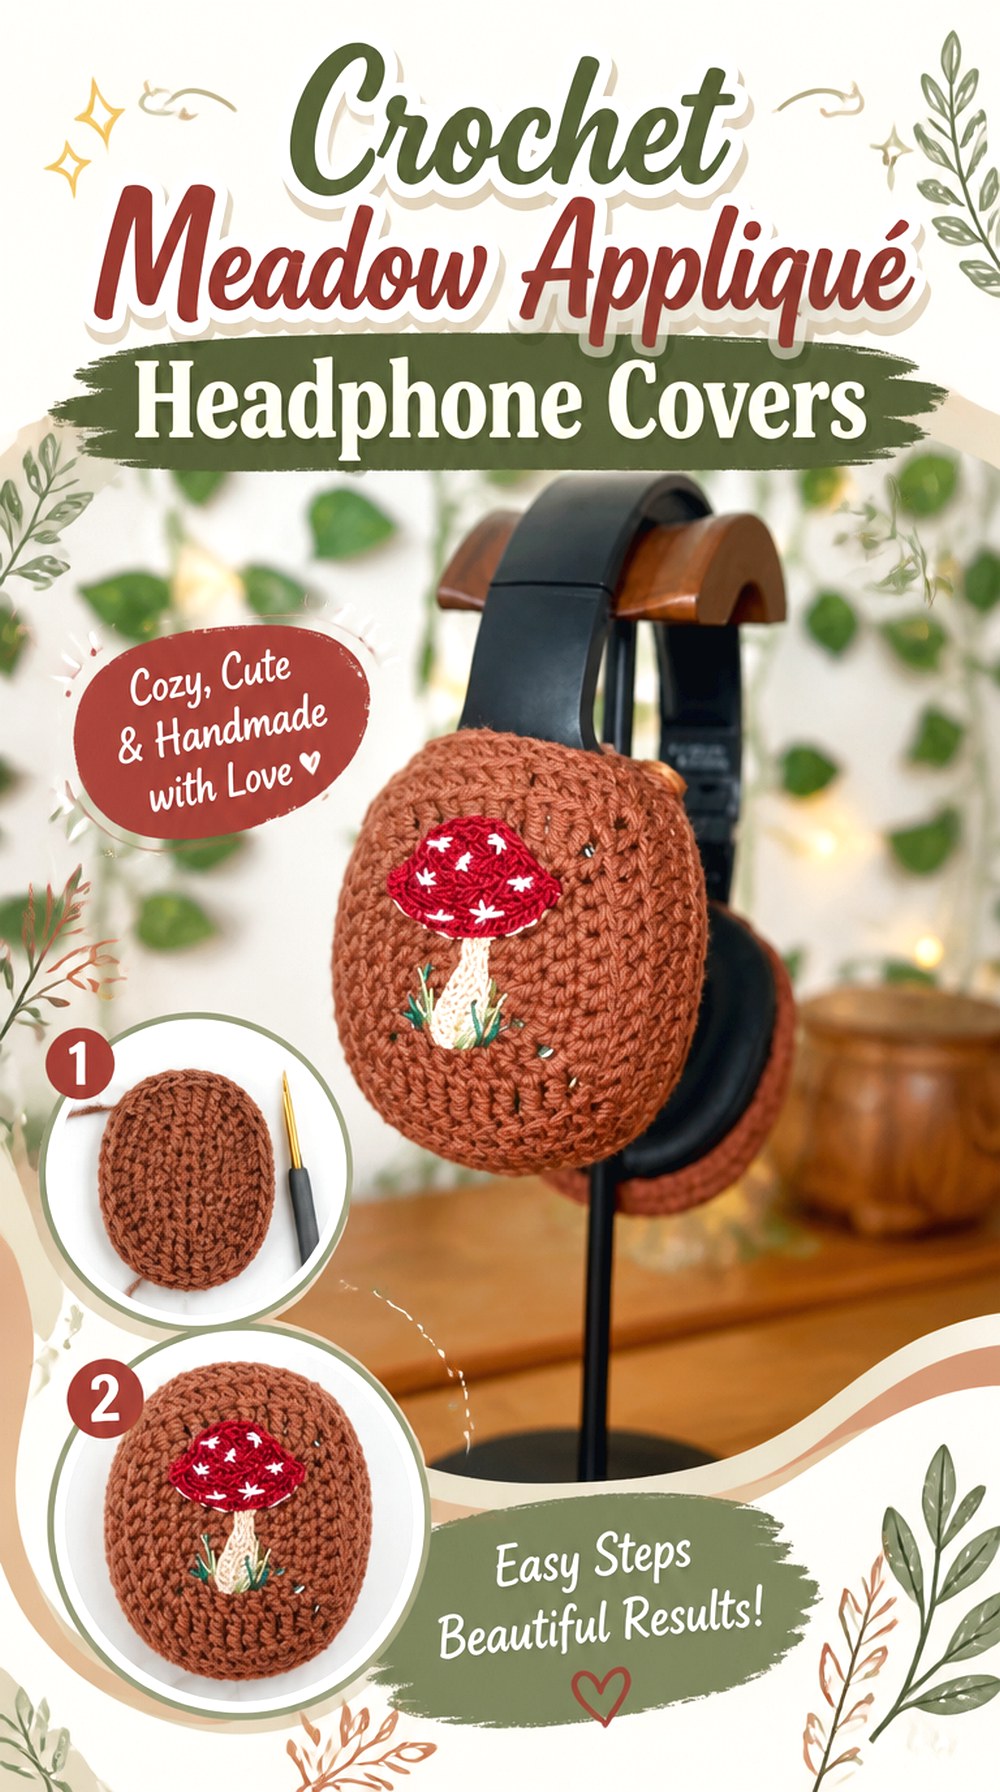
Woodland Stitchcraft takes headphone decoration in a botanical direction. The accompanying project material shows covers intended for rectangle or oval-shaped headphones and decorative options that include flowers, leaves, a mushroom, and a bow.
This idea is useful when you want individual appliqués to carry the visual theme rather than covering the entire headset in one texture. For wired headphones, that also gives you control over where decoration goes: embellishments can stay on broad outer surfaces while the cable entry, adjustment points, and cup edges remain comparatively uncluttered.
Give One Appliqué Visual Priority
A flower, mushroom, leaf cluster, and bow can all work on headphones, but using every motif at the same scale may overwhelm a small cup. Choose a main focal element first, then decide whether smaller supporting pieces improve the composition. Leaving some visible background crochet can make the decorative shapes easier to read.
Keep Fastening Areas Clear of Headphone Hardware
The project uses attachment details that help secure the cover around the headphone shape. Before adapting them, locate your headphone’s cable entry, hinge, buttons, and adjustment points. A fastening method is only useful if it lands on a stable, unobstructed part of the housing.
Rectangle and Oval Cups Need Different Planning
This tutorial is especially relevant to headphones that are not perfectly circular. Compare the corner curvature and overall outline of your cup with the example before treating “oval” or “rectangular” as an exact match. A squarer device may need more room near its corners, while a long oval may require more length without extra width.
Original Tutorial and Creator Credit
Creator: Woodland Stitchcraft
Which Crochet Wired Headphone Idea Fits Your Use?
| Project type | Ideas | Most useful when | Main checkpoint |
|---|---|---|---|
| Direct cable wraps | 1–3 | You want the crochet to remain on the earphone cord | Keep plugs, splitters, controls, and strain relief clear |
| Removable cable keeper | 4 | You only need help containing the cord during storage | Bundle the cable loosely enough to avoid sharp bends |
| Earphone pouch | 5 | You want the entire wired set contained in one place | Size it around a relaxed cable coil, not only the earbuds |
| Ear-pad and headset covers | 6–12 | You want crochet on the headphones while listening | Match cup geometry and preserve jack, microphone, hinge, and control access |
| Decorative character or appliqué covers | 13–14 | Styling is as important as the basic cover | Keep dimensional decoration away from adjustment and moving hardware |
Conclusion
The right crochet idea depends on what you want to change about the headphones. For cable-focused decoration, Ideas 1–3 stay with the wire, while Idea 4 gives you removable organization and Idea 5 provides separate storage. Round, oval, and office-headset users have more shape-specific choices in Ideas 6–12, and Ideas 13–14 are stronger options when decorative styling is the main goal.
Whichever direction you choose, compare the demonstrated device with your own before assuming the fit will transfer. Cable entries, controls, hinges, and ear-pad shapes matter more than brand appearance alone. Use the original tutorials for the creators’ exact construction details, then make only the adaptations your particular wired headphones can accommodate.
Frequently Asked Questions
Can I crochet directly around a wired headphone cable?
Yes, there are tutorials specifically designed around crocheting onto an earphone wire, including the first three projects above. Keep functional areas such as the plug, strain relief, Y-splitter, inline controls, and earpiece connections accessible. The crochet should not force the cable into a sharp bend. If a cable is already split, frayed, or electrically damaged, decorative crochet should not be treated as a repair.
Is a cord cover better than a removable crochet cable keeper?
They serve different preferences. A direct cord cover stays on the cable continuously and changes both its appearance and feel. A removable keeper leaves the listening cable untouched and only organizes it during storage. Choose the keeper if you want easy removal, simpler cleaning, or frequent access to controls; choose a direct cover if you specifically want the wire itself to become the crochet project.
Will one crochet ear-pad cover fit every wired headset?
No. Round headphones, elongated oval cups, compact on-ear models, and office headsets can require very different shapes. Compare width, height, depth, cushion outline, and the area available for a retaining edge. Also inspect the cable entry and microphone hardware. A tutorial demonstrated on one model is best treated as a construction reference unless your own headphones have a genuinely comparable shape.
Can crochet headphone covers affect comfort or sound?
They can change how the ear pad contacts your head because you are adding another layer around or over the cushion. That may affect comfort or the way the pad seals. Do not assume a crochet cover improves or preserves listening performance automatically. Fit one cover, wear the headphones normally, and compare the result. If the headset feels different or performs worse, adjust or remove the cover.
What yarn should I use around wired headphones?
There is no single required fiber for every design. Several tutorials in this collection use cotton, and finer yarn can be useful when you want a relatively low-profile cable or cup treatment. Whatever yarn you choose, consider shedding, stretch, surface texture, and added bulk. For fitted covers, the yarn’s ability to hold or recover its shape can matter as much as its color.
How should crochet headphone accessories be cleaned?
Whenever possible, remove the crochet piece from the headphones and follow the yarn manufacturer’s care instructions separately. Let it dry completely before putting it back on electronic equipment. A crochet treatment worked permanently around a cable should not be soaked as though it were an ordinary washable accessory; follow the headphone manufacturer’s cleaning guidance and keep plugs, controls, and electronic components away from unnecessary moisture.
What should I check before adapting a wireless-headphone tutorial to a wired pair?
First compare the actual cup shape and depth. Then locate the wired jack or fixed cable entry, controls, vents, adjustment sliders, hinges, and rotating parts. A cover that works on a wireless model may occupy space needed by a cable connector on your headphones. Adapt only when those functional areas can remain accessible and the crochet can sit securely without pressing against the plug or moving hardware.